
 développement back-end
Tutoriel Python
Explication détaillée d'exemples de Python extrayant ces photos 'marquées'
développement back-end
Tutoriel Python
Explication détaillée d'exemples de Python extrayant ces photos 'marquées'
Explication détaillée d'exemples de Python extrayant ces photos 'marquées'

这篇文章主要介绍了用python找出那些被“标记”的照片的相关资料,需要的朋友可以参考下
源码传送门
环境准备
下面的两个第三方模块都可以直接通过pip快速安装,这里使用py36作为运行环境。
python3.6
requests
exifread
思路
遍历目录
拉取数据集合
遍历集合取得exif
exif信息整理,并获取实体地址
拷贝文件到结果样本目录
生成json报告文件
基础知识
下面是现今相片中会存在与GPS相关的关键字,大牛亦可一比带过~ [参考]
{
 "GPSVersionID": "GPS版本",
 "GPSLatitudeRef": "南北纬",
 "GPSLatitude": "纬度",
 "GPSLongitudeRef": "东西经",
 "GPSLongitude": "经度",
 "GPSAltitudeRef": "海拔参照值",
 "GPSAltitude": "海拔",
 "GPSTimeStamp": "GPS时间戳",
 "GPSSatellites": "测量的卫星",
 "GPSStatus": "接收器状态",
 "GPSMeasureMode": "测量模式",
 "GPSDOP": "测量精度",
 "GPSSpeedRef": "速度单位",
 "GPSSpeed": "GPS接收器速度",
 "GPSTrackRef": "移动方位参照",
 "GPSTrack": "移动方位",
 "GPSImgDirectionRef": "图像方位参照",
 "GPSImgDirection": "图像方位",
 "GPSMapDatum": "地理测量资料",
 "GPSDestLatitudeRef": "目标纬度参照",
 "GPSDestLatitude": "目标纬度",
 "GPSDestLongitudeRef": "目标经度参照",
 "GPSDestLongitude": "目标经度",
 "GPSDestBearingRef": "目标方位参照",
 "GPSDestBearing": "目标方位",
 "GPSDestDistanceRef": "目标距离参照",
 "GPSDestDistance": "目标距离",
 "GPSProcessingMethod": "GPS处理方法名",
 "GPSAreaInformation": "GPS区功能变数名",
 "GPSDateStamp": "GPS日期",
 "GPSDifferential": "GPS修正"
}初始化
考虑到exifread的模块中有大量的logging输出,这里将它的level级别调到最高。 然后下边的KEY是某站在高德地图API的时候遗留下来的 我也很尴尬。。就当福利了
import os
import time
import json
import random
import logging
import requests
import exifread
logging.basicConfig(level=logging.CRITICAL)
KEY = "169d2dd7829fe45690fabec812d05bc3"
主逻辑函数
def main():
 # 预设后缀列表
 types = ["bmp", "jpg", "tiff", "gif", "png"]
 #结果数据集合
 picex = []
 # 文件存储路径
 saves = "$" + input("| SavePath: ").strip()
 # 文件搜索路径 并遍历所有文件返回文件路径列表
 pools = jpgwalk(input("| FindPath: "), types)
 #存储目录
 savep = "%s/%s" % (os.getcwd().replace("\\", "/"), saves)
 if savep in pools:
 pools.remove(savep)
 # 遍历数据集并获取exif信息
 for path in pools:
 res = getEXIF(path)
 if res:
  picex.append(res)
 # 结果报告
 print("| Result %s" % len(picex))
 # 如果存在结果 保存结果到json并讲相关图片复制到该目录下
 if picex:
 #创建目录
 if not os.path.exists(saves):
  os.mkdir(saves)
 #生成一个4格缩进的json文件
 with open("%s/%s.json" % (saves, saves), "wb") as f:
  f.write(json.dumps(picex, ensure_ascii=False, indent=4).encode("utf8"))
 #copy图像到该目录
 for item in picex:
  source_path = item["Filename"]
  with open("%s/%s" % (saves, source_path.split("/")[-1]), "wb") as f_in:
  with open(source_path, "rb") as f_out:
f_in.write(f_out.read())遍历方法
遍历指定及其所有下级目录,并返回全部的图片的路径集合,这里要注意的是每次扫描后的拷贝行为都会生成缓存,所以通过指定 $ 来避开。
# 获取指导目录全部的图片路径
def jpgwalk(path, types):
 _start = time.time()
 _pools = []
 # 遍历该目录 并判断files后缀 如符合规则则拼接路径
 for _root, _dirs, _files in os.walk(path):
 _pools.extend([_root.replace("\\", "/") + "/" +
   _item for _item in _files if _item.split(".")[-1].lower() in types and "$" not in _root])
 #报告消耗时间
 print("| Find %s \n| Time %.3fs" % (len(_pools), time.time() - _start))
return _pools经纬度格式化
度分秒转浮点,方便api调用查询,因为存在一些诡异的数据比如 1/0,所以默认返回0
def cg(i):
 try:
 _ii = [float(eval(x)) for x in i[1:][:-1].split(', ')]
 _res = _ii[0] + _ii[1] / 60 + _ii[2] / 3600
 return _res
 except ZeropisionError:
 return 0
EXIF信息整理
考虑到大部分的设备还未开始支持朝向、速度、测量依据等关键字,这里暂时只使用比较常见的,如有需要的朋友可以自行添加。毕竟得到的信息越多对社工有更大的帮助。
def getEXIF(filepath):
 #基础关键字
 _showlist = [
 'GPS GPSDOP',
 'GPS GPSMeasureMode',
 'GPS GPSAltitudeRef',
 'GPS GPSAltitude',
 'Image Software',
 'Image Model',
 'Image Make'
 ]
 #GPS关键字
 _XYlist = ["GPS GPSLatitude", "GPS GPSLongitude"]
 #时间关键字
 _TimeList = ["EXIF DateTimeOrigina", "Image DateTime", "GPS GPSDate"]
 #初始化结果字典
 _infos = {
 'Filename': filepath
 }
 with open(filepath, "rb") as _files:
 _tags = None
 # 尝试去的EXIF信息
 try:
  _tags = exifread.process_file(_files)
 except KeyError:
  return
 # 判断是否存在地理位置信息
 _tagkeys = _tags.keys()
 if _tags and len(set(_tagkeys) & set(_XYlist)) == 2 and cg(str(_tags["GPS GPSLongitude"])) != 0.0:
  for _item in sorted(_tagkeys):
  if _item in _showlist:
   _infos[_item.split()[-1]] = str(_tags[_item]).strip()
  # 经纬度取值
  _infos["GPS"] = (cg(str(_tags["GPS GPSLatitude"])) * float(1.0 if str(_tags.get("GPS GPSLatitudeRef", "N")) == "N" else -1.0),
    cg(str(_tags["GPS GPSLongitude"])) * float(1.0 if str(_tags.get("GPS GPSLongitudeRef", "E")) == "E" else -1.0))
  # 获取实体地址
  _infos["address"] = address(_infos["GPS"])
  # 获取照片海拔高度
  if "GPS GPSAltitudeRef" in _tagkeys:
  try:
   _infos["GPSAltitude"] = eval(_infos["GPSAltitude"])
  except ZeropisionError:
   _infos["GPSAltitude"] = 0
  _infos["GPSAltitude"] = "距%s%.2f米" % ("地面" if int(
   _infos["GPSAltitudeRef"]) == 1 else "海平面", _infos["GPSAltitude"])
  del _infos["GPSAltitudeRef"]
  # 获取可用时间
  _timeitem = list(set(_TimeList) & set(_tagkeys))
  if _timeitem:
  _infos["Dates"] = str(_tags[_timeitem[0]])
return _infos地址转换
一个简单的爬虫,调用高德地图api进行坐标转换,考虑到原本是跨域,这里添加基础的反防爬代码。这里有个小细节,海外的一律都取不到(包括台湾),可以通过更换googlemap的api来实现全球查询。
def address(gps):
 global KEY
 try:
 # 随机UA
 _ulist = [
  "Mozilla/5.0 (Windows NT 6.1; WOW64) AppleWebKit/535.1 (KHTML, like Gecko) Chrome/14.0.835.163 Safari/535.1",
  "Mozilla/5.0 (Windows NT 6.1; WOW64; rv:6.0) Gecko/20100101 Firefox/6.0",
  "Mozilla/4.0 (compatible; MSIE 7.0; Windows NT 5.1; Trident/4.0; InfoPath.2; .NET4.0C; .NET4.0E; .NET CLR 2.0.50727; 360SE)",
  "Mozilla/5.0 (Macintosh; Intel Mac OS X 10_7_0) AppleWebKit/535.11 (KHTML, like Gecko) Chrome/17.0.963.56 Safari/535.11",
  "Mozilla/5.0 (Macintosh; U; Intel Mac OS X 10_6_8; en-us) AppleWebKit/534.50 (KHTML, like Gecko) Version/5.1 Safari/534.50",
  "Mozilla/5.0 (compatible; MSIE 9.0; Windows NT 6.1; Win64; x64; Trident/5.0; .NET CLR 2.0.50727; SLCC2; .NET CLR 3.5.30729; .NET CLR 3.0.30729; Media Center PC 6.0; InfoPath.3; .NET4.0C; Tablet PC 2.0; .NET4.0E)",
  "Mozilla/5.0 (compatible; MSIE 9.0; Windows NT 6.1; WOW64; Trident/5.0)",
  "Mozilla/5.0 (X11; U; Linux i686; rv:1.7.3) Gecko/20040913 Firefox/0.10",
  "Opera/9.80 (Macintosh; Intel Mac OS X 10.6.8; U; ja) Presto/2.10.289 Version/12.00",
  "Mozilla/5.0 (Windows NT 6.2; WOW64) AppleWebKit/537.36 (KHTML, like Gecko) Chrome/45.0.2454.93 Safari/537.36"
 ]
 # 伪造header
 _header = {
  "User-Agent": random.choice(_ulist),
  "Accept": "text/javascript, application/javascript, application/ecmascript, application/x-ecmascript, */*; q=0.01",
  "Accept-Encoding": "gzip, deflate, sdch",
  "Accept-Language": "zh-CN,zh;q=0.8",
  "Referer": "http://www.gpsspg.com",
 }
 _res = requests.get(
  "http://restapi.amap.com/v3/geocode/regeo?key={2}&s=rsv3&location={1},{0}&platform=JS&logversion=2.0&sdkversion=1.3&appname=http%3A%2F%2Fwww.gpsspg.com%2Fiframe%2Fmaps%2Famap_161128.htm%3Fmapi%3D3&csid=945C5A2C-E67F-4362-B881-9608D9BC9913".format(gps[0], gps[1], KEY), headers=_header, timeout=(5, 5))
 _json = _res.json()
 # 判断是否取得数据
 if _json and _json["status"] == "1" and _json["info"] == "OK":
  # 返回对应地址
  return _json.get("regeocode").get("formatted_address")
 except Exception as e:
pass实例
运行该代码 然后输入保存文件夹名和扫描位置即可
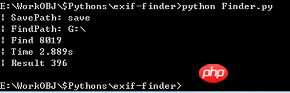
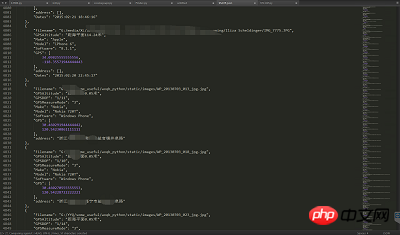
这边可以看到8019张中有396张存在有效的地理位置,打码的地方就不解释了,各位老司机~后期打算加入图像识别,和相似度识别。
下面给大家分享小编收集整理的python专题知识:
python基本语法
python多线程学习教程
python排序算法大全
Ce qui précède est le contenu détaillé de. pour plus d'informations, suivez d'autres articles connexes sur le site Web de PHP en chinois!

Outils d'IA chauds

Undresser.AI Undress
Application basée sur l'IA pour créer des photos de nu réalistes

AI Clothes Remover
Outil d'IA en ligne pour supprimer les vêtements des photos.

Undress AI Tool
Images de déshabillage gratuites

Clothoff.io
Dissolvant de vêtements AI

AI Hentai Generator
Générez AI Hentai gratuitement.

Article chaud
Outils chauds

Bloc-notes++7.3.1
Éditeur de code facile à utiliser et gratuit

SublimeText3 version chinoise
Version chinoise, très simple à utiliser

Envoyer Studio 13.0.1
Puissant environnement de développement intégré PHP

Dreamweaver CS6
Outils de développement Web visuel

SublimeText3 version Mac
Logiciel d'édition de code au niveau de Dieu (SublimeText3)


 Comment utiliser les journaux Debian Apache pour améliorer les performances du site Web
Apr 12, 2025 pm 11:36 PM
Comment utiliser les journaux Debian Apache pour améliorer les performances du site Web
Apr 12, 2025 pm 11:36 PM
Cet article expliquera comment améliorer les performances du site Web en analysant les journaux Apache dans le système Debian. 1. Bases de l'analyse du journal APACH LOG enregistre les informations détaillées de toutes les demandes HTTP, y compris l'adresse IP, l'horodatage, l'URL de la demande, la méthode HTTP et le code de réponse. Dans Debian Systems, ces journaux sont généralement situés dans les répertoires /var/log/apache2/access.log et /var/log/apache2/error.log. Comprendre la structure du journal est la première étape d'une analyse efficace. 2.
 Python: jeux, GUIS, et plus
Apr 13, 2025 am 12:14 AM
Python: jeux, GUIS, et plus
Apr 13, 2025 am 12:14 AM
Python excelle dans les jeux et le développement de l'interface graphique. 1) Le développement de jeux utilise Pygame, fournissant des fonctions de dessin, audio et d'autres fonctions, qui conviennent à la création de jeux 2D. 2) Le développement de l'interface graphique peut choisir Tkinter ou Pyqt. Tkinter est simple et facile à utiliser, PYQT a des fonctions riches et convient au développement professionnel.
 PHP et Python: comparaison de deux langages de programmation populaires
Apr 14, 2025 am 12:13 AM
PHP et Python: comparaison de deux langages de programmation populaires
Apr 14, 2025 am 12:13 AM
PHP et Python ont chacun leurs propres avantages et choisissent en fonction des exigences du projet. 1.Php convient au développement Web, en particulier pour le développement rapide et la maintenance des sites Web. 2. Python convient à la science des données, à l'apprentissage automatique et à l'intelligence artificielle, avec syntaxe concise et adaptée aux débutants.
 Comment Debian Readdir s'intègre à d'autres outils
Apr 13, 2025 am 09:42 AM
Comment Debian Readdir s'intègre à d'autres outils
Apr 13, 2025 am 09:42 AM
La fonction ReadDir dans le système Debian est un appel système utilisé pour lire le contenu des répertoires et est souvent utilisé dans la programmation C. Cet article expliquera comment intégrer ReadDir avec d'autres outils pour améliorer sa fonctionnalité. Méthode 1: combinant d'abord le programme de langue C et le pipeline, écrivez un programme C pour appeler la fonction readdir et sortir le résultat: # include # include # include # includeIntmain (intargc, char * argv []) {dir * dir; structDirent * entrée; if (argc! = 2) {
 Python et temps: tirer le meilleur parti de votre temps d'étude
Apr 14, 2025 am 12:02 AM
Python et temps: tirer le meilleur parti de votre temps d'étude
Apr 14, 2025 am 12:02 AM
Pour maximiser l'efficacité de l'apprentissage de Python dans un temps limité, vous pouvez utiliser les modules DateTime, Time et Schedule de Python. 1. Le module DateTime est utilisé pour enregistrer et planifier le temps d'apprentissage. 2. Le module de temps aide à définir l'étude et le temps de repos. 3. Le module de planification organise automatiquement des tâches d'apprentissage hebdomadaires.
 Certificat NGINX SSL Mise à jour du tutoriel Debian
Apr 13, 2025 am 07:21 AM
Certificat NGINX SSL Mise à jour du tutoriel Debian
Apr 13, 2025 am 07:21 AM
Cet article vous guidera sur la façon de mettre à jour votre certificat NGINXSSL sur votre système Debian. Étape 1: Installez d'abord CERTBOT, assurez-vous que votre système a des packages CERTBOT et Python3-CERTBOT-NGINX installés. Si ce n'est pas installé, veuillez exécuter la commande suivante: Sudoapt-getUpDaSuDoapt-GetInstallCertBotpyThon3-Certerbot-Nginx Étape 2: Obtenez et configurez le certificat Utilisez la commande Certbot pour obtenir le certificat LETSCRYPT et configure
 Comment configurer le serveur HTTPS dans Debian OpenSSL
Apr 13, 2025 am 11:03 AM
Comment configurer le serveur HTTPS dans Debian OpenSSL
Apr 13, 2025 am 11:03 AM
La configuration d'un serveur HTTPS sur un système Debian implique plusieurs étapes, notamment l'installation du logiciel nécessaire, la génération d'un certificat SSL et la configuration d'un serveur Web (tel qu'Apache ou Nginx) pour utiliser un certificat SSL. Voici un guide de base, en supposant que vous utilisez un serveur Apacheweb. 1. Installez d'abord le logiciel nécessaire, assurez-vous que votre système est à jour et installez Apache et OpenSSL: SudoaptupDaSuDoaptupgradeSudoaptinsta
 Guide de développement du plug-in de Gitlab sur Debian
Apr 13, 2025 am 08:24 AM
Guide de développement du plug-in de Gitlab sur Debian
Apr 13, 2025 am 08:24 AM
Développer un plugin Gitlab sur Debian nécessite des étapes et des connaissances spécifiques. Voici un guide de base pour vous aider à démarrer avec ce processus. Installation de GitLab Tout d'abord, vous devez installer GitLab sur votre système Debian. Vous pouvez vous référer au manuel d'installation officiel de Gitlab. Obtenez un jeton d'accès API avant d'effectuer l'intégration de l'API, vous devez d'abord obtenir le jeton d'accès API de GitLab. Ouvrez le tableau de bord GitLab, recherchez l'option "AccessTokens" dans les paramètres utilisateur et générez un nouveau jeton d'accès. Sera généré
