

Présentation de trois méthodes d'annotation Spring en Java

本篇文章主要介绍最重要的三个Spring注解,也就是@Autowired、@Resource和@Service,具有很好的参考价值。下面跟着小编一起来看下吧
什么是注解
传统的Spring做法是使用.xml文件来对bean进行注入或者是配置aop、事物,这么做有两个缺点:
1、如果所有的内容都配置在.xml文件中,那么.xml文件将会十分庞大;如果按需求分开.xml文件,那么.xml文件又会非常多。总之这将导致配置文件的可读性与可维护性变得很低
2、在开发中在.java文件和.xml文件之间不断切换,是一件麻烦的事,同时这种思维上的不连贯也会降低开发的效率
为了解决这两个问题,Spring引入了注解,通过"@XXX"的方式,让注解与Java Bean紧密结合,既大大减少了配置文件的体积,又增加了Java Bean的可读性与内聚性。
本篇文章,讲讲最重要的三个Spring注解,也就是@Autowired、@Resource和@Service,希望能通过有限的篇幅说清楚这三个注解的用法。
不使用注解
先看一个不使用注解的Spring示例,在这个示例的基础上,改成注解版本的,这样也能看出使用与不使用注解之间的区别,先定义一个老虎:
public class Tiger
{
 private String tigerName = "TigerKing";

 public String toString()
 {
  return "TigerName:" + tigerName;
 }
}再定义一个猴子:
public class Monkey
{
 private String monkeyName = "MonkeyKing";

 public String toString()
 {
  return "MonkeyName:" + monkeyName;
 }
}定义一个动物园:
public class Zoo
{
 private Tiger tiger;
 private Monkey monkey;

 public void setTiger(Tiger tiger)
 {
  this.tiger = tiger;
 }

 public void setMonkey(Monkey monkey)
 {
  this.monkey = monkey;
 }

 public Tiger getTiger()
 {
  return tiger;
 }

 public Monkey getMonkey()
 {
  return monkey;
 }
 public String toString()
 {
  return tiger + "\n" + monkey;
 }
}spring的配置文件这么写:
<?xml version="1.0" encoding="UTF-8"?>
<beans xmlns:xsi="http://www.w3.org/2001/XMLSchema-instance"
 xmlns="http://www.springframework.org/schema/beans"
 xmlns:context="http://www.springframework.org/schema/context"
 xsi:schemaLocation="http://www.springframework.org/schema/beans
  http://www.springframework.org/schema/beans/spring-beans-4.2.xsd
  http://www.springframework.org/schema/context
  http://www.springframework.org/schema/context/spring-context-4.2.xsd"
 default-autowire="byType">

 <bean id="zoo" class="com.xrq.bean.Zoo" >
  <property name="tiger" ref="tiger" />
  <property name="monkey" ref="monkey" />
 </bean>

 <bean id="tiger" class="com.xrq.domain.Tiger" />
 <bean id="monkey" class="com.xrq.domain.Monkey" />
</beans>
都很熟悉,权当复习一遍了。
@Autowired
@Autowired顾名思义,就是自动装配,其作用是为了消除代码Java代码里面的getter/setter与bean属性中的property。当然,getter看个人需求,如果私有属性需要对外提供的话,应当予以保留。
因此,引入@Autowired注解,先看一下spring配置文件怎么写:
<?xml version="1.0" encoding="UTF-8"?>
<beans xmlns:xsi="http://www.w3.org/2001/XMLSchema-instance"
 xmlns="http://www.springframework.org/schema/beans"
 xmlns:context="http://www.springframework.org/schema/context"
 xsi:schemaLocation="http://www.springframework.org/schema/beans
  http://www.springframework.org/schema/beans/spring-beans-4.2.xsd
  http://www.springframework.org/schema/context
  http://www.springframework.org/schema/context/spring-context-4.2.xsd">

 <context:component-scan base-package="com.xrq" />

 <bean id="zoo" class="com.xrq.bean.Zoo" />
 <bean id="tiger" class="com.xrq.domain.Tiger" />
 <bean id="monkey" class="com.xrq.domain.Monkey" />
</beans>
注意第10行,使用必须告诉spring一下我要使用注解了,告诉的方式有很多,
看到第12行,原来zoo里面应当注入两个属性tiger、monkey,现在不需要注入了。再看下,Zoo.java也很方便,把getter/setter都可以去掉:
public class Zoo
{
 @Autowired
 private Tiger tiger;

 @Autowired
 private Monkey monkey;

 public String toString()
 {
  return tiger + "\n" + monkey;
 }
}这里@Autowired注解的意思就是,当Spring发现@Autowired注解时,将自动在代码上下文中找到和其匹配(默认是类型匹配)的Bean,并自动注入到相应的地方去。
有一个细节性的问题是,假如bean里面有两个property,Zoo.java里面又去掉了属性的getter/setter并使用@Autowired注解标注这两个属性那会怎么样?答案是Spring会按照xml优先的原则去Zoo.java中寻找这两个属性的getter/setter,导致的结果就是初始化bean报错。
OK,假设此时我把.xml文件的13行、14行两行给去掉,再运行,会抛出异常:
Exception in thread "main" org.springframework.beans.factory.BeanCreationException: Error creating bean with name 'Zoo': Injection of autowired dependencies failed; nested exception is org.springframework.beans.factory.BeanCreationException: Could not autowire field: private com.xrq.domain.Tiger com.xrq.bean.Zoo.ttiger; nested exception is org.springframework.beans.factory.NoSuchBeanDefinitionException: No qualifying bean of type [com.xrq.domain.Tiger] found for dependency: expected at least 1 bean which qualifies as autowire candidate for this dependency. Dependency annotations: {@org.springframework.beans.factory.annotation.Autowired(required=true)}
 at org.springframework.beans.factory.annotation.AutowiredAnnotationBeanPostProcessor.postProcessPropertyValues(AutowiredAnnotationBeanPostProcessor.java:334)
 at org.springframework.beans.factory.support.AbstractAutowireCapableBeanFactory.populateBean(AbstractAutowireCapableBeanFactory.java:1214)
 at org.springframework.beans.factory.support.AbstractAutowireCapableBeanFactory.doCreateBean(AbstractAutowireCapableBeanFactory.java:543)
 at org.springframework.beans.factory.support.AbstractAutowireCapableBeanFactory.createBean(AbstractAutowireCapableBeanFactory.java:482)
 at org.springframework.beans.factory.support.AbstractBeanFactory$1.getObject(AbstractBeanFactory.java:305)
 at org.springframework.beans.factory.support.DefaultSingletonBeanRegistry.getSingleton(DefaultSingletonBeanRegistry.java:230)
 at org.springframework.beans.factory.support.AbstractBeanFactory.doGetBean(AbstractBeanFactory.java:301)
 at org.springframework.beans.factory.support.AbstractBeanFactory.getBean(AbstractBeanFactory.java:196)
 at org.springframework.beans.factory.support.DefaultListableBeanFactory.preInstantiateSingletons(DefaultListableBeanFactory.java:772)
 at org.springframework.context.support.AbstractApplicationContext.finishBeanFactoryInitialization(AbstractApplicationContext.java:835)
 at org.springframework.context.support.AbstractApplicationContext.refresh(AbstractApplicationContext.java:537)
 at org.springframework.context.support.ClassPathXmlApplicationContext.<init>(ClassPathXmlApplicationContext.java:139)
 at org.springframework.context.support.ClassPathXmlApplicationContext.<init>(ClassPathXmlApplicationContext.java:83)
 at com.xrq.test.MyTest.main(MyTest.java:13)
Caused by: org.springframework.beans.factory.BeanCreationException: Could not autowire field: private com.xrq.domain.Tiger com.xrq.bean.Zoo.ttiger; nested exception is org.springframework.beans.factory.NoSuchBeanDefinitionException: No qualifying bean of type [com.xrq.domain.Tiger] found for dependency: expected at least 1 bean which qualifies as autowire candidate for this dependency. Dependency annotations: {@org.springframework.beans.factory.annotation.Autowired(required=true)}
 at org.springframework.beans.factory.annotation.AutowiredAnnotationBeanPostProcessor$AutowiredFieldElement.inject(AutowiredAnnotationBeanPostProcessor.java:571)
 at org.springframework.beans.factory.annotation.InjectionMetadata.inject(InjectionMetadata.java:88)
 at org.springframework.beans.factory.annotation.AutowiredAnnotationBeanPostProcessor.postProcessPropertyValues(AutowiredAnnotationBeanPostProcessor.java:331)
 ... 13 more
Caused by: org.springframework.beans.factory.NoSuchBeanDefinitionException: No qualifying bean of type [com.xrq.domain.Tiger] found for dependency: expected at least 1 bean which qualifies as autowire candidate for this dependency. Dependency annotations: {@org.springframework.beans.factory.annotation.Autowired(required=true)}
 at org.springframework.beans.factory.support.DefaultListableBeanFactory.raiseNoSuchBeanDefinitionException(DefaultListableBeanFactory.java:1373)
 at org.springframework.beans.factory.support.DefaultListableBeanFactory.doResolveDependency(DefaultListableBeanFactory.java:1119)
 at org.springframework.beans.factory.support.DefaultListableBeanFactory.resolveDependency(DefaultListableBeanFactory.java:1014)
 at org.springframework.beans.factory.annotation.AutowiredAnnotationBeanPostProcessor$AutowiredFieldElement.inject(AutowiredAnnotationBeanPostProcessor.java:543)
... 15 more因为,@Autowired注解要去寻找的是一个Bean,Tiger和Monkey的Bean定义都给去掉了,自然就不是一个Bean了,Spring容器找不到也很好理解。那么,如果属性找不到我不想让Spring容器抛出异常,而就是显示null,可以吗?可以的,其实异常信息里面也给出了提示了,就是将@Autowired注解的required属性设置为false即可:
public class Zoo
{
 @Autowired(required = false)
 private Tiger tiger;

 @Autowired(required = false)
 private Monkey monkey;
 public String toString()
 {
  return tiger + "\n" + monkey;
 }
}此时,找不到tiger、monkey两个属性,Spring容器不再抛出异而是认为这两个属性为null。
@Autowired接口注入
上面的比较简单,我们只是简单注入一个Java类,那么如果有一个接口,有多个实现,Bean里引用的是接口名,又该怎么做呢?比如有一个Car接口:
public interface Car
{
 public String carName();
}两个实现类BMW和Benz:
@Service
public class BMW implements Car
{
 public String carName()
 {
  return "BMW car";
 }
}@Service
public class Benz implements Car
{
public String carName()
{
return "Benz car";
}
}写一个CarFactory,引用Car:
@Service
public class CarFactory
{
 @Autowired
 private Car car;
 public String toString()
 {
  return car.carName();
 }
}不用说,一定是报错的,Car接口有两个实现类,Spring并不知道应当引用哪个实现类。这种情况通常有两个解决办法:
1、删除其中一个实现类,Spring会自动去base-package下寻找Car接口的实现类,发现Car接口只有一个实现类,便会直接引用这个实现类
2、实现类就是有多个该怎么办?此时可以使用@Qualifier注解:
@Service
public class CarFactory
{
 @Autowired
 @Qualifier("BMW")
 private Car car;

 public String toString()
 {
  return car.carName();
 }
}注意@Qualifier注解括号里面的应当是Car接口实现类的类名,我之前试的时候一直以为是bean的名字,所以写了"bMW",结果一直报错。
@Resource
把@Resource注解放在@Autowired下面说,是因为它们作用非常相似,这个就简单说了,例子过后点明一下@Resource和@Autowired的区别。先看一下@Resource,直接写Zoo.java了:
@Service
public class Zoo
{
 @Resource(name = "tiger")
 private Tiger tiger;
 @Resource(type = Monkey.class)
 private Monkey monkey;
 public String toString()
 {
  return tiger + "\n" + monkey;
 }
}这是详细一些的用法,说一下@Resource的装配顺序:
1、@Resource后面没有任何内容,默认通过name属性去匹配bean,找不到再按type去匹配
2、指定了name或者type则根据指定的类型去匹配bean
3、指定了name和type则根据指定的name和type去匹配bean,任何一个不匹配都将报错
然后,区分一下@Autowired和@Resource两个注解的区别:
1、@Autowired默认按照byType方式进行bean匹配,@Resource默认按照byName方式进行bean匹配
2、@Autowired是Spring的注解,@Resource是J2EE的注解,这个看一下导入注解的时候这两个注解的包名就一清二楚了
Spring属于第三方的,J2EE是Java自己的东西,因此,建议使用@Resource注解,以减少代码和Spring之间的耦合。
@Service
上面这个例子,还可以继续简化,因为spring的配置文件里面还有12行~14行三个bean,下一步的简化是把这三个bean也给去掉,使得spring配置文件里面只有一个自动扫描的标签,增强Java代码的内聚性并进一步减少配置文件。
要继续简化,可以使用@Service。先看一下配置文件,当然是全部删除了:
<?xml version="1.0" encoding="UTF-8"?>
<beans xmlns:xsi="http://www.w3.org/2001/XMLSchema-instance"
 xmlns="http://www.springframework.org/schema/beans"
 xmlns:context="http://www.springframework.org/schema/context"
 xsi:schemaLocation="http://www.springframework.org/schema/beans
  http://www.springframework.org/schema/beans/spring-beans-4.2.xsd
  http://www.springframework.org/schema/context
  http://www.springframework.org/schema/context/spring-context-4.2.xsd">
 <context:component-scan base-package="com.xrq" />
</beans>
是不是感觉很爽?起码我觉得是的。OK,下面以Zoo.java为例,其余的Monkey.java和Tiger.java都一样:
@Service
public class Zoo
{
 @Autowired
 private Tiger ttiger;
 @Autowired
 private Monkey mmonkey;
 public String toString()
 {
  return ttiger + "\n" + mmonkey;
 }
}这样,Zoo.java在Spring容器中存在的形式就是"zoo",即可以通过ApplicationContext的getBean("zoo")方法来得到Zoo.java。@Service注解,其实做了两件事情:
1、声明Zoo.java是一个bean,这点很重要,因为Zoo.java是一个bean,其他的类才可以使用@Autowired将Zoo作为一个成员变量自动注入
2、Zoo.java在bean中的id是"zoo",即类名且首字母小写
如果,我不想用这种形式怎么办,就想让Zoo.java在Spring容器中的名字叫做"Zoo",可以的:
@Service
@Scope("prototype")
public class Zoo
{
 @Autowired
 private Monkey monkey;
 @Autowired
 private Tiger tiger;
 public String toString()
 {
  return "MonkeyName:" + monkey + "\nTigerName:" + tiger;
 }
}这样,就可以通过ApplicationContext的getBean("zoo")方法来得到Zoo.java了。
这里我还多加了一个@Scope注解,应该很好理解。因为Spring默认产生的bean是单例的,假如我不想使用单例怎么办,xml文件里面可以在bean里面配置scope属性。注解也是一样,配置@Scope即可,默认是"singleton"即单例,"prototype"表示原型即每次都会new一个新的出来。
补充细节
最后再补充一个我发现的细节。假如animal包下有Tiger、domain包下也有Tiger,它们二者都加了@Service注解,那么在Zoo.java中即使明确表示我要引用的是domain包下的Tiger,程序运行的时候依然会报错。
细想,其实这很好理解,两个Tiger都使用@Service注解标注,意味着两个Bean的名字都是"tiger",那么我在Zoo.java中自动装配的是哪个Tiger呢?不明确,因此,Spring容器会抛出BeanDefinitionStoreException异常,Caused by:
Caused by: org.springframework.context.annotation.ConflictingBeanDefinitionException: Annotation-specified bean name 'monkey' for bean class [com.xrq.domain.Monkey] conflicts with existing, non-compatible bean definition of same name and class [com.xrq.animal.Monkey]
【相关推荐】
1. Java免费视频教程
2. JAVA教程手册
3. 全面解析Java注解
Ce qui précède est le contenu détaillé de. pour plus d'informations, suivez d'autres articles connexes sur le site Web de PHP en chinois!

Outils d'IA chauds

Undresser.AI Undress
Application basée sur l'IA pour créer des photos de nu réalistes

AI Clothes Remover
Outil d'IA en ligne pour supprimer les vêtements des photos.

Undress AI Tool
Images de déshabillage gratuites

Clothoff.io
Dissolvant de vêtements AI

AI Hentai Generator
Générez AI Hentai gratuitement.

Article chaud
Outils chauds

Bloc-notes++7.3.1
Éditeur de code facile à utiliser et gratuit

SublimeText3 version chinoise
Version chinoise, très simple à utiliser

Envoyer Studio 13.0.1
Puissant environnement de développement intégré PHP

Dreamweaver CS6
Outils de développement Web visuel

SublimeText3 version Mac
Logiciel d'édition de code au niveau de Dieu (SublimeText3)


 Un nouveau paradigme de programmation, quand Spring Boot rencontre OpenAI
Feb 01, 2024 pm 09:18 PM
Un nouveau paradigme de programmation, quand Spring Boot rencontre OpenAI
Feb 01, 2024 pm 09:18 PM
En 2023, la technologie de l’IA est devenue un sujet brûlant et a un impact énorme sur diverses industries, notamment dans le domaine de la programmation. Les gens sont de plus en plus conscients de l’importance de la technologie de l’IA, et la communauté Spring ne fait pas exception. Avec l’évolution continue de la technologie GenAI (Intelligence Artificielle Générale), il est devenu crucial et urgent de simplifier la création d’applications dotées de fonctions d’IA. Dans ce contexte, « SpringAI » a émergé, visant à simplifier le processus de développement d'applications fonctionnelles d'IA, en le rendant simple et intuitif et en évitant une complexité inutile. Grâce à « SpringAI », les développeurs peuvent plus facilement créer des applications dotées de fonctions d'IA, ce qui les rend plus faciles à utiliser et à exploiter.
 Utilisez Spring Boot et Spring AI pour créer des applications d'intelligence artificielle générative
Apr 28, 2024 am 11:46 AM
Utilisez Spring Boot et Spring AI pour créer des applications d'intelligence artificielle générative
Apr 28, 2024 am 11:46 AM
En tant que leader du secteur, Spring+AI fournit des solutions de pointe pour divers secteurs grâce à son API puissante et flexible et ses fonctions avancées. Dans cette rubrique, nous examinerons les exemples d'application de Spring+AI dans divers domaines. Chaque cas montrera comment Spring+AI répond à des besoins spécifiques, atteint ses objectifs et étend ces LEÇONS APPRISES à une gamme plus large d'applications. J'espère que ce sujet pourra vous inciter à comprendre et à utiliser plus profondément les possibilités infinies de Spring+AI. Le framework Spring a une histoire de plus de 20 ans dans le domaine du développement logiciel, et cela fait 10 ans que la version Spring Boot 1.0 est sortie. Maintenant, personne ne peut contester ce printemps
 Quelles sont les méthodes de mise en œuvre des transactions programmatiques Spring ?
Jan 08, 2024 am 10:23 AM
Quelles sont les méthodes de mise en œuvre des transactions programmatiques Spring ?
Jan 08, 2024 am 10:23 AM
Comment implémenter les transactions programmatiques Spring : 1. Utilisez TransactionTemplate ; 2. Utilisez TransactionCallback et TransactionCallbackWithoutResult ; 3. Utilisez les annotations Transactional ; 4. Utilisez TransactionTemplate en combinaison avec @Transactional ;
 Comment implémenter des tâches planifiées dans Java Spring
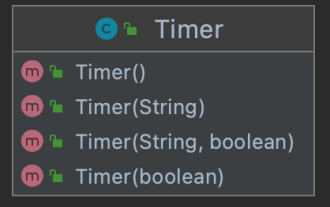
May 24, 2023 pm 01:28 PM
Comment implémenter des tâches planifiées dans Java Spring
May 24, 2023 pm 01:28 PM
Java implémente les tâches planifiées dans la bibliothèque fournie avec Jdk, il existe deux façons d'implémenter les tâches planifiées, l'une est Timer et l'autre est ScheduledThreadPoolExecutor. Lorsque Timer+TimerTask crée un Timer, il crée un thread, qui peut être utilisé pour planifier des tâches TimerTask. Timer a quatre méthodes de construction, et vous pouvez spécifier le nom du thread Timer et s'il doit être défini comme thread démon. Le nom par défaut est Timer-number et il ne s'agit pas d'un thread démon par défaut. Il existe trois méthodes principales : cancel() : mettre fin à la planification des tâches et annuler toutes les tâches actuellement planifiées. purge() : supprimer les tâches de la file d'attente des tâches.
 Les différences et les connexions entre Spring Boot et Spring Cloud
Jun 22, 2023 pm 06:25 PM
Les différences et les connexions entre Spring Boot et Spring Cloud
Jun 22, 2023 pm 06:25 PM
SpringBoot et SpringCloud sont tous deux des extensions de Spring Framework qui aident les développeurs à créer et déployer des applications de microservices plus rapidement, mais elles ont chacune des objectifs et des fonctions différents. SpringBoot est un framework permettant de créer rapidement des applications Java, permettant aux développeurs de créer et de déployer plus rapidement des applications basées sur Spring. Il fournit un moyen simple et facile à comprendre de créer des applications Spring autonomes et exécutables.
 Les 7 annotations les plus utilisées dans Spring, l'organisation la plus puissante de l'histoire !
Jul 26, 2023 pm 04:38 PM
Les 7 annotations les plus utilisées dans Spring, l'organisation la plus puissante de l'histoire !
Jul 26, 2023 pm 04:38 PM
Avec la mise à jour et l'itération de la technologie, Java5.0 a commencé à prendre en charge les annotations. En tant que framework leader en Java, Spring a lentement commencé à abandonner la configuration XML depuis sa mise à jour vers la version 2.5, et davantage d'annotations sont utilisées pour contrôler le framework Spring.
 Comment définir le niveau d'isolement des transactions au printemps
Jan 26, 2024 pm 05:38 PM
Comment définir le niveau d'isolement des transactions au printemps
Jan 26, 2024 pm 05:38 PM
Comment définir le niveau d'isolement des transactions dans Spring : 1. Utilisez l'annotation @Transactional ; 2. Définissez-le dans le fichier de configuration Spring ; 3. Utilisez PlatformTransactionManager ; Introduction détaillée : 1. Utilisez l'annotation @Transactional, ajoutez l'annotation @Transactional à la classe ou à la méthode qui nécessite la gestion des transactions et définissez le niveau d'isolement dans l'attribut 2. Dans le fichier de configuration Spring, etc.
 Apprenez Spring Cloud à partir de zéro
Jun 22, 2023 am 08:11 AM
Apprenez Spring Cloud à partir de zéro
Jun 22, 2023 am 08:11 AM
En tant que développeur Java, apprendre et utiliser le framework Spring est une compétence essentielle. Avec la popularité du cloud computing et des microservices, apprendre et utiliser Spring Cloud est devenu une autre compétence qui doit être maîtrisée. SpringCloud est un ensemble d'outils de développement basé sur SpringBoot permettant de créer rapidement des systèmes distribués. Il fournit aux développeurs une série de composants, notamment l'enregistrement et la découverte de services, un centre de configuration, l'équilibrage de charge et des disjoncteurs, etc., permettant aux développeurs de créer des micro-ordinateurs.
