
Push est une fonction essentielle des applications mobiles Cette fois, je dois l'étudier à cause du projet d'entreprise. Puisque le push est généralement écrit côté serveur, c'est un casse-tête pour les programmeurs Javaweb qui ne connaissent pas Android d'écrire une démo complète. Je vais donc écrire un exemple du début à la fin ici pour référence. Comme je ne comprends pas Android, je viens de faire une démo de Baidu en raison des besoins du projet. Il comporte de nombreuses lacunes et je ne veux pas que vous me corrigiez.
1. Tout d'abord, présentons brièvement ce qu'est Aurora Push
① Pourquoi le push est nécessaire : Afin de résoudre le problème de la synchronisation des données, il existe deux méthodes couramment utilisées sur les plateformes mobiles. L'une consiste à interroger régulièrement les données sur le serveur, également appelée Polling, et l'autre consiste à maintenir une longue connexion TCP entre le téléphone mobile et le serveur. Lorsque le serveur dispose de données, elles sont transmises au client en temps réel, ce qui est le cas. c'est ce que nous appelons Push. Parce qu'il est techniquement difficile de maintenir de longues connexions sur les réseaux mobiles lors d'un push, et lorsque le nombre d'utilisateurs augmente, de nombreux serveurs sont nécessaires pour maintenir de longues connexions, et le coût est également très élevé. Par conséquent, nous avons besoin d’un package jar tiers pour prendre en charge notre service push. Si vous souhaitez en savoir plus, veuillez vous référer à la documentation officielle d'Aurora Push.
②La réponse populaire de Jiguang Push : il s'agit d'envoyer le contenu qui doit être poussé vers le serveur Jiguang Push en appelant l'API jpush. Le serveur Jiguang Push choisit de le pousser vers l'application spécifique en fonction de la. contenu que nous avons poussé dans le passé.
2. Code source
Code du serveur :
Code client Android :
L'environnement Android est : ADT+SDK+ Eclipse
Téléchargement ADT :
Téléchargement SDK :
L'installation de l'environnement JDK requise ne sera pas décrite une par une.
Remarque : Le code peut être importé directement et ne doit être modifié qu'à quelques endroits, qui seront expliqués plus tard. Tout d'abord, je vais vous apprendre à configurer l'environnement Android et à m'assurer que le code peut être importé avec succès
3 Étapes de fonctionnement
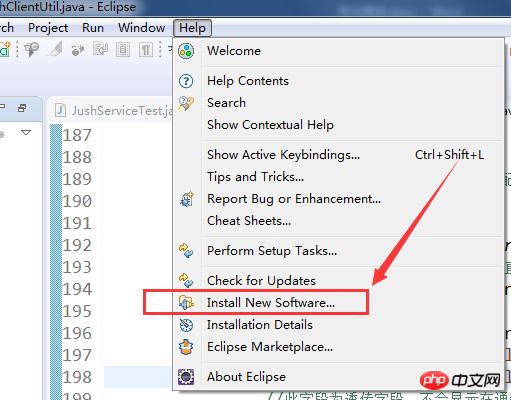
① Installez le plug-in
.
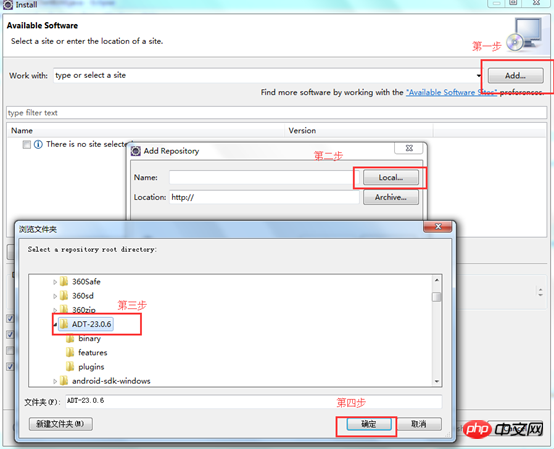
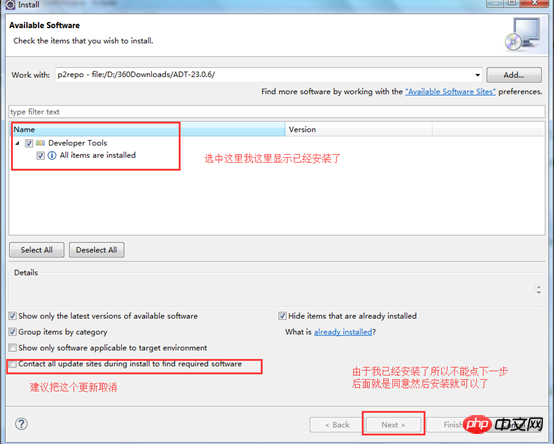
②Installer le SDK
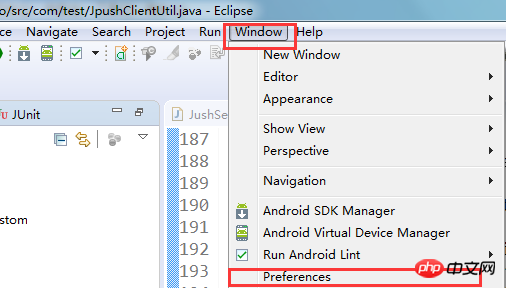
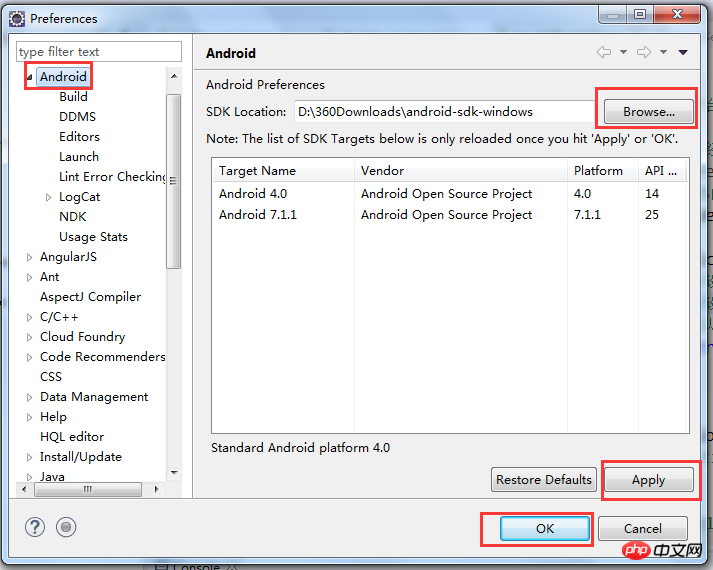
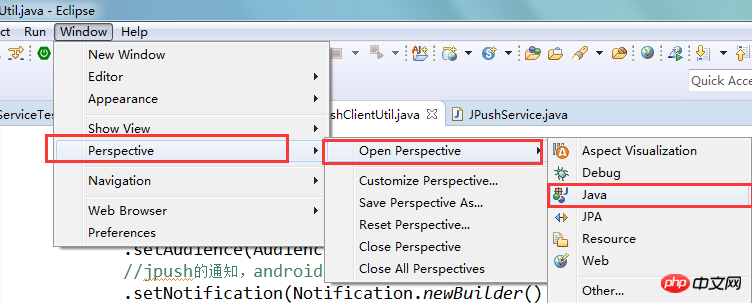
Une fois cette étape terminée, la page passera à l'interface de développement Android, et il y aura deux autres choses sur la page

Sélectionnez celle que vous souhaitez installer. Sélectionnez généralement la version dont vous avez besoin dans Outils et Android, et. puis vous guide pour l'installer. Je ne l'ai pas sélectionné ici, il est donc grisé.
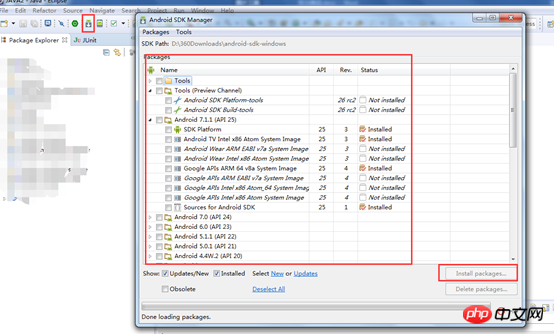
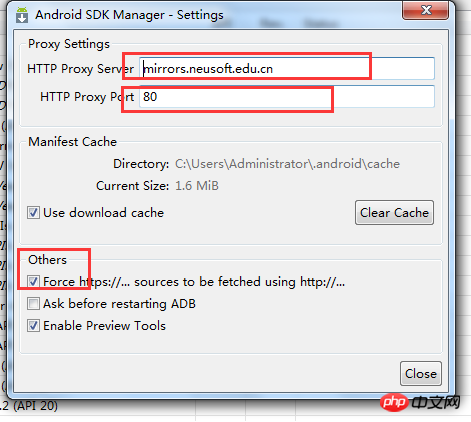
Remarque : Concernant l'installation lente ou l'échec de l'installation
il existe deux méthodes :
① Utiliser le logiciel FQ J'utilise Blue Light
② Utiliser le serveur miroir de configuration Comme indiqué dans l'image :
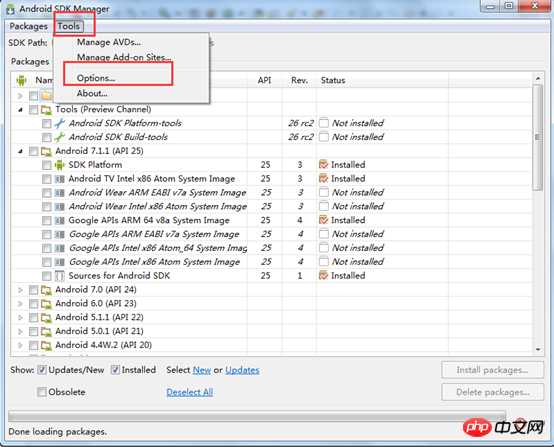
③Ensuite, importez le projet Android (le projet côté serveur ne sera pas décrit comment importer)
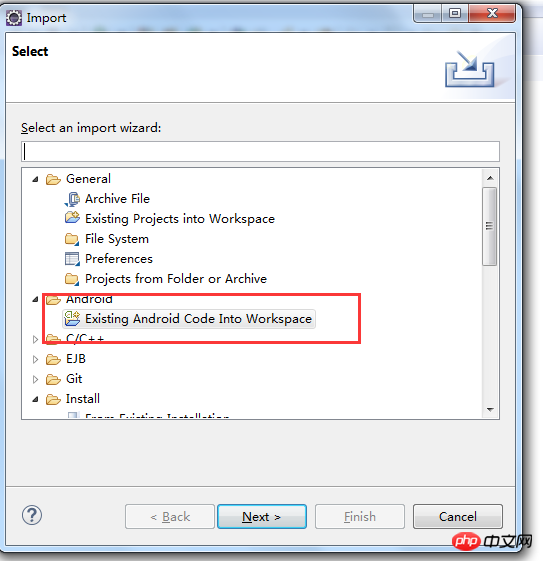
Cliquez avec le bouton droit dans l'espace vide de la liste des projets - sélectionnez importer - puis agissez comme montré
Exécutez ensuite le programme Android (il est préférable de brancher le câble de données - activez le débogage USB du téléphone - puis c'est parti revenir au téléphone lorsque le programme est en cours d'exécution)
Spécifique Vous pouvez le télécharger depuis Baidu.
4. Comment utiliser Aurora Push (vous devez créer un compte sur le site officiel)
Veuillez vous référer à Baidu pour une utilisation spécifique, ou vous référer au site officiel. . Vous trouverez ci-dessous les principales captures d'écran
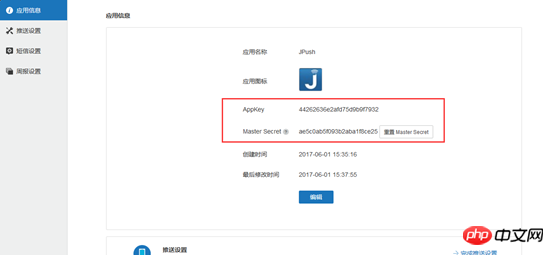
la clé d'application et le secret principal seront utilisés plus tard
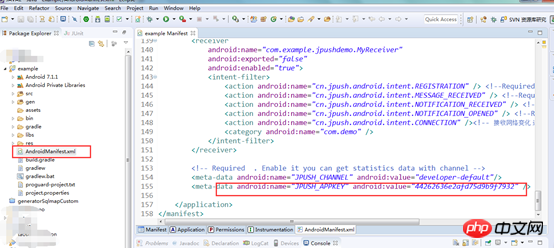
5. Modifiez le fichier de configuration Android et remplacez la clé d'application par la clé d'application de. l'application que vous avez ajoutée
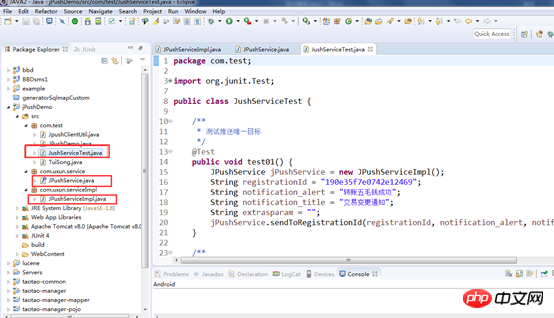
6. Affichage du code du serveur, les codes sont tous commentés, je ne vais donc pas les expliquer un par un
Utilisez uniquement ces trois codes
APPKET et MASTERSECRET sont remplacés par les chaînes générées lorsque vous ajoutez l'application dans Jiguang Developer Service


1 package com.uxun.serviceImpl; 2 3 import com.uxun.service.JPushService; 4 5 import cn.jiguang.common.resp.APIConnectionException; 6 import cn.jiguang.common.resp.APIRequestException; 7 import cn.jpush.api.JPushClient; 8 import cn.jpush.api.push.PushResult; 9 import cn.jpush.api.push.model.Platform; 10 import cn.jpush.api.push.model.PushPayload; 11 import cn.jpush.api.push.model.audience.Audience; 12 import cn.jpush.api.push.model.notification.AndroidNotification; 13 import cn.jpush.api.push.model.notification.IosNotification; 14 import cn.jpush.api.push.model.notification.Notification; 15 16 public class JPushServiceImpl implements JPushService { 17 18 private final static String APPKET = "44262636e2afd75d9b9f7932"; 19 20 private final static String MASTERSECRET = "ae5c0ab5f093b2aba1f8ce25"; 21 22 private static JPushClient jPushClient = new JPushClient(MASTERSECRET, APPKET);//通知默认保留24小时。 23 24 @Override 25 public int sendToRegistrationId(String registrationId, String notification_alert, String notification_title, 26 String extrasparam) { 27 int result = 0; 28 try { 29 PushPayload pushPayload= JPushServiceImpl.buildPushObjectWithRegistrationId(registrationId, 30 notification_alert, notification_title, extrasparam); 31 System.out.println(pushPayload); 32 PushResult pushResult=jPushClient.sendPush(pushPayload); //发送推送对象 33 //System.out.println(pushResult); 34 if(pushResult.getResponseCode() == 200) { //状态码等于200 为成功 35 result=1; 36 } 37 } catch (APIConnectionException e) { 38 e.printStackTrace(); 39 } catch (APIRequestException e) { 40 e.printStackTrace(); 41 } 42 43 return result; 44 } 45 46 @Override 47 public int sendToAll(String notification_alert, String notification_title, String extrasparam) { 48 int result = 0; 49 try { 50 PushPayload pushPayload= JPushServiceImpl.buildPushObjectWithAll(notification_alert, 51 notification_title, extrasparam); 52 System.out.println(pushPayload); 53 PushResult pushResult=jPushClient.sendPush(pushPayload); //发送推送对象 54 //System.out.println(pushResult); 55 if(pushResult.getResponseCode() == 200) { //状态码等于200 为成功 56 result=1; 57 } 58 } catch (APIConnectionException e) { 59 e.printStackTrace(); 60 } catch (APIRequestException e) { 61 e.printStackTrace(); 62 } 63 64 return result; 65 } 66 67 @Override 68 public int sendToAllIos(String notification_alert, String notification_title, String extrasparam) { 69 70 int result = 0; 71 try { 72 PushPayload pushPayload= JPushServiceImpl.buildPushObjectWithIos(notification_alert, 73 notification_title, extrasparam); 74 System.out.println(pushPayload); 75 PushResult pushResult=jPushClient.sendPush(pushPayload); //发送推送对象 76 //System.out.println(pushResult); 77 if(pushResult.getResponseCode() == 200) { //状态码等于200 为成功 78 result=1; 79 } 80 } catch (APIConnectionException e) { 81 e.printStackTrace(); 82 } catch (APIRequestException e) { 83 e.printStackTrace(); 84 } 85 86 return result; 87 } 88 89 @Override 90 public int sendToAllAndroid(String notification_alert, String notification_title, String extrasparam) { 91 92 int result = 0; 93 try { 94 PushPayload pushPayload= JPushServiceImpl.buildPushObjectWithAndroid(notification_alert, 95 notification_title, extrasparam); 96 System.out.println(pushPayload); 97 PushResult pushResult=jPushClient.sendPush(pushPayload); //发送推送对象 98 //System.out.println(pushResult); 99 if(pushResult.getResponseCode() == 200) { //状态码等于200 为成功100 result=1;101 }102 } catch (APIConnectionException e) {103 e.printStackTrace();104 } catch (APIRequestException e) {105 e.printStackTrace();106 }107 108 return result;109 }110 111 /**112 * 建立以唯一设备标识符推送的对象113 * @param registrationId 唯一设备标识114 * @param notification_alert 通知内容115 * @param notification_title 通知标题116 * @param extrasparam 扩展字段117 * @return 返回推送对象118 */119 private static PushPayload buildPushObjectWithRegistrationId(String registrationId, String notification_alert, String notification_title,120 String extrasparam) {121 return PushPayload.newBuilder()122 //指定要推送的平台,all代表当前应用配置了的所有平台,也可以传android等具体平台123 .setPlatform(Platform.all())124 //指定推送的接收对象,all代表所有人,也可以指定已经设置成功的tag或alias或该应应用客户端调用接口获取到的registration id125 .setAudience(Audience.registrationId(registrationId))126 //jpush的通知,android的由jpush直接下发,iOS的由apns服务器下发,Winphone的由mpns下发127 .setNotification(Notification.newBuilder()128 //指定当前推送的android通知129 .addPlatformNotification(AndroidNotification.newBuilder()130 .setAlert(notification_alert) //设置通知内容(必填)131 .setTitle(notification_title) //设置通知标题(可选)132 //此字段为透传字段,不会显示在通知栏。用户可以通过此字段来做一些定制需求,如特定的key传要指定跳转的页面(value)133 .addExtra("androidNotification extras key",extrasparam)134 .build())135 136 //指定当前推送的iOS通知137 .addPlatformNotification(IosNotification.newBuilder()138 //传一个IosAlert对象,指定apns title、title、subtitle等139 .setAlert(notification_alert)140 //直接传alert141 //此项是指定此推送的badge(应用角标)自动加1142 .incrBadge(1)143 //此字段的值default表示系统默认声音;传sound.caf表示此推送以项目里面打包的sound.caf声音来提醒,144 // 如果系统没有此音频则以系统默认声音提醒;此字段如果传空字符串,iOS9及以上的系统是无声音提醒,以下的系统是默认声音145 .setSound("sound.caf")146 //此字段为透传字段,不会显示在通知栏。用户可以通过此字段来做一些定制需求,如特定的key传要指定跳转的页面(value)147 .addExtra("iosNotification extras key",extrasparam)148 //此项说明此推送是一个background推送,想了解background看:http://docs.jpush.io/client/ios_tutorials/#ios-7-background-remote-notification149 //取消此注释,消息推送时ios将无法在锁屏情况接收150 // .setContentAvailable(true)151 .build())152 153 //指定当前推送的winPhone通知154 /*.addPlatformNotification(WinphoneNotification.newBuilder()155 .setAlert(notification_alert)156 //.setTitle("")) //设置通知标题(可选)此标题将取代显示app名称的地方157 .build())*/158 .build())159 .build();160 }161 162 /**163 * 建立推送所有用户的推送对象164 * @param notification_alert 通知内容165 * @param notification_title 通知标题166 * @param extrasparam 扩展字段167 * @return 返回推送对象168 */169 private static PushPayload buildPushObjectWithAll(String notification_alert,170 String notification_title, String extrasparam) {171 return PushPayload.newBuilder()172 //指定要推送的平台,all代表当前应用配置了的所有平台,也可以传android等具体平台173 .setPlatform(Platform.all())174 //指定推送的接收对象,all代表所有人,也可以指定已经设置成功的tag或alias或该应应用客户端调用接口获取到的registration id175 .setAudience(Audience.all())176 //jpush的通知,android的由jpush直接下发,iOS的由apns服务器下发,Winphone的由mpns下发177 .setNotification(Notification.newBuilder()178 //指定当前推送的android通知179 .addPlatformNotification(AndroidNotification.newBuilder()180 .setAlert(notification_alert) //设置通知内容(必填)181 .setTitle(notification_title) //设置通知标题(可选)182 //此字段为透传字段,不会显示在通知栏。用户可以通过此字段来做一些定制需求,如特定的key传要指定跳转的页面(value)183 .addExtra("androidNotification extras key",extrasparam)184 .build())185 186 //指定当前推送的iOS通知187 .addPlatformNotification(IosNotification.newBuilder()188 //传一个IosAlert对象,指定apns title、title、subtitle等189 .setAlert(notification_alert)190 //直接传alert191 //此项是指定此推送的badge(应用角标)自动加1192 .incrBadge(1)193 //此字段的值default表示系统默认声音;传sound.caf表示此推送以项目里面打包的sound.caf声音来提醒,194 // 如果系统没有此音频则以系统默认声音提醒;此字段如果传空字符串,iOS9及以上的系统是无声音提醒,以下的系统是默认声音195 .setSound("sound.caf")196 //此字段为透传字段,不会显示在通知栏。用户可以通过此字段来做一些定制需求,如特定的key传要指定跳转的页面(value)197 .addExtra("iosNotification extras key",extrasparam)198 //此项说明此推送是一个background推送,想了解background看:http://docs.jpush.io/client/ios_tutorials/#ios-7-background-remote-notification199 //取消此注释,消息推送时ios将无法在锁屏情况接收200 // .setContentAvailable(true)201 .build())202 203 //指定当前推送的winPhone通知204 /*.addPlatformNotification(WinphoneNotification.newBuilder()205 .setAlert(notification_alert)206 //.setTitle("")) //设置通知标题(可选)此标题将取代显示app名称的地方207 .build())*/208 .build())209 .build();210 }211 212 /**213 * 建立推送所有ios用户的推送对象214 * @param notification_alert 通知内容215 * @param notification_title 通知标题216 * @param extrasparam 扩展字段217 * @return 返回推送对象218 */219 private static PushPayload buildPushObjectWithIos(String notification_alert,220 String notification_title, String extrasparam) {221 return PushPayload.newBuilder()222 //指定要推送的平台,all代表当前应用配置了的所有平台,也可以传android等具体平台223 .setPlatform(Platform.ios())224 //指定推送的接收对象,all代表所有人,也可以指定已经设置成功的tag或alias或该应应用客户端调用接口获取到的registration id225 .setAudience(Audience.all())226 //jpush的通知,android的由jpush直接下发,iOS的由apns服务器下发,Winphone的由mpns下发227 .setNotification(Notification.newBuilder()228 229 //指定当前推送的iOS通知230 .addPlatformNotification(IosNotification.newBuilder()231 //传一个IosAlert对象,指定apns title、title、subtitle等232 .setAlert(notification_alert)233 //直接传alert234 //此项是指定此推送的badge(应用角标)自动加1235 .incrBadge(1)236 //此字段的值default表示系统默认声音;传sound.caf表示此推送以项目里面打包的sound.caf声音来提醒,237 // 如果系统没有此音频则以系统默认声音提醒;此字段如果传空字符串,iOS9及以上的系统是无声音提醒,以下的系统是默认声音238 .setSound("sound.caf")239 //此字段为透传字段,不会显示在通知栏。用户可以通过此字段来做一些定制需求,如特定的key传要指定跳转的页面(value)240 .addExtra("iosNotification extras key",extrasparam)241 //此项说明此推送是一个background推送,想了解background看:http://docs.jpush.io/client/ios_tutorials/#ios-7-background-remote-notification242 //取消此注释,消息推送时ios将无法在锁屏情况接收243 // .setContentAvailable(true)244 .build())245 .build())246 .build();247 }248 249 /**250 * 建立推送所有安卓用户的推送对象251 * @param notification_alert 通知内容252 * @param notification_title 通知标题253 * @param extrasparam 扩展字段254 * @return 返回推送对象255 */256 private static PushPayload buildPushObjectWithAndroid(String notification_alert,257 String notification_title, String extrasparam) {258 return PushPayload.newBuilder()259 //指定要推送的平台,all代表当前应用配置了的所有平台,也可以传android等具体平台260 .setPlatform(Platform.android())261 //指定推送的接收对象,all代表所有人,也可以指定已经设置成功的tag或alias或该应应用客户端调用接口获取到的registration id262 .setAudience(Audience.all())263 //jpush的通知,android的由jpush直接下发,iOS的由apns服务器下发,Winphone的由mpns下发264 .setNotification(Notification.newBuilder()265 //指定当前推送的android通知266 .addPlatformNotification(AndroidNotification.newBuilder()267 .setAlert(notification_alert) //设置通知内容(必填)268 .setTitle(notification_title) //设置通知标题(可选)269 //此字段为透传字段,不会显示在通知栏。用户可以通过此字段来做一些定制需求,如特定的key传要指定跳转的页面(value)270 .addExtra("androidNotification extras key",extrasparam)271 .build())272 .build())273 .build();274 }275 276 277 278 }
Après avoir exécuté le code du serveur, le téléphone recevra le message suivant notification :
En fait, le serveur envoie la notification au serveur Aurora via la clé d'application et le secret principal identifiés de manière unique, et le serveur la transmet ensuite à l'application correspondante (La clé d'application est également configuré dans le fichier de configuration de l'application ci-dessus)

Il y a tellement d'opérations spécifiques Ce n'est peut-être pas très détaillé, mais il y en a trop. étapes, donc je ne prendrai pas de captures d’écran une par une, je donne seulement la plupart d’entre elles ici.
Ce qui précède est le contenu détaillé de. pour plus d'informations, suivez d'autres articles connexes sur le site Web de PHP en chinois!
 Que signifie le port de liaison montante ?
 Comment configurer Maven dans Idea
 Activer le numéro qq
 Introduction aux types d'interfaces de disque dur
 La différence entre les fonctions fléchées et les fonctions ordinaires
 Comment utiliser la fonction valeur
 Comment utiliser la fonction mois
 Comment réparer libcurl.dll manquant sur votre ordinateur