Configuration dans le fichier de configuration Spring MVC
<!-- 设置使用注解的类所在的jar包,只加载controller类 -->
<context:component-scan base-package="com.jay.plat.config.controller" />
<!-- 使用 Swagger Restful API文档时,添加此注解 -->
<mvc:default-servlet-handler /><mvc:resources mapping="swagger-ui.html" location="classpath:/META-INF/resources/"/> <mvc:resources mapping="/webjars/**" location="classpath:/META-INF/resources/webjars/"/>
dépendance maven
<!-- 构建Restful API -->

        <dependency>
            <groupId>io.springfox</groupId>
            <artifactId>springfox-swagger2</artifactId>
            <version>2.4.0</version>
        </dependency>
        <dependency>
            <groupId>io.springfox</groupId>
            <artifactId>springfox-swagger-ui</artifactId>
            <version>2.4.0</version>
</dependency>Fichier de configuration Swagger
package com.jay.plat.config.util;

import org.springframework.context.annotation.Bean;
import org.springframework.context.annotation.ComponentScan;
import org.springframework.context.annotation.Configuration;
import org.springframework.web.servlet.config.annotation.EnableWebMvc;
import org.springframework.web.servlet.config.annotation.WebMvcConfigurationSupport;


import springfox.documentation.builders.ApiInfoBuilder;
import springfox.documentation.builders.PathSelectors;
import springfox.documentation.builders.RequestHandlerSelectors;
import springfox.documentation.service.ApiInfo;
import springfox.documentation.spi.DocumentationType;
import springfox.documentation.spring.web.plugins.Docket;
import springfox.documentation.swagger2.annotations.EnableSwagger2;
/*
 * Restful API 访问路径:
 * http://IP:port/{context-path}/swagger-ui.html
 * eg:http://localhost:8080/jd-config-web/swagger-ui.html
 */
@EnableWebMvc
@EnableSwagger2
@ComponentScan(basePackages = {"com.plat.config.controller"})
@Configuration
public class RestApiConfig extends WebMvcConfigurationSupport{

    @Bean
    public Docket createRestApi() {
        return new Docket(DocumentationType.SWAGGER_2)
                .apiInfo(apiInfo())
                .select()
                .apis(RequestHandlerSelectors.basePackage("com.jay.plat.config.controller"))
                .paths(PathSelectors.any())
                .build();
    }

    private ApiInfo apiInfo() {
        return new ApiInfoBuilder()
                .title("Spring 中使用Swagger2构建RESTful APIs")
                .termsOfServiceUrl("http://blog.csdn.net/he90227")
                .contact("逍遥飞鹤")
                .version("1.1")
                .build();
    }
}Instructions de configuration :
@Configuration 配置注解,自动在本类上下文加载一些环境变量信息
@EnableWebMvc
@EnableSwagger2 使swagger2生效
@ComponentScan("com.myapp.packages") 需要扫描的包路径Utiliser des annotations pour ajouter des documents API dans Controller
package com.jay.spring.boot.demo10.swagger2.controller;

import java.util.ArrayList;
import java.util.Collections;
import java.util.HashMap;
import java.util.List;
import java.util.Map;

import org.springframework.web.bind.annotation.PathVariable;
import org.springframework.web.bind.annotation.RequestBody;
import org.springframework.web.bind.annotation.RequestMapping;
import org.springframework.web.bind.annotation.RequestMethod;
import org.springframework.web.bind.annotation.RestController;

import com.jay.spring.boot.demo10.swagger2.bean.User;

import io.swagger.annotations.ApiImplicitParam;
import io.swagger.annotations.ApiImplicitParams;
import io.swagger.annotations.ApiOperation;

@RestController
@RequestMapping(value = "/users") // 通过这里配置使下面的映射都在/users下,可去除
public class UserController {

    static Map<Long, User> users = Collections.synchronizedMap(new HashMap<Long, User>());

    @ApiOperation(value = "获取用户列表", notes = "")
    @RequestMapping(value = { "" }, method = RequestMethod.GET)
    public List<User> getUserList() {
        List<User> r = new ArrayList<User>(users.values());
        return r;
    }

    @ApiOperation(value = "创建用户", notes = "根据User对象创建用户")
    @ApiImplicitParam(name = "user", value = "用户详细实体user", required = true, dataType = "User")
    @RequestMapping(value = "", method = RequestMethod.POST)
    public String postUser(@RequestBody User user) {
        users.put(user.getId(), user);
        return "success";
    }

    @ApiOperation(value = "获取用户详细信息", notes = "根据url的id来获取用户详细信息")
    @ApiImplicitParam(name = "id", value = "用户ID", required = true, dataType = "Long")
    @RequestMapping(value = "/{id}", method = RequestMethod.GET)
    public User getUser(@PathVariable Long id) {
        return users.get(id);
    }

    @ApiOperation(value = "更新用户详细信息", notes = "根据url的id来指定更新对象,并根据传过来的user信息来更新用户详细信息")
    @ApiImplicitParams({ @ApiImplicitParam(name = "id", value = "用户ID", required = true, dataType = "Long"),
            @ApiImplicitParam(name = "user", value = "用户详细实体user", required = true, dataType = "User") })
    @RequestMapping(value = "/{id}", method = RequestMethod.PUT)
    public String putUser(@PathVariable Long id, @RequestBody User user) {
        User u = users.get(id);
        u.setName(user.getName());
        u.setAge(user.getAge());
        users.put(id, u);
        return "success";
    }

    @ApiOperation(value = "删除用户", notes = "根据url的id来指定删除对象")
    @ApiImplicitParam(name = "id", value = "用户ID", required = true, dataType = "Long")
    @RequestMapping(value = "/{id}", method = RequestMethod.DELETE)
    public String deleteUser(@PathVariable Long id) {
        users.remove(id);
        return "success";
    }

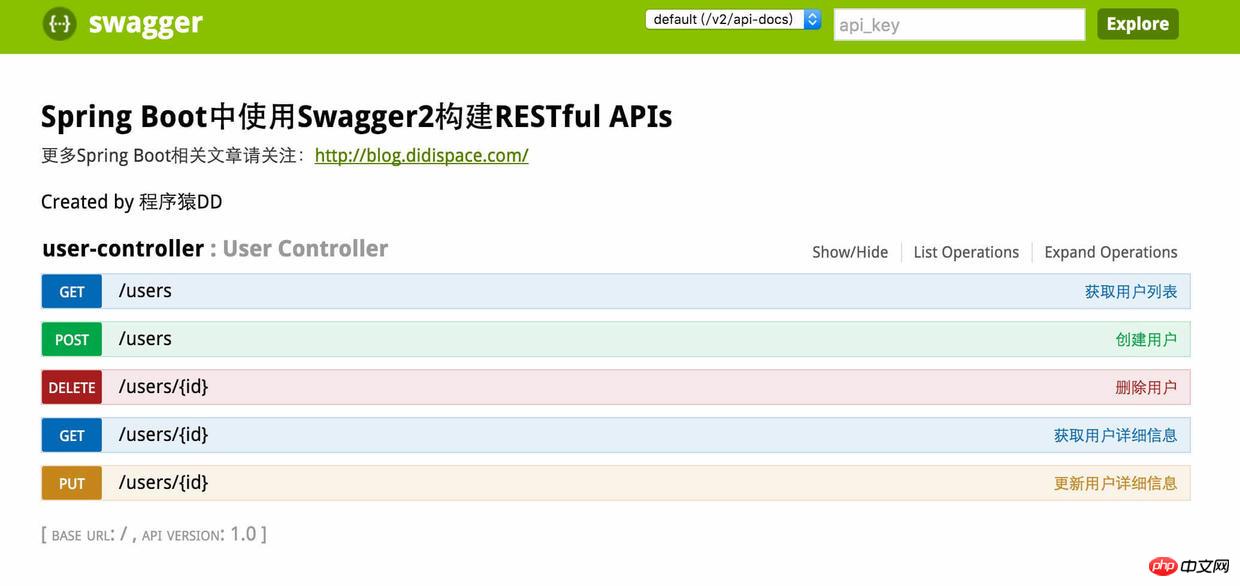
}Affichage des effets
Chemin d'accès :
Restful API 访问路径:
 * http://IP:port/{context-path}/swagger-ui.html
 * eg:http://localhost:8080/jd-config-web/swagger-ui.html
Ce qui précède est le contenu détaillé de. pour plus d'informations, suivez d'autres articles connexes sur le site Web de PHP en chinois!
 Comment supprimer une base de données
 Étapes WeChat
 commande de ligne de rupture cad
 Quel fichier est une ressource ?
 Solution au problème selon lequel le logiciel de téléchargement Win10 ne peut pas être installé
 Le dernier classement des dix principales bourses du cercle des devises
 Comment restaurer les données du serveur
 prix BTC aujourd'hui