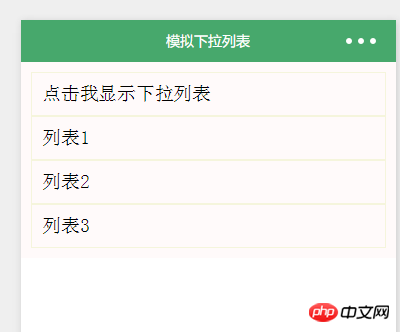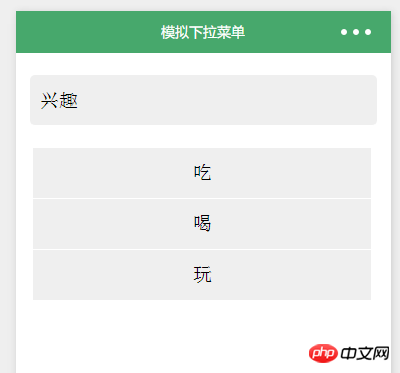
Cet article partage principalement avec vous les exemples de développement du menu déroulant de simulation d'applet WeChat, en espérant aider tout le monde.
1. Points de connaissances
1.Réaliser l'affichage et le masquage dynamique d'un certain contrôle
  data:{
    open:false
  },
  showitem:function(){
      this.setData({
          open:!this.data.open
      })
},.display_show{
display: block;
}
.display_none{
display: none;
} 2 . Transmettez les paramètres via data-* et e.target.dateset
< afficher class="phone_personal">{{firstPerson}}
    this.setData({
             firstPerson:e.target.dataset.me,
})À cette heure : firstPerson=eat
3 .Mots de boîte flexible : display:flex;
<view class="phone_one" bindtap="clickPerson">
<view class="phone_personal">{{firstPerson}}</view>
<image src="../../image/i.png" class="personal_image {{selectArea ? 'rotateRight' :''}}"></image>
</view>dans le parent :
display:flex;
justifier-content:space- between;
De cette façon les sous-ensembles seront juxtaposés. justify-content:space-between; De cette façon, les sous-ensembles seront aux deux extrémités
2. Liste des événements
(1). Liste déroulante
1.wxml
<view class="page">
<view class="page_bd">
<view class="body_head" bindtap="showitem">点击我显示下拉列表</view>
<navigator url="pages/list/list">
<view class="{{open?'display_show':'display_none'}}">列表1</view>
</navigator>
<navigator url="pages/scroll-view/index">
<view class="{{open?'display_show':'display_none'}}">列表2</view>
</navigator>
<navigator url="pages/scroll-view/index">
<view class="{{open?'display_show':'display_none'}}">列表3</view>
</navigator>
</view>
</view>2.wxss
.page_bd{
    padding: 10px;
    background-color: snow;
}
.body_head{
    border: 1px solid;
    border-color: beige;
    padding: 10px;
}
.display_show{
    display: block;
    border: 1px solid;
    border-color: beige;
    padding: 10px;
}
.display_none{
    display: none;
}
3.js
Page({
  data:{
    open:false
  },
  showitem:function(){
      this.setData({
          open:!this.data.open
      })
  },
  onLoad:function(options){
    // 页面初始化 options为页面跳转所带来的参数
  },
  onReady:function(){
    // 页面渲染完成
  },
  onShow:function(){
    // 页面显示
  },
  onHide:function(){
    // 页面隐藏
  },
  onUnload:function(){
    // 页面关闭
  }
})
(2 ). Menu déroulant
1.wxml
<view class="phone_one" bindtap="clickPerson">
<view class="phone_personal">{{firstPerson}}</view>
<image src="../../image/i.png" class="personal_image {{selectArea ? 'rotateRight' :''}}"></image>
</view>
吃
喝
玩
2.wxss
phone_personal{
  width: 100%;
  color:rgb(34, 154, 181);
  height:100rpx;
  line-height:100rpx;
  text-align: center;
}
.phone_one{
    display:flex;
    position:relative;
    justify-content:space-between;
    background-color:rgb(239, 239, 239);
    width:90%;
    height:100rpx;
    margin:22px auto;
    border-radius:10rpx;
    border-bottom:2rpx solid rgb(255, 255, 255);
    line-height:51px;
    padding-left:10px;
}
.person_box{
  position: relative;
}
.phone_select{
  margin-top:0;
  z-index: 100;
  position: absolute;
}
.select_one{
  text-align: center;
  background-color:rgb(239, 239, 239);
  width:676rpx;
  height:100rpx;
  line-height:100rpx;
  margin:0 5%;
  border-bottom:2rpx solid rgb(255, 255, 255);
}
.personal_image{
  z-index: 100;
  position: absolute;
  right:2.5%;
  width: 34rpx;
  height: 20rpx;
  margin:40rpx 20rpx 40rpx 0;
  transition: All 0.4s ease;
  -webkit-transition: All 0.4s ease;
}
.rotateRight{
  transform: rotate(180deg);
}3 .js
Page({
  data:{
    selectPerson:true,
    firstPerson:'兴趣',
    selectArea:false,
  },
  //点击选择类型
  clickPerson:function(){
    var selectPerson = this.data.selectPerson;
    if(selectPerson == true){
        this.setData({
        selectArea:true,
        selectPerson:false,
      })
    }else{
      this.setData({
        selectArea:false,
        selectPerson:true,
      })
    }
  } ,
  //点击切换
  mySelect:function(e){
    this.setData({
      firstPerson:e.target.dataset.me,
      selectPerson:true,
      selectArea:false,
    })
  },
  onLoad:function(options){
  // 页面初始化 options为页面跳转所带来的参数
  },
  onReady:function(){
  // 页面渲染完成
  },
  onShow:function(){
  // 页面显示
  },
  onHide:function(){
  // 页面隐藏
  },
  onUnload:function(){
  // 页面关闭
  }
})
Recommandations associées :
Menu déroulant de simulation JavaScript effets code_form
Ce qui précède est le contenu détaillé de. pour plus d'informations, suivez d'autres articles connexes sur le site Web de PHP en chinois!
 Acquisition de chemin de mini-programme
 Solution à la réinitialisation de la connexion
 Dogecoin dernier prix aujourd'hui
 Introduction aux types d'interfaces de disque dur
 Quel fichier est au format moyen ?
 Méthode de définition de l'espace HTML
 OuYi Exchange est-il légal ?
 Utilisation de la fonction SetTimer
 bootmgr est manquant et ne peut pas démarrer