Cet article présente principalement le développement d'extensions PHP, qui a une certaine valeur de référence. Maintenant, je le partage avec tout le monde. Les amis dans le besoin peuvent s'y référer
PHP est un langage très largement utilisé actuellement, à l'étranger. être visible depuis Facebook et Twitter jusqu'aux Taobao, Tencent, Baidu et toutes sortes de grands, moyens et petits sites Web sur Internet. Il faut dire que le succès de PHP repose en grande partie sur son mécanisme API d'extension ouvert et ses riches composants d'extension (PHP Extension). Ce sont ces composants d'extension qui permettent à PHP d'opérer depuis diverses opérations de base de données vers XML, JSON, le chiffrement, le traitement de fichiers, etc. Il est omnipotent dans des domaines tels que le traitement graphique et Socket. Parfois, les développeurs peuvent avoir besoin de développer leurs propres extensions PHP. Le mécanisme d'extension actuel de PHP5 est basé sur l'API Zend. L'API Zend fournit des interfaces riches et des définitions de macros, ainsi que des outils pratiques, ce qui rend le développement d'extensions PHP pas particulièrement difficile. Cet article présentera les connaissances de base sur le développement de composants d'extension PHP et démontrera le processus de base de développement d'extensions PHP à travers un exemple.
Le processus de développement des composants d'extension PHP est différent dans les environnements Unix et Windows, mais ils sont fondamentalement interopérables. Cet article sera basé sur l'environnement Unix (utilisant spécifiquement Linux). La lecture de cet article nécessite une compréhension simple de l'environnement Unix, des connaissances de base en PHP et en langage C. Tant que vous avez une compréhension simple, j'essaierai de ne pas aborder les fonctionnalités trop spécifiques du système d'exploitation et du langage, et de les expliquer si nécessaire. faciliter la lecture des lecteurs.
L'environnement de développement spécifique de cet article est Ubuntu 10.04 + PHP 5.3.3.
Pour développer des extensions PHP, la première étape consiste à télécharger le code source PHP, car il contient les outils nécessaires au développement d'extensions. Ce que j'ai téléchargé est la dernière version de PHP 5.3.3, au format du package compressé tar.bz2. L'adresse de téléchargement est : http://cn.php.net/get/php-5.3.3.tar.bz2/from/a/mirror.
Après le téléchargement, déplacez le code source vers le répertoire approprié et décompressez-le. La commande de décompression est :
<br/>
tar -jxvf Nom du package source
Si vous avez téléchargé un package compressé tar.gz, la commande de décompression est
<br/>
tar - zxvf Nom du package de code source
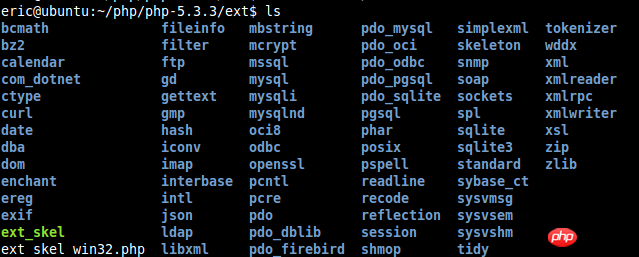
Après décompression, il y a un répertoire ext dans le répertoire de code source, voici les répertoires associés à l’extension PHP. Après être entré dans le répertoire et l'avoir consulté avec ls, vous pouvez voir de nombreuses extensions existantes. L'image ci-dessous est le résultat de sa visualisation dans mon environnement :

Les bleus sont les répertoires du package d'extension, dans lesquels vous pouvez voir les fichiers mysql, iconv et gd familiers, etc. . ext_skel est un outil de script utilisé pour générer automatiquement un framework d'extension PHP dans un environnement Unix. Nous l'utiliserons bientôt. ext_skel_win32.php est le script correspondant sous Windows.
Maintenant, nous développons une extension PHP : say_hello. Cette extension est très simple, elle accepte simplement un paramètre de chaîne et affiche "Hello xxx!". Cet exemple vise uniquement à présenter le processus de développement des composants d'extension PHP et ne suppose pas de fonctions réelles.
Le répertoire et les fichiers de développement des composants d'extension de PHP ont une structure organisationnelle fixe. Vous pouvez entrer dans un répertoire de composants d'extension existant et afficher tous ses fichiers. été éblouissant. Bien sûr, vous pouvez choisir de créer le framework manuellement, mais je pense que vous préféreriez que quelque chose le fasse pour vous. Le script ext_skel mentionné ci-dessus est un outil utilisé pour créer automatiquement le framework du package d'extension. La commande complète de ext_skel est :
ext_skel --extname=module [--proto=file] [--stubs=file] [--xml[=file]] [--skel=dir] [--full-xml] [--no-help]
En tant que débutants, nous n'avons pas besoin de connaître tous les paramètres de la commande. En fait, dans la plupart des cas, nous n'avons besoin que de fournir le premier paramètre, qui est le. nom du module d'extension. Par conséquent, nous tapons la commande suivante dans le répertoire ext :
./ext_skel --extname=say_hello
(如果你希望详细了解ext_skel的各项命令参数,请参考这里)
这时再用ls查看,会发现多了一个“say_hello”目录,进入这个目录,会发现ext_skel已经为我们建立好了say_hello的基本框架,如下图:

如果你懒得弄清楚PHP扩展包目录结构的全部内容,那么里面有三个文件你必须注意:
config.m4:这是Unix环境下的Build System配置文件,后面将会通过它生成配置和安装。
php_say_hello.h:这个文件是扩展模块的头文件。遵循C语言一贯的作风,这个里面可以放置一些自定义的结构体、全局变量等等。
say_hello.c:这个就是扩展模块的主程序文件了,最终的扩展模块各个函数入口都在这里。当然,你可以将所有程序代码都塞到这里面,也可以遵循模块化思想,将各个功能模块放到不同文件中。
下面的内容主要围绕这三个文件展开。
开发PHP扩展组件的第一步不是写实现代码,而是要先配置好Build System选项。由于我们是在Linux下开发,所以这里的配置主要与config.m4有关。
关于Build System配置这一块,要是写起来能写一大堆,而且与Unix系统很多东西相关,就算我有兴趣写估计大家也没兴趣看,所以这里我们从略,只拣关键地方说一下,关于config.m4更多细节可以参考这里。
打开生成的config.m4文件,内容大致如下:
<br/>
dnl $Id$
dnl config.m4 for extension say_hello
dnl Comments in this file start with the string 'dnl'.
dnl Remove where necessary. This file will not work
dnl without editing.

dnl If your extension references something external, use with:
dnl PHP_ARG_WITH(say_hello, for say_hello support,
dnl Make sure that the comment is aligned:
dnl [ --with-say_hello Include say_hello support])

dnl Otherwise use enable:
dnl PHP_ARG_ENABLE(say_hello, whether to enable say_hello support,
dnl Make sure that the comment is aligned:
dnl [ --enable-say_hello Enable say_hello support])

if test "$PHP_SAY_HELLO" != "no"; then
dnl Write more examples of tests here...
dnl # --with-say_hello -> check with-path
dnl SEARCH_PATH="/usr/local /usr" # you might want to change this
dnl SEARCH_FOR="/include/say_hello.h" # you most likely want to change this
dnl if test -r $PHP_SAY_HELLO/$SEARCH_FOR; then # path given as parameter
dnl SAY_HELLO_DIR=$PHP_SAY_HELLO
dnl else # search default path list
dnl AC_MSG_CHECKING([for say_hello files in default path])
dnl for i in $SEARCH_PATH ; do
dnl if test -r $i/$SEARCH_FOR; then
dnl SAY_HELLO_DIR=$i
dnl AC_MSG_RESULT(found in $i)
dnl fi
dnl done
dnl fi
dnl
dnl if test -z "$SAY_HELLO_DIR"; then
dnl AC_MSG_RESULT([not found])
dnl AC_MSG_ERROR([Please reinstall the say_hello distribution])
dnl fi
dnl # --with-say_hello -> add include path
dnl PHP_ADD_INCLUDE($SAY_HELLO_DIR/include)
dnl # --with-say_hello -> check for lib and symbol presence
dnl LIBNAME=say_hello # you may want to change this
dnl LIBSYMBOL=say_hello # you most likely want to change this
dnl PHP_CHECK_LIBRARY($LIBNAME,$LIBSYMBOL,
dnl [
dnl PHP_ADD_LIBRARY_WITH_PATH($LIBNAME, $SAY_HELLO_DIR/lib, SAY_HELLO_SHARED_LIBADD)
dnl AC_DEFINE(HAVE_SAY_HELLOLIB,1,[ ])
dnl ],[
dnl AC_MSG_ERROR([wrong say_hello lib version or lib not found])
dnl ],[
dnl -L$SAY_HELLO_DIR/lib -lm
dnl ])
dnl
dnl PHP_SUBST(SAY_HELLO_SHARED_LIBADD)
PHP_NEW_EXTENSION(say_hello, say_hello.c, $ext_shared)
fi
不要看这么多,因为所有以“dnl”开头的全是注释,所以真正起作用没几行。这里需要配置的只有下面几行:
<br/>
dnl If your extension references something external, use with:
dnl PHP_ARG_WITH(say_hello, for say_hello support,
dnl Make sure that the comment is aligned:
dnl [ --with-say_hello Include say_hello support])

dnl Otherwise use enable:
dnl PHP_ARG_ENABLE(say_hello, whether to enable say_hello support,
dnl Make sure that the comment is aligned:
dnl [ --enable-say_hello Enable say_hello support])
我想大家也都能看明白,意思就是“如果你的扩展引用了外部组件,使用…,否则使用…”。我们的say_hello扩展并没有引用外部组件,所以将“Otherwise use enable”下面三行的“dnl”去掉,改为:
<br/>
dnl Otherwise use enable:
PHP_ARG_ENABLE(say_hello, whether to enable say_hello support,
Make sure that the comment is aligned:
[ --enable-say_hello Enable say_hello support])
保存,这样关于Build System配置就大功告成了。
以上可以看成是为开发PHP扩展而做的准备工作,下面就要编写核心代码了。上文说过,编写PHP扩展是基于Zend API和一些宏的,所以如果要编写核心代码,我们首先要弄清楚PHP Extension的结构。因为一个PHP Extension在C语言层面实际上就是一个zend_module_entry结构体,这点可以从“php_say_hello.h”中得到证实。打开“php_say_hello.h”,会看到里面有怎么一行:
extern zend_module_entry say_hello_module_entry;
say_hello_module_entry就是say_hello扩展的C语言对应元素,而关于其类型zend_module_entry的定义可以在PHP源代码的“Zend/zend_modules.h”文件里找到,下面代码是zend_module_entry的定义:
<br/>
typedef struct _zend_module_entry zend_module_entry;

struct _zend_module_entry {
    unsigned short size;
    unsigned int zend_api;
    unsigned char zend_debug;
    unsigned char zts;
    const struct _zend_ini_entry *ini_entry;
    const struct _zend_module_dep *deps;
    const char *name;
    const struct _zend_function_entry *functions;
    int (*module_startup_func)(INIT_FUNC_ARGS);
    int (*module_shutdown_func)(SHUTDOWN_FUNC_ARGS);
    int (*request_startup_func)(INIT_FUNC_ARGS);
    int (*request_shutdown_func)(SHUTDOWN_FUNC_ARGS);
    void (*info_func)(ZEND_MODULE_INFO_FUNC_ARGS);
    const char *version;
    size_t globals_size;

    #ifdef ZTS
    ts_rsrc_id* globals_id_ptr;
    #else
    void* globals_ptr;
    #endif

    void (*globals_ctor)(void *global TSRMLS_DC);
    void (*globals_dtor)(void *global TSRMLS_DC);
    int (*post_deactivate_func)(void);
    int module_started;
    unsigned char type;
    void *handle;
    int module_number;
    char *build_id;
};这个结构体可能看起来会让人有点头疼,不过我还是要解释一下里面的内容。因为这就是PHP Extension的原型,如果不搞清楚,就没法开发PHP Extension了。当然,我就不一一对每个字段进行解释了,只拣关键的、这篇文章会用到的字段说,因为许多字段并不需要我们手工填写,而是可以使用某些预定义的宏填充。
第7个字段“name”,这个字段是此PHP Extension的名字,在本例中就是“say_hello”。
第8个字段“functions”,这个将存放我们在此扩展中定义的函数的引用,具体结构不再分析,有兴趣的朋友可以阅读_zend_function_entry的源代码。具体编写代码时这里会有相应的宏。
第9-12个字段分别是四个函数指针,这四个函数会在相应时机被调用,分别是“扩展模块加载时”、“扩展模块卸载时”、“每个请求开始时”和“每个请求结束时”。这四个函数可以看成是一种拦截机制,主要用于相应时机的资源分配、释放等相关操作。
第13个字段“info_func”也是一个函数指针,这个指针指向的函数会在执行phpinfo()时被调用,用于显示自定义模块信息。
第14个字段“version”是模块的版本。
(关于zend_module_entry更详尽的介绍请参考这里)
介绍完以上字段,我们可以看看“say_hello.c”中自动生成的“say_hello_module_entry”框架代码了。
<br/>
/* {{{ say_hello_module_entry
*/
zend_module_entry say_hello_module_entry = {
    #if ZEND_MODULE_API_NO >= 20010901
    STANDARD_MODULE_HEADER,
    #endif
    "say_hello",
    say_hello_functions,
    PHP_MINIT(say_hello),
    PHP_MSHUTDOWN(say_hello),
    PHP_RINIT(say_hello), /* Replace with NULL if there's nothing to do at request start */
    PHP_RSHUTDOWN(say_hello), /* Replace with NULL if there's nothing to do at request end */
    PHP_MINFO(say_hello),
    #if ZEND_MODULE_API_NO >= 20010901
    "0.1", /* Replace with version number for your extension */
    #endif
    STANDARD_MODULE_PROPERTIES
};
/* }}} */首先,宏“STANDARD_MODULE_HEADER”会生成前6个字段,“STANDARD_MODULE_PROPERTIES ”会生成“version”后的字段,所以现在我们还不用操心。而我们关心的几个字段,也都填写好或由宏生成好了,并且在“say_hello.c”的相应位置也生成了几个函数的框架。这里要注意,几个宏的参数均为“say_hello”,但这并不表示几个函数的名字全为“say_hello”,C语言中也不可能存在函数名重载机制。实际上,在开发PHP Extension的过程中,几乎处处都要用到Zend里预定义的各种宏,从全局变量到函数的定义甚至返回值,都不能按照“裸写”的方式来编写C语言,这是因为PHP的运行机制可能会导致命名冲突等问题,而这些宏会将函数等元素变换成一个内部名称,但这些对程序员都是透明的(除非你去阅读那些宏的代码),我们通过各种宏进行编程,而宏则为我们处理很多内部的东西。
写到这里,我们的任务就明了了:第一,如果需要在相应时机处理一些东西,那么需要填充各个拦截函数内容;第二,编写say_hello的功能函数,并将引用添加到say_hello_functions中。
因为say_hello扩展在各个生命周期阶段并不需要做操作,所以我们只编写info_func的内容,上文说过,这个函数将在phpinfo()执行时被自动调用,用于显示扩展的信息。编写这个函数会用到四个函数:
php_info_print_table_start()——开始phpinfo表格。无参数。
php_info_print_table_header()——输出表格头。第一个参数是整形,指明头的列数,然后后面的参数是与列数等量的(char*)类型参数用于指定显示的文字。
php_info_print_table_row()——输出表格内容。第一个参数是整形,指明这一行的列数,然后后面的参数是与列数等量的(char*)类型参数用于指定显示的文字。
php_info_print_table_end()——结束phpinfo表格。无参数。
下面是“say_hello.c”中需要编写的info_func的具体代码:
<br/>
/* {{{ PHP_MINFO_FUNCTION
*/
PHP_MINFO_FUNCTION(say_hello)
{
    php_info_print_table_start();
    php_info_print_table_header(2, "say_hello support", "enabled");
    php_info_print_table_row(2, "author", "Zhang Yang"); /* Replace with your name */
    php_info_print_table_end();
    /* Remove comments if you have entries in php.ini
    DISPLAY_INI_ENTRIES();
    */
}
/* }}} */可以看到我们编写了两行内容、组件是否可用以及作者信息。
编写核心函数,总共分为三步:1、使用宏PHP_FUNCTION定义函数体;2、使用宏ZEND_BEGIN_ARG_INFO和ZEND_END_ARG_INFO定义参数信息;3、使用宏PHP_FE将函数加入到say_hello_functions中。下面分步说明。
<br/>
PHP_FUNCTION(say_hello_func)
{
    char *name;
    int name_len;
    if (zend_parse_parameters(ZEND_NUM_ARGS() TSRMLS_CC, "s", &name, &name_len) == FAILURE)
    {
        return;
    }
    php_printf("Hello %s!", name);

    RETURN_TRUE;
}上文说过,编写PHP扩展时几乎所有东西都不能裸写,而是必须使用相应的宏。从上面代码可以清楚看到这一点。总体来说,核心函数代码一般由如下几部分构成:
定义函数,这一步通过宏PHP_FUNCTION实现,函数的外部名称就是宏后面括号里面的名称。
声明并定义局部变量。
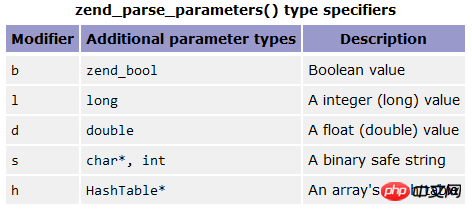
解析参数,这一步通过zend_parse_parameters函数实现,这个函数的作用是从函数用户的输入栈中读取数据,然后转换成相应的函数参数填入变量以供后面核心功能代码使用。zend_parse_parameters的第一个参数是用户传入参数的个数,可以由宏“ZEND_NUM_ARGS() TSRMLS_CC”生成;第二个参数是一个字符串,其中每个字母代表一个变量类型,我们只有一个字符串型变量,所以第二个参数是“s”;最后各个参数需要一些必要的局部变量指针用于存储数据,下表给出了不同变量类型的字母代表及其所需要的局部变量指针。

参数解析完成后就是核心功能代码,我们这里只是输出一行字符,php_printf是Zend版本的printf。
最后的返回值也是通过宏实现的。RETURN_TRUE宏是返回布尔值“true”。
参数信息是函数所必要部分,这里不做深究,直接给出相应代码:
ZEND_BEGIN_ARG_INFO(arginfo_say_hello_func, 0) ZEND_END_ARG_INFO()
如需了解具体信息请阅读相关宏定义。
最后,我们需要将刚才定义的函数和参数信息加入到say_hello_functions数组里,代码如下:
<br/>
const zend_function_entry say_hello_functions[] = {
PHP_FE(say_hello_func, arginfo_say_hello_func)
    {NULL, NULL, NULL}
};这一步就是通过PHP_EF宏实现,注意这个数组最后一行必须是{NULL, NULL, NULL} ,请不要删除。
下面是编写完成后的say_hello.c全部代码:
<br/>
/*
+----------------------------------------------------------------------+
| PHP Version 5                                                        |
+----------------------------------------------------------------------+
| Copyright (c) 1997-2010 The PHP Group                                |
+----------------------------------------------------------------------+
| This source file is subject to version 3.01 of the PHP license,      |
| that is bundled with this package in the file LICENSE, and is        |
| available through the world-wide-web at the following url:           |
| http://www.php.net/license/3_01.txt                                  |
| If you did not receive a copy of the PHP license and are unable to   |
| obtain it through the world-wide-web, please send a note to          |
| license@php.net so we can mail you a copy immediately.               |
+----------------------------------------------------------------------+
| Author: ZhangYang                          |
+----------------------------------------------------------------------+
*/
/* $Id: header 297205 2010-03-30 21:09:07Z johannes $ */
#ifdef HAVE_CONFIG_H
#include "config.h"
#endif
#include "php.h"
#include "php_ini.h"
#include "ext/standard/info.h"
#include "php_say_hello.h"
/* If you declare any globals in php_say_hello.h uncomment this:
ZEND_DECLARE_MODULE_GLOBALS(say_hello)
*/
/* True global resources - no need for thread safety here */
static int le_say_hello;
/* {{{ PHP_FUNCTION
*/
PHP_FUNCTION(say_hello_func)
{
    char *name;
    int name_len;
    if (zend_parse_parameters(ZEND_NUM_ARGS() TSRMLS_CC, "s", &name, &name_len) == FAILURE)
    {
        return;
    }
    php_printf("Hello %s!", name);
    RETURN_TRUE;
}
ZEND_BEGIN_ARG_INFO(arginfo_say_hello_func, 0)
ZEND_END_ARG_INFO()
/* }}} */
/* {{{ say_hello_functions[]
*
* Every user visible function must have an entry in say_hello_functions[].
*/
const zend_function_entry say_hello_functions[] = {
    PHP_FE(say_hello_func, arginfo_say_hello_func)
    {NULL, NULL, NULL} /* Must be the last line in say_hello_functions[] */
};
/* }}} */
/* {{{ say_hello_module_entry
*/
zend_module_entry say_hello_module_entry = {
    #if ZEND_MODULE_API_NO >= 20010901
    STANDARD_MODULE_HEADER,
    #endif
    "say_hello",
    say_hello_functions,
    NULL,
    NULL,
    NULL,
    NULL,
    PHP_MINFO(say_hello),
    #if ZEND_MODULE_API_NO >= 20010901
    "0.1", /* Replace with version number for your extension */
    #endif
    STANDARD_MODULE_PROPERTIES
};
/* }}} */
#ifdef COMPILE_DL_SAY_HELLO
ZEND_GET_MODULE(say_hello)
#endif
/* {{{ PHP_MINFO_FUNCTION
*/
PHP_MINFO_FUNCTION(say_hello)
{
    php_info_print_table_start();
    php_info_print_table_header(2, "say_hello support", "enabled");
    php_info_print_table_row(2, "author", "Zhang Yang"); /* Replace with your name */
    php_info_print_table_end();
    /* Remove comments if you have entries in php.ini
    DISPLAY_INI_ENTRIES();
    */
}
/* }}} */在say_hello目录下输入下面命令:
<br/>
/usr/bin/phpize
./configure
make
make install
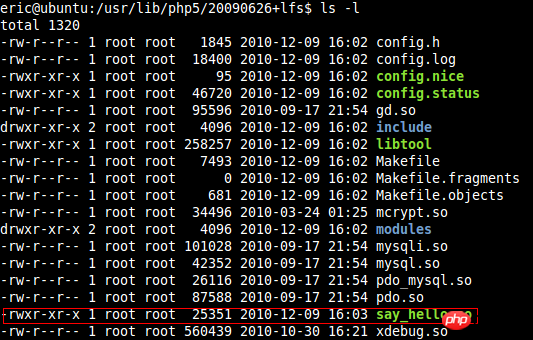
这样就完成了say_hello扩展的安装(如果没有报错的话)。
这时如果你去放置php扩展的目录下,会发现多了一个say_hello.so的文件。如下图所示:

下面就是将其加入到php.ini配置中,然后重启Apache(如果需要的话)。这些都是PHP基本配置的内容,我就不详述了。
如果上面顺利完成,这时运行phpinfo(),应该能看到如下信息:

这说明扩展已经安装成功了。然后我们编写一个测试用PHP脚本:
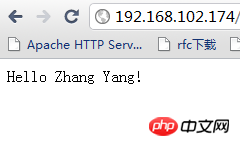
<?php say_hello_func('Zhang Yang'); ?>;
执行这个脚本,结果如下:

Indique que l'extension fonctionne normalement.
Cet article utilise principalement des exemples pour présenter les bases du développement d'extensions PHP. Lors de l'utilisation de PHP, peut-être en raison de la nécessité de prendre en charge de nouveaux composants (comme une nouvelle base de données), ou en raison de besoins commerciaux ou de performances, vous rencontrerez presque toujours des endroits où vous devrez développer des extensions PHP. Si j'en ai l'occasion à l'avenir, j'écrirai un article pour présenter des éléments approfondis sur le développement d'extensions, tels que le cycle de vie des modules d'extension, l'utilisation d'INI, l'écriture de modules d'extension orientés objet, etc.
Recommandations associées :
Résumé du didacticiel de développement d'extensions PHP
Ce qui précède est le contenu détaillé de. pour plus d'informations, suivez d'autres articles connexes sur le site Web de PHP en chinois!
 Comment ouvrir le fichier php
 Comment supprimer les premiers éléments d'un tableau en php
 Que faire si la désérialisation php échoue
 Comment connecter PHP à la base de données mssql
 Comment connecter PHP à la base de données mssql
 Comment télécharger du HTML
 Comment résoudre les caractères tronqués en PHP
 Comment ouvrir des fichiers php sur un téléphone mobile