Cet article présente principalement l'explication détaillée de l'utilisation de TensorFlow pour implémenter l'algorithme de régression logistique. Il a une certaine valeur de référence. Maintenant, je le partage avec vous. Les amis dans le besoin peuvent s'y référer
Cet article l'implémentera. l'algorithme de régression logistique et prédire la probabilité d'un faible poids à la naissance.
# Logistic Regression
# 逻辑回归
#----------------------------------
#
# This function shows how to use TensorFlow to
# solve logistic regression.
# y = sigmoid(Ax + b)
#
# We will use the low birth weight data, specifically:
# y = 0 or 1 = low birth weight
# x = demographic and medical history data
import matplotlib.pyplot as plt
import numpy as np
import tensorflow as tf
import requests
from tensorflow.python.framework import ops
import os.path
import csv
ops.reset_default_graph()
# Create graph
sess = tf.Session()
###
# Obtain and prepare data for modeling
###
# name of data file
birth_weight_file = 'birth_weight.csv'
# download data and create data file if file does not exist in current directory
if not os.path.exists(birth_weight_file):
birthdata_url = 'https://github.com/nfmcclure/tensorflow_cookbook/raw/master/01_Introduction/07_Working_with_Data_Sources/birthweight_data/birthweight.dat'
birth_file = requests.get(birthdata_url)
birth_data = birth_file.text.split('\r\n')
birth_header = birth_data[0].split('\t')
birth_data = [[float(x) for x in y.split('\t') if len(x)>=1] for y in birth_data[1:] if len(y)>=1]
with open(birth_weight_file, "w") as f:
writer = csv.writer(f)
writer.writerow(birth_header)
writer.writerows(birth_data)
f.close()
# read birth weight data into memory
birth_data = []
with open(birth_weight_file, newline='') as csvfile:
csv_reader = csv.reader(csvfile)
birth_header = next(csv_reader)
for row in csv_reader:
birth_data.append(row)
birth_data = [[float(x) for x in row] for row in birth_data]
# Pull out target variable
y_vals = np.array([x[0] for x in birth_data])
# Pull out predictor variables (not id, not target, and not birthweight)
x_vals = np.array([x[1:8] for x in birth_data])
# set for reproducible results
seed = 99
np.random.seed(seed)
tf.set_random_seed(seed)
# Split data into train/test = 80%/20%
# 分割数据集为测试集和训练集
train_indices = np.random.choice(len(x_vals), round(len(x_vals)*0.8), replace=False)
test_indices = np.array(list(set(range(len(x_vals))) - set(train_indices)))
x_vals_train = x_vals[train_indices]
x_vals_test = x_vals[test_indices]
y_vals_train = y_vals[train_indices]
y_vals_test = y_vals[test_indices]
# Normalize by column (min-max norm)
# 将所有特征缩放到0和1区间(min-max缩放),逻辑回归收敛的效果更好
# 归一化特征
def normalize_cols(m):
col_max = m.max(axis=0)
col_min = m.min(axis=0)
return (m-col_min) / (col_max - col_min)
x_vals_train = np.nan_to_num(normalize_cols(x_vals_train))
x_vals_test = np.nan_to_num(normalize_cols(x_vals_test))
###
# Define Tensorflow computational graph
###
# Declare batch size
batch_size = 25
# Initialize placeholders
x_data = tf.placeholder(shape=[None, 7], dtype=tf.float32)
y_target = tf.placeholder(shape=[None, 1], dtype=tf.float32)
# Create variables for linear regression
A = tf.Variable(tf.random_normal(shape=[7,1]))
b = tf.Variable(tf.random_normal(shape=[1,1]))
# Declare model operations
model_output = tf.add(tf.matmul(x_data, A), b)
# Declare loss function (Cross Entropy loss)
loss = tf.reduce_mean(tf.nn.sigmoid_cross_entropy_with_logits(logits=model_output, labels=y_target))
# Declare optimizer
my_opt = tf.train.GradientDescentOptimizer(0.01)
train_step = my_opt.minimize(loss)
###
# Train model
###
# Initialize variables
init = tf.global_variables_initializer()
sess.run(init)
# Actual Prediction
# 除记录损失函数外,也需要记录分类器在训练集和测试集上的准确度。
# 所以创建一个返回准确度的预测函数
prediction = tf.round(tf.sigmoid(model_output))
predictions_correct = tf.cast(tf.equal(prediction, y_target), tf.float32)
accuracy = tf.reduce_mean(predictions_correct)
# Training loop
# 开始遍历迭代训练,记录损失值和准确度
loss_vec = []
train_acc = []
test_acc = []
for i in range(1500):
rand_index = np.random.choice(len(x_vals_train), size=batch_size)
rand_x = x_vals_train[rand_index]
rand_y = np.transpose([y_vals_train[rand_index]])
sess.run(train_step, feed_dict={x_data: rand_x, y_target: rand_y})
temp_loss = sess.run(loss, feed_dict={x_data: rand_x, y_target: rand_y})
loss_vec.append(temp_loss)
temp_acc_train = sess.run(accuracy, feed_dict={x_data: x_vals_train, y_target: np.transpose([y_vals_train])})
train_acc.append(temp_acc_train)
temp_acc_test = sess.run(accuracy, feed_dict={x_data: x_vals_test, y_target: np.transpose([y_vals_test])})
test_acc.append(temp_acc_test)
if (i+1)%300==0:
print('Loss = ' + str(temp_loss))
###
# Display model performance
###
# 绘制损失和准确度
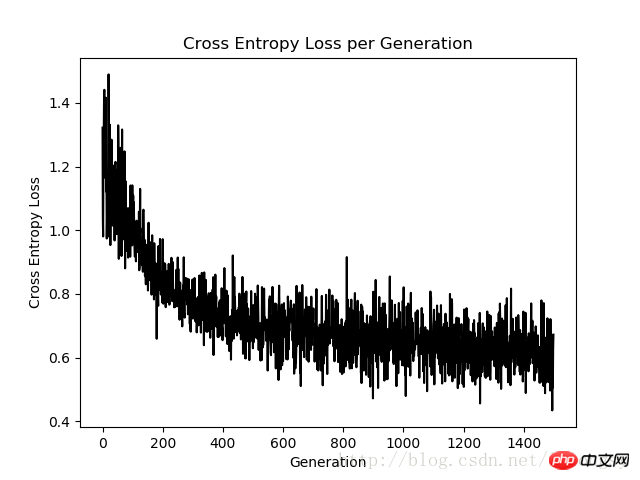
plt.plot(loss_vec, 'k-')
plt.title('Cross Entropy Loss per Generation')
plt.xlabel('Generation')
plt.ylabel('Cross Entropy Loss')
plt.show()
# Plot train and test accuracy
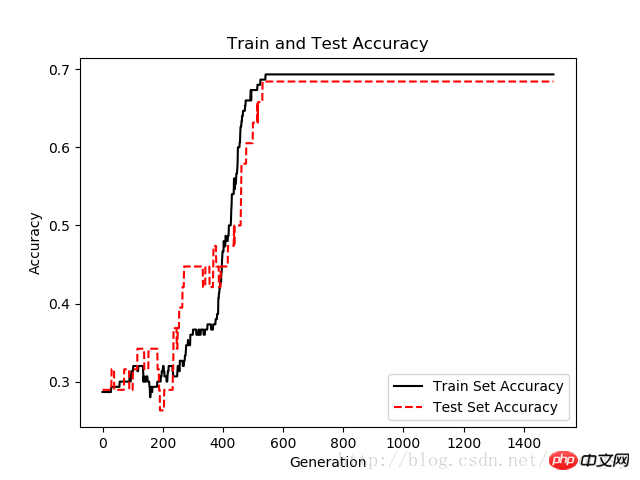
plt.plot(train_acc, 'k-', label='Train Set Accuracy')
plt.plot(test_acc, 'r--', label='Test Set Accuracy')
plt.title('Train and Test Accuracy')
plt.xlabel('Generation')
plt.ylabel('Accuracy')
plt.legend(loc='lower right')
plt.show()Résultats des données :
Perte = 0,845124
Perte = 0,658061
Perte = 0,471852
Perte = 0,643469
Perte = 0,672077

Diagramme de perte d'entropie croisée pour 1500 itérations

Tracés de précision de l'ensemble de test et de l'ensemble d'entraînement après 1 500 itérations
Recommandations associées :
Exemple d'algorithme de régression Deming implémenté avec TensorFlow
Ce qui précède est le contenu détaillé de. pour plus d'informations, suivez d'autres articles connexes sur le site Web de PHP en chinois!
 Une seule page Word change l'orientation du papier
 Qu'est-ce que l'optimisation de la topologie
 Quels sont les avantages du modèle d'usine Java
 marque PC
 méthode de configuration de Nagios
 Comment résoudre le problème selon lequel WLAN n'a pas de configuration IP valide
 Site officiel d'Okex
 Comment intercepter les appels harcelants