

Comment utiliser cropperjs dans vue (tutoriel détaillé)
Cet article résume les méthodes d'utilisation et les leçons apprises de cropperjs dans les fichiers .vue. Les amis intéressés peuvent apprendre ensemble
Dans les projets utilisant vue, les images doivent être recadrées, j'ai donc appris à utiliser cropperjs et j'ai appris à le faire. J'ai également rencontré quelques pièges dans le processus d'utilisation. Voici un résumé des méthodes d'utilisation et des leçons apprises de cropperjs dans le fichier .vue :
Avant de l'utiliser, présentez-le d'abord :

Dans le projet, exécutez :
npm install cropperjs -save
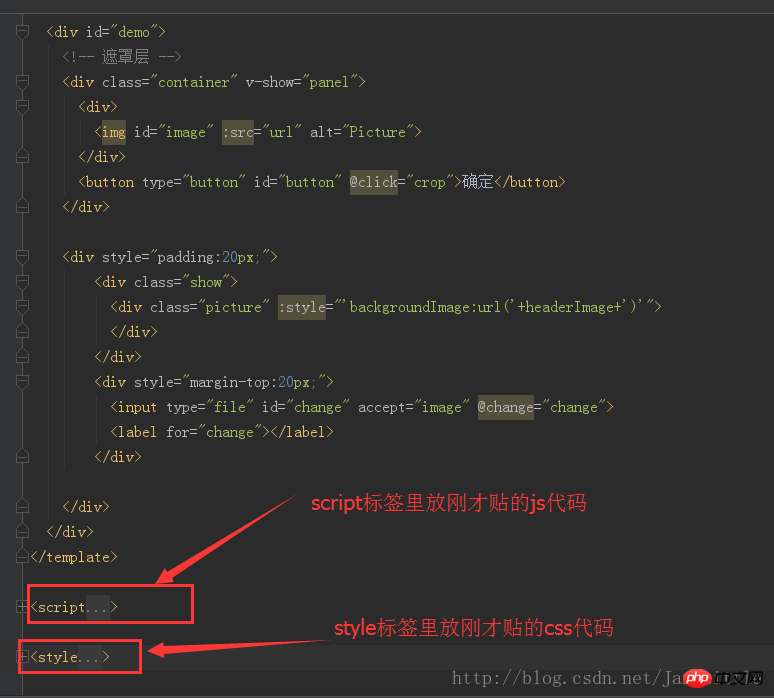
Dans le modèle :
<p id="demo">
<!-- 遮罩层 -->
<p class="container" v-show="panel">
<p>
<img src="/static/imghw/default1.png" data-src="url" class="lazy" id="image" : alt="Picture">
</p>
<button type="button" id="button" @click="crop">确定</button>
</p>
<p style="padding:20px;">
<p class="show">
<p class="picture" :style="'backgroundImage:url('+headerImage+')'">
</p>
</p>
<p style="margin-top:20px;">
<input type="file" id="change" accept="image" @change="change">
<label for="change"></label>
</p>
</p>
</p>
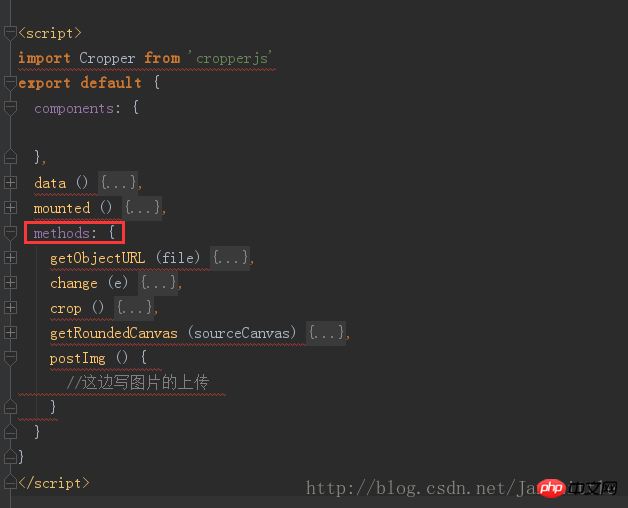
code js :
import Cropper from 'cropperjs'
export default {
 components: {
 },
 data () {
  return {
   headerImage:'',
   picValue:'',
   cropper:'',
   croppable:false,
   panel:false,
   url:''
  }
 },
 mounted () {
  //初始化这个裁剪框
  var self = this;
  var image = document.getElementById('image');
  this.cropper = new Cropper(image, {
   aspectRatio: 1,
   viewMode: 1,
   background:false,
   zoomable:false,
   ready: function () {
    self.croppable = true;
   }
  });
 },
 methods: {
  getObjectURL (file) {
   var url = null ;
   if (window.createObjectURL!=undefined) { // basic
    url = window.createObjectURL(file) ;
   } else if (window.URL!=undefined) { // mozilla(firefox)
    url = window.URL.createObjectURL(file) ;
   } else if (window.webkitURL!=undefined) { // webkit or chrome
    url = window.webkitURL.createObjectURL(file) ;
   }
   return url ;
  },
  change (e) {
   let files = e.target.files || e.dataTransfer.files;
   if (!files.length) return;
   this.panel = true;
   this.picValue = files[0];
   this.url = this.getObjectURL(this.picValue);
   //每次替换图片要重新得到新的url
   if(this.cropper){
    this.cropper.replace(this.url);
   }
   this.panel = true;
  },
  crop () {
    this.panel = false;
    var croppedCanvas;
    var roundedCanvas;
    if (!this.croppable) {
     return;
    }
    // Crop
    croppedCanvas = this.cropper.getCroppedCanvas();
    console.log(this.cropper)
    // Round
    roundedCanvas = this.getRoundedCanvas(croppedCanvas);
    this.headerImage = roundedCanvas.toDataURL();
    this.postImg()
  },
  getRoundedCanvas (sourceCanvas) {
   var canvas = document.createElement('canvas');
   var context = canvas.getContext('2d');
   var width = sourceCanvas.width;
   var height = sourceCanvas.height;
   canvas.width = width;
   canvas.height = height;
   context.imageSmoothingEnabled = true;
   context.drawImage(sourceCanvas, 0, 0, width, height);
   context.globalCompositeOperation = 'destination-in';
   context.beginPath();
   context.arc(width / 2, height / 2, Math.min(width, height) / 2, 0, 2 * Math.PI, true);
   context.fill();
   return canvas;
  },
  postImg () {
   //这边写图片的上传
  }
 }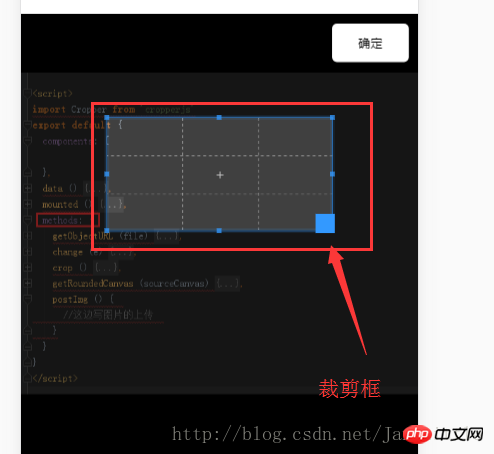
}Effet global :
code css (relativement long, à l'origine je ne voulais pas le publier, mais comme je voulais lancer la démo directement pour les chaussures pour enfants, je l'ai quand même posté. La longueur est trop longue, pardonnez-moi) :
*{
margin: 0;
padding: 0;
}
#demo #button {
position: absolute;
right: 10px;
top: 10px;
width: 80px;
height: 40px;
border:none;
border-radius: 5px;
background:white;
}
#demo .show {
width: 100px;
height: 100px;
overflow: hidden;
position: relative;
border-radius: 50%;
border: 1px solid #d5d5d5;
}
#demo .picture {
width: 100%;
height: 100%;
overflow: hidden;
background-position: center center;
background-repeat: no-repeat;
background-size: cover;
}
#demo .container {
z-index: 99;
position: fixed;
padding-top: 60px;
left: 0;
top: 0;
right: 0;
bottom: 0;
background:rgba(0,0,0,1);
}
#demo #image {
max-width: 100%;
}
.cropper-view-box,.cropper-face {
border-radius: 50%;
}
/*!
* Cropper.js v1.0.0-rc
* https://github.com/fengyuanchen/cropperjs
*
* Copyright (c) 2017 Fengyuan Chen
* Released under the MIT license
*
* Date: 2017-03-25T12:02:21.062Z
*/
.cropper-container {
font-size: 0;
line-height: 0;
position: relative;
-webkit-user-select: none;
-moz-user-select: none;
-ms-user-select: none;
user-select: none;
direction: ltr;
-ms-touch-action: none;
touch-action: none
}
.cropper-container img {
/* Avoid margin top issue (Occur only when margin-top <= -height) */
display: block;
min-width: 0 !important;
max-width: none !important;
min-height: 0 !important;
max-height: none !important;
width: 100%;
height: 100%;
image-orientation: 0deg
}
.cropper-wrap-box,
.cropper-canvas,
.cropper-drag-box,
.cropper-crop-box,
.cropper-modal {
position: absolute;
top: 0;
right: 0;
bottom: 0;
left: 0;
}
.cropper-wrap-box {
overflow: hidden;
}
.cropper-drag-box {
opacity: 0;
background-color: #fff;
}
.cropper-modal {
opacity: .5;
background-color: #000;
}
.cropper-view-box {
display: block;
overflow: hidden;
width: 100%;
height: 100%;
outline: 1px solid #39f;
outline-color: rgba(51, 153, 255, 0.75);
}
.cropper-dashed {
position: absolute;
display: block;
opacity: .5;
border: 0 dashed #eee
}
.cropper-dashed.dashed-h {
top: 33.33333%;
left: 0;
width: 100%;
height: 33.33333%;
border-top-width: 1px;
border-bottom-width: 1px
}
.cropper-dashed.dashed-v {
top: 0;
left: 33.33333%;
width: 33.33333%;
height: 100%;
border-right-width: 1px;
border-left-width: 1px
}
.cropper-center {
position: absolute;
top: 50%;
left: 50%;
display: block;
width: 0;
height: 0;
opacity: .75
}
.cropper-center:before,
.cropper-center:after {
position: absolute;
display: block;
content: ' ';
background-color: #eee
}
.cropper-center:before {
top: 0;
left: -3px;
width: 7px;
height: 1px
}
.cropper-center:after {
top: -3px;
left: 0;
width: 1px;
height: 7px
}
.cropper-face,
.cropper-line,
.cropper-point {
position: absolute;
display: block;
width: 100%;
height: 100%;
opacity: .1;
}
.cropper-face {
top: 0;
left: 0;
background-color: #fff;
}
.cropper-line {
background-color: #39f
}
.cropper-line.line-e {
top: 0;
right: -3px;
width: 5px;
cursor: e-resize
}
.cropper-line.line-n {
top: -3px;
left: 0;
height: 5px;
cursor: n-resize
}
.cropper-line.line-w {
top: 0;
left: -3px;
width: 5px;
cursor: w-resize
}
.cropper-line.line-s {
bottom: -3px;
left: 0;
height: 5px;
cursor: s-resize
}
.cropper-point {
width: 5px;
height: 5px;
opacity: .75;
background-color: #39f
}
.cropper-point.point-e {
top: 50%;
right: -3px;
margin-top: -3px;
cursor: e-resize
}
.cropper-point.point-n {
top: -3px;
left: 50%;
margin-left: -3px;
cursor: n-resize
}
.cropper-point.point-w {
top: 50%;
left: -3px;
margin-top: -3px;
cursor: w-resize
}
.cropper-point.point-s {
bottom: -3px;
left: 50%;
margin-left: -3px;
cursor: s-resize
}
.cropper-point.point-ne {
top: -3px;
right: -3px;
cursor: ne-resize
}
.cropper-point.point-nw {
top: -3px;
left: -3px;
cursor: nw-resize
}
.cropper-point.point-sw {
bottom: -3px;
left: -3px;
cursor: sw-resize
}
.cropper-point.point-se {
right: -3px;
bottom: -3px;
width: 20px;
height: 20px;
cursor: se-resize;
opacity: 1
}
@media (min-width: 768px) {
.cropper-point.point-se {
width: 15px;
height: 15px
}
}
@media (min-width: 992px) {
.cropper-point.point-se {
width: 10px;
height: 10px
}
}
@media (min-width: 1200px) {
.cropper-point.point-se {
width: 5px;
height: 5px;
opacity: .75
}
}
.cropper-point.point-se:before {
position: absolute;
right: -50%;
bottom: -50%;
display: block;
width: 200%;
height: 200%;
content: ' ';
opacity: 0;
background-color: #39f
}
.cropper-invisible {
opacity: 0;
}
.cropper-bg {
background-image: url('data:image/png;base64,iVBORw0KGgoAAAANSUhEUgAAABAAAAAQAQMAAAAlPW0iAAAAA3NCSVQICAjb4U/gAAAABlBMVEXMzMz////TjRV2AAAACXBIWXMAAArrAAAK6wGCiw1aAAAAHHRFWHRTb2Z0d2FyZQBBZG9iZSBGaXJld29ya3MgQ1M26LyyjAAAABFJREFUCJlj+M/AgBVhF/0PAH6/D/HkDxOGAAAAAElFTkSuQmCC');
}
.cropper-hide {
position: absolute;
display: block;
width: 0;
height: 0;
}
.cropper-hidden {
display: none !important;
}
.cropper-move {
cursor: move;
}
.cropper-crop {
cursor: crosshair;
}
.cropper-disabled .cropper-drag-box,
.cropper-disabled .cropper-face,
.cropper-disabled .cropper-line,
.cropper-disabled .cropper-point {
cursor: not-allowed;
}. Image globale :
Mettez le code ci-dessus dans votre projet, ou créez un .vue séparé et insérez-le dans le projet pour obtenir cet effet :
Ce qui précède, c'est moi, je l'ai compilé pour tout le monde, j'espère qu'il sera utile à tout le monde à l'avenir.
Articles connexes :
Méthode de composant de saisie de formulaire d'événement personnalisé Vue.js
Un résumé de plusieurs façons d'enregistrer des composants dans vue
Utilisez use pour enregistrer les composants globaux et les directives globales de Vue
Ce qui précède est le contenu détaillé de. pour plus d'informations, suivez d'autres articles connexes sur le site Web de PHP en chinois!

Outils d'IA chauds

Undresser.AI Undress
Application basée sur l'IA pour créer des photos de nu réalistes

AI Clothes Remover
Outil d'IA en ligne pour supprimer les vêtements des photos.

Undress AI Tool
Images de déshabillage gratuites

Clothoff.io
Dissolvant de vêtements AI

AI Hentai Generator
Générez AI Hentai gratuitement.

Article chaud
Outils chauds

Bloc-notes++7.3.1
Éditeur de code facile à utiliser et gratuit

SublimeText3 version chinoise
Version chinoise, très simple à utiliser

Envoyer Studio 13.0.1
Puissant environnement de développement intégré PHP

Dreamweaver CS6
Outils de développement Web visuel

SublimeText3 version Mac
Logiciel d'édition de code au niveau de Dieu (SublimeText3)


 Comment utiliser les liens magnétiques
Feb 18, 2024 am 10:02 AM
Comment utiliser les liens magnétiques
Feb 18, 2024 am 10:02 AM
Le lien magnétique est une méthode de lien pour télécharger des ressources, qui est plus pratique et efficace que les méthodes de téléchargement traditionnelles. Les liens magnétiques vous permettent de télécharger des ressources de manière peer-to-peer sans recourir à un serveur intermédiaire. Cet article explique comment utiliser les liens magnétiques et à quoi il faut prêter attention. 1. Qu'est-ce qu'un lien magnétique ? Un lien magnétique est une méthode de téléchargement basée sur le protocole P2P (Peer-to-Peer). Grâce à des liens magnétiques, les utilisateurs peuvent se connecter directement à l'éditeur de la ressource pour finaliser le partage et le téléchargement des ressources. Par rapport aux méthodes de téléchargement traditionnelles, magnétique
 Comment utiliser les fichiers mdf et mds
Feb 19, 2024 pm 05:36 PM
Comment utiliser les fichiers mdf et mds
Feb 19, 2024 pm 05:36 PM
Comment utiliser les fichiers mdf et mds Grâce aux progrès continus de la technologie informatique, nous pouvons stocker et partager des données de différentes manières. Dans le domaine des médias numériques, nous rencontrons souvent des formats de fichiers particuliers. Dans cet article, nous discuterons d'un format de fichier courant - les fichiers mdf et mds, et présenterons comment les utiliser. Tout d’abord, nous devons comprendre la signification des fichiers mdf et mds. mdf est l'extension du fichier image CD/DVD et le fichier mds est le fichier de métadonnées du fichier mdf.
 Quel logiciel est CrystalDiskmark ? -Comment utiliser crystaldiskmark ?
Mar 18, 2024 pm 02:58 PM
Quel logiciel est CrystalDiskmark ? -Comment utiliser crystaldiskmark ?
Mar 18, 2024 pm 02:58 PM
CrystalDiskMark est un petit outil de référence pour disques durs qui mesure rapidement les vitesses de lecture/écriture séquentielles et aléatoires. Ensuite, laissez l'éditeur vous présenter CrystalDiskMark et comment utiliser crystaldiskmark~ 1. Introduction à CrystalDiskMark CrystalDiskMark est un outil de test de performances de disque largement utilisé pour évaluer la vitesse et les performances de lecture et d'écriture des disques durs mécaniques et des disques SSD (SSD). ). Performances d’E/S aléatoires. Il s'agit d'une application Windows gratuite qui fournit une interface conviviale et divers modes de test pour évaluer différents aspects des performances du disque dur. Elle est largement utilisée dans les revues de matériel.
 Comment télécharger foobar2000 ? -Comment utiliser foobar2000
Mar 18, 2024 am 10:58 AM
Comment télécharger foobar2000 ? -Comment utiliser foobar2000
Mar 18, 2024 am 10:58 AM
foobar2000 est un logiciel qui peut écouter des ressources musicales à tout moment. Il vous offre toutes sortes de musique avec une qualité sonore sans perte. La version améliorée du lecteur de musique vous permet d'obtenir une expérience musicale plus complète et plus confortable. lire l'audio avancé sur l'ordinateur. L'appareil est transplanté sur le téléphone mobile pour offrir une expérience de lecture de musique plus pratique et efficace. La conception de l'interface est simple, claire et facile à utiliser. opérations pour démarrer rapidement. Il prend également en charge une variété de skins et de thèmes, personnalisez les paramètres en fonction de vos propres préférences et créez un lecteur de musique exclusif prenant en charge la lecture de plusieurs formats audio. Il prend également en charge la fonction de gain audio pour régler le volume. selon vos propres conditions auditives pour éviter les dommages auditifs causés par un volume excessif. Ensuite, laisse-moi t'aider
 Comment utiliser NetEase Mailbox Master
Mar 27, 2024 pm 05:32 PM
Comment utiliser NetEase Mailbox Master
Mar 27, 2024 pm 05:32 PM
NetEase Mailbox, en tant qu'adresse e-mail largement utilisée par les internautes chinois, a toujours gagné la confiance des utilisateurs grâce à ses services stables et efficaces. NetEase Mailbox Master est un logiciel de messagerie spécialement créé pour les utilisateurs de téléphones mobiles. Il simplifie grandement le processus d'envoi et de réception d'e-mails et rend le traitement de nos e-mails plus pratique. Alors comment utiliser NetEase Mailbox Master, et quelles sont ses fonctions spécifiques Ci-dessous, l'éditeur de ce site vous donnera une introduction détaillée, en espérant vous aider ! Tout d’abord, vous pouvez rechercher et télécharger l’application NetEase Mailbox Master dans la boutique d’applications mobiles. Recherchez « NetEase Mailbox Master » dans l'App Store ou Baidu Mobile Assistant, puis suivez les instructions pour l'installer. Une fois le téléchargement et l'installation terminés, nous ouvrons le compte de messagerie NetEase et nous connectons. L'interface de connexion est la suivante
 Comment utiliser l'application Baidu Netdisk
Mar 27, 2024 pm 06:46 PM
Comment utiliser l'application Baidu Netdisk
Mar 27, 2024 pm 06:46 PM
Le stockage cloud est devenu aujourd’hui un élément indispensable de notre vie quotidienne et de notre travail. En tant que l'un des principaux services de stockage cloud en Chine, Baidu Netdisk a gagné la faveur d'un grand nombre d'utilisateurs grâce à ses puissantes fonctions de stockage, sa vitesse de transmission efficace et son expérience de fonctionnement pratique. Et que vous souhaitiez sauvegarder des fichiers importants, partager des informations, regarder des vidéos en ligne ou écouter de la musique, Baidu Cloud Disk peut répondre à vos besoins. Cependant, de nombreux utilisateurs peuvent ne pas comprendre l'utilisation spécifique de l'application Baidu Netdisk, ce didacticiel vous présentera donc en détail comment utiliser l'application Baidu Netdisk. Si vous êtes toujours confus, veuillez suivre cet article pour en savoir plus ! Comment utiliser Baidu Cloud Network Disk : 1. Installation Tout d'abord, lors du téléchargement et de l'installation du logiciel Baidu Cloud, veuillez sélectionner l'option d'installation personnalisée.
 Tutoriel BTCC : Comment lier et utiliser le portefeuille MetaMask sur l'échange BTCC ?
Apr 26, 2024 am 09:40 AM
Tutoriel BTCC : Comment lier et utiliser le portefeuille MetaMask sur l'échange BTCC ?
Apr 26, 2024 am 09:40 AM
MetaMask (également appelé Little Fox Wallet en chinois) est un logiciel de portefeuille de cryptage gratuit et bien accueilli. Actuellement, BTCC prend en charge la liaison au portefeuille MetaMask. Après la liaison, vous pouvez utiliser le portefeuille MetaMask pour vous connecter rapidement, stocker de la valeur, acheter des pièces, etc., et vous pouvez également obtenir un bonus d'essai de 20 USDT pour la première liaison. Dans le didacticiel du portefeuille BTCCMetaMask, nous présenterons en détail comment enregistrer et utiliser MetaMask, ainsi que comment lier et utiliser le portefeuille Little Fox dans BTCC. Qu'est-ce que le portefeuille MetaMask ? Avec plus de 30 millions d’utilisateurs, MetaMask Little Fox Wallet est aujourd’hui l’un des portefeuilles de crypto-monnaie les plus populaires. Son utilisation est gratuite et peut être installée sur le réseau en tant qu'extension
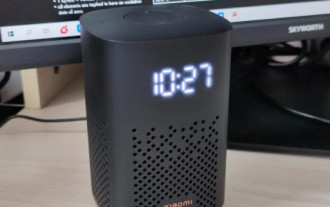 Comment utiliser Xiaoai Speaker Comment connecter Xiaoai Speaker à un téléphone mobile
Feb 22, 2024 pm 05:19 PM
Comment utiliser Xiaoai Speaker Comment connecter Xiaoai Speaker à un téléphone mobile
Feb 22, 2024 pm 05:19 PM
Après avoir appuyé longuement sur le bouton play de l'enceinte, connectez-vous au wifi dans le logiciel pour l'utiliser. Tutoriel Modèle applicable : Xiaomi 12 Système : EMUI11.0 Version : Xiaoai Classmate 2.4.21 Analyse 1 Trouvez d'abord le bouton de lecture du haut-parleur et maintenez-le enfoncé pour accéder au mode de distribution réseau. 2 Connectez-vous à votre compte Xiaomi dans le logiciel Xiaoai Speaker sur votre téléphone et cliquez pour ajouter un nouveau haut-parleur Xiaoai. 3. Après avoir entré le nom et le mot de passe du wifi, vous pouvez appeler Xiao Ai pour l'utiliser. Supplément : quelles sont les fonctions de Xiaoai Speaker ? 1 Xiaoai Speaker a des fonctions système, des fonctions sociales, des fonctions de divertissement, des fonctions de connaissances, des fonctions de vie, une maison intelligente et des plans de formation. Résumé/Remarques : L'application Xiao Ai doit être installée à l'avance sur votre téléphone mobile pour une connexion et une utilisation faciles.
