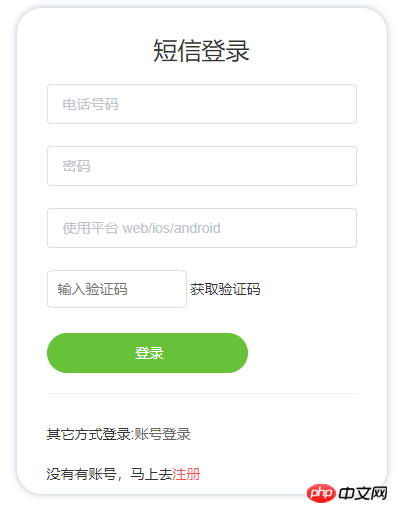
Cette fois, je vais vous montrer comment utiliser vue pour envoyer un code de vérification SMS via un téléphone mobile. Quelles sont les précautions pour utiliser vue pour envoyer un code de vérification SMS via un téléphone mobile. . Jetons un coup d'oeil.
L'effet est le suivant :

Le code est le suivant :
code du modèle :
<el-main>
  <el-form
   :model="ReginForm"
   ref="ReginForm"
   :rules="rule"
   class="regform"
   label-width="0">
   <h3 class="login-text">手机注册</h3>
    <el-form-item prop="tel">
    <el-input
     type="text"
     v-model.number="ReginForm.tel"
     placeholder="手机号码">
    </el-input>
   </el-form-item>
    <el-form-item prop="password">
    <el-input
     type="password"
     v-model="ReginForm.password"
     placeholder="密码">
    </el-input>
   </el-form-item>
        <p>
       <input class="auth_input" type="text" v-model="verification"  placeholder="输入验证码" />
  <span v-show="sendAuthCode" class="auth_text auth_text_blue" @click="getAuthCode">获取验证码</span>
  <span v-show="!sendAuthCode" class="auth_text"> <span class="auth_text_blue">{{auth_time}} </span> 秒之后重新发送验证码</span>
  </p>
   <el-form-item >
    <el-button
     type="success"
     class="submitBtn"
     round
     @click.native.prevent="submit"
     :loading="logining">
     注册
    </el-button>
    <hr>
    <p>已经有账号,马上去<span class="to" @click="tologin">登录</span></p>
   </el-form-item>
  </el-form>
 </el-main>
</template>Le code du script est le suivant
export default {
data () {
let confirmpasswordCheck = (rule, value, callback) => {
if (value === '') {
return callback(new Error('密码是必须的'))
} else {
return callback()
}
}
let telCheck = (rule, value, callback) => {
if (value === '') {
return callback(new Error('电话号码是必须的'))
} else if (!Number.isInteger(value)) {
return callback(new Error('电话号码必须是数字'))
} else if (value.toString().length !== 11) {
return callback(new Error('电话号码必须是11位数字'))
} else {
callback()
}
}
return {
ReginForm: {
password: '',
tel: '',
},
logining: false,
sendAuthCode:true,/*布尔值,通过v-show控制显示‘获取按钮'还是‘倒计时' */
auth_time: 0, /*倒计时 计数器*/
verification:"",//绑定输入验证码框框
rule: {
password: [
{
required: true,
message: '密码是必须的!',
trigger: 'blur'
}
],
tel: [
{
required: true,
validator: telCheck,
trigger: 'blur'
}
],
}
}
},
methods: {
// 验证
getAuthCode:function () {
const verification =this.ReginForm.tel;
const url = " "
console.log("url",url);
this.$http.get(url).then(function (response) {
console.log("请求成功",response)
}, function (error) {
console.log("请求失败",error);
})
this.sendAuthCode = false;
//设置倒计时秒
this.auth_time = 10;
var auth_timetimer = setInterval(()=>{
this.auth_time--;
if(this.auth_time<=0){
this.sendAuthCode = true;
clearInterval(auth_timetimer);
}
}, 1000);
},
// 封装注册发送请求方法
thisAjax(){
const passwordData=this.ReginForm.password;
const phoneData =this.ReginForm.tel;
const mCodeData=this.verification;
// 手机注册
//emulateJSON:true设置后post可跨域
const url = " 填接口"
this.$http.post(url,{填传入的参数},{emulateJSON:true}).then(function (response)
{
//登录后跳转的页面
this.$router.push('/');
}, function (error) {
alert("请求失败",error);
})
},
// ...
submit () {
this.$refs.ReginForm.validate(valid => {
if (valid) {
this.logining = true
this. thisAjax();
console.log('开始写入后台数据!')
} else {
console.log('submit err')
}
})
},
reset () {
this.$refs.ReginForm.resetFields()
},
tologin () {
//已经注册过跳转到登入界面
this.$router.push('/phoneLogin')
}
}
}
</script>Le code de style est le suivant :
.regform {
 margin: 20px auto;
 width: 310px;
 background: #fff;
 box-shadow: 0 0 10px #B4BCCC;
 padding: 30px 30px 0 30px;
 border-radius: 25px;
}
.submitBtn {
 width: 65%;
}
.to {
 color: #FA5555;
 cursor: pointer;
}
.auth_input{
  width:140px;
  height:38px;
  margin-bottom:20px;
  border:1px solid #DCDFE6;
  /* color:red; */
  padding-left:10px;
  border-radius: 8%;
}
.regform[data-v-92def6b0]{
  width:370px;
  min-height: 440px;
}
.login-text{
 text-align: center;
 margin-bottom:20px;
}
</style>Je pense que vous maîtrisez la méthode après avoir lu le cas dans cet article. Pour des informations plus intéressantes. , veuillez faire attention aux autres articles connexes sur le site Web php chinois !
Lecture recommandée :
Comment utiliser Vue pour implémenter un bouton de compte à rebours
Comment utiliser Vue pour écrire un deux liaison de données -way
Comment utiliser Vue pour implémenter un proxy
Ce qui précède est le contenu détaillé de. pour plus d'informations, suivez d'autres articles connexes sur le site Web de PHP en chinois!
 Racine du téléphone portable
 Téléphone portable projecteur
 Le téléphone ne parvient pas à se connecter au casque Bluetooth
 Pourquoi mon téléphone continue-t-il de redémarrer ?
 La différence entre un téléphone de remplacement officiel et un téléphone neuf
 Pourquoi mon téléphone continue-t-il de redémarrer ?
 Pourquoi mon téléphone portable ne peut-il pas passer d'appels mais ne peut pas surfer sur Internet ?
 Pourquoi mon téléphone n'est-il pas éteint mais lorsque quelqu'un m'appelle, il me demande de l'éteindre ?