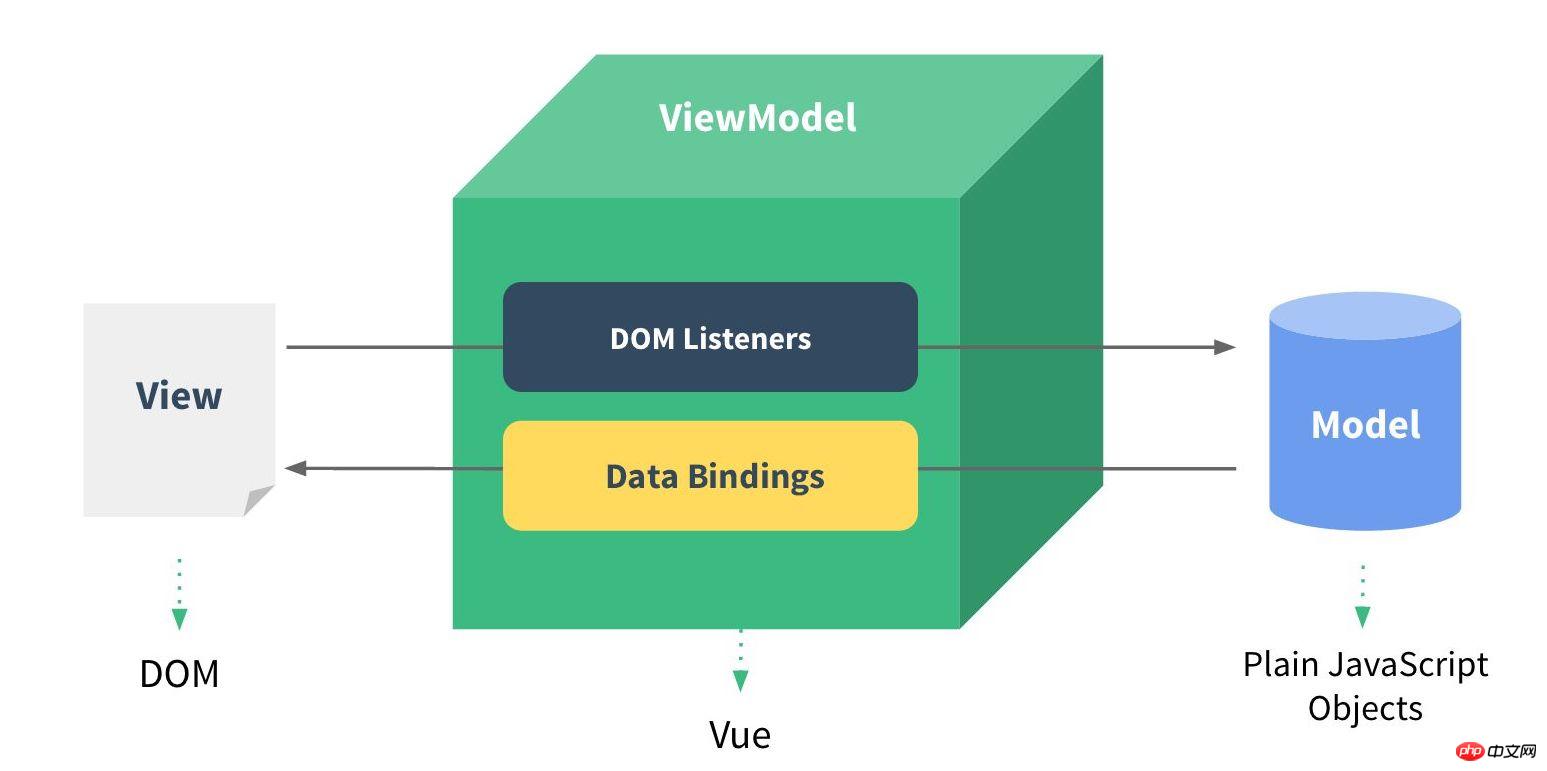
这次给大家带来怎样在实战项目中进行mvvm-simple双向绑定,在实战项目中进行mvvm-simple双向绑定的注意事项有哪些,下面就是实战案例,一起来看一下。
mvvm模式解放DOM枷锁

mvvm原理分析
JavaScript在浏览器中操作HTML经历了几个不同阶段
第一阶段 直接用浏览器提供的原生API操作DOM元素
var dom = document.getElementById('id');
dom.innerHTML = 'hello mvvm';第二阶段 jQuery的出现解决了原生API的复杂性和浏览器间的兼容性等问题,提供了更加简易方便的API
$('#id').text('hello mvvm')第三阶段 MVC模式使前端可以和后端配合,修改服务端渲染后的页面内容
而随着产品对于用户体验的重视,交互体验越来越重要,仅用jQuery远远不够。 MVVM模型解决了频繁操作的痛点,Model-View-ViewModel模式将数据与视图的同步交由ViewModel完成
jQuery修改节点内容:
<p>name: <span id="name">vist</span>!</p>
<p>age: <span id="age">25</span>.</p>
var name = 'bestvist';
var age = 26;
$('#name').text(name);
$('#age').text(age);MVVM模式下只需要关注数据结构:
var me = {
  name: 'vist',
  age: 25
}修改相应属性就好
me.name = 'bestvist';
me.age = 26;
mvvm实现
mvvm实现数据绑定的几种方式:
发布-订阅模式
脏值检查
数据劫持
比较流行的vue采用的就是数据劫持和发布-订阅模式,通过劫持es5提供的Object.defineProperty()中各个属性的get,set方法, 数据更新时触发消息给订阅者,实现数据绑定功能。
Object.defineProperty(obj, prop, descriptor)方法直接在一个对象上定义一个新属性,或者修改一个已经存在的属性,并返回这个对象。 该方法接受3个参数:
obj 定义属性的对象。
prop 被定义或修改的属性名。
descriptor 被定义或修改的属性的描述符。
一般情况通过直接给对象属性赋值来创建属性或者修改对应属性,而使用Object.defineProperty可以修改对象属性的一些额外默认配置。 如:
const obj = {name: 'Tom'};
Object.defineProperty(obj, 'name', {
 get: function(val) {
   return 'Jerry';
 }
})
console.log(obj.name);
//输出: JerryObject.defineProperty详细解释,请戳这里
mvvm实现的主要流程:
数据代理,访问实例上的属性时直接返回对应data里的属性
数据监听,对实例上的属性监听,如果数据改变通知订阅者更新
指令解析,对每个元素节点进行解析,替换数据并绑定更新函数
链接数据监听和指令解析,保证每个数据的更新,指令解析都可以获取并更新视图
实例化类:
new MVVM({
  el: '#app',
  data() {
    return {
      message: 'hello mvvm'
    }
  }
})数据代理:
class MVVM {
  constructor(options) {
    this.$options = options || {};
    let data = this._data = this.$options.data();
    // 数据代理 vm.xxx => vm._data.xxx
    Object.keys(data).forEach(key => {
      this._proxyData(key);
    });
    // observe(data, this);
    // this.$compile = new Compile(options.el || document.body, this);
  }
  _proxyData(key) {
    Object.defineProperty(this, key, {
      configurable: true,
      enumerable: true,
      get: () => {
        return this._data[key];
      },
      set: newVal => {
        this._data[key] = newVal;
      }
    });
  }
}数据监听,劫持实例属性更新
class Observer {
  constructor(data) {
    this.data = data;
    Object.keys(this.data).forEach(key => {
      this.defineReactive(key, this.data[key]);
    })
  }
  // 定义反应
  defineReactive(key, val) {
    let dep = new Dep();
    Object.defineProperty(this.data, key, {
      enumerable: true,
      configurable: false,
      get: () => {
        return val;
      },
      set: newVal => {
        if (val === newVal) {
          return;
        }
        val = newVal;
        // 赋值对象再进行劫持
        observe(val);
        ... // 数据修改通知
      }
    })
  }
}
function observe(val) {
  if (!val || typeof val !== 'object') {
    return;
  }
  return new Observer(val);
}指令解析部分代码
class Compile {
  constructor(el, vm) {
    this.$vm = vm;
    this.$el = this.isElementNode(el) ? el : document.querySelector(el);
    if (this.$el) {
      this.$fragment = this.node2Fragment(this.$el);
      this.init();
      this.$el.appendChild(this.$fragment);
    }
  }
  init() {
    this.compileElement(this.$fragment);
  }
  node2Fragment(el) {
    let fragment = document.createDocumentFragment(), child;
    // 原生节点拷贝到fragment
    while (child = el.firstChild) {
      // appendChild将元素从dom上移到fragment
      fragment.appendChild(child);
    }
    return fragment;
  }
  compileElement(el) {
    let childNodes = el.childNodes;
    [].slice.call(childNodes).forEach(node => {
      let text = node.textContent;
      let reg = /\{\{(.*)\}\}/;
      if (this.isElementNode(node)) {
        this.compile(node);
      } else if (this.isTextNode(node) && reg.test(text)) {
        this.compileText(node, RegExp.$1);
      }
      if (node.childNodes && node.childNodes.length) {
        this.compileElement(node);
      }
    })
  }
}其中
while (child = el.firstChild) {
  // appendChild将元素从dom上移到fragment
  fragment.appendChild(child);
}通过appendChild改变原dom结构特点,逐步把dom元素节点移到fragment中。
相信看了本文案例你已经掌握了方法,更多精彩请关注php中文网其它相关文章!
推荐阅读:
Ce qui précède est le contenu détaillé de. pour plus d'informations, suivez d'autres articles connexes sur le site Web de PHP en chinois!
 qu'est-ce que nodejs
 js arrondi
 Comment ouvrir un compte avec votre devise
 Introduction aux types de zones de texte HTML
 Introduction à la signification d'une syntaxe invalide
 Comment définir le style des points CAO
 Qu'est-ce que l'indice Baidu
 Quels sont les outils d'analyse des données ?
 Que signifient les composants électroniques ?