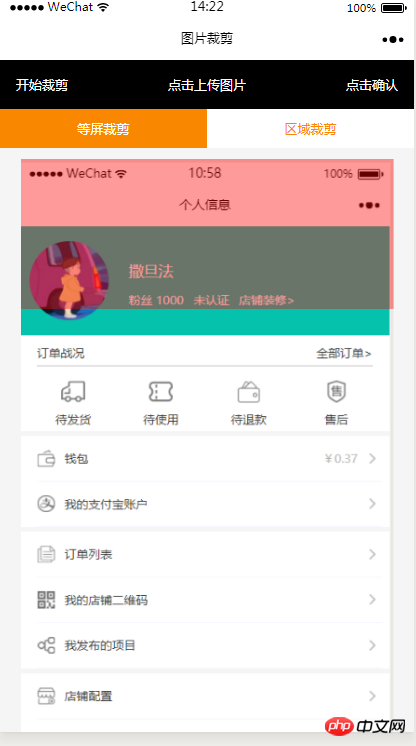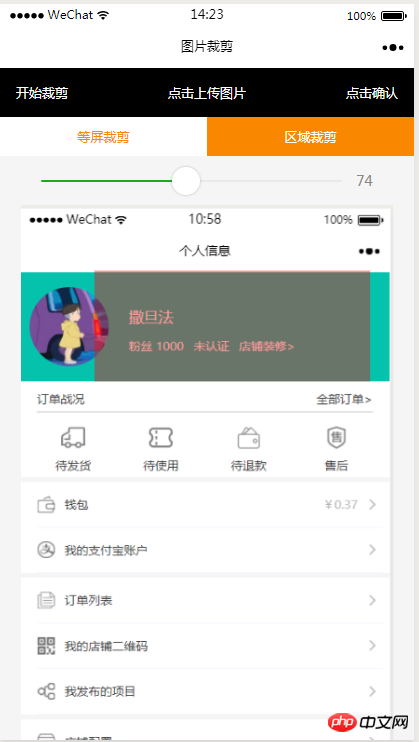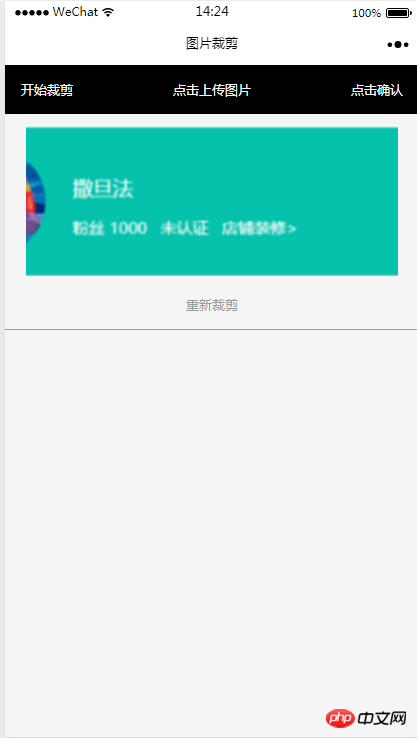
Cet article présente principalement la méthode de recadrage d'écran dans la zone de sélection d'image de l'applet WeChat. Le contenu est assez bon, je vais le partager avec vous maintenant et le donner comme référence.
Cet article présente la méthode de mise en œuvre du recadrage d'écran dans la zone sélectionnée des images de l'applet WeChat et le partage avec tout le monde. Les détails sont les suivants :
Rendu


Code HTML
<view class="index_all_box">
<view class="imgCut_header">
<view class="imgCut_header_l" bindtap='okCutImg'>开始裁剪</view>
<view class="imgCut_header_m" bindtap='clickUpImg'>点击上传图片</view>
<view class="imgCut_header_r" bindtap='okBtn'>点击确认</view>
</view>
<!-- 选择裁剪模式 -->
<view class="selectCutMode" wx:if='{{alreay}}'>
<view class="selectCutMode_in {{cutType?'selectCutMode_in_act':''}}" bindtap='etcType'>
等屏裁剪
</view>
<view class="selectCutMode_in {{!cutType?'selectCutMode_in_act':''}}" bindtap='areaType'>
区域裁剪
</view>
</view>
<view class="areaSelct_box" wx:if='{{!cutType && alreay}}'>
<slider bindchange="areaChange" min="50" max="100" show-value value='{{propor}}'/>
</view>
<view class="cutImg_box" wx:if='{{!prienFlag}}'>
<view class="cutImg_box_t">
<image src="{{cutImgUrl}}" mode='widthFix'></image>
</view>
<view class="clickCutImg_txt" bindtap='againBtn'>重新裁剪</view>
</view>
<view class="allCavans" wx:if='{{prienFlag}}' style='width: {{canvasW}}px;height: {{canvasH}}px' >
<canvas class='canvasSty' style='width: {{canvasW}}px;height: {{canvasH}}px' canvas-id='cutImg' disable-scroll='true' bindtouchmove='canvasMove'></canvas>
<view class="allCavans_inbg" style='width: {{canvasW}}px;height:{{canvasH}}px; background: url({{img}});background-size: 100% 100%'></view>
</view>
</view>Code CSS
.imgCut_header{
 padding: 30rpx;
 display: flex;
 justify-content: space-between;
 align-items: center;
 background: #000;
 color: #fff;
 font-size: 24rpx;
}
.allCavans{
 margin: 20rpx auto;
 position: relative;
}
.canvasSty{
 position: absolute;
}
.cutImg_box{
 width: 100%;

 border-bottom: 2rpx #f98700 solid;
 padding-bottom: 20rpx;
}
.cutImg_box .cutImg_box_t{
 width: 90%;
 margin: 20rpx auto;
}
.cutImg_box image{
 width: 100%;
}
.cutImg_box .cutImg_box_b{
 margin-top: 20rpx;
 width: 80%;
 height: 80rpx;
 line-height: 80rpx;
 background: #f98700;
 color: #fff;
 border-radius: 10rpx;
 text-align: center;
 margin:0rpx auto;
}
.selectCutMode{
 background: #fff;
 display: flex;
 justify-content: space-between;
 align-items: center;
}
.selectCutMode .selectCutMode_in{
 width: 100%;
 text-align: center;
 background: #fff;
 color: #f98700;
 font-size: 24rpx;
 padding: 20rpx;
}
.selectCutMode .selectCutMode_in_act{
 background: #f98700;
 color: #fff;
 padding: 20rpx;
}
.areaSelct_box{
 width: 100%;
 display: flex;
 align-items: center;
 height: 50rpx;
 justify-content: center;
 margin-top: 20rpx;
}
.areaSelct_box slider{
 width: 80%;
}
.cutImg_box .clickCutImg_txt{
 width: 100%;
 text-align: center;
 height: 50rpx;
 font-size: 24rpx;
 line-height: 50rpx;
 color: #999;
}Code JS part
Le chargement initial apporte le chemin du paramètre apporté de la page précédente
onLoad: function (options) {
var that = this;
const ctx = wx.createCanvasContext('cutImg');
ctx.setGlobalAlpha(0.4)
var aa = 'https://pintuanqu.oss-cn-hangzhou.aliyuncs.com/Uploads/Picture/goodsShow/20171201/5a2125fc86566.png'<br /> //获取当前屏幕宽度
var phoneW = Number(util.nowPhoneWH()[0]*90)/100;
var cutH = 150;
wx.getImageInfo({
src: aa,
success: function (res) {
var w = phoneW;
var h = (phoneW/Number(res.width))*Number(res.height)
ctx.save()
ctx.drawImage(aa, 0, 0, w, h)
ctx.restore()
ctx.setFillStyle('red')
ctx.fillRect(0, 0, phoneW, cutH)
ctx.draw()
that.setData({
canvasW:w,
canvasH:h,
img:aa,
cutH:cutH
})
}
})
},Confirmez la zone sélectionnée et commencez le recadrage
// 点击确认裁剪图片
 okCutImg:function(){
  var that = this;
  var canvasW = that.data.canvasW;
  var canvasH = that.data.canvasH;
  var nowCutW = that.data.cutType?canvasW:that.data.nowCutW;
  var nowCutH = that.data.cutType?that.data.cutH:that.data.nowCutH;
  var cutX = that.data.cutX;
  var cutY = that.data.cutY;
  const ctx = wx.createCanvasContext('cutImg');
  ctx.setGlobalAlpha(1)
  ctx.drawImage(that.data.img, 0, 0, canvasW, canvasH)
  ctx.draw()
  wx.canvasToTempFilePath({
   x: cutX,
   y: cutY,
   width: nowCutW,
   height: nowCutH,
   destWidth: nowCutW,
   destHeight: nowCutH,
   canvasId: 'cutImg',
   success: function(res) {
    var aa = res.tempFilePath
    that.setData({
     cutImgUrl:aa,
     prienFlag:false,
     alreay:false
    })
   }
  })
},Le cadre rouge se déplace selon la méthode de mouvement des doigts
// 点击红框开始移动
 canvasMove:function(e){
  var that = this;
  var canvasW = that.data.canvasW;
  var canvasH = that.data.canvasH;
  var nowCutW = that.data.cutType?canvasW:that.data.nowCutW;
  var nowCutH = that.data.cutType?that.data.cutH:that.data.nowCutH
  var touches = e.touches[0];
  var x = touches.x;
  var y = touches.y-(Number(nowCutH)/2);
  that.data.cutType?x=0:x=x-(Number(nowCutW)/2);
  that.setData({
   cutX:x,
   cutY:y
  })
  const ctx = wx.createCanvasContext('cutImg');
  ctx.setGlobalAlpha(0.4)
  ctx.drawImage(that.data.img, 0, 0, canvasW, canvasH)
  ctx.setFillStyle('red')
  ctx.fillRect(x, y, nowCutW, nowCutH)
  ctx.draw()
},Le deux boutons ci-dessus pour sélectionner la méthode de recadrage
Recadrage d'écran égal
//等屏裁剪
 etcType:function(){
  var that = this;
  var propor = 100;
  var canvasW = that.data.canvasW;
  var canvasH = that.data.canvasH;
  var cutH = that.data.cutH;
  var nowCutW = (Number(canvasW)*propor)/100
  var nowCutH = (Number(cutH)*propor)/100
  const ctx = wx.createCanvasContext('cutImg');
  ctx.setGlobalAlpha(0.4)
  ctx.drawImage(that.data.img, 0, 0, canvasW, canvasH)
  ctx.setFillStyle('red')
  ctx.fillRect(0, 0, nowCutW, nowCutH)
  ctx.draw()
  that.setData({
   nowCutW:nowCutW,
   nowCutH:nowCutH,
   cutType:true
  })
},Recadrage local
areaType:function(){
  var that = this;
  var propor = that.data.propor;
  var canvasW = that.data.canvasW;
  var canvasH = that.data.canvasH;
  var cutH = that.data.cutH;
  var nowCutW = (Number(canvasW)*propor)/100
  var nowCutH = (Number(cutH)*propor)/100
  const ctx = wx.createCanvasContext('cutImg');
  ctx.setGlobalAlpha(0.4)
  ctx.drawImage(that.data.img, 0, 0, canvasW, canvasH)
  ctx.setFillStyle('red')
  ctx.fillRect(0,0, nowCutW, nowCutH)
  ctx.draw()
  that.setData({
   nowCutW:nowCutW,
   nowCutH:nowCutH,
   cutType:false
  })
},La boîte rouge de sélection coulissante au-dessus des échelles de recadrage locales s'échelonne proportionnellement à la largeur
areaChange:function(e){
  var that = this;
  var propor = e.detail.value;
  var canvasW = that.data.canvasW;
  var canvasH = that.data.canvasH;
  var cutH = that.data.cutH;
  var nowCutW = (Number(canvasW)*propor)/100
  var nowCutH = (Number(cutH)*propor)/100
  const ctx = wx.createCanvasContext('cutImg');
  ctx.setGlobalAlpha(0.4)
  ctx.drawImage(that.data.img, 0, 0, canvasW, canvasH)
  ctx.setFillStyle('red')
  ctx.fillRect(that.data.cutX||0, that.data.cutY||0,nowCutW, nowCutH)
  ctx.draw()
  that.setData({
   nowCutW:nowCutW,
   nowCutH:nowCutH,
   propor:propor
  })
},Re-recadrer et revenir à la page de sélection initiale des images
// 重新裁剪
 againBtn:function(){
  var that = this;
  var data = that.data
  this.setData({
   prienFlag:true,
   alreay:true
  })
  const ctx = wx.createCanvasContext('cutImg');
  ctx.setGlobalAlpha(0.4)
  ctx.drawImage(data.img, 0, 0, data.canvasW, data.canvasH)
  ctx.setFillStyle('red')
  ctx.fillRect(that.data.cutX||0, that.data.cutY||0, data.nowCutW||data.canvasW, data.nowCutH||data.cutH)
  ctx.draw()
},Il y a toujours un bug dans IOS qui ne peut pas être recadré Le responsable est en train de le corriger et je ne le fais pas. Je ne sais pas quand il sera prêt.
Ce qui précède représente l'intégralité du contenu de cet article, j'espère qu'il sera utile à l'apprentissage de tout le monde. Pour plus de contenu connexe, veuillez faire attention au site Web PHP chinois !
Recommandations associées :
Développement d'un mini programme pour créer une fonction de menu contextuel (avec code)
Ce qui précède est le contenu détaillé de. pour plus d'informations, suivez d'autres articles connexes sur le site Web de PHP en chinois!
 Comment échanger des pièces VV
 L'ordinateur portable n'a soudainement plus d'option WLAN
 Utilisation de l'ordinateur Alibaba Cloud
 Qu'est-ce que la carte de contrôle d'accès NFC
 Quels serveurs y a-t-il sur le Web ?
 Méthode de mise en œuvre de la fonction VUE page suivante
 Codes hexadécimaux de couleur courants
 mi-téléchargement