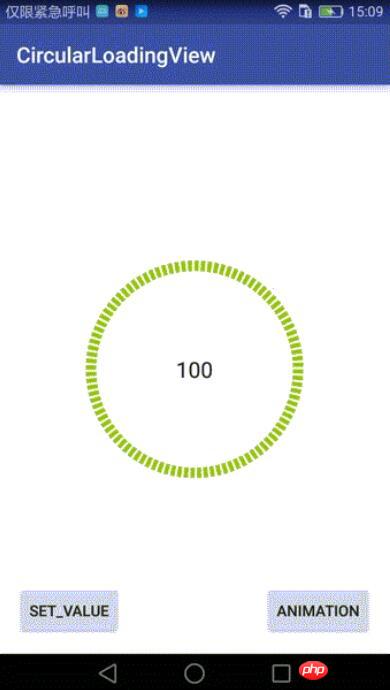
Cet article présente principalement en détail la méthode de personnalisation de l'effet Ring LoadingView sur Android. Il a une certaine valeur de référence. Les amis intéressés peuvent s'y référer
Il existe des projets récents qui doivent utiliser l'anneau Progress. bar, il existe un contrôle DashedCircularProgress similaire sur Github, mais la progression qu'il dessine est espacée en définissant l'effet de ligne pointillée du pinceau : progressPaint.setPathEffect(new DashPathEffect(new float[]{dashWith, dashSpace}, dashSpace)); il y a une autre couche d'anneaux dans la couche interne, il y aura une légère déviation entre la couche interne et la couche externe lors du réglage dynamique. J'en ai donc changé une sur la base d'origine pour obtenir l'effet que je voulais (vous pouvez choisir d'ajouter une animation. ou pas lors de la définition de la progression) Ajouter une animation) :

Implémentation du contrôle :
Ce contrôle hérite de RelativeLayout et ne deux choses pendant onDraw :
1. Dessinez d'abord l'anneau noir en bas
2. Dessinez l'anneau vert extérieur de proportion correspondante
Fournissez un. interface avec le monde extérieur pour rappeler la valeur de progression actuelle :
public interface OnValueChangeListener {
  void onValueChange(float value);
} Cours de dessin de base :
InternalCirclePainterImp2, dessine l'anneau noir intérieur :
/**
 * @author Chuck
 */
public class InternalCirclePainterImp2 implements InternalCirclePainter {

  private RectF internalCircle;//画出圆弧时,圆弧的外切矩形
  private Paint internalCirclePaint;
  private int color;
  private float startAngle = 270f;
  int arcQuantity=100;//等分(圆弧加间隔),比如arcQuantity=100时,表示将有100个圆弧,和100个空白间隔
  float ratio=0.5f;//每段圆弧与圆弧加间隔之和的比例,ratio=0.5表示每个圆弧与相邻的间隔弧度比是1:1
  private int width;
  private int height;
  private int internalStrokeWidth = 48;//圆环宽度

  public InternalCirclePainterImp2(int color, int progressStrokeWidth, int arcQuantity,float ratio) {
    this.color = color;
    this.internalStrokeWidth = progressStrokeWidth;
    this.arcQuantity = arcQuantity;
    if(ratio>0&&ratio<1){
      this.ratio = ratio;
    }

    init();
  }

  private void init() {
    initExternalCirclePainter();
  }

  private void initExternalCirclePainter() {
    internalCirclePaint = new Paint();
    internalCirclePaint.setAntiAlias(true);
    internalCirclePaint.setStrokeWidth(internalStrokeWidth);
    internalCirclePaint.setColor(color);
    internalCirclePaint.setStyle(Paint.Style.STROKE);

  }

  //圆弧外切矩形
  private void initExternalCircle() {
    internalCircle = new RectF();
    float padding = internalStrokeWidth * 0.5f;
    internalCircle.set(padding, padding , width - padding, height - padding);
    initExternalCirclePainter();
  }


  @Override
  public void draw(Canvas canvas) {

    float eachAngle=360f/arcQuantity;

    float eachArcAngle=eachAngle*ratio;

    for(int i=0;i<arcQuantity*2;i++){
      if(i%2==0){//遇到偶数就画圆弧,基数则跳过
        canvas.drawArc(internalCircle, startAngle+eachAngle*i/2, eachArcAngle, false, internalCirclePaint);
      }
      else{
        continue;
      }
    }

  }

  public void setColor(int color) {
    this.color = color;
    internalCirclePaint.setColor(color);
  }

  @Override
  public int getColor() {
    return color;
  }

  @Override
  public void onSizeChanged(int height, int width) {
    this.width = width;
    this.height = height;
    initExternalCircle();
  }
}ProgressPainterImp2, dessine l'anneau noir intérieur :
/**
 * @author Chuck
 */
public class ProgressPainterImp2 implements ProgressPainter {

  private RectF progressCircle;
  private Paint progressPaint;
  private int color = Color.RED;
  private float startAngle = 270f;
  private int internalStrokeWidth = 48;
  private float min;
  private float max;
  private int width;
  private int height;

  private int currentPecent;//当前的百分比

  int arcQuantity=100;//等分(圆弧加间隔),比如arcQuantity=100时,表示将有100个圆弧,和100个空白间隔
  float ratio=0.5f;//每段圆弧与圆弧加间隔之和的比例,ratio=0.5表示每个圆弧与相邻的间隔弧度比是1:1

  public ProgressPainterImp2(int color, float min, float max, int progressStrokeWidth, int arcQuantity,float ratio) {
    this.color = color;
    this.min = min;
    this.max = max;
    this.internalStrokeWidth = progressStrokeWidth;
    this.arcQuantity = arcQuantity;
    this.ratio = ratio;
    init();
    Log.e("ProgressPainterImp","构造函数执行");
  }

  private void init() {
    initInternalCirclePainter();

  }

  private void initInternalCirclePainter() {
    progressPaint = new Paint();
    progressPaint.setAntiAlias(true);
    progressPaint.setStrokeWidth(internalStrokeWidth);
    progressPaint.setColor(color);
    progressPaint.setStyle(Paint.Style.STROKE);

  }

  //初始化外切的那个矩形
  private void initInternalCircle() {
    progressCircle = new RectF();
    float padding = internalStrokeWidth * 0.5f;
    progressCircle.set(padding, padding , width - padding, height - padding);

    initInternalCirclePainter();
  }

  @Override
  public void draw(Canvas canvas) {

    float eachAngle=360f/arcQuantity;

    float eachArcAngle=eachAngle*ratio;

    int quantity=2*arcQuantity*currentPecent/100;
    for(int i=0;i<quantity;i++){
      if(i%2==0){//遇到偶数就画圆弧,基数则跳过
        canvas.drawArc(progressCircle, startAngle+eachAngle*i/2, eachArcAngle, false, progressPaint);
      }
      else{
        continue;
      }
    }
  }

  public float getMin() {
    return min;
  }

  public void setMin(float min) {
    this.min = min;
  }

  public float getMax() {
    return max;
  }

  public void setMax(float max) {
    this.max = max;
  }

  public void setValue(float value) {
    this.currentPecent = (int) (( 100f * value) / max);
  }

  @Override
  public void onSizeChanged(int height, int width) {
    Log.e("ProgressPainterImp","onSizeChanged执行");

    this.width = width;
    this.height = height;
    initInternalCircle();
  }

  public int getColor() {
    return color;
  }

  public void setColor(int color) {
    this.color = color;
    progressPaint.setColor(color);
  }
}Attributs personnalisables :
<declare-styleable name="CircularLoadingView">
  <attr name="base_color" format="color" /> <!--内层圆环的颜色-->
  <attr name="progress_color" format="color" /><!--进度圆环的颜色-->
  <attr name="max" format="float" /><!--最小值-->
  <attr name="min" format="float" /><!--最大值-->
  <attr name="duration" format="integer" /><!--动画时长-->
  <attr name="progress_stroke_width" format="integer" /><!--圆环宽度-->

  <!--等分(圆弧加间隔),比如arcQuantity=100时,表示将有100个圆弧,和100个空白间隔-->
  <attr name="argQuantity" format="integer" />

  <!--每段圆弧与圆弧加间隔之和的比例,ratio=0.5表示每个圆弧与相邻的间隔弧度比是1:1-->
  <attr name="ratio" format="float" />
</declare-styleable>
Appel :
main_activity.xml :
<?xml version="1.0" encoding="utf-8"?>
<RelativeLayout
  xmlns:android="http://schemas.android.com/apk/res/android"
  android:layout_width="match_parent"
  android:layout_height="match_parent"
  android:paddingBottom="@dimen/activity_vertical_margin"
  android:paddingLeft="@dimen/activity_horizontal_margin"
  android:paddingRight="@dimen/activity_horizontal_margin"
  android:paddingTop="@dimen/activity_vertical_margin"
  xmlns:custom="http://schemas.android.com/apk/res-auto"
  android:background="#ffffff"
  >

  <!--自定义控件,继承RelativeLayout-->
  <qdong.com.mylibrary.CircularLoadingView
    android:id="@+id/simple"
    custom:base_color="@color/pager_bg"
    custom:min="0"
    custom:max="100"
    custom:argQuantity="100"
    custom:ratio="0.6"
    custom:progress_color="@android:color/holo_green_light"
    custom:progress_icon="@mipmap/ic_launcher"
    custom:duration="1000"
    custom:progress_stroke_width="28"
    android:layout_centerInParent="true"
    android:layout_width="200dp"
    android:layout_height="200dp">

    <RelativeLayout
      android:layout_centerInParent="true"
      android:layout_width="match_parent"
      android:layout_height="match_parent">


        <TextView
          android:layout_centerInParent="true"

          android:textSize="20sp"
          android:layout_centerHorizontal="true"
          android:id="@+id/number"
          android:text="0"
          android:gravity="center"
          android:textColor="@color/pager_bg"
          android:layout_width="wrap_content"
          android:layout_height="wrap_content" />

    </RelativeLayout>

  </qdong.com.mylibrary.CircularLoadingView>

  <Button
    android:layout_width="wrap_content"
    android:layout_height="wrap_content"
    android:text="Set_Value"
    android:id="@+id/button"
    android:layout_alignParentBottom="true"
    android:layout_alignParentStart="true"/>

  <Button
    android:layout_width="wrap_content"
    android:layout_height="wrap_content"
    android:text="Animation"
    android:id="@+id/button3"
    android:layout_alignTop="@+id/button"
    android:layout_alignParentEnd="true"/>
</RelativeLayout>Activité principale :
findViewById(R.id.button).setOnClickListener(new View.OnClickListener() {
  @Override
  public void onClick(View view) {
    try {
      mDashedCircularProgress.setValue(66);//没有动画的,直接设置
    } catch (Exception e) {
      e.printStackTrace();
    }
  }
});
findViewById(R.id.button3).setOnClickListener(new View.OnClickListener() {
  @Override
  public void onClick(View view) {
    try {
      mDashedCircularProgress.setValue(0);//无动画,归零
      mDashedCircularProgress.setValueWithAnimation(100,2000);//带动画
    } catch (Exception e) {
      e.printStackTrace();
    }
  }
});Adresse Github : https://github. com/506954774 /AndroidCircularLoadingView
Ce qui précède est l'intégralité du contenu de cet article. J'espère qu'il sera utile à l'étude de tout le monde. Pour plus de contenu connexe, veuillez faire attention au site Web PHP chinois !
Recommandations associées :
Effet de couche contextuelle simple AJAX implémenté par jQuery
Comment télécharger des fichiers blob avec ajax en utilisant jQuery
Ce qui précède est le contenu détaillé de. pour plus d'informations, suivez d'autres articles connexes sur le site Web de PHP en chinois!
 Trois frameworks majeurs pour le développement Android
 Quel système est Android
 Comment débloquer les restrictions d'autorisation Android
 Quelles sont les méthodes pour redémarrer les applications sous Android ?
 Méthode de mise en œuvre de la fonction de lecture vocale Android
 projet Microsoft
 Comment désactiver la protection en temps réel dans le Centre de sécurité Windows
 La différence entre les disques en bardeaux et les disques verticaux