Cet article vous présente le processus détaillé de création d'un environnement LAMP. Il a une certaine valeur de référence. Les amis dans le besoin peuvent s'y référer. J'espère qu'il vous sera utile.
Après avoir installé CentOS 7 au minimum, entrez directement la commande ifconfig et le message "commande ifconfig introuvable" s'affichera.
, indiquant que l'installation minimale n'installe pas les logiciels associés. Nous pouvons utiliser ip addr au lieu de ifconfig pour afficher les détails de la carte réseau, ou nous pouvons utiliser yum install.
net-tools pour installer la commande ifconfig. Entrez y deux fois pendant le processus d'installation pour terminer l'installation.
1. Apache
yum install httpd //Installer Apache
Total download size: 3.0 M
Installed size: 10 M
Is this ok [y/d/N]:  //输入y,确认安装
Retrieving key from file:///etc/pki/rpm-gpg/RPM-GPG-KEY-CentOS-7
Importing GPG key 0xF4A80EB5:
 Userid     : "CentOS-7 Key (CentOS 7 Official Signing Key) <security>"
 Fingerprint: 6341 ab27 53d7 8a78 a7c2 7bb1 24c6 a8a7 f4a8 0eb5
 Package    : centos-release-7-5.1804.el7.centos.x86_64 (@anaconda)
 From       : /etc/pki/rpm-gpg/RPM-GPG-KEY-CentOS-7
Is this ok [y/N]:  //验证GPG密钥是否正确,输入y</security>
Running transaction check
Running transaction test
Transaction test succeeded
Running transaction
  Installing : apr-1.4.8-3.el7_4.1.x86_64                                                            1/5
  Installing : apr-util-1.5.2-6.el7.x86_64                                                           2/5
  Installing : httpd-tools-2.4.6-80.el7.centos.1.x86_64                                              3/5
  Installing : mailcap-2.1.41-2.el7.noarch                                                           4/5
  Installing : httpd-2.4.6-80.el7.centos.1.x86_64                                                    5/5
  Verifying  : mailcap-2.1.41-2.el7.noarch                                                           1/5
  Verifying  : httpd-tools-2.4.6-80.el7.centos.1.x86_64                                              2/5
  Verifying  : apr-util-1.5.2-6.el7.x86_64                                                           3/5
  Verifying  : apr-1.4.8-3.el7_4.1.x86_64                                                            4/5
  Verifying  : httpd-2.4.6-80.el7.centos.1.x86_64                                                    5/5

Installed:
  httpd.x86_64 0:2.4.6-80.el7.centos.1

Dependency Installed:
  apr.x86_64 0:1.4.8-3.el7_4.1  apr-util.x86_64 0:1.5.2-6.el7 httpd-tools.x86_64 0:2.4.6-80.el7.centos.1
  mailcap.noarch 0:2.1.41-2.el7

Complete!
Activer le service Apache , Et configurer le service pour qu'il démarre automatiquement au démarrage du système : systemctl start httpd.servicesystemctl enable httpd.service
Afin de pouvoir accéder au serveur web de l'extérieur, le HTTP (80) et les ports HTTPS (443) doivent être ouverts dans le pare-feu. Le pare-feu par défaut sur CentOS est firewalld, qui peut être configuré à l'aide de la commande firewalld-cmd. firewall-cmd --permanent --zone = public --add-service = http firewall-cmd --permanent --zone = public --add-service = https firewall-cmd --reload //Redémarrer firewalld
Vérifiez si le service Apache est ouvert : systemctl status httpd.service
● httpd.service - The Apache HTTP Server
   Loaded: loaded (/usr/lib/systemd/system/httpd.service; disabled; vendor preset: disabled)
   Active: active (running) since Mon 2018-08-06 20:14:21 CST; 9s ago
     Docs: man:httpd(8)
           man:apachectl(8)
 Main PID: 1498 (httpd)
   Status: "Total requests: 0; Current requests/sec: 0; Current traffic:   0 B/sec"
   CGroup: /system.slice/httpd.service
           ├─1498 /usr/sbin/httpd -DFOREGROUND
           ├─1499 /usr/sbin/httpd -DFOREGROUND
           ├─1500 /usr/sbin/httpd -DFOREGROUND
           ├─1501 /usr/sbin/httpd -DFOREGROUND
           ├─1502 /usr/sbin/httpd -DFOREGROUND
           └─1503 /usr/sbin/httpd -DFOREGROUND

Aug 06 20:14:21 localhost systemd[1]: Starting The Apache HTTP Server...
Aug 06 20:14:21 localhost httpd[1498]: AH00558: httpd: Could not reliably determine the server's f...sage
Aug 06 20:14:21 localhost systemd[1]: Started The Apache HTTP Server.
Hint: Some lines were ellipsized, use -l to show in full.
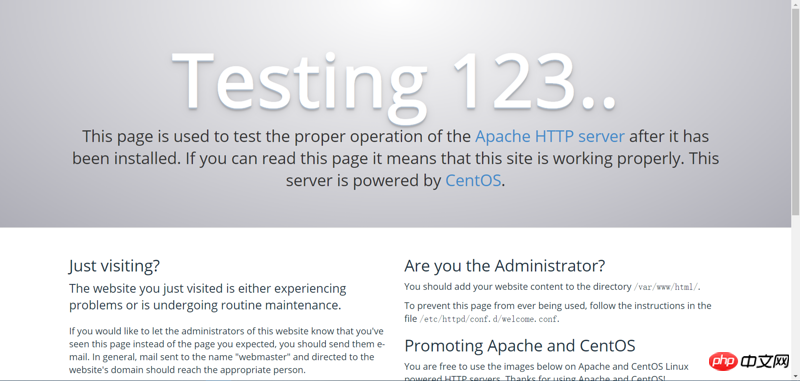
encore une fois Utilisez un navigateur pour saisir l'adresse IP du serveur :

Lorsque vous voyez l'interface comme indiqué sur l'image, le l'installation est réussie.
2. MySQL/MariaDB
Le système de gestion de base de données MariaDB est une branche de MySQL, qui est principalement maintenue par la communauté open source et est sous licence GPL.
L'une des raisons du développement de cette branche est qu'après l'acquisition de MySQL par Oracle, il y avait un risque potentiel de fermer MySQL en tant que source, la communauté a donc adopté une approche de branche pour éviter ce risque.
MariaDB vise à être entièrement compatible avec MySQL, y compris l'API et la ligne de commande. Il s'agit actuellement du dérivé de base de données MySQL le plus populaire et est également considéré comme un substitut à la base de données open source MySQL.
Ici, nous utilisons MariaDB au lieu de MySQL. Les méthodes d'installation et de fonctionnement de MySQL sont généralement similaires.
Lors de l'installation, remplacez mariadb par mysql ;
Pour démarrer, arrêtez le service et vérifiez l'état, remplacez mariadb.service par mysql.service.
yum -y install mariadb-server mariadb //Installer MariaDB
Installed:
  mariadb.x86_64 1:5.5.56-2.el7                   mariadb-server.x86_64 1:5.5.56-2.el7

Dependency Installed:
  perl.x86_64 4:5.16.3-292.el7                        perl-Carp.noarch 0:1.26-244.el7
  perl-Compress-Raw-Bzip2.x86_64 0:2.061-3.el7        perl-Compress-Raw-Zlib.x86_64 1:2.061-4.el7
  perl-DBD-MySQL.x86_64 0:4.023-6.el7                 perl-DBI.x86_64 0:1.627-4.el7
  perl-Data-Dumper.x86_64 0:2.145-3.el7               perl-Encode.x86_64 0:2.51-7.el7
  perl-Exporter.noarch 0:5.68-3.el7                   perl-File-Path.noarch 0:2.09-2.el7
  perl-File-Temp.noarch 0:0.23.01-3.el7               perl-Filter.x86_64 0:1.49-3.el7
  perl-Getopt-Long.noarch 0:2.40-3.el7                perl-HTTP-Tiny.noarch 0:0.033-3.el7
  perl-IO-Compress.noarch 0:2.061-2.el7               perl-Net-Daemon.noarch 0:0.48-5.el7
  perl-PathTools.x86_64 0:3.40-5.el7                  perl-PlRPC.noarch 0:0.2020-14.el7
  perl-Pod-Escapes.noarch 1:1.04-292.el7              perl-Pod-Perldoc.noarch 0:3.20-4.el7
  perl-Pod-Simple.noarch 1:3.28-4.el7                 perl-Pod-Usage.noarch 0:1.63-3.el7
  perl-Scalar-List-Utils.x86_64 0:1.27-248.el7        perl-Socket.x86_64 0:2.010-4.el7
  perl-Storable.x86_64 0:2.45-3.el7                   perl-Text-ParseWords.noarch 0:3.29-4.el7
  perl-Time-HiRes.x86_64 4:1.9725-3.el7               perl-Time-Local.noarch 0:1.2300-2.el7
  perl-constant.noarch 0:1.27-2.el7                   perl-libs.x86_64 4:5.16.3-292.el7
  perl-macros.x86_64 4:5.16.3-292.el7                 perl-parent.noarch 1:0.225-244.el7
  perl-podlators.noarch 0:2.5.1-3.el7                 perl-threads.x86_64 0:1.87-4.el7
  perl-threads-shared.x86_64 0:1.43-6.el7

Complete!
Activez le service MariaDB et configurez le service pour qu'il démarre automatiquement au démarrage du système : systemctl start mariadb.servicesystemctl enable mariadb.service
Définissez le mot de passe du compte root MySQL : mysql_secure_installation
NOTE: RUNNING ALL PARTS OF THIS SCRIPT IS RECOMMENDED FOR ALL MariaDB
      SERVERS IN PRODUCTION USE!  PLEASE READ EACH STEP CAREFULLY!

In order to log into MariaDB to secure it, we'll need the current
password for the root user.  If you've just installed MariaDB, and
you haven't set the root password yet, the password will be blank,
so you should just press enter here.

Enter current password for root (enter for none):  //输入当前root用户密码,直接回车

OK, successfully used password, moving on...

Setting the root password ensures that nobody can log into the MariaDB
root user without the proper authorisation.

Set root password? [Y/n]
New password:   //输入密码
Re-enter new password:   //确认密码
Password updated successfully!
Reloading privilege tables..
 ... Success!

By default, a MariaDB installation has an anonymous user, allowing anyone
to log into MariaDB without having to have a user account created for
them.  This is intended only for testing, and to make the installation
go a bit smoother.  You should remove them before moving into a
production environment.

Remove anonymous users? [Y/n]   //删除匿名用户,回车
 ... Success!

Normally, root should only be allowed to connect from 'localhost'.  This
ensures that someone cannot guess at the root password from the network.

Disallow root login remotely? [Y/n]   //不允许root用户远程登录,回车
 ... Success!

By default, MariaDB comes with a database named 'test' that anyone can
access.  This is also intended only for testing, and should be removed
before moving into a production environment.

Remove test database and access to it? [Y/n]   //删除测试数据库并访问它,回车
 - Dropping test database...
 ... Success!
 - Removing privileges on test database...
 ... Success!

Reloading the privilege tables will ensure that all changes made so far
will take effect immediately.

Reload privilege tables now? [Y/n]   //重新加载权限表,回车
 ... Success!

Cleaning up...

All done!  If you've completed all of the above steps, your MariaDB
installation should now be secure.

Thanks for using MariaDB!
PHP
yum install php // Installer php
Total download size: 4.7 M
Installed size: 17 M
Is this ok [y/d/N]:   //允许安装,输入y
Downloading packages:
(1/4): libzip-0.10.1-8.el7.x86_64.rpm                                             |  48 kB  00:00:00
(2/4): php-5.4.16-45.el7.x86_64.rpm                                               | 1.4 MB  00:00:01
(3/4): php-common-5.4.16-45.el7.x86_64.rpm                                        | 565 kB  00:00:01
(4/4): php-cli-5.4.16-45.el7.x86_64.rpm                                           | 2.7 MB  00:00:02
---------------------------------------------------------------------------------------------------------
Total                                                                    2.1 MB/s | 4.7 MB  00:00:02
Running transaction check
Running transaction test
Transaction test succeeded
Running transaction
  Installing : libzip-0.10.1-8.el7.x86_64                                                            1/4
  Installing : php-common-5.4.16-45.el7.x86_64                                                       2/4
  Installing : php-cli-5.4.16-45.el7.x86_64                                                          3/4
  Installing : php-5.4.16-45.el7.x86_64                                                              4/4
  Verifying  : php-5.4.16-45.el7.x86_64                                                              1/4
  Verifying  : php-cli-5.4.16-45.el7.x86_64                                                          2/4
  Verifying  : libzip-0.10.1-8.el7.x86_64                                                            3/4
  Verifying  : php-common-5.4.16-45.el7.x86_64                                                       4/4

Installed:
  php.x86_64 0:5.4.16-45.el7

Dependency Installed:
  libzip.x86_64 0:0.10.1-8.el7    php-cli.x86_64 0:5.4.16-45.el7    php-common.x86_64 0:5.4.16-45.el7

Complete!
Afin d'associer la base de données à php, nous devons également installer php-mysql : yum install php-mysql //Entrez y pendant le processus d'installation pour terminer l'installation
systemctl restart httpd.service //Installation Après avoir installé php, redémarrez le service Apache
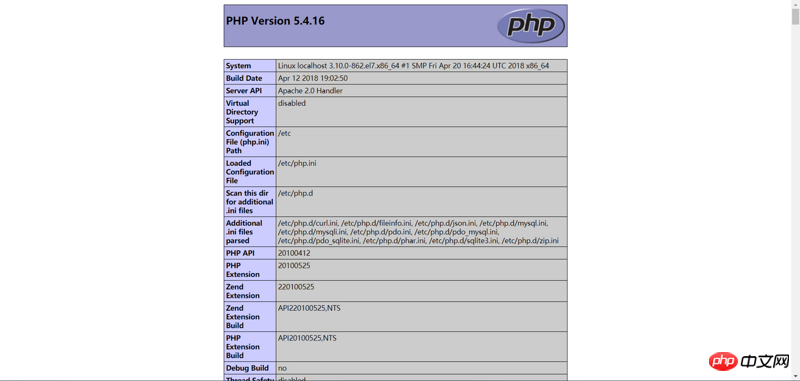
Testez si php est installé : vi /var/www/html/index.php //Créez un nouveau fichier php et remplissez le contenu suivant
<?php phpinfo();
?>
avant Ajoutez /info.php après l'URL Si vous voyez l'interface suivante, cela signifie que l'installation est réussie.

Articles connexes recommandés :
Étapes de fonctionnement du fichier de configuration Nginx nginx.conf
Ce qui précède est le contenu détaillé de. pour plus d'informations, suivez d'autres articles connexes sur le site Web de PHP en chinois!