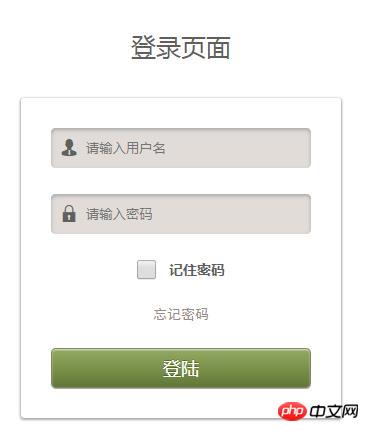
Avez-vous remarqué lorsque vous parcourez des sites Web que presque tous les sites Web vous obligent à vous inscrire ou à vous connecter ? En tant que développeur front-end, savez-vous comment créer une page de connexion HTML ? Cet article partagera avec vous un code de page de connexion sympa implémenté par HTML et CSS. Il a une certaine valeur pratique. Les amis intéressés peuvent s'y référer.
La création de cette page de connexion sympa nécessite l'utilisation de nombreux attributs en CSS, tels que l'ombre de la boîte, l'attribut d'affichage, le coin arrondi du rayon de bordure, la pseudo-classe de survol, etc. Si vous n'êtes pas clair, vous pouvez lire Lisez mes articles précédents ou visitez le Tutoriel vidéo CSS, j'espère que cela pourra vous aider !
Description de l'instance : créez une page de connexion HTML et CSS sympa Lorsque des informations sont saisies dans la zone de saisie, la couleur de la zone de saisie devient plus claire. Elle a également des fonctions de mémorisation des mots de passe, d'oubli des mots de passe et de connexion. . Le code spécifique est le suivant :
Partie HTML :
<div class="wrapper">
<div class="header">登录页面</div>
<form action="" method="post">
<ul>
<li>
<div class="text">
<span class="yonghu"></span><input type="text" placeholder="请输入用户名">
</div>
</li>
<li>
<div class="password">
<span class="mima"></span><input type="password" placeholder="请输入密码">
</div>
</li>
<li class="remember">
<input type="checkbox">记住密码
</li>
<li>
<a href="">忘记密码</a>
</li>
<li>
<input type="button" value="登陆">
</li>
</ul>
</form>
</div>Partie CSS :
@font-face {
       font-family: 'iconfont';
       src: url('//at.alicdn.com/t/font_1463147324_946932.eot'); /* IE9*/
       src: url('//at.alicdn.com/t/font_1463147324_946932.eot?#iefix') format('embedded-opentype'), /* IE6-IE8 */
       url('http://at.alicdn.com/t/font_1463147324_946932.woff') format('woff'), /* chrome、firefox */
       url('http://at.alicdn.com/t/font_1463147324_946932.ttf') format('truetype'), /* chrome、firefox、opera、Safari, Android, iOS 4.2+*/
       url('//at.alicdn.com/t/font_1463147324_946932.svg#iconfont') format('svg'); /* iOS 4.1- */
   }
   *{margin: 0;padding: 0}
   li{list-style: none;}
   form a{text-decoration: none;}
   html,body {
       background: #fff;
       width: 100%;
       height: 100%;
       display: flex;
       flex-flow: column nowrap;
       justify-content: center;
   }
   .wrapper{text-align: center;}
   .header{
       font-size: 25px;
       font-family: 微软雅黑;
       color: rgb(98,94,91);
   }
   form{
       background: url(input-bg.png);
       width: 260px;
       height: 260px;
       margin: 35px auto;
       padding: 30px;
       box-shadow:0px 1px 2px 1px #aaaaaa,
       inset 0px 1px 1px rgba(255,255,255,0.7);
       border-radius: 3px;
   }
   form ul{
       width: 100%;
       height: 100%;
       text-align: left;
       display: flex;
       flex-flow: column nowrap;
       justify-content: space-between;
   }
   ul li div{
       width: 260px;
       height: 40px;
       background: #e1dcd8;
       color: rgb(98,94,91);
       box-shadow: inset 0px 2px 5px #aaaaaa;
       border-radius: 5px;
       position: relative;
   }
   ul li .yonghu{
       font-family: iconfont;
       position: absolute;
       top: 12px;
       left: 10px;
   }
   ul li .mima{
       font-family: iconfont;
       position: absolute;
       top: 12px;
       left: 10px;
   }
   ul li div input{
       height: 40px;
       width: 190px;
       padding: 0 35px;
       border: none;
       background: #e1dcd8;
       color: rgb(98,94,91);
       box-shadow:
               0px 1px 1px rgba(255,255,255,0.7),
               inset 0px 2px 5px #aaaaaa;
       border-radius: 5px;
   }
   ul li input:focus{
       outline: none;
       background: #f5f2ef;
   }
   ul .remember{
       font-size: 14px;
       font-family: 微软雅黑;
       font-weight: bold;
       color: rgb(98,94,91);
       position: relative;
       display: flex;
       justify-content: center;
   }
   ul .remember input[type*="checkbox"]{
       width: 20px;
       height: 20px;
       vertical-align: super;
       margin-right: 12px;
   }
   .remember label {
       cursor: pointer;
       position: absolute;
       width: 22px;
       height: 22px;
       top: 7px;
       left: 0;
       background: #eee;
       border:1px solid #cccccc;
       border-radius: 4px;

   }
   /*Display the tick inside the checkbox*/
   .remember label:after {
       opacity: 0.4;
       content: '';
       position: absolute;
       width: 12px;
       height: 5px;
       background: transparent;
       top: 6px;
       left: 4px;
       border: 3px solid #74884a;
       border-top: none;
       border-right: none;

       -webkit-transform: rotate(-45deg);
       -moz-transform: rotate(-45deg);
       -o-transform: rotate(-45deg);
       -ms-transform: rotate(-45deg);
       transform: rotate(-45deg);
   }
   /*Create the hover event of the tick*/
   .remember label:hover::after {
       opacity: 0.7;
   }
   /*Create the checkbox state for the tick*/
   .remember input[type=checkbox]:checked + label:after {
       opacity: 1;
       border-color: #74884a;
   }
   ul li a{
       font-size: 14px;
       font-family: 黑体;
       color: rgb(152,142,135);
       display: flex;
       justify-content: center;
   }
   ul li input[type*="button"]{
       width: 100%;
       height: 40px;
       font-family: Arial, Helvetica, sans-serif;
       font-size: 18px;
       color: #ffffff;
       background: -moz-linear-gradient(
               top,
               #94aa64 0%,
               #7a924a 50%,
               #607738);
       background: -webkit-gradient(
               linear, left top, left bottom,
               from(#94aa64),
               color-stop(0.50, #7a924a),
               to(#607738));
       -moz-border-radius: 5px;
       -webkit-border-radius: 5px;
       border-radius: 5px;
       border: 1px solid #7d8862;
       -moz-box-shadow:
               0px 1px 0px rgba(170,170,170,1),
               inset 0px 1px 1px rgba(255,255,255,0.7);
       -webkit-box-shadow:
               0px 1px 0px rgba(170,170,170,1),
               inset 0px 1px 1px rgba(255,255,255,0.7);
       box-shadow:
               0px 1px 0px rgba(170,170,170,1),
               inset 0px 1px 1px rgba(255,255,255,0.7);
       text-shadow:
               0px -1px 0px rgba(000,000,000,0.3),
               0px 0px 0px rgba(255,255,255,0);
   }
   ul li input[type*="button"]:hover{
       opacity: 0.8;
   }
   ul li input[type*="button"]:active{
       width: 100%;
       height: 40px;
       font-family: Arial, Helvetica, sans-serif;
       font-size: 18px;
       color: #ffffff;
       background: -moz-linear-gradient(
               top,
               #607738 0%,
               #7a924a 50%,
               #94aa64 );
       background: -webkit-gradient(
               linear, left top, left bottom,
               from(#607738),
               color-stop(0.50, #7a924a),
               to(#94aa64));
       -moz-border-radius: 5px;
       -webkit-border-radius: 5px;
       border-radius: 5px;
       border: 1px solid #7d8862;
       -moz-box-shadow:
               0px -1px 0px rgba(170,170,170,1),
               inset 0px -1px 1px rgba(255,255,255,0.7);
       -webkit-box-shadow:
               0px -1px 0px rgba(170,170,170,1),
               inset 0px -1px 1px rgba(255,255,255,0.7);
       box-shadow:
               0px -1px 0px rgba(170,170,170,1),
               inset 0px -1px 1px rgba(255,255,255,0.7);
       text-shadow:
               0px 1px 0px rgba(000,000,000,0.3),
               0px 0px 0px rgba(255,255,255,0);
}L'effet est comme indiqué sur l'image :

Ce qui précède a partagé avec vous le code sympa de la page de connexion implémenté par HTML et CSS. Cela peut être difficile pour les débutants. Cet exemple est une application complète des connaissances HTML et CSS. , alors assurez-vous de comprendre les bases. Accrochez-vous, j'espère que ce tutoriel vous aidera !
【Tutoriels associés recommandés】
1 Tutoriel HTML
2 Tutoriel CSS3
3.
Ce qui précède est le contenu détaillé de. pour plus d'informations, suivez d'autres articles connexes sur le site Web de PHP en chinois!