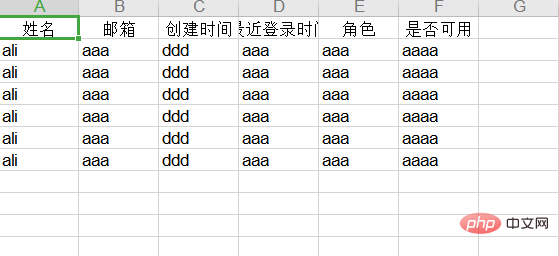

La méthode de mise en œuvre est la suivante :
(Recommandation du didacticiel vidéo : cours Java)
1. nouveau projet SpringBoot
2. Importer les dépendances –pom.xml
<?xml version="1.0" encoding="UTF-8"?>
<project xmlns="http://maven.apache.org/POM/4.0.0" xmlns:xsi="http://www.w3.org/2001/XMLSchema-instance"
	xsi:schemaLocation="http://maven.apache.org/POM/4.0.0 https://maven.apache.org/xsd/maven-4.0.0.xsd">
	<modelVersion>4.0.0</modelVersion>
	<parent>
		<groupId>org.springframework.boot</groupId>
		<artifactId>spring-boot-starter-parent</artifactId>
		<version>2.2.6.RELEASE</version>
		<relativePath/> <!-- lookup parent from repository -->
	</parent>
	<groupId>com.briup</groupId>
	<artifactId>demo3</artifactId>
	<version>0.0.1-SNAPSHOT</version>
	<packaging>war</packaging>
	<name>demo3</name>
	<description>Demo project for Spring Boot</description>

	<properties>
		<java.version>1.8</java.version>
	</properties>

	<dependencies>
		<dependency>
			<groupId>org.springframework.boot</groupId>
			<artifactId>spring-boot-starter-web</artifactId>
		</dependency>

		<dependency>
			<groupId>org.springframework.boot</groupId>
			<artifactId>spring-boot-starter-tomcat</artifactId>
			<scope>provided</scope>
		</dependency>
		<dependency>
			<groupId>org.springframework.boot</groupId>
			<artifactId>spring-boot-starter-test</artifactId>
			<scope>test</scope>
			<exclusions>
				<exclusion>
					<groupId>org.junit.vintage</groupId>
					<artifactId>junit-vintage-engine</artifactId>
				</exclusion>
			</exclusions>
		</dependency>
		<dependency>
            <groupId>org.apache.poi</groupId>
            <artifactId>poi</artifactId>
            <version>3.6</version>
            <exclusions>
                <exclusion>
                    <groupId>javax.servlet</groupId>
                    <artifactId>servlet-api</artifactId>
                </exclusion>
                <exclusion>
                    <groupId>log4j</groupId>
                    <artifactId>log4j</artifactId>
                </exclusion>
            </exclusions>
        </dependency>
	</dependencies>

	<build>
		<plugins>
			<plugin>
				<groupId>org.springframework.boot</groupId>
				<artifactId>spring-boot-maven-plugin</artifactId>
			</plugin>
		</plugins>
	</build>

</project>3 Créer diverses classes
Créer de nouvelles classes d'entité
N'oubliez pas d'ajouter get/. définir des méthodes
public class User {

	private String username;
	private String email;
	private String createTime;
	private String LastLoginTime;
	private String roleName;
	private String enable;
	public User() {
		super();
	}
}Créer une nouvelle interface de service
import java.util.List;

public interface UserService {
	public List<User> findAllUser();
}Créer un nouvel Impl qui implémente l'interface de service
import java.util.List;

public class UserServiceImpl implements UserService {
	@Override
	public List<User> findAllUser() {
		User user = new User();
		return null;
	}

}Créer une nouvelle classe d'outils ExcelUtil
import java.util.List;
import java.util.Map;
import org.apache.poi.hssf.usermodel.HSSFCell;
import org.apache.poi.hssf.usermodel.HSSFCellStyle;
import org.apache.poi.hssf.usermodel.HSSFRow;
import org.apache.poi.hssf.usermodel.HSSFSheet;
import org.apache.poi.hssf.usermodel.HSSFWorkbook;

public class ExcelUtil {
    public static HSSFWorkbook getHSSFWorkbook(String sheetName,String sheetName1,String sheetName2, String []title, String[]  content,String[] app){

        // 第一步,创建一个HSSFWorkbook,对应一个Excel文件
        HSSFWorkbook wb = new HSSFWorkbook();

        // 第二步,在workbook中添加一个sheet,对应Excel文件中的sheet
        HSSFSheet sheet = wb.createSheet(sheetName);
        HSSFSheet sheet1 = wb.createSheet(sheetName1);
        HSSFSheet sheet2 = wb.createSheet(sheetName2);

        // 第三步,在sheet中添加表头第0行,注意老版本poi对Excel的行数列数有限制
        HSSFRow row = sheet.createRow(0);
        HSSFRow row1 = sheet1.createRow(0);
        HSSFRow row2 = sheet2.createRow(0);

        // 第四步,创建单元格样式,并设置值表头 设置表头居中
        HSSFCellStyle style = wb.createCellStyle();
        style.setAlignment(HSSFCellStyle.ALIGN_CENTER); // 创建一个居中格式

        //声明单元格
        HSSFCell cell = null;

        //创建标题
        for(int i=0;i<title.length;i++){
            //创建一个单元格
            cell = row.createCell(i);
            //给单元格赋值
            cell.setCellValue(title[i]);
            //给单元格设置样式
            cell.setCellStyle(style);
        }
        //创建标题
        for(int i=0;i<title.length;i++){
            //创建一个单元格
            cell = row1.createCell(i);
            //给单元格赋值
            cell.setCellValue(title[i]);
            //给单元格设置样式
            cell.setCellStyle(style);
        }

        //创建内容
        if (content != null && content.length > 0){
        	for(int i=0;i<content.length;i++){
        		row = sheet.createRow(i + 1);
        		for(int j=0;j<content.length;j++){
                    //将内容按顺序赋给对应的列对象
                    row.createCell(j).setCellValue(content[j]);
                }

            }
        }

        if (content != null && content.length > 0){
        	for(int i=0;i<content.length;i++){
        		row1 = sheet1.createRow(i + 1);
        		for(int j=0;j<content.length;j++){
                    //将内容按顺序赋给对应的列对象
                    row1.createCell(j).setCellValue(content[j]);
                }

            }
        }
        if (app != null && app.length > 0){
        	for(int i=0;i<app.length;i++){
        		row2 = sheet2.createRow(i + 1);
        		for(int j=0;j<app.length;j++){
                    //将内容按顺序赋给对应的列对象
                    row2.createCell(j).setCellValue(app[j]);
                }
            }
        }
        return wb;
    }
}Créez une nouvelle classe Controller
import java.io.OutputStream;
import java.text.SimpleDateFormat;
import java.util.ArrayList;
import java.util.List;
import javax.servlet.http.HttpServletResponse;
import org.apache.poi.hssf.usermodel.HSSFWorkbook;
import org.springframework.util.StringUtils;
import org.springframework.web.bind.annotation.RequestBody;
import org.springframework.web.bind.annotation.RequestMapping;
import org.springframework.web.bind.annotation.ResponseBody;
import org.springframework.web.bind.annotation.RestController;

@RestController
@RequestMapping("/MyTest")
public class HelloController {
    @ResponseBody
    @RequestMapping("/hello")
    public void export(@RequestBody(required = false) User user,String username,HttpServletResponse response) throws Exception {

        if (user ==null && !StringUtils.isEmpty(username)){
            //GET 请求的参数
            user = new User();
            user.setUsername(username);
        }
        UserService userService = new UserServiceImpl();
		//获取数据
        List<User> list = userService.findAllUser();

        //excel标题
        String[] title = {"姓名", "邮箱", "创建时间", "最近登录时间","角色","是否可用"};

        //excel文件名
        String fileName = System.currentTimeMillis() + ".xls";

        //sheet名
        String sheetName = "用户信息";
        String sheetName1 = "hello";
        String sheetName2 = "xixi";

        //没有数据就传入null吧,Excel工具类有对null判断
        String[] content= {"ali","aaa","ddd","aaa","aaa","aaaa"};
        String[] app= {"bbbb","bbbb","bbbb","bbbb","bbbb","bbbb",};
        if (list != null && list.size() > 0){
            SimpleDateFormat sdf = new SimpleDateFormat("yyyy-MM-dd");
            for (int i = 0; i < list.size(); i++) {
                User obj = list.get(i);

                content[1] = obj.getUsername();
                content[1] = obj.getEmail();
                content[2] = obj.getCreateTime() == null ? "" : sdf.format(obj.getCreateTime());
                content[3] = obj.getLastLoginTime() == null ? "": sdf.format(obj.getLastLoginTime());
                content[4] = obj.getRoleName();
            }
        }
        if (list != null && list.size() > 0){
            SimpleDateFormat sdf = new SimpleDateFormat("yyyy-MM-dd");
            for (int i = 0; i < list.size(); i++) {
                User obj = list.get(i);

                app[1] = obj.getUsername();
                app[1] = obj.getEmail();
                app[2] = obj.getCreateTime() == null ? "" : sdf.format(obj.getCreateTime());
                app[3] = obj.getLastLoginTime() == null ? "": sdf.format(obj.getLastLoginTime());
                app[4] = obj.getRoleName();
            }
        }

        //创建HSSFWorkbook
        HSSFWorkbook wb = ExcelUtil.getHSSFWorkbook(sheetName,sheetName1,sheetName2, title, content,app);
//        HSSFWorkbook wb1 = ExcelUtil.getHSSFWorkbook(sheetName1, title, content);

        //响应到客户端
        try {
            fileName = new String(fileName.getBytes(), "UTF-8");
            response.setContentType("application/vnd.ms-excel;charset=utf-8");
            response.setHeader("Content-Disposition", "attachment; filename=" + fileName);
            OutputStream os = response.getOutputStream();
            wb.write(os);
            os.flush();
            os.close();
        } catch (Exception e) {
            e.printStackTrace();
        }
    }
}Définissez l'application .properties
server.port=8081
La chose la plus importante à noter est la suivante : la classe Application doit être dans le package le plus externe ! ! !
4. Dernière visite
localhost:8081/MyTest/hello
Résultat :

Aucun front-end écrit , Vous pouvez écrire un code HTML, définir une balise a et cliquer sur un événement.
Recommandations associées : Démarrez avec Java
Ce qui précède est le contenu détaillé de. pour plus d'informations, suivez d'autres articles connexes sur le site Web de PHP en chinois!