
 base de données
Redis
Tutoriel détaillé sur l'intégration du framework Redis pour construire SpringBoot2.X
base de données
Redis
Tutoriel détaillé sur l'intégration du framework Redis pour construire SpringBoot2.X
Tutoriel détaillé sur l'intégration du framework Redis pour construire SpringBoot2.X

Tutoriel de base de données Redisla colonne présente le tutoriel de création de SpringBoot2
Tutoriel de base de données Redis
Je ne sais pas quoi écrire, j'ai lu récemment. un article que j'ai déjà écrit sur l'intégration de Springboot par Kafka. Tout le monde a répondu avec beaucoup d'enthousiasme, je pense que cela aide tout le monde, et on peut considérer que j'ai atteint mon objectif. intégrer redis. Parce que je l'ai déjà fait, j'ai du code prêt à l'emploi. Il peut être utilisé après cv, donc j'ai plus de temps, donc je vais vous le donner. Trions l'implémentation du code de l'intégration de Redis par Springboot. De la construction du projet à la mise en œuvre du code source, tout est inclus ci-dessous. Lisez-le patiemment, je pense que cela vous sera utile D'accord, sans plus tarder, commençons. Eh bien, de la même manière, il est toujours recommandé de le faire. implémentez-le sur votre propre PC Compte public personnel : Java Architect Alliance, mise à jour quotidienne des articles techniques 1. Utilisez Spring Initializr pour créer un projet Web de projet
1. →Projet3. Ensuite, comme le montre la figure, vérifiez les dépendances requises et Spring Initializr importera automatiquement le démarreur requis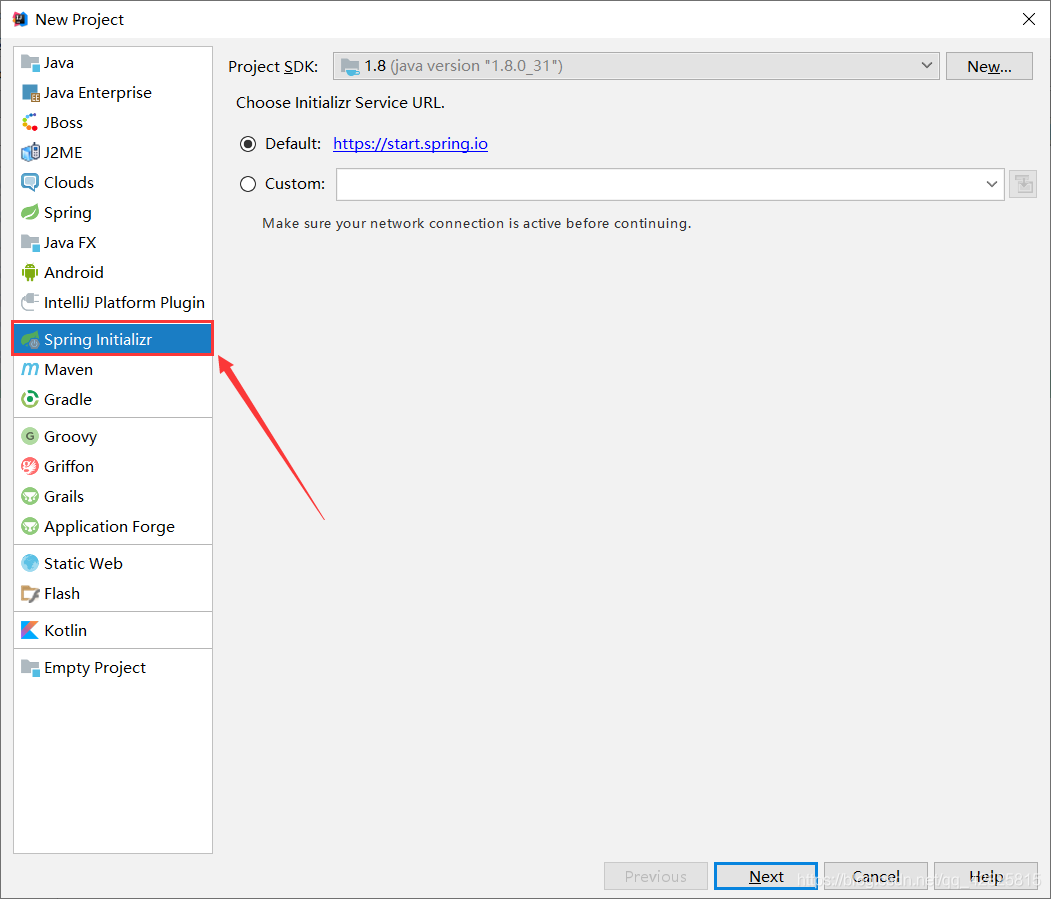
Une fois le projet créé avec succès, les dépendances dans le fichier. pom.xml sont les suivants 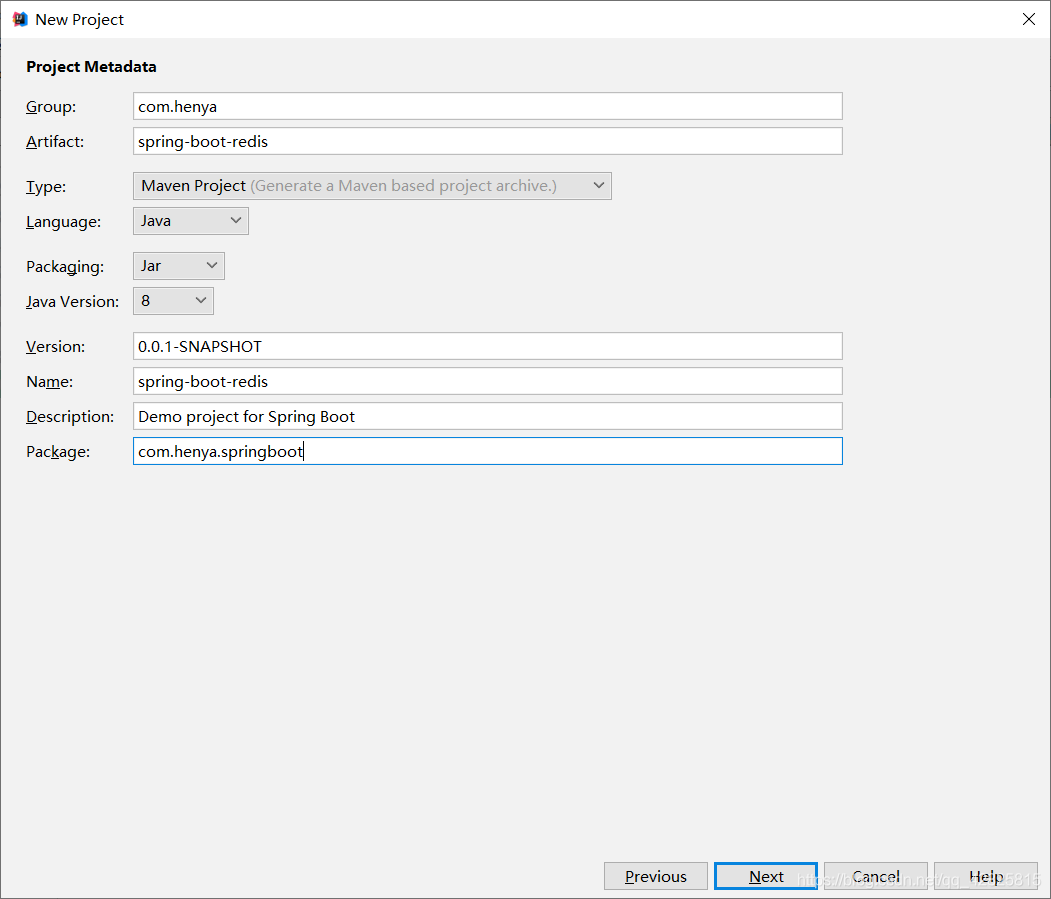
<?xml version="1.0" encoding="UTF-8"?>
<project xmlns="http://maven.apache.org/POM/4.0.0" xmlns:xsi="http://www.w3.org/2001/XMLSchema-instance"
	xsi:schemaLocation="http://maven.apache.org/POM/4.0.0 https://maven.apache.org/xsd/maven-4.0.0.xsd">
	<modelVersion>4.0.0</modelVersion>
	<parent>
		<groupId>org.springframework.boot</groupId>
		<artifactId>spring-boot-starter-parent</artifactId>
		<version>2.2.2.RELEASE</version>
		<relativePath/> <!-- lookup parent from repository -->
	</parent>
	<groupId>com.heny</groupId>
	<artifactId>spring-boot-redis</artifactId>
	<version>0.0.1-SNAPSHOT</version>
	<name>spring-boot-redis</name>
	<description>Demo project for Spring Boot</description>

	<properties>
		<java.version>1.8</java.version>
	</properties>

	<dependencies>
		<dependency>
			<groupId>org.springframework.boot</groupId>
			<artifactId>spring-boot-starter-web</artifactId>
		</dependency>
		<dependency>
			<groupId>org.mybatis.spring.boot</groupId>
			<artifactId>mybatis-spring-boot-starter</artifactId>
			<version>2.1.1</version>
		</dependency>

		<dependency>
			<groupId>mysql</groupId>
			<artifactId>mysql-connector-java</artifactId>
			<scope>runtime</scope>
		</dependency>
		<dependency>
			<groupId>org.springframework.boot</groupId>
			<artifactId>spring-boot-starter-test</artifactId>
			<scope>test</scope>
			<exclusions>
				<exclusion>
					<groupId>org.junit.vintage</groupId>
					<artifactId>junit-vintage-engine</artifactId>
				</exclusion>
			</exclusions>
		</dependency>
	</dependencies>

	<build>
		<plugins>
			<plugin>
				<groupId>org.springframework.boot</groupId>
				<artifactId>spring-boot-maven-plugin</artifactId>
			</plugin>
		</plugins>
	</build>

</project>
5 Ajoutez le démarreur Redis 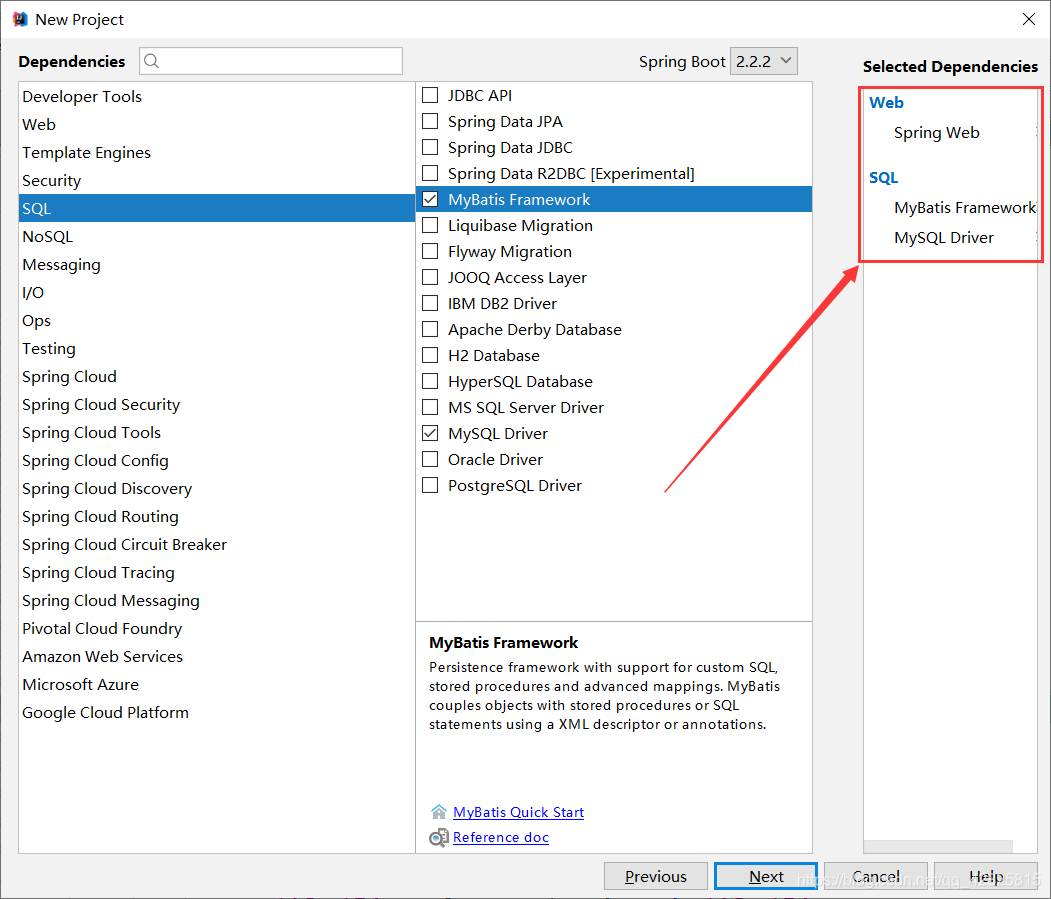
<dependency>
		<groupId>org.springframework.boot</groupId>
		<artifactId>spring-boot-starter-data-redis</artifactId>
	</dependency>
package com.henya.springboot.bean;

import java.io.Serializable;

public class Employee implements Serializable{

	private Integer id;
	private String lastName;
	private String email;
	private Integer gender; //性别 1男 0女
	private Integer dId;


	public Employee() {
		super();
	}


	public Employee(Integer id, String lastName, String email, Integer gender, Integer dId) {
		super();
		this.id = id;
		this.lastName = lastName;
		this.email = email;
		this.gender = gender;
		this.dId = dId;
	}

	public Integer getId() {
		return id;
	}
	public void setId(Integer id) {
		this.id = id;
	}
	public String getLastName() {
		return lastName;
	}
	public void setLastName(String lastName) {
		this.lastName = lastName;
	}
	public String getEmail() {
		return email;
	}
	public void setEmail(String email) {
		this.email = email;
	}
	public Integer getGender() {
		return gender;
	}
	public void setGender(Integer gender) {
		this.gender = gender;
	}
	public Integer getdId() {
		return dId;
	}
	public void setdId(Integer dId) {
		this.dId = dId;
	}
	@Override
	public String toString() {
		return "Employee [id=" + id + ", lastName=" + lastName + ", email=" + email + ", gender=" + gender + ", dId="
				+ dId + "]";
	}
}Lors de l'écriture d'objets JavaBean, vous devez implémenter l'interface Serialisable, sinon le L'erreur suivante sera signalée :
Impossible de désérialiser ; l'exception imbriquée est org.springframework.core.serializer.support.SerializationFailedException
7. Fichier de configuration application.properties Configurer les informations de la source de données dans
#serverTimezone用于指定时区,不然会报错
spring.datasource.url=jdbc:mysql://localhost:3306/cache?serverTimezone=UTC
spring.datasource.username=root
spring.datasource.password=123456

# 开启驼峰命名法规则
mybatis.configuration.map-underscore-to-camel-case=true
#日志级别
logging.level.com.henya.springboot.mapper=debug
8. Utilisez la version annotée de Mybatis pour créer Mapper
package com.henya.springboot.mapper;


import com.henya.springboot.bean.Employee;
import org.apache.ibatis.annotations.*;

@Mapper
public interface EmployeeMapper {

 @Select("SELECT * FROM employee WHERE id=#{id}")
 public Employee getEmpById(Integer id);

 @Update("UPDATE employee SET lastName=#{lastName},email=#{email},gender=#{gender},d_id=#{dId} WHERE id=#{id}")
 public void updateEmp(Employee employee);

 @Delete("DELETE FROM emlpoyee WHERE id=#{id}")
 public void delEmpById(Integer id);

 @Insert("INSERT INTO employee(lastName, email, gender, d_id) VALUES (#{lastName}, #{email}, #{gender}, #{dId})")
 public Employee insertEmp(Employee employee);

 @Select("SELECT * FROM employee WHERE lastName=#{lastName}")
 public Employee getEmpByLastName(String lastName);
} Vous devez utiliser l'annotation @MapperScan pour analyser l'interface où se trouve le Mapper. Il vous suffit de l'ajouter à la classe principale du programme. De plus, utilisez @EnableCaching pour activer la mise en cache.
@MapperScan("com.henya.springboot.mapper")
@SpringBootApplication
@EnableCaching //开启缓存
public class SpringBootRedisApplication {

	public static void main(String[] args) {
		SpringApplication.run(SpringBootRedisApplication.class, args);
	}
}9. Écrivez une classe de service pour accéder à la base de données ou au cache Redis
package com.henya.springboot.service;
import com.henya.springboot.bean.Employee;
import com.henya.springboot.mapper.EmployeeMapper;
import org.springframework.beans.factory.annotation.Autowired;
import org.springframework.cache.annotation.*;
import org.springframework.stereotype.Service;

@CacheConfig(cacheNames = "emp") //抽取缓存的公共配置
@Service
public class EmployeeService {
 @Autowired
 EmployeeMapper employeeMapper;

 /**
 * @param id
 * @return
 */
 @Cacheable(cacheNames = {"emp"},keyGenerator = "myKeyGenerator")
 public Employee getEmpById(Integer id) {
 System.err.println("开始查询"+ id +"号员工");
 Employee employee = employeeMapper.getEmpById(id);
 return employee;
 }

 /**
 * @CachePut:既调用方法(这个方法必须要执行),又更新缓存数据
 * @param employee
 * @return
 */
 @CachePut(value = "emp",key = "#result.id")
 public Employee updateEmp(Employee employee){
 System.err.println("开始更新" + employee.getId() + "号员工");
 employeeMapper.updateEmp(employee);
 return employee;
 }

 /**
 * @CacheEvict:缓存清除
 * @param id
 */
 @CacheEvict(value = "emp",beforeInvocation = true)
 public void deleteEmp(Integer id){
 System.err.println("删除" + id + "员工");
 int i = 10/0;
}package com.henya.springboot.controller;
import com.henya.springboot.bean.Employee;
import com.henya.springboot.service.EmployeeService;
import org.springframework.beans.factory.annotation.Autowired;
import org.springframework.web.bind.annotation.GetMapping;
import org.springframework.web.bind.annotation.PathVariable;
import org.springframework.web.bind.annotation.RestController;
/**
* @Description:
* @Author:HenYa
* @CreatTime:2019/12/1 12:44
*/
@RestController
public class EmployeeController {
@Autowired
EmployeeService employeeService;
@GetMapping("/emp/{id}")
public Employee getEmpById(@PathVariable("id") Integer id){
Employee employee = employeeService.getEmpById(id);
return employee;
}
@GetMapping("/emp")
public Employee updateEmp(Employee employee){
Employee emp = employeeService.updateEmp(employee);
return emp;
}
}
1. Accès dans le navigateur, vous pouvez également utiliser la classe de test, l'auteur a utilisé le navigateur pour accéder à http://localhost:8080/emp/1 à des fins de test Lors du premier accès, la console vous demandera de commencer à interroger l'employé n°1, comme indiqué dans la figure.
2. Lors d'un nouvel accès, il n'y a pas de journal SQL dans la console, comme le montre la figure.


static RedisSerializer<Object> java(@Nullable ClassLoader classLoader) {
 return new JdkSerializationRedisSerializer(classLoader);
 }
3. RedisCacheManager personnalisé
package com.henya.springboot.config;
import org.springframework.context.annotation.Bean;
import org.springframework.context.annotation.Configuration;
import org.springframework.data.redis.cache.RedisCacheConfiguration;
import org.springframework.data.redis.cache.RedisCacheManager;
import org.springframework.data.redis.cache.RedisCacheWriter;
import org.springframework.data.redis.connection.RedisConnectionFactory;
import org.springframework.data.redis.serializer.GenericJackson2JsonRedisSerializer;
import org.springframework.data.redis.serializer.RedisSerializationContext;
import org.springframework.data.redis.serializer.RedisSerializer;

/**
 * @Description:
 * @Author:HenYa
 * @CreatTime:2019/12/6 20:50
 */
@Configuration
public class MyRedisConfig {
 @Bean
 public RedisCacheManager empCacheManager(RedisConnectionFactory redisConnectionFactory){
 //RedisCacheManager redisCacheManager = new RedisCacheManager(redisConnectionFactory);
 RedisCacheWriter redisCacheWriter = RedisCacheWriter.nonLockingRedisCacheWriter(redisConnectionFactory);

 RedisSerializer<Object> redisSerializer = new GenericJackson2JsonRedisSerializer();

 RedisSerializationContext.SerializationPair<Object> pair = RedisSerializationContext.SerializationPair.fromSerializer(redisSerializer);
 RedisCacheConfiguration redisCacheConfiguration = RedisCacheConfiguration.defaultCacheConfig().serializeValuesWith(pair);
 // 默认会将CacheName作为key的前缀
 return new RedisCacheManager(redisCacheWriter, redisCacheConfiguration);
 }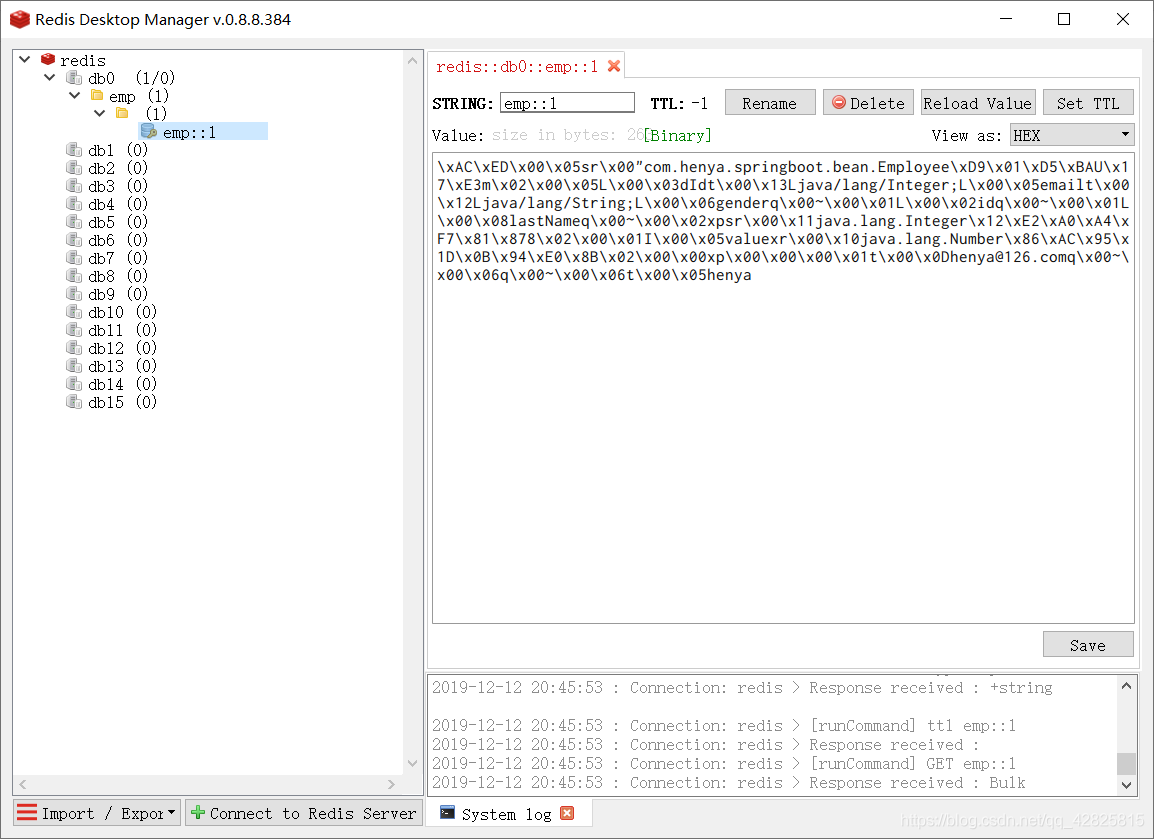
} À ce stade, les données mises en cache dans Redis sont sérialisées au format Json, comme le montre la figure.
 Ce qui précède est le contenu détaillé de. pour plus d'informations, suivez d'autres articles connexes sur le site Web de PHP en chinois!

Outils d'IA chauds

Undresser.AI Undress
Application basée sur l'IA pour créer des photos de nu réalistes

AI Clothes Remover
Outil d'IA en ligne pour supprimer les vêtements des photos.

Undress AI Tool
Images de déshabillage gratuites

Clothoff.io
Dissolvant de vêtements AI

Video Face Swap
Échangez les visages dans n'importe quelle vidéo sans effort grâce à notre outil d'échange de visage AI entièrement gratuit !

Article chaud
Outils chauds

Bloc-notes++7.3.1
Éditeur de code facile à utiliser et gratuit

SublimeText3 version chinoise
Version chinoise, très simple à utiliser

Envoyer Studio 13.0.1
Puissant environnement de développement intégré PHP

Dreamweaver CS6
Outils de développement Web visuel

SublimeText3 version Mac
Logiciel d'édition de code au niveau de Dieu (SublimeText3)
Sujets chauds


 Comment construire le mode Cluster Redis
Apr 10, 2025 pm 10:15 PM
Comment construire le mode Cluster Redis
Apr 10, 2025 pm 10:15 PM
Le mode Redis Cluster déploie les instances Redis sur plusieurs serveurs grâce à la rupture, à l'amélioration de l'évolutivité et de la disponibilité. Les étapes de construction sont les suivantes: Créez des instances de redis étranges avec différents ports; Créer 3 instances Sentinel, Moniteur Redis Instances et basculement; Configurer les fichiers de configuration Sentinel, ajouter des informations d'instance Redis de surveillance et des paramètres de basculement; Configurer les fichiers de configuration d'instance Redis, activer le mode de cluster et spécifier le chemin du fichier d'informations de cluster; Créer un fichier nœuds.conf, contenant des informations de chaque instance redis; Démarrez le cluster, exécutez la commande CREATE pour créer un cluster et spécifiez le nombre de répliques; Connectez-vous au cluster pour exécuter la commande d'informations de cluster pour vérifier l'état du cluster; faire
 Comment effacer les données redis
Apr 10, 2025 pm 10:06 PM
Comment effacer les données redis
Apr 10, 2025 pm 10:06 PM
Comment effacer les données Redis: utilisez la commande flushall pour effacer toutes les valeurs de clé. Utilisez la commande flushdb pour effacer la valeur clé de la base de données actuellement sélectionnée. Utilisez SELECT pour commuter les bases de données, puis utilisez FlushDB pour effacer plusieurs bases de données. Utilisez la commande del pour supprimer une clé spécifique. Utilisez l'outil Redis-CLI pour effacer les données.
 Comment lire la file d'attente redis
Apr 10, 2025 pm 10:12 PM
Comment lire la file d'attente redis
Apr 10, 2025 pm 10:12 PM
Pour lire une file d'attente à partir de Redis, vous devez obtenir le nom de la file d'attente, lire les éléments à l'aide de la commande LPOP et traiter la file d'attente vide. Les étapes spécifiques sont les suivantes: Obtenez le nom de la file d'attente: Nommez-le avec le préfixe de "Fitre:" tel que "Fitre: My-Quyue". Utilisez la commande LPOP: éjectez l'élément de la tête de la file d'attente et renvoyez sa valeur, telle que la file d'attente LPOP: My-Queue. Traitement des files d'attente vides: si la file d'attente est vide, LPOP renvoie NIL et vous pouvez vérifier si la file d'attente existe avant de lire l'élément.
 Comment utiliser la commande redis
Apr 10, 2025 pm 08:45 PM
Comment utiliser la commande redis
Apr 10, 2025 pm 08:45 PM
L'utilisation de la directive Redis nécessite les étapes suivantes: Ouvrez le client Redis. Entrez la commande (Verbe Key Value). Fournit les paramètres requis (varie de l'instruction à l'instruction). Appuyez sur Entrée pour exécuter la commande. Redis renvoie une réponse indiquant le résultat de l'opération (généralement OK ou -err).
 Comment utiliser un seul fileté redis
Apr 10, 2025 pm 07:12 PM
Comment utiliser un seul fileté redis
Apr 10, 2025 pm 07:12 PM
Redis utilise une architecture filetée unique pour fournir des performances élevées, une simplicité et une cohérence. Il utilise le multiplexage d'E / S, les boucles d'événements, les E / S non bloquantes et la mémoire partagée pour améliorer la concurrence, mais avec des limites de limitations de concurrence, un point d'échec unique et inadapté aux charges de travail à forte intensité d'écriture.
 Comment utiliser Redis Lock
Apr 10, 2025 pm 08:39 PM
Comment utiliser Redis Lock
Apr 10, 2025 pm 08:39 PM
L'utilisation des opérations Redis pour verrouiller nécessite l'obtention du verrouillage via la commande setnx, puis en utilisant la commande Expire pour définir le temps d'expiration. Les étapes spécifiques sont les suivantes: (1) Utilisez la commande setnx pour essayer de définir une paire de valeurs de clé; (2) Utilisez la commande Expire pour définir le temps d'expiration du verrou; (3) Utilisez la commande del pour supprimer le verrouillage lorsque le verrouillage n'est plus nécessaire.
 Comment lire le code source de Redis
Apr 10, 2025 pm 08:27 PM
Comment lire le code source de Redis
Apr 10, 2025 pm 08:27 PM
La meilleure façon de comprendre le code source redis est d'aller étape par étape: familiarisez-vous avec les bases de Redis. Sélectionnez un module ou une fonction spécifique comme point de départ. Commencez par le point d'entrée du module ou de la fonction et affichez le code ligne par ligne. Affichez le code via la chaîne d'appel de fonction. Familiez les structures de données sous-jacentes utilisées par Redis. Identifiez l'algorithme utilisé par Redis.
 Moniteur Disd Droplet avec service d'exportateur Redis
Apr 10, 2025 pm 01:36 PM
Moniteur Disd Droplet avec service d'exportateur Redis
Apr 10, 2025 pm 01:36 PM
La surveillance efficace des bases de données Redis est essentielle pour maintenir des performances optimales, identifier les goulots d'étranglement potentiels et assurer la fiabilité globale du système. Le service Redis Exporter est un utilitaire puissant conçu pour surveiller les bases de données Redis à l'aide de Prometheus. Ce didacticiel vous guidera à travers la configuration et la configuration complètes du service Redis Exportateur, en vous garantissant de créer des solutions de surveillance de manière transparente. En étudiant ce tutoriel, vous réaliserez les paramètres de surveillance entièrement opérationnels
