

Comment utiliser le composant Typeahead dans Bootstrap


Bootstrap 中的 Typeahead 组件就是通常所说的自动完成 AutoComplete,功能很强大,但是,使用上并不太方便。这里我们将介绍一下这个组件的使用。
相关推荐:《bootstrap基础教程》
第一,简单使用
首先,最简单的使用方式,就是直接在标记中声明,通过 data-provide="typeahead" 来声明这是一个 typeahead 组件,通过 data-source= 来提供数据。当然了,你还必须提供 bootstrap-typeahead.js 脚本。
<html>
<head>
<link href="bootstrap.min.css" rel="stylesheet" type="text/css" />
</head>
<body>
<div style="margin: 50px 50px">
<label for="product_search">Product Search: </label>
<input id="product_search" type="text" data-provide="typeahead"
data-source='["Deluxe Bicycle", "Super Deluxe Trampoline", "Super Duper Scooter"]'>
</div>
<script src="js/jquery-1.8.3.min.js"></script>
<script src="js/bootstrap-typeahead.js"></script>
</body>
</html>第二,使用脚本填充数据
通常,我们使用脚本来填充数据,那么,页面可以变成如下的形式。
<html>
<head>
<link href="bootstrap.min.css" rel="stylesheet" type="text/css" />
</head>
<body>

<div style="margin: 50px 50px">
<label for="product_search">Product Search: </label>
<input id="product_search" type="text" data-provide="typeahead">
</div>

<script src="js/jquery-1.8.3.min.js"></script>
<script src="js/bootstrap-typeahead.js"></script>

<script>
$(document).ready(function($) {
   // Workaround for bug in mouse item selection
   $.fn.typeahead.Constructor.prototype.blur = function() {
      var that = this;
      setTimeout(function () { that.hide() }, 250);
   };

   $('#product_search').typeahead({
      source: function(query, process) {
         return ["Deluxe Bicycle", "Super Deluxe Trampoline", "Super Duper Scooter"];
      }
   });
})
</script>

</body>
</html>注意,我们提供了一个 source 函数来提供数据,这个函数接收两个参数,第一个参数 query 表示用户的输入,第二个参数是 process 函数,这个 process 函数是 typeahead 提供的,用来处理我们的数据。
如果你希望通过 Ajax 调用从服务器端获取匹配的数据,那么,在异步完成的处理函数中,你需要获取一个匹配的字符串数组,然后,将这个数组作为参数,调用 process 函数。
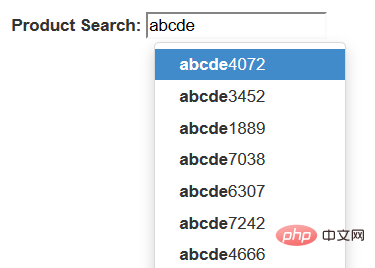
第三,支持 Ajax 获取数据
说了半天,数据都是从本地获取的,到底如何从服务器端获取数据呢?
其实很简单,在 source 函数中,自己调用 Ajax 方法来获取数据,主要注意的是,在获取数据之后,调用 typeahead 的 process 函数处理即可。
$('#product_search').typeahead({
    source: function (query, process) {
        var parameter = {query: query};
        $.post('@Url.Action("AjaxService")', parameter, function (data) {
            process(data);
        });
    }
});当然了,在服务器上,你需要创建一个服务来提供数据,这里,我们演示使用随机数来生成一组随机数据的方法。
public ActionResult AjaxService(string query)
{
    System.Collections.ArrayList list
        = new System.Collections.ArrayList();
    System.Random random = new Random();

    for (int i = 0; i < 20; i++)
    {
        string item  = string.Format("{0}{1}", query, random.Next(10000));
        list.Add(item);
    }
    return this.Json(list);
}第四,使用 highlighter 和 updater
除了使用 source 函数之外,还可以使用 highlighter 函数来特别处理匹配项目的显示,使用 updater 函数,在选择了某个匹配项之后,做出一些后继的处理。

默认的 highlighter 是这样实现的,item 是匹配的项目,找到匹配的部分之后,使用 加粗了。 而 updater 的默认实现就更加简单了。 我们可以重写这两个函数,来实现自定义的处理。 实际上,你的数据可能是一组对象而不是一个字符串数组,下面的例子中,我们使用一个产品对象的数组来说明,每个产品对象有一个 id 编号,还有名称 name 和价格 price . 我们希望能够在提示中显示产品的更加详细的信息。 首先,修改我们的 source 函数,原来这个函数返回一个字符串的数组,现在我们返回一个产品 id 的数组,但是,process 函数期望得到一个字符串数组的参数,所以,我们将每个 id 都转换为字符串类型。 然后,typeahead 组件就会调用 matcher 函数来检查用户的输入是否与某个项目匹配,你可以使用产品的 id 在产品列表中获取产品对象,然后检查产品的名称与用户的输入是否匹配。 默认的 matcher 直接使用用户的输入来匹配,我们如果使用 id 的话,显然不能匹配,我们需要重写 matcher 函数。 matcher 接收一个当前项目的字符串,用户当前的输入为 this.query,匹配返回 true, 否则返回 false. 默认的 matcher 如下: 将它重写为永远匹配,直接返回 true。而在 highlighter 中将显示结果替换为希望的产品名称和价格组合。在下一步的 highlighter 中,我们使用 Underscore 组件中的 find 方法,通过产品的 id 在产品列表中获取产品对象,然后,显示产品名称和价格的组合。 默认的 updater 直接返回当前匹配的内容,我们这里是一个 id, 需要重写。 在用户选择之后,typeahead 将会调用 updater 函数,我们通过产品的 id 在产品列表中获取产品对象,然后 最后,updater 函数返回一个产品名称的字符串,为输入框提供内容。setSelectedProduct 是我们的一个自定义函数。 下面是全部的代码。 更多编程相关知识,请访问:编程入门!! Ce qui précède est le contenu détaillé de. pour plus d'informations, suivez d'autres articles connexes sur le site Web de PHP en chinois!highlighter: function (item) {
var query = this.query.replace(/[\-\[\]{}()*+?.,\\\^$|#\s]/g, '\\$&')
return item.replace(new RegExp('(' + query + ')', 'ig'), function ($1, match) {
return '<strong>' + match + '</strong>'
})
}updater: function (item) {
return item
}<html>
<head>
<link href="bootstrap.min.css" rel="stylesheet" type="text/css" />
</head>
<body>
<div style="margin: 50px 50px">
<label for="product_search">Product Search: </label>
<input id="product_search" type="text" data-provide="typeahead">
</div>
<script src="js/jquery-1.8.3.min.js"></script>
<script src="js/bootstrap-typeahead.js"></script>
<script>
$(document).ready(function($) {
// Workaround for bug in mouse item selection
$.fn.typeahead.Constructor.prototype.blur = function() {
var that = this;
setTimeout(function () { that.hide() }, 250);
};
$('#product_search').typeahead({
source: function(query, process) {
return ["Deluxe Bicycle", "Super Deluxe Trampoline", "Super Duper Scooter"];
},
highlighter: function(item) {
return "==>" + item + "<==";
},
updater: function(item) {
console.log("'" + item + "' selected.");
return item;
}
});
})
</script>
</body>
</html>第五,使用对象数据
<html>
<head>
    <link href="~/Content/dist/css/bootstrap.min.css" rel="stylesheet" />
</head>
<body>

    <div style="margin: 50px 50px">
        <label for="product_search">Product Search: </label>
        <input id="product_search" type="text" data-provide="typeahead">
    </div>
    <script src="~/Content/dist/js/jquery.js"></script>
    <script src="~/Content/dist/js/bootstrap-typeahead.js"></script>
    <script src="~/Content/dist/js/underscore-min.js"></script>


    <script>
        $(document).ready(function ($) {
            // Workaround for bug in mouse item selection
            $.fn.typeahead.Constructor.prototype.blur = function () {
                var that = this;
                setTimeout(function () { that.hide() }, 250);
            };

            var products = [
            {
                id: 0,
                name: "Deluxe Bicycle",
                price: 499.98
            },
            {
                id: 1,
                name: "Super Deluxe Trampoline",
                price: 134.99
            },
            {
                id: 2,
                name: "Super Duper Scooter",
                price: 49.95
            }
            ];

            $('#product_search').typeahead({
                source: function (query, process) {
                    var results = _.map(products, function (product) {
                        return product.name;
                    });
                    process(results);
                },

                highlighter: function (item) {
                    return "==>" + item + "<==";
                },

                updater: function (item) {
                    console.log("'" + item + "' selected.");
                    return item;
                }
            });
        })
    </script>

</body>
</html>第六,高级用法
, matcher: function (item) {    return ~item.toLowerCase().indexOf(this.query.toLowerCase())
}highlighter: function (id) { var product = _.find(products, function (p) { return p.id == id;
}); return product.name + " ($" + product.price + ")";
}updater: function (item) { return item
}updater: function (id) {
var product = _.find(products, function (p) {
return p.id == id;
});
that.setSelectedProduct(product);
return product.name;
}<html>
<head>
<link href="~/Content/dist/css/bootstrap.min.css" rel="stylesheet" />
</head>
<body>
<div style="margin: 50px 50px">
<label for="product_search">Product Search: </label>
<input id="product_search" type="text" data-provide="typeahead">
<div id="product" style="border-width: 1; padding: 5px; border-style: solid"></div>
</div>
<script src="~/Content/dist/js/jquery.js"></script>
<script src="~/Content/dist/js/bootstrap-typeahead.js"></script>
<script src="~/Content/dist/js/underscore-min.js"></script>
<script>
$(document).ready(function ($) {
// Workaround for bug in mouse item selection
$.fn.typeahead.Constructor.prototype.blur = function () {
var that = this;
setTimeout(function () { that.hide() }, 250);
};
var products = [
{
id: 0,
name: "Deluxe Bicycle",
price: 499.98
},
{
id: 1,
name: "Super Deluxe Trampoline",
price: 134.99
},
{
id: 2,
name: "Super Duper Scooter",
price: 49.95
}
];
var that = this;
$('#product_search').typeahead({
source: function (query, process) {
$('#product').hide();
var results = _.map(products, function (product) {
return product.id + "";
});
process(results);
},
matcher: function (item) {
return true;
},
highlighter: function (id) {    var product = _.find(products, function (p) {        return p.id == id;
    });    return product.name + " ($" + product.price + ")";
},
updater: function (id) {
    var product = _.find(products, function (p) {
        return p.id == id;
    });
    that.setSelectedProduct(product);
    return product.name;
}
});
$('#product').hide();
this.setSelectedProduct = function (product) {
$('#product').html("Purchase: <strong>" + product.name + " ($" + product.price + ")</strong>").show();
}
})
</script>
</body>
</html>

Outils d'IA chauds

Undresser.AI Undress
Application basée sur l'IA pour créer des photos de nu réalistes

AI Clothes Remover
Outil d'IA en ligne pour supprimer les vêtements des photos.

Undress AI Tool
Images de déshabillage gratuites

Clothoff.io
Dissolvant de vêtements AI

AI Hentai Generator
Générez AI Hentai gratuitement.

Article chaud
Outils chauds

Bloc-notes++7.3.1
Éditeur de code facile à utiliser et gratuit

SublimeText3 version chinoise
Version chinoise, très simple à utiliser

Envoyer Studio 13.0.1
Puissant environnement de développement intégré PHP

Dreamweaver CS6
Outils de développement Web visuel

SublimeText3 version Mac
Logiciel d'édition de code au niveau de Dieu (SublimeText3)


 Comment obtenir la barre de recherche bootstrap
Apr 07, 2025 pm 03:33 PM
Comment obtenir la barre de recherche bootstrap
Apr 07, 2025 pm 03:33 PM
Comment utiliser Bootstrap pour obtenir la valeur de la barre de recherche: détermine l'ID ou le nom de la barre de recherche. Utilisez JavaScript pour obtenir des éléments DOM. Obtient la valeur de l'élément. Effectuer les actions requises.
 Comment utiliser Bootstrap en Vue
Apr 07, 2025 pm 11:33 PM
Comment utiliser Bootstrap en Vue
Apr 07, 2025 pm 11:33 PM
L'utilisation de bootstrap dans vue.js est divisée en cinq étapes: installer bootstrap. Importer un bootstrap dans main.js. Utilisez le composant bootstrap directement dans le modèle. Facultatif: style personnalisé. Facultatif: utilisez des plug-ins.
 Comment écrire des lignes fendues sur bootstrap
Apr 07, 2025 pm 03:12 PM
Comment écrire des lignes fendues sur bootstrap
Apr 07, 2025 pm 03:12 PM
Il existe deux façons de créer une ligne divisée bootstrap: en utilisant la balise, qui crée une ligne divisée horizontale. Utilisez la propriété CSS Border pour créer des lignes de fractionnement de style personnalisées.
 Comment faire le centrage vertical de bootstrap
Apr 07, 2025 pm 03:21 PM
Comment faire le centrage vertical de bootstrap
Apr 07, 2025 pm 03:21 PM
Utilisez Bootstrap pour implémenter Centering vertical: Flexbox Méthode: Utilisez les classes D-Flex, Justify-Content-Center et Align-Items-Center pour placer des éléments dans le conteneur Flexbox. Méthode de classe Align-Items-Center: Pour les navigateurs qui ne prennent pas en charge FlexBox, utilisez la classe Align-Items-Center, à condition que l'élément parent ait une hauteur définie.
 Comment redimensionner le bootstrap
Apr 07, 2025 pm 03:18 PM
Comment redimensionner le bootstrap
Apr 07, 2025 pm 03:18 PM
Pour ajuster la taille des éléments dans Bootstrap, vous pouvez utiliser la classe de dimension, qui comprend: ajuster la largeur: .col-, .w-, .mw-ajustement Hauteur: .h-, .min-h-, .max-h-
 Comment configurer le cadre de bootstrap
Apr 07, 2025 pm 03:27 PM
Comment configurer le cadre de bootstrap
Apr 07, 2025 pm 03:27 PM
Pour configurer le framework Bootstrap, vous devez suivre ces étapes: 1. Référez le fichier bootstrap via CDN; 2. Téléchargez et hébergez le fichier sur votre propre serveur; 3. Incluez le fichier bootstrap dans HTML; 4. Compiler les sass / moins au besoin; 5. Importer un fichier personnalisé (facultatif). Une fois la configuration terminée, vous pouvez utiliser les systèmes, composants et styles de grille de Bootstrap pour créer des sites Web et des applications réactifs.
 Comment insérer des photos sur bootstrap
Apr 07, 2025 pm 03:30 PM
Comment insérer des photos sur bootstrap
Apr 07, 2025 pm 03:30 PM
Il existe plusieurs façons d'insérer des images dans Bootstrap: insérer directement les images, en utilisant la balise HTML IMG. Avec le composant d'image bootstrap, vous pouvez fournir des images réactives et plus de styles. Définissez la taille de l'image, utilisez la classe IMG-FLUID pour rendre l'image adaptable. Réglez la bordure en utilisant la classe IMG-border. Réglez les coins arrondis et utilisez la classe Roundée IMG. Réglez l'ombre, utilisez la classe Shadow. Redimensionner et positionner l'image, en utilisant le style CSS. À l'aide de l'image d'arrière-plan, utilisez la propriété CSS d'image d'arrière-plan.
 Que faire si la table bootstrap utilise Ajax pour faire grimper les données
Apr 07, 2025 am 11:54 AM
Que faire si la table bootstrap utilise Ajax pour faire grimper les données
Apr 07, 2025 am 11:54 AM
Solutions à la table Bootstrap Code Bootstrap lors de l'utilisation de AJAX pour obtenir des données à partir du serveur: 1. Définissez le codage de caractères correct du code côté serveur (tel que UTF-8). 2. Définissez l'en-tête de demande dans la demande AJAX et spécifiez le codage des caractères accepté (accepte-charge). 3. Utilisez le convertisseur "Unescape" de la table bootstrap pour décoder l'entité HTML échappée en caractères originaux.
