 cadre php
 Workerman
 Parlons de la façon d'utiliser Workerman pour implémenter la fonction de chat instantané
Parlons de la façon d'utiliser Workerman pour implémenter la fonction de chat instantané
Cet article vous présentera comment utiliser workerman pour mettre en œuvre le chat instantané. Il a une certaine valeur de référence. Les amis dans le besoin peuvent s'y référer. J'espère qu'il sera utile à tout le monde.
Recommandations associées : "tutoriel Workerman"
Documentation de développement : http://doc2.workerman.net/
Téléchargez le fichier d'installation côté serveur :
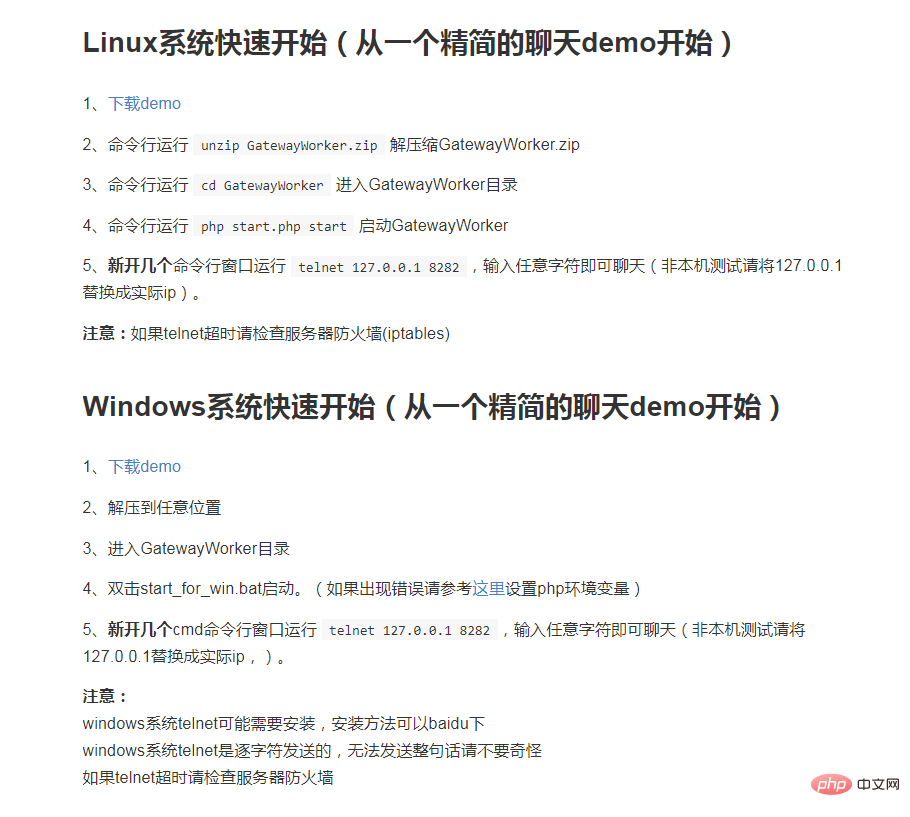
Il existe deux versions : la version Windows et la version Linux. La version Linux que j'ai téléchargée peut également fonctionner sous Windows.
Après ouverture, il y a ces fichiers :
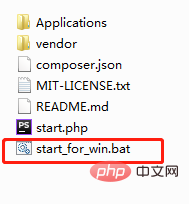
Vous pouvez mettre ce fichier sur le serveur ou dans le projet. Ce qui doit être exécuté est le dernier. Fichier start_for_win.bat .
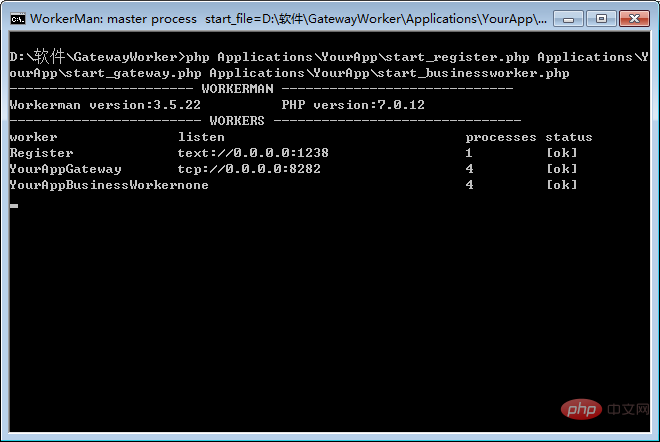
Exécuter avec succès.
Modifiez le fichier start_gateway.php :
<?php
/**
* This file is part of workerman.
*
* Licensed under The MIT License
* For full copyright and license information, please see the MIT-LICENSE.txt
* Redistributions of files must retain the above copyright notice.
*
* @author walkor<walkor@workerman.net>
* @copyright walkor<walkor@workerman.net>
* @link http://www.workerman.net/
* @license http://www.opensource.org/licenses/mit-license.php MIT License
*/
use \Workerman\Worker;
use \Workerman\WebServer;
use \GatewayWorker\Gateway;
use \GatewayWorker\BusinessWorker;
use \Workerman\Autoloader;
// 自动加载类
require_once __DIR__ . '/../../vendor/autoload.php';
// gateway 进程,这里使用Text协议,可以用telnet测试
$gateway = new Gateway("websocket://0.0.0.0:8282");
// gateway名称,status方便查看
$gateway->name = 'YourAppGateway';
// gateway进程数
$gateway->count = 4;
// 本机ip,分布式部署时使用内网ip
$gateway->lanIp = '127.0.0.1';
// 内部通讯起始端口,假如$gateway->count=4,起始端口为4000
// 则一般会使用4000 4001 4002 4003 4个端口作为内部通讯端口
$gateway->startPort = 2900;
// 服务注册地址
$gateway->registerAddress = '127.0.0.1:1238';
// 心跳间隔
$gateway->pingInterval = 60;
// 心跳数据
$gateway->pingData = '{"type":"ping"}';
/*
// 当客户端连接上来时,设置连接的onWebSocketConnect,即在websocket握手时的回调
$gateway->onConnect = function($connection)
{
$connection->onWebSocketConnect = function($connection , $http_header)
{
// 可以在这里判断连接来源是否合法,不合法就关掉连接
// $_SERVER['HTTP_ORIGIN']标识来自哪个站点的页面发起的websocket链接
if($_SERVER['HTTP_ORIGIN'] != 'http://kedou.workerman.net')
{
$connection->close();
}
// onWebSocketConnect 里面$_GET $_SERVER是可用的
// var_dump($_GET, $_SERVER);
};
};
*/
// 如果不是在根目录启动,则运行runAll方法
if(!defined('GLOBAL_START'))
{
Worker::runAll();
}Ligne 24, changez le protocole TCP en protocole websocket
Lignes 38 et 40, définissez la direction du serveur. temps de pulsation envoyé par le client pour détecter si le client est connecté. S'il n'est pas connecté, il sera déconnecté.
Le contenu suivant est commenté par défaut. Vous pouvez l'ouvrir ou le modifier selon vos besoins.
Exécutez à nouveau le fichier start_for_win.bat :
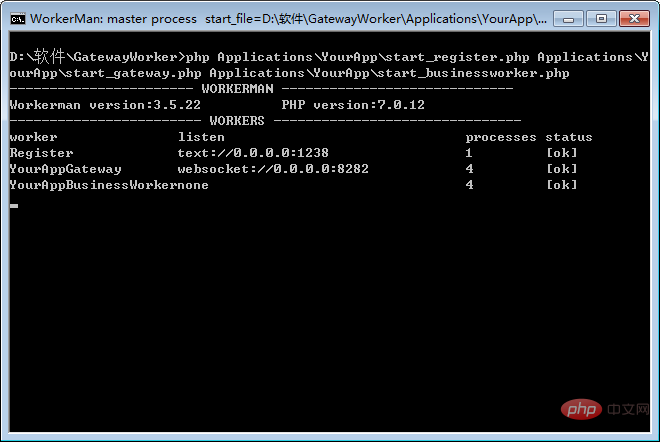
Le protocole deviendra le protocole websocket, et vous pourrez désormais effectuer des opérations au sein du projet.
Vous devez également télécharger un fichier supplémentaire : https://github.com/walkor/GatewayClient
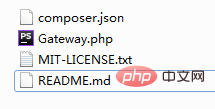
Mettez ces fichiers dans le fichier d'extension thinkphp Fold it (j'utilise la version thinkphp5.0) :
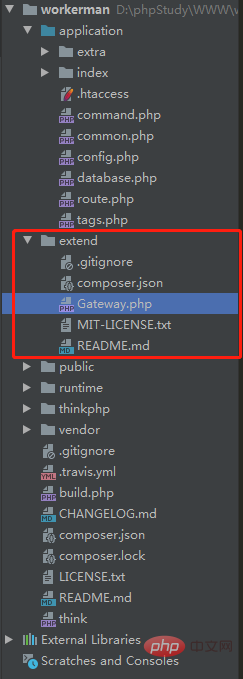
Presque toutes les méthodes sont écrites dans le fichier Gateway.php.
Écrivez une page frontale simple :
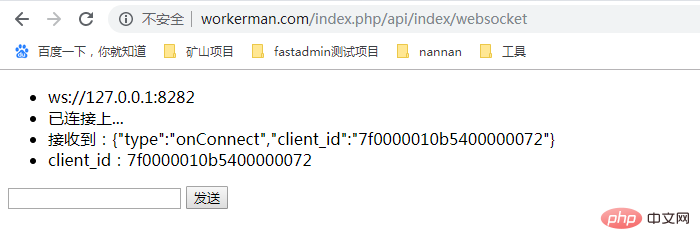
<!DOCTYPE html>
<html>
<head>
<meta charset="UTF-8">
<meta name="viewport" content="width=device-width, initial-scale=1.0">
<meta http-equiv="X-UA-Compatible" content="ie=edge">
<title></title>
</head>
<body>
<ul id="msgUl">
<li>ws://127.0.0.1:8282</li>
</ul>
<input type="" name="" id="sendValue" value="" />
<button type="button" id="sendButton">发送</button>
<div style="margin-top: 100px">
{volist name="msg" id="vo" empty="这里没有数据" key ='s'}
<br/>
<span>{$vo.user_name}:</span>
<span>{$vo.msg}</span>
<span>{$vo.createtime}</span>
<br/>
{/volist}
</div>
<script src="http://www.zhihuapinpai.com/static/index/js/jquery-1.11.3.min.js"></script>
<script>
// var ws = new WebSocket("ws://123.56.216.232:8282");
var ws = new WebSocket("ws://127.0.0.1:8282");
ws.onopen = function() {
$('#msgUl').append('<li>已连接上...</li>')
sendValue();
};
ws.onmessage = function(evt) {
$('#msgUl').append('<li>接收到:' + evt.data + '</li>')
var obj = JSON.parse(evt.data);
if (obj.type == 'onConnect') {
// 连接成功
$('#msgUl').append('<li>client_id:' + obj.client_id + '</li>')
$.ajax({
type:"POST",
url:"/index.php/api/Index/user_bind",
data:{
client_id:obj.client_id
},
dataType: "html",
success: function(data){
console.log('成功')
}
});
} else if (obj.type == 'ping') {
// 心跳检测 不做任何处理
} else if (obj.type == 'chatGroup') {
// 群组聊天
$('#msgUl').append('<li>接收到:' + evt.data + '</li>')
}
};
ws.onclose = function() {
// console.log('连接已关闭...');
$('#msgUl').append('<li>连接已关闭...</li>')
};
function sendValue() {
$('#sendButton').click(function() {
var thisValue = $('#sendValue').val();
if (thisValue) {
ws.send(thisValue);
$('#msgUl').append('<li>发送数据:' + thisValue + '</li>')
$.get("/index.php/api/Index/send_msg/msg/"+thisValue,function (data,status) {
console.log('成功:'+thisValue)
});
}
})
}
</script>
</body>
</html>Les lignes 42 à 52 transmettent le client_id à l'arrière-plan et le lient à l'utilisateur dans la table utilisateur .
Code backend :
<?php
namespace app\api\controller;
use think\Controller;
use GatewayClient\Gateway;
use think\Db;
class Index extends Controller
{
public function websocket(){
$where=[];
$user_id=1;
$where['from_id|to_id']=$user_id;
$msg=Db::name('msg')->where($where)->select();
foreach ($msg as $key=>$val){
$msg[$key]['createtime']=date('Y-m-d H:i:s',$val['createtime']);
$msg[$key]['user_name']=Db::name('user')->where(['id'=>$val['from_id']])->value('name');
}
$this->assign('msg',$msg);
return view();
}
//绑定用户
public function user_bind($user_id=1){
//$user_id=1; //发送人用户id
$client_id = input('post.client_id');
// $user=Db::name('user')->where(['id'=>$user_id])->find();
Gateway::bindUid($client_id, 1);
return $client_id;
}
//发送信息
public function send_msg(){
$msg=input('msg');
if($msg){
$data=[
'msg'=>$msg,
'from_id'=>1,
'to_id'=>2,
'createtime'=>time()
];
Db::name('msg')->insert($data);
Gateway::sendToUid(1,$msg);
Gateway::sendToUid(2,$msg);
}
return 'success';
}
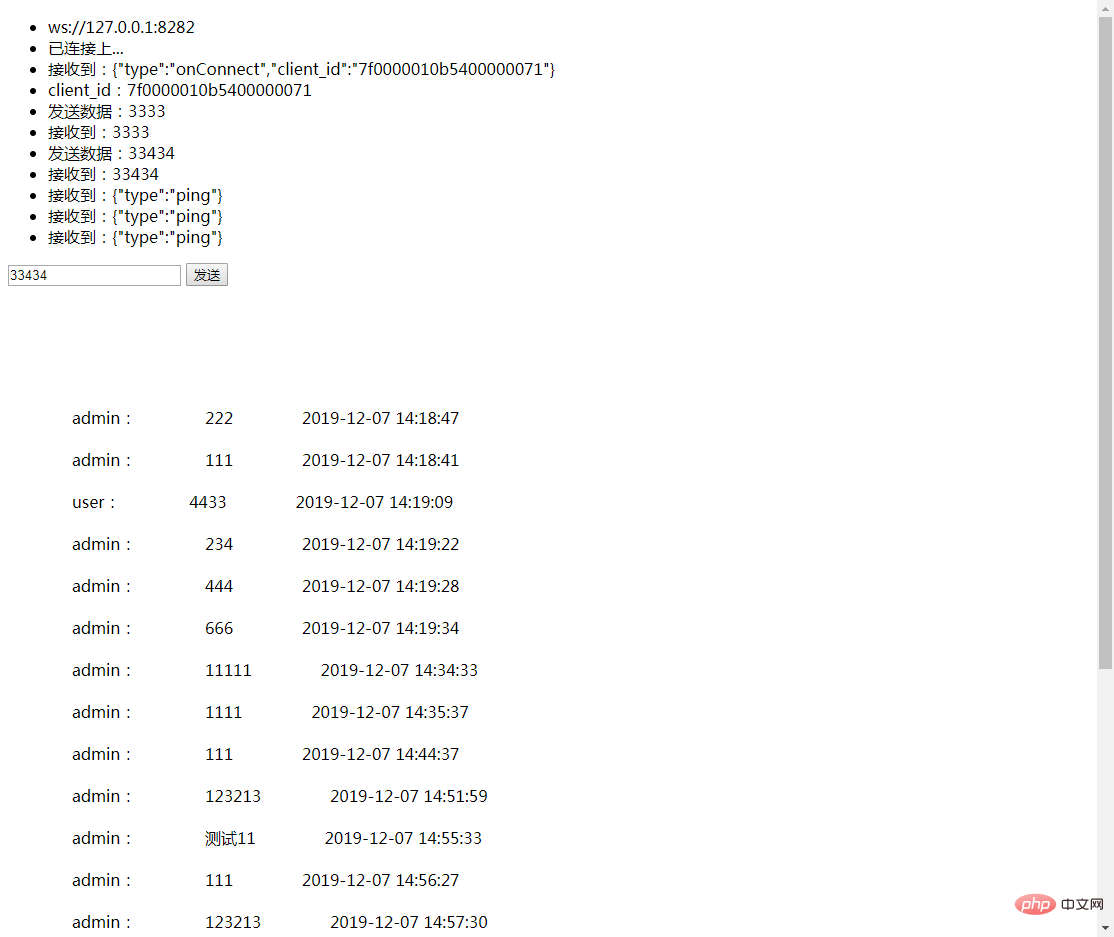
}Envoyez le message et stockez-le dans la base de données, et la page s'affichera.
Pour plus de connaissances sur la programmation informatique, veuillez visiter : Vidéo de programmation ! !
Ce qui précède est le contenu détaillé de. pour plus d'informations, suivez d'autres articles connexes sur le site Web de PHP en chinois!

Outils d'IA chauds

Undresser.AI Undress
Application basée sur l'IA pour créer des photos de nu réalistes

AI Clothes Remover
Outil d'IA en ligne pour supprimer les vêtements des photos.

Undress AI Tool
Images de déshabillage gratuites

Clothoff.io
Dissolvant de vêtements AI

AI Hentai Generator
Générez AI Hentai gratuitement.

Article chaud

Outils chauds

Bloc-notes++7.3.1
Éditeur de code facile à utiliser et gratuit

SublimeText3 version chinoise
Version chinoise, très simple à utiliser

Envoyer Studio 13.0.1
Puissant environnement de développement intégré PHP

Dreamweaver CS6
Outils de développement Web visuel

SublimeText3 version Mac
Logiciel d'édition de code au niveau de Dieu (SublimeText3)
 Implémenter le téléchargement et le téléchargement de fichiers dans les documents Workerman
Nov 08, 2023 pm 06:02 PM
Pour implémenter le téléchargement et le téléchargement de fichiers dans des documents Workerman, des exemples de code spécifiques sont requis Introduction : Workerman est un framework de communication réseau asynchrone PHP hautes performances, simple, efficace et facile à utiliser. Dans le développement réel, le téléchargement et le téléchargement de fichiers sont des exigences fonctionnelles courantes. Cet article explique comment utiliser le framework Workerman pour implémenter le téléchargement et le téléchargement de fichiers, et donne des exemples de code spécifiques. 1. Téléchargement de fichiers : le téléchargement de fichiers fait référence à l'opération de transfert de fichiers de l'ordinateur local vers le serveur. Ce qui suit est utilisé
 Comment mettre en œuvre l'utilisation de base des documents Workerman
Nov 08, 2023 am 11:46 AM
Introduction à la façon d'implémenter l'utilisation de base des documents Workerman : Workerman est un framework de développement PHP hautes performances qui peut aider les développeurs à créer facilement des applications réseau à haute concurrence. Cet article présentera l'utilisation de base de Workerman, y compris l'installation et la configuration, la création de services et de ports d'écoute, la gestion des demandes des clients, etc. Et donnez des exemples de code correspondants. 1. Installez et configurez Workerman. Entrez la commande suivante sur la ligne de commande pour installer Workerman : c
 Lequel est le meilleur, Swoole ou Workerman ?
Apr 09, 2024 pm 07:00 PM
Swoole et Workerman sont tous deux des frameworks de serveur PHP hautes performances. Connu pour son traitement asynchrone, ses excellentes performances et son évolutivité, Swoole convient aux projets qui doivent gérer un grand nombre de requêtes simultanées et un débit élevé. Workerman offre la flexibilité des modes asynchrone et synchrone, avec une API intuitive mieux adaptée à la facilité d'utilisation et aux projets gérant des volumes de concurrence inférieurs.
 Développement Workerman : Comment mettre en œuvre des appels vidéo en temps réel basés sur le protocole UDP
Nov 08, 2023 am 08:03 AM
Développement Workerman : appel vidéo en temps réel basé sur le protocole UDP Résumé : Cet article présentera comment utiliser le framework Workerman pour implémenter la fonction d'appel vidéo en temps réel basée sur le protocole UDP. Nous aurons une compréhension approfondie des caractéristiques du protocole UDP et montrerons comment créer une application d'appel vidéo en temps réel simple mais complète à travers des exemples de code. Introduction : Dans la communication réseau, les appels vidéo en temps réel sont une fonction très importante. Le protocole TCP traditionnel peut rencontrer des problèmes tels que des retards de transmission lors de la mise en œuvre d'appels vidéo en temps réel. Et UDP
 Comment utiliser Workerman pour créer un système d'équilibrage de charge à haute disponibilité
Nov 07, 2023 pm 01:16 PM
Comment utiliser Workerman pour créer un système d'équilibrage de charge à haute disponibilité nécessite des exemples de code spécifiques. Dans le domaine de la technologie moderne, avec le développement rapide d'Internet, de plus en plus de sites Web et d'applications doivent gérer un grand nombre de requêtes simultanées. Afin d’atteindre une haute disponibilité et des performances élevées, le système d’équilibrage de charge est devenu l’un des composants essentiels. Cet article explique comment utiliser le framework open source PHP Workerman pour créer un système d'équilibrage de charge à haute disponibilité et fournit des exemples de code spécifiques. 1. Introduction à Workerman Worke
 Comment implémenter la fonction de minuterie dans le document Workerman
Nov 08, 2023 pm 05:06 PM
Comment implémenter la fonction timer dans le document Workerman Workerman est un puissant framework de communication réseau asynchrone PHP qui fournit une multitude de fonctions, y compris la fonction timer. Utilisez des minuteries pour exécuter du code dans des intervalles de temps spécifiés, ce qui est très approprié pour les scénarios d'application tels que les tâches planifiées et les interrogations. Ensuite, je présenterai en détail comment implémenter la fonction de minuterie dans Workerman et fournirai des exemples de code spécifiques. Étape 1 : Installer Workerman Tout d’abord, nous devons installer Worker
 Comment implémenter la fonction de proxy inverse dans le document Workerman
Nov 08, 2023 pm 03:46 PM
La façon d'implémenter la fonction de proxy inverse dans le document Workerman nécessite des exemples de code spécifiques.Introduction : Workerman est un cadre de communication réseau multi-processus PHP hautes performances qui offre des fonctions riches et des performances puissantes et est largement utilisé dans la communication Web en temps réel et à long terme. connexions. Parmi eux, Workerman prend également en charge la fonction de proxy inverse, qui peut réaliser l'équilibrage de charge et la mise en cache des ressources statiques lorsque le serveur fournit des services externes. Cet article explique comment utiliser Workerman pour implémenter la fonction de proxy inverse.
 Comment implémenter la communication TCP/UDP dans la documentation Workerman
Nov 08, 2023 am 09:17 AM
La façon d'implémenter la communication TCP/UDP dans le document Workerman nécessite des exemples de code spécifiques. Workerman est un framework PHP asynchrone piloté par les événements hautes performances qui est largement utilisé pour implémenter la communication TCP et UDP. Cet article explique comment utiliser Workerman pour implémenter la communication basée sur TCP et UDP et fournit des exemples de code correspondants. 1. Créez un serveur TCP pour la communication TCP. Il est très simple de créer un serveur TCP à l'aide de Workerman. Il vous suffit d'écrire le code suivant : <?ph.


