Qu'est-ce que le module CSS motion path ? Dans cet article, nous en apprendrons plus sur le module CSS motion path, parlerons de son utilisation et présenterons comment utiliser ce module pour créer des animations de chemin simples et complexes.

Il existe un module très intéressant en CSS - CSS Motion Path Module Level 1, qui se traduit par trajectoire de mouvement. Cet article examinera de plus près le chemin de mouvement. Grâce à cet article, vous pouvez apprendre :
Qu'est-ce que CSS Motion Path ? En utilisant les propriétés stipulées dans cette spécification, nous pouvons contrôler l'animation de la transformation de position de l'élément selon un chemin spécifique. De plus, ce chemin peut être très complexe.
Avant d'introduire davantage CSS Motion Path, voyons d'abord comment nous pouvons implémenter l'animation de chemin en utilisant les capacités du CSS traditionnel.
Auparavant, nous voulions déplacer un objet en ligne droite du point A au point B. De manière générale, nous pouvons utiliser transform: translate(), top left | bottom | right ou margin et d'autres attributs qui peuvent modifier la position de l'objet. transform: translate()、top | left | bottom | right 或者 是 margin 之类的可以改变物体位置的属性。
简单的一个 Demo:
<div></div>
div {
    width: 60px;
    height: 60px;
    background: #000;
    animation: move infinite 1s alternate linear;
}
@keyframes move {
    100% {
        transform: translate(100px, 100px);
    }
}对于简单的从 A 点直线运动到 B 点的效果如下:

当然,CSS 也可以实现一些简单的曲线路径动画的。如果我们希望从 A 点运动到 B 点走的不是一条直线,而是一条曲线,该怎么做呢?
对于一些简单的圆弧曲线路径,还是可以借助一些巧妙的办法实现的,看看下面这个例子。
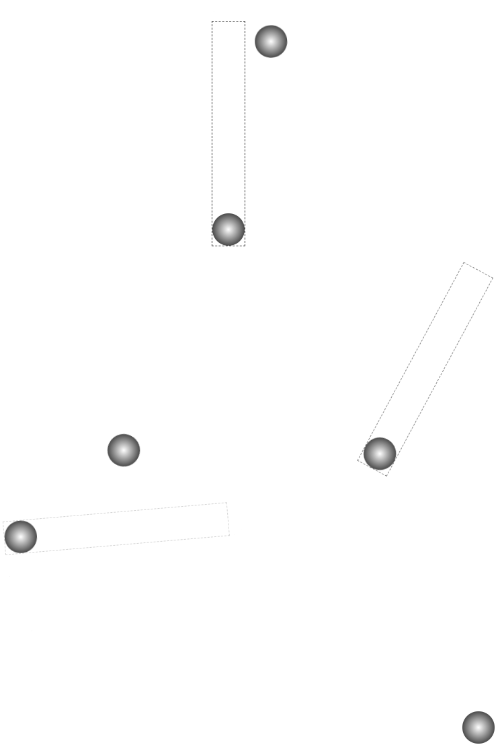
这次,我们使用了两个元素,子元素是希望被曲线运动的小球,但是实际上我们是通过设定了父元素的 transform-origin,让父元素进行了一个 transform: rotate() 的运动带动了子元素的小球:
<div class="g-container">
    <div class="g-ball"></div>
</div>.g-container {
position: relative;
width: 10vmin;
height: 70vmin;
transform-origin: center 0;
animation: rotate 1.5s infinite alternate;
}
.g-ball {
position: absolute;
width: 10vmin;
height: 10vmin;
border-radius: 50%;
background: radial-gradient(circle, #fff, #000);
bottom: 0;
left: 0;
}
@keyframes rotate {
100% {
transform: rotate(90deg);
}
}为了方便理解,在运动的过程中,我让父元素的轮廓显现出来:

这样,我们算是勉强得到了一个非直线路径运动动画,它的实际运动轨迹是一条曲线。
然而,这基本上是之前 CSS 能做到的极限了,使用纯 CSS 的方法,没办法实现更复杂的路径动画,譬如下面这样一条路径动画:

直到现在,我们有了一种更为强大的专门做这个事情的规范,也就是本文的主角 -- CSS Motion Path。
CSS Motion Path 规范主要包含以下几个属性:
offset-path:接收一个 SVG 路径(与 SVG 的path、CSS 中的 clip-path 类似),指定运动的几何路径offset-distance:控制当前元素基于 offset-path 运动的距离offset-position:指定 offset-path 的初始位置offset-anchor:定义沿 offset-path 定位的元素的锚点。 这个也算好理解,运动的元素可能不是一个点,那么就需要指定元素中的哪个点附着在路径上进行运动offset-rotate:定义沿 offset-path 定位时元素的方向,说人话就是运动过程中元素的角度朝向下面,我们使用 Motion Path 实现一个简单的直线位移动画。
<div></div>
div {
    width: 60px;
    height: 60px;
    background: linear-gradient(#fc0, #f0c);
    offset-path: path("M 0 0 L 100 100");
    offset-rotate: 0deg;
    animation: move 2000ms infinite alternate ease-in-out;
}
@keyframes move {
    0% {
        offset-distance: 0%;
    }
    100% {
        offset-distance: 100%;
    }
}offset-path 接收一个 SVG 的 path 路径,这里我们的路径内容是一条自定义路径 path("M 0 0 L 100 100"),翻译过来就是从 0 0 点运动到 100px 100px 点。
offset-path 接收一个 SVG 路径,指定运动的几何路径。与 SVG 的path、CSS 中的 clip-path 类似,对于这个 SVG Path 还不太了解的可以戳这里先了解下 SVG 路径内容:SVG 路径我们会得到如下结果:

通过控制元素的 offset-distance 从 0% 变化到 100%
div {
    // 只改变运动路径,其他保持一致
    offset-path: path("M 0 0 L 100 0 L 200 0 L 300 100 L 400 0 L 500 100 L 600 0 L 700 100 L 800 0");
    animation: move 2000ms infinite alternate linear;
}
@keyframes move {
    0% {
        offset-distance: 0%;
    }
    100% {
        offset-distance: 100%;
    }
}<svg width="400" height="160" xmlns="http://www.w3.org/2000/svg"> <path d="M 10 80 C 80 10, 130 10, 190 80 S 300 150, 360 80" stroke="black" fill="transparent"/> </svg>
 🎜🎜🎜Manière traditionnelle CSS d'implémenter l'animation de chemin de courbe🎜🎜🎜Bien sûr, CSS peut également implémenter une animation simple de chemin de courbe. Et si nous voulions nous déplacer du point A au point B non pas en ligne droite, mais en courbe ? 🎜🎜Pour certains chemins de courbes en arc simples, vous pouvez toujours y parvenir à l'aide de méthodes intelligentes. Jetez un œil à l'exemple ci-dessous. 🎜🎜Cette fois, nous avons utilisé deux éléments. L'élément enfant est une petite boule que nous espérons déplacer dans une courbe. Mais en fait, nous avons défini le
 transform-origin de l'élément parent pour laisser le. L'élément parent effectue la transformation. Un mouvement de transform:rotate() entraîne la boule de l'élément enfant : 🎜<div></div>
div:nth-child(2) {
    width: 40px;
    height: 40px;
    background: linear-gradient(#fc0, #f0c);
    offset-path: path('M 10 80 C 80 10, 130 10, 190 80 S 300 150, 360 80');
}
@keyframes move {
    0% {
        offset-distance: 0%;
    }
    100% {
        offset-distance: 100%;
    }
} 🎜 🎜De cette façon, nous sommes réticents. Une animation de mouvement de chemin non linéaire est obtenue, et sa trajectoire de mouvement réelle est une courbe. 🎜🎜Cependant, c'est fondamentalement la limite de ce que CSS peut faire auparavant. En utilisant des méthodes CSS pures, il n'y a aucun moyen de réaliser des animations de chemin plus complexes, comme l'animation de chemin suivante : 🎜🎜
 🎜🎜Jusqu'à présent, nous avons une spécification plus puissante spécialisé dans ce domaine est le protagoniste de cet article - 🎜CSS Motion Path🎜. 🎜🎜🎜CSS Motion Path implémente une animation de chemin droit🎜🎜🎜La spécification CSS Motion Path comprend principalement les attributs suivants : 🎜🎜🎜
offset-path : reçoit un chemin SVG (similaire au chemin SVG, CSS (similaire au clip-path), spécifiez le chemin géométrique du mouvement🎜🎜offset-distance : Contrôlez la distance de l'élément actuel en fonction du offset-path 🎜🎜offset -position : Spécifie la position initiale de offset-path 🎜🎜offset-anchor : Définit le point d'ancrage de l'élément positionné le long de offset-path . C'est facile à comprendre. L'élément en mouvement peut ne pas être un point, vous devez donc spécifier quel point de l'élément est attaché au chemin de déplacement🎜🎜offset-rotate : définir le long de . offset-path La direction de l'élément pendant le positionnement, en termes humains, est la direction angulaire de l'élément pendant le mouvement 🎜🎜🎜 Ci-dessous, nous utilisons Motion Path pour implémenter une animation de déplacement linéaire simple. 🎜 width: 40px;
height: 40px;
clip-path: polygon(0 0, 100% 50%, 0 100%);
background: linear-gradient(#fc0, #f0c);.ball {
width: 40px;
height: 40px;
clip-path: polygon(0 0, 100% 50%, 0 100%);
offset-path: path('M 10 80 C 80 10, 130 10, 190 80 S 300 150, 360 80');
offset-anchor: 0 100%;
background: linear-gradient(#fc0, #f0c);
animation: move 3000ms infinite alternate linear;
}
@keyframes move {
0% {
offset-distance: 0%;
}
100% {
offset-distance: 100%;
}
}offset-path reçoit un chemin SVG, ici le contenu de notre chemin est un chemin personnalisé path("M 0 0 L 100 100"), traduction Venir ici est de passer du point 0 0 au point 100px 100px. 🎜offset-path reçoit un chemin SVG, spécifiant la trajectoire géométrique du mouvement. Semblable au chemin SVG et au chemin de clip en CSS, si vous ne savez pas grand chose sur ce chemin SVG, vous pouvez cliquer ici pour en savoir plus sur le contenu du chemin SVG : Chemin SVG 🎜🎜En contrôlant le
 offset-distance passe de 0% à 100% pour animer le chemin de l'élément. 🎜🎜Bien sûr, l'animation ci-dessus est la plus basique. Je peux utiliser pleinement les caractéristiques du chemin, ajouter plusieurs images clés intermédiaires et modifier légèrement le code ci-dessus : 🎜div {
// 只改变运动路径,其他保持一致
offset-path: path("M 0 0 L 100 0 L 200 0 L 300 100 L 400 0 L 500 100 L 600 0 L 700 100 L 800 0");
animation: move 2000ms infinite alternate linear;
}
@keyframes move {
0% {
offset-distance: 0%;
}
100% {
offset-distance: 100%;
}
}这里最主要还是运用了 path 中的 L 指令,得到了如下图这样一条直线路径:

最终的效果如下,与利用 transform: translate() 添加多个关键帧类似:

完整的 Demo :CodePen Demo -- CSS Motion Path Demo
地址:https://codepen.io/Chokcoco/pen/gOgqoem
上面的运动轨迹都是由直线构成,下面我们看看如何使用 CSS Motion Path 实现曲线路径动画。
其实原理还是一模一样,只需要在 offset-path: path() 中添加曲线相关的路径即可。
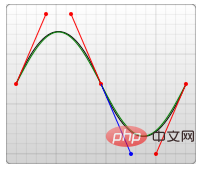
在 SVG 的 Path 中,我们取其中一种绘制曲线的方法 -- 贝塞尔曲线,譬如下述这条 path,其中的 path 为 d="M 10 80 C 80 10, 130 10, 190 80 S 300 150, 360 80":
<svg width="400" style="max-width:90%" xmlns="http://www.w3.org/2000/svg"> <path d="M 10 80 C 80 10, 130 10, 190 80 S 300 150, 360 80" stroke="black" fill="transparent"/> </svg>
对应这样一条连续的贝塞尔曲线:

将对应的路径应用在 offset-path: path 中:
<div></div>
div:nth-child(2) {
width: 40px;
height: 40px;
background: linear-gradient(#fc0, #f0c);
offset-path: path('M 10 80 C 80 10, 130 10, 190 80 S 300 150, 360 80');
}
@keyframes move {
0% {
offset-distance: 0%;
}
100% {
offset-distance: 100%;
}
}可以得到如下运动效果:

可以看到,元素是沿着贝塞尔曲线的路径进行运动的,并且,由于这次没有限制死 offset-rotate,元素的朝向也是跟随路径的朝向一直变化的。(可以联想成开车的时候,车头一直跟随道路会进行变化的,带动整个车身的角度变化)
完整的 Demo :CodePen Demo -- CSS Motion Path Demo
地址:https://codepen.io/Chokcoco/pen/gOgqoem
OK,那么接下来,我们再看看 offset-anchor 如何理解。
还是上述的 DEMO,我们把小正方形替换成一个三角形,并且把运动的曲线给画到页面上,像是这样:

其中,三角形是通过 clip-path 实现的:
    width: 40px;
    height: 40px;
    clip-path: polygon(0 0, 100% 50%, 0 100%);
    background: linear-gradient(#fc0, #f0c);
通常而言,沿着曲线运动的是物体的中心点(类比 transform-origin),在这里,我们可以通过 offset-anchor 改变运动的锚点,譬如,我们希望三角形的最下方沿着曲线运动:
.ball {
    width: 40px;
    height: 40px;
    clip-path: polygon(0 0, 100% 50%, 0 100%);
    offset-path: path('M 10 80 C 80 10, 130 10, 190 80 S 300 150, 360 80');
    offset-anchor: 0 100%;
    background: linear-gradient(#fc0, #f0c);
    animation: move 3000ms infinite alternate linear;
}
@keyframes move {
    0% {
        offset-distance: 0%;
    }
    100% {
        offset-distance: 100%;
    }
}
经过实测,Can i use 上写着 offset-anchor 属性的兼容性在为 Chrome 79+、Firefox 72+,但是实际只有 Firefox 支持,Chrome 下暂时无法生效~完整的 Demo :CodePen Demo -- CSS Motion Path offset-anthor Demo
地址:https://codepen.io/Chokcoco/pen/poRGZeE
OK,上面我们基本把原理给过了一遍,下面我们就看看,运用 Motion Path,可以在实践中如何运用。
利用运动路径,我们可以制作一些简单的按钮点击效果。在之前,我在 CodePen 上见到过这样一种按钮点击效果:

其原理是运用了 background-radial 去生成每一个小圆点,通过控制 background-position 控制小圆点的位移
详细的 Demo 代码:CodePen Demo -- Bubbly button (Design by Gal Shir)
地址:https://codepen.io/Chokcoco/pen/bGGMLdd
但是小圆点的运动路径基本上都是直线,运用本文的 Motion Path,我们也可以实现一些类似的效果,核心代码如下,HTML 这里我们使用了 Pug 模板,CSS 使用了 SASS:
.btn
  -for(var i=0; i<60; i++)
span.dot.btn {
position: relative;
padding: 1.5rem 4.5rem;
}
.btn .dot {
position: absolute;
width: 4px;
height: 4px;
@for $i from 1 through $count {
&:nth-child(#{$i}) {
top: 50%;
left: 50%;
transform: translate3d(-50%, -50%, 0) rotate(#{360 / $count * $i}deg);
}
}
&::before {
content: "";
position: absolute;
top: 0;
left: 0;
width: 4px;
height: 4px;
border-radius: 50%;
offset-path: path("M0 1c7.1 0 10.7 2 14.3 4s7.1 4 14.3 4 10.7-2 14.3-4 7.2-4 14.3-4 10.7 2 14.3 4 7.1 4 14.3 4 10.7-2 14.3-4 7.1-4 14.3-4 10.7 2 14.3 4 7.1 4 14.3 4 10.7-2 14.3-4 7.1-4 14.3-4 10.7 2 14.3 4 7.1 4 14.3 4");
offset-distance: 0;
}
}
.btn.is-animating:active .dot:nth-child(4n+1)::before {
animation: dot var(--animation-time) var(--animation-timging-function);
}
.btn.is-animating:active .dot:nth-child(4n+2)::before {
border: 1px solid var(--color-primary);
background: transparent;
animation: dot var(--animation-time) var(--animation-timging-function) 0.1s;
}
.btn.is-animating:active .dot:nth-child(4n+3)::before {
animation: dot var(--animation-time) var(--animation-timging-function) 0.2s;
}
.btn.is-animating:active .dot:nth-child(4n)::before {
border: 1px solid var(--color-primary);
background: transparent;
animation: dot var(--animation-time) var(--animation-timging-function) 0.3s;
}
@keyframes dot {
0% {
offset-distance: 0%;
opacity: 1;
}
90% {
offset-distance: 60%;
opacity: .5;
}
100% {
offset-distance: 100%;
opacity: 0;
}
}别看代码多有一点点复杂,但是不难理解,本质就是给每个子元素小点点设置同样的 offset-path: path(),给不同分组下的子元素设定不同的旋转角度,并且利用了动画延迟 animation-delay 设定了 4 组同时出发的动画。
这里我们的轨迹 path 不是直线,效果如下:

Code complet : Démo CodePen - Animation de boutons avec chemins de décalage CSS
Adresse : https://codepen.io/Chokcoco/pen/xxgMPzJ
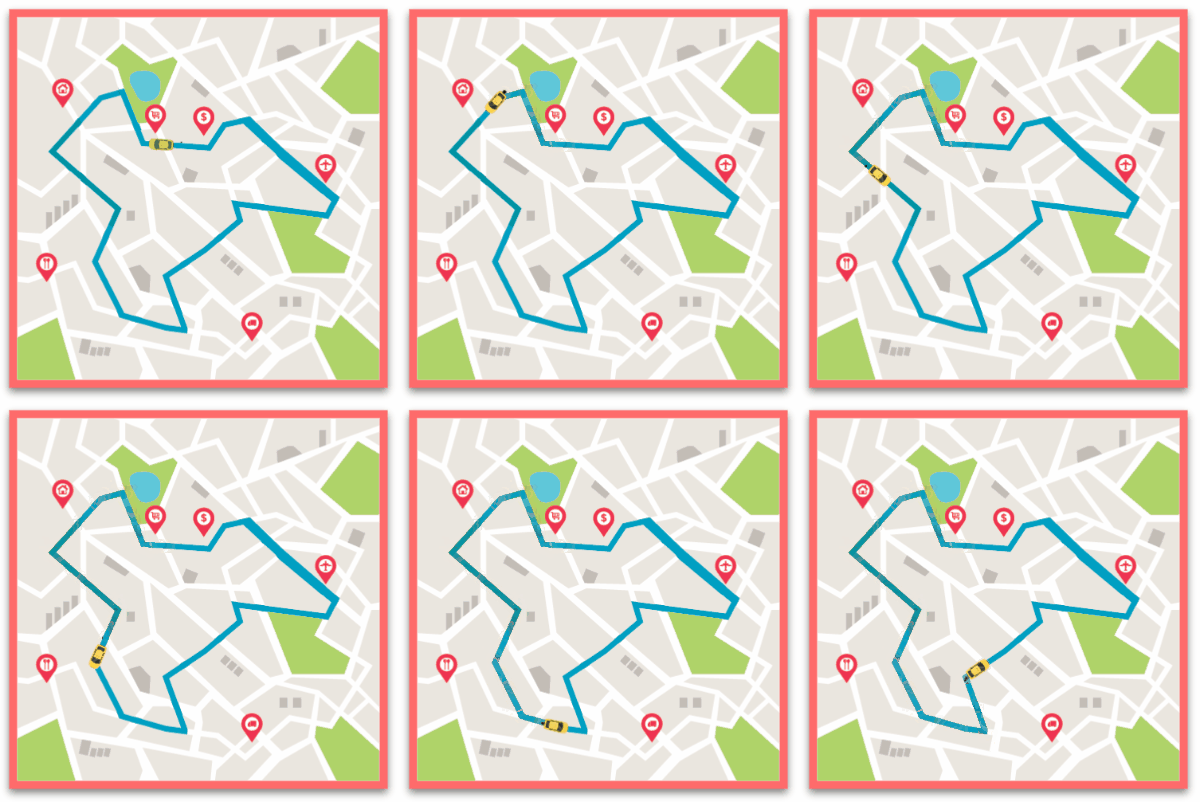
C'est également très pratique. Nous pouvons désormais utiliser pleinement CSS Motion-Path pour implémenter une animation de recherche de chemin sur la carte :

Cette démo vient d'Ahmad Emran, le code complet : CodePen Demo -- CodePen Home Animation avec offset-path | Utilisant uniquement CSS et HTML
Adresse : https://codepen.io/ahmadbassamemran/pen/bXByBv
Ou, nous pouvons utiliser Path pour dessiner n'importe quelle Les caractéristiques du chemin peuvent réaliser différents chemins que nous souhaitons, comme des paraboles ajoutées au panier, ou diverses trajectoires de mouvement. Voici une autre démo :

Démo CodePen -- Animation de chemin de décalage CSS Motion Path
. Adresse : https://codepen.io/Chokcoco/pen/dyNaZea
Jetons un coup d'œil à la compatibilité actuelle de Motion-Path ? Au 2021-04-27.
Puis-je utiliser - Motion-Path :

À l'heure actuelle, outre le navigateur IE, nous attendons quand Safari sera compatible ou non, cela dépend de l'utilisation du navigateur du groupe cible.
D'accord, cet article se termine ici. J'ai présenté l'animation de chemin de mouvement Motion Path et je l'ai utilisé pour obtenir des effets d'animation de chemin qui ne pouvaient pas être facilement obtenus dans le passé. :)
Réimprimé de cet article De : https://segmentfault.com/a/1190000039916159
Auteur : chokcoco
Pour plus de connaissances liées à la programmation, veuillez visiter : Vidéo de programmation ! !
Ce qui précède est le contenu détaillé de. pour plus d'informations, suivez d'autres articles connexes sur le site Web de PHP en chinois!
 tutoriel CSS3
 Quelles sont les propriétés du dégradé CSS3 ?
 Les pièces BAGS peuvent-elles être conservées longtemps ?
 Solution de délai d'expiration des requêtes du serveur
 Comment résoudre javascriptvoid(o)
 Quelle interface est audio ?
 Comment lire les données dans un fichier Excel en python
 Outil de requête de sous-domaine de site Web