Comment installer des extensions dans Win PHP
Comment installer des extensions dans Win PHP : 1. Téléchargez l'extension souhaitée sur le site officiel ; 2. Décompressez et placez le php_redis.dll dans le répertoire ext ; 3. Mettez php_redis.dll dans le fichier spécifié dans php.ini ; dossier et chargez le module redis.

L'environnement d'exploitation de cet article : système Windows 7, PHP version 7.1, ordinateur DELL G3
Comment installer des extensions dans win php ?
Extension d'installation PHP dans l'environnement Windows
Extension d'installation PHP
1. Gestion des extensions PHP
1. Qu'est-ce que l'extension php
L'extension php est une fonction qui n'est pas prise en charge par le php core Ensuite, vous pouvez étendre les fonctions de PHP via des extensions, des extensions courantes telles que MySQL, gb2, etc.
2. Vérifiez quelles extensions sont installées dans php
Méthode 1 : Vérifiez via la fonction phpinfo()
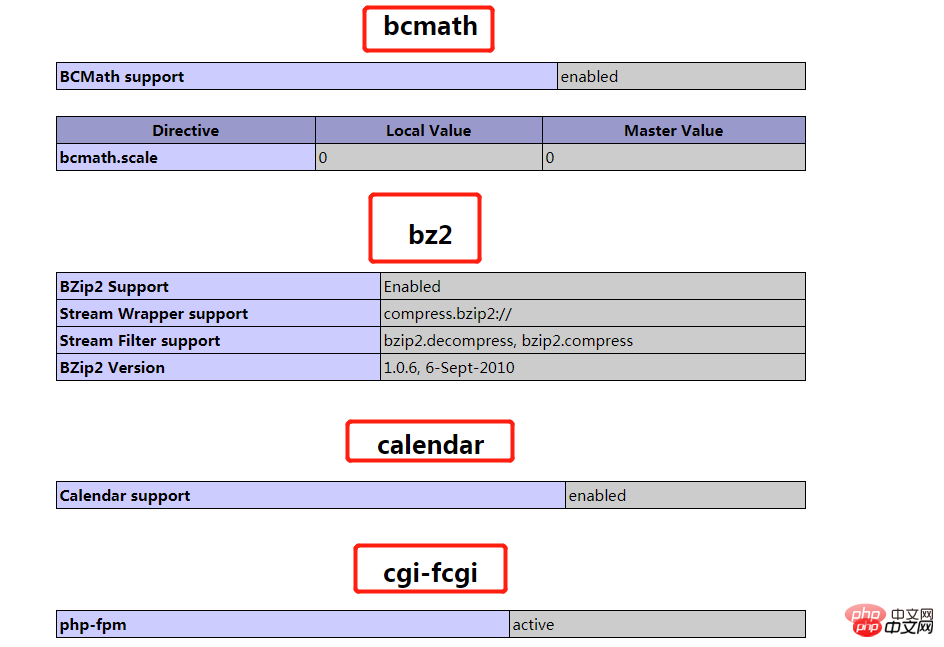
<?php
phpinfo();
?>
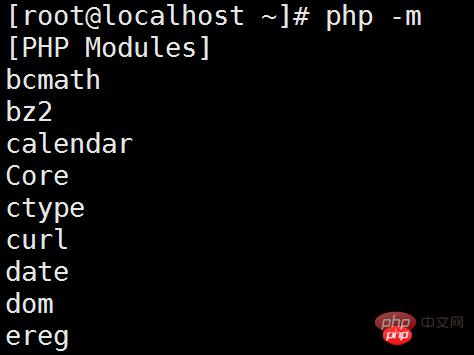 Array( [0] => xml [1] => wddx [2] => standard [3] => session [4] => posix [5] => [10] => calendrier [11] => bcmath)
Méthode 4 : La fonction extension_loaded vérifie si une extension a été chargée si l'extension spécifiée par son nom a été chargée, elle renvoie VRAI, sinon elle renvoie FAUX.
[root@linux-host ~]# php -m
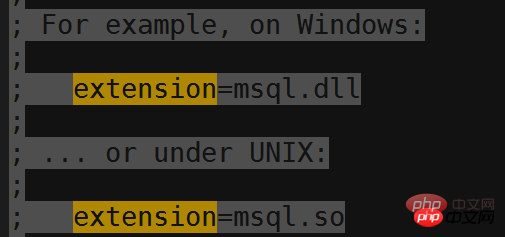
a Définissez le répertoire où se trouve l'extension et définissez le extension_dir de php.ini sur votre propre chemin d'extension php
b.
2. Extension php d'installation Windows 
Liste des toutes les extensions : https://pecl.php.net/package-stats.php
2. Sélectionnez la version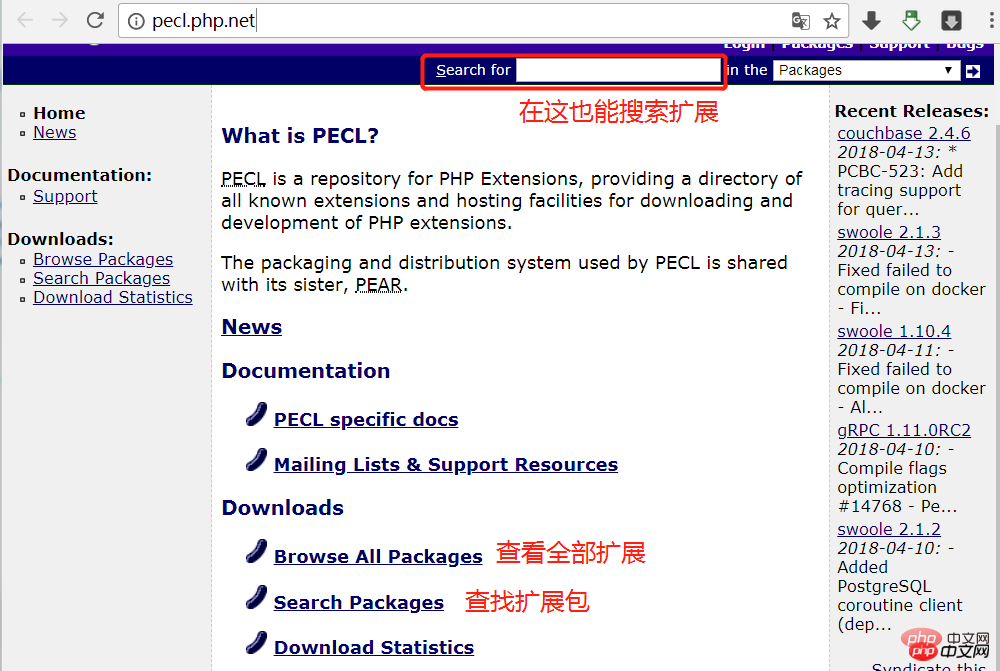 Redis a été installé à titre d'exemple :
Cliquez sur le bouton
à côté pour accéder à l'interface de téléchargement Windows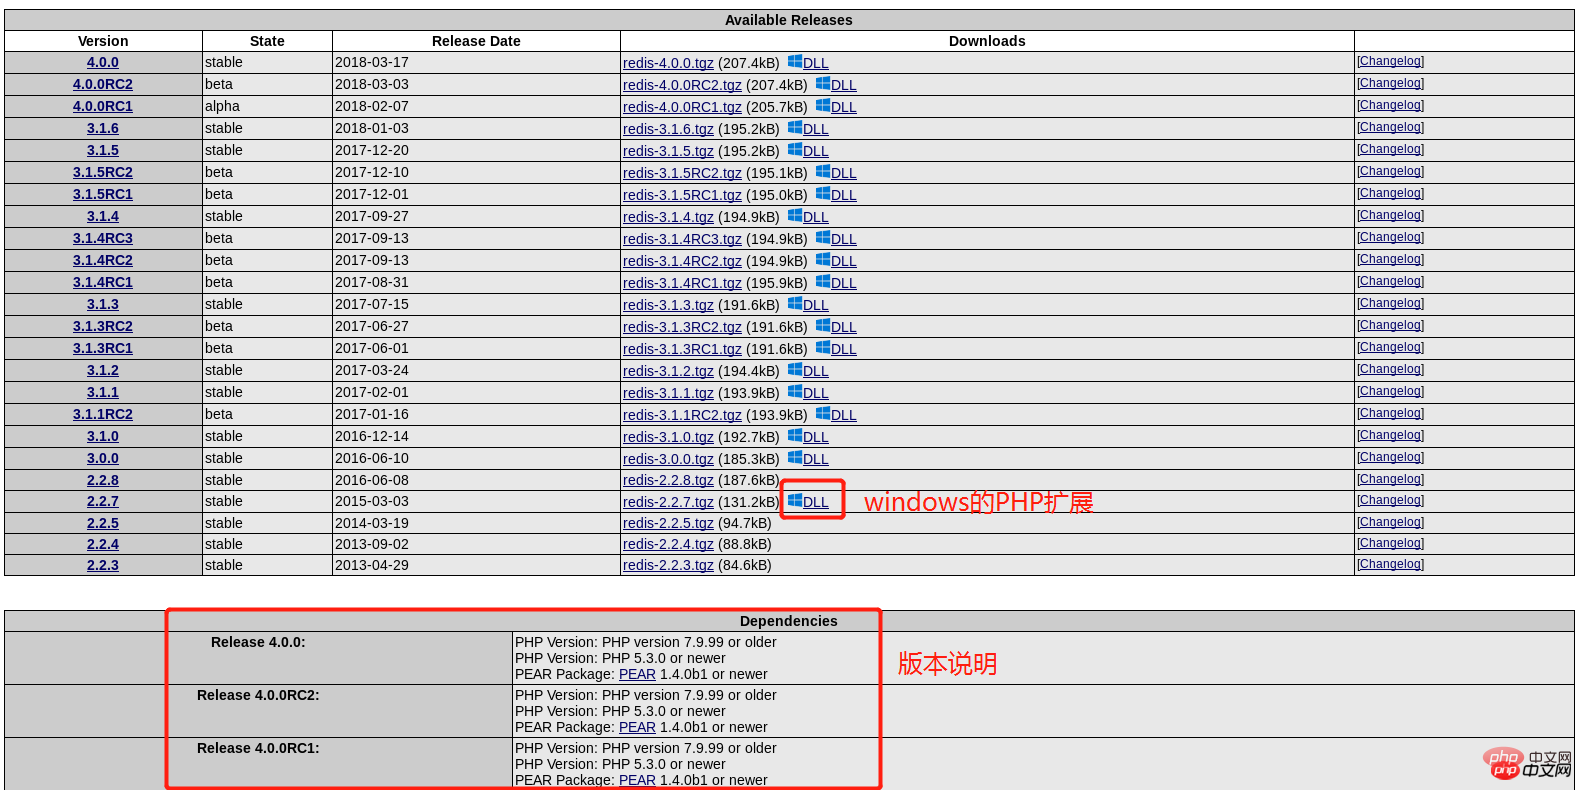
 Comment vérifier les informations de version prises en charge par votre environnement ? Vous pouvez les vérifier via la fonction phpinfo() intégrée à php :

<?php
print_r(get_loaded_extensions());
?>
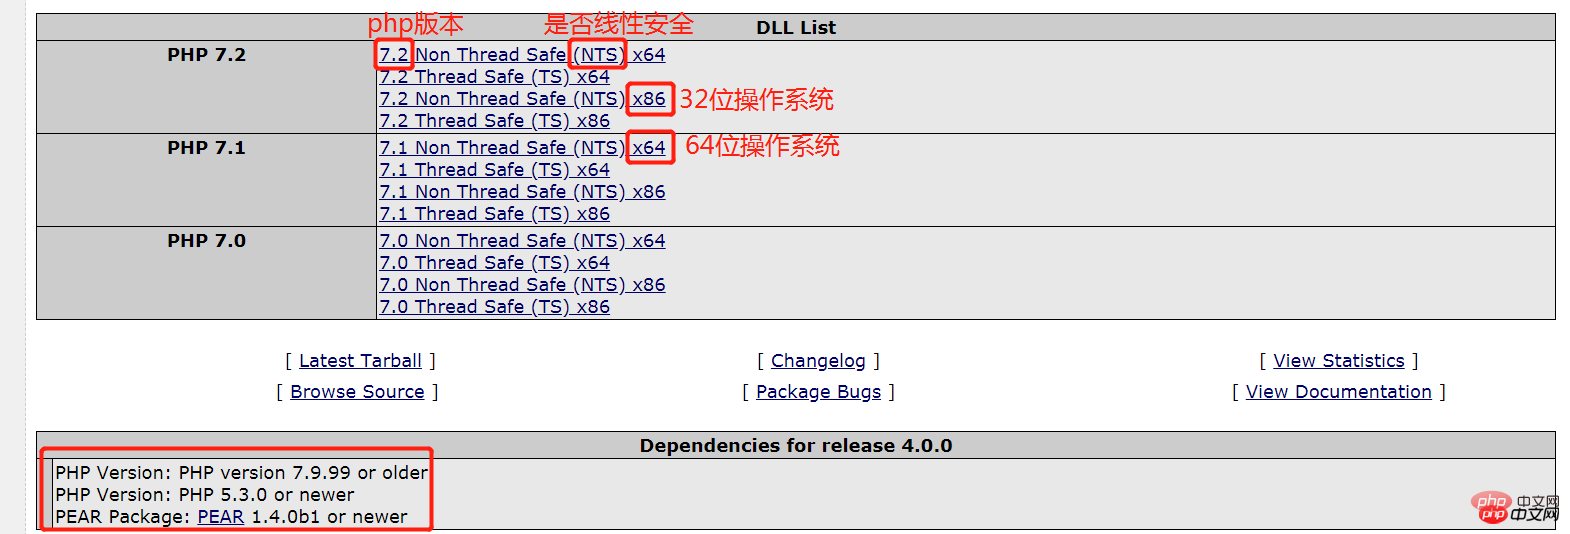
 Les paramètres ci-dessus sont liés à la possibilité d'installer l'extension, alors faites-y attention attentivement ! Il existe de nombreuses options lors du téléchargement du fichier d'extension .dll, et les options correspondantes correspondent à celles ici ! Par exemple :
 Choisissez-en une et analysez-la :
<?php
if (!extension_loaded('gd')) {
if (!dl('gd.so')) {
exit;
}
}Cela signifie : extension php_igbinary de la version 1.2.1. La version php appropriée est 5.3 et supérieure. Cette extension compilée par vc9 ne prend pas en charge la sécurité des threads et peut être utilisée dans. Sur une architecture CPU x86, notez que des machines 64 bits peuvent également être utilisées ! Mais l’inverse n’est pas possible. 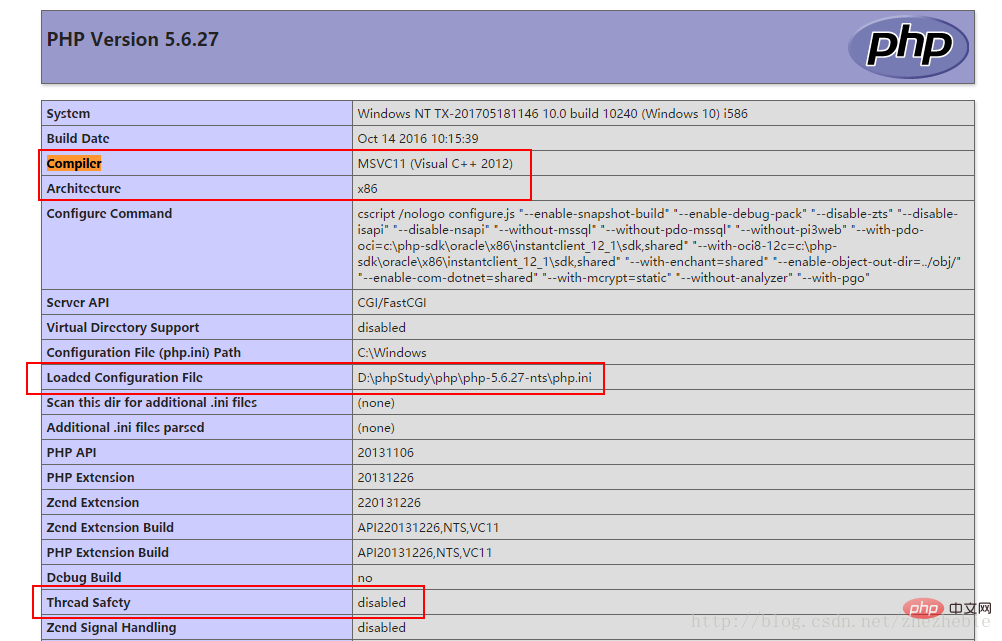
Est-ce beaucoup plus clair ? J'ai rencontré ce problème lors de l'installation de Redis.
Pour continuer l'installation de l'extension redis, entrez dans la page : https://windows.php.net/downloads/pecl/releases/redis/
Prenez l'installation de php-redis-3.1.3 comme exemple :
Je passe phpinfo() Pour configurer la fonction, les extensions dll NTS, x86 et VC14 doivent être installées : 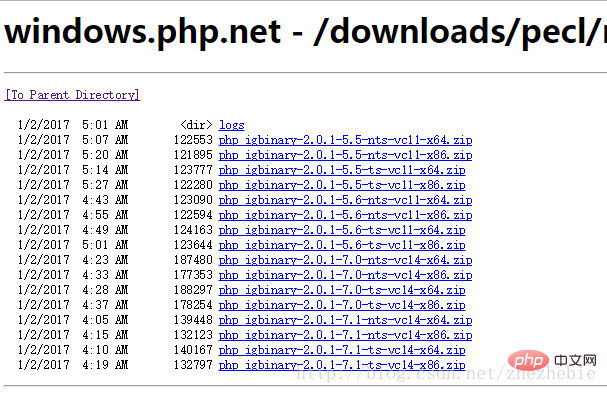

下载页: https://windows.php.net/downloads/pecl/releases/redis/3.1.3/
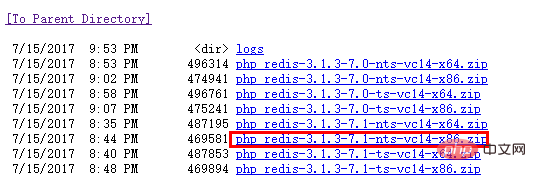
下载解压,将里面的 php_redis.dll 放到ext目录下,
3.安装
将下载好的压缩包解压,然后把里面的php_redis.dll放到php.ini中制定的文件夹里面,并把redis模块加载,然后从起服务器。
同理, 安装memcache:
https://windows.php.net/downloads/pecl/releases/memcache/3.0.8/
三、linux安装php扩展
1.yum或者apt-get安装
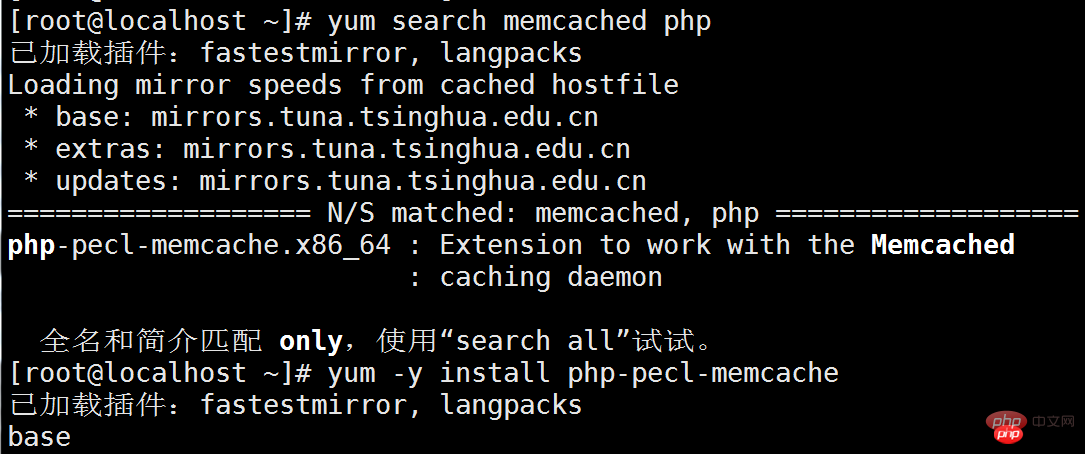
2.使用pecl安装
1)、pecl install安装
~# pecl install memcached
downloading memcached-2.2.0.tgz ...
Starting to download memcached-2.2.0.tgz (70,449 bytes)....
2)、配置php.ini
通过运行 php --ini查找php.ini文件位置,然后在文件中添加extension=memcached.so
3.phpize安装——以redis为例
1)、下载php扩展包
[root@localhost ~]# wget http://pecl.php.net/get/redis-4.0.0.tgz
2)、解压缩并进入扩展包目录
[root@localhost ~]# tar -xzvvf redis-4.0.0.tgz
[root@localhost redis-4.0.0]# cd redis-4.0.0
3)、执行phpize
[root@localhost redis-4.0.0]# phpize
4)、./configure
[root@localhost redis-4.0.0]# ./configure --with-php-config=/usr/bin/php-config
5)、make && make install
[root@localhost redis-4.0.0]# make && make install
6)、配置php.ini
extension=redis.so
4.直接安装(类似windows)
直接下载将下载好的压缩包,解压后将.so后缀的文件直接放到指定的路径,然后配置php.ini文件。
phpStudy2018 踩过的一些坑:
发现phpStudy2018切换到php 7以上版本,无论怎么修改安装拓展,就是拓展都不生效,就连自带的curl都没有启来,
经过半天反复折腾php.ini配置,才发现phpStudy2018的几个php7目录下的php.ini有个配置出的问题:
extension_dir = "E:\PHPServer\phpStudy2018\PHPTutorial\php\php-7.1.9-nts\ext"
屏蔽到这句,改成:
;extension_dir = "E:\PHPServer\phpStudy2018\PHPTutorial\php\php-7.1.9-nts\ext"extension_dir = "ext"
查看phpinfo函数,拓展都生效了


windows的php7安装memcache扩展
安装memcache:http://www.runoob.com/memcached/memcached-connection.html
启动服务:
c:\memcached\memcached.exe -d install
c:\memcached\memcached.exe -d start
c:\memcached\memcached.exe -d stop
启动计划任务:
schtasks /create /sc onstart /tn memcached /tr “‘c:\memcached\memcached.exe’ -m 512”
telnet HOST PORT
window下安装php7的memcache扩展,结果发现php_memcache.dll的官方编译出来的版本支持到PHP 5.6就停了,找了半天才在外国人的网站找到
https://stackoverflow.com/questions/34952502/memcache-for-php7-on-windows,
git下载地址:https://github.com/nono303/PHP7-memcache-dll
根据自己的php版本下载
下载解压后,
就到 php/ext 目录下 把 php_memcache.dll 放到里面
然后在 php 目录下的 php.ini 增加一段内容
extension=php_memcache.dll
加完之后,重启 apache或者nginx
然后 在php页面输出phpinfo();
检查 memcache 是否成功加载了。
如果成功加载了 ,就可以 在一个php页面做 memcache测试了
<?php $memcache = new Memcache; $memcache->connect('127.0.0.1',11211) or die('shit'); $memcache->set('key','hello memcache!'); $out = $memcache->get('key'); echo $out; ?>
成功的话会输出
hello memcache!
windows的php7安装xdebug扩展
下载地址1: https://windows.php.net/downloads/pecl/releases/xdebug/
假设根据上面步骤获取到 7.2 NTS, VC15 x64等信息,来下载对应的版本:
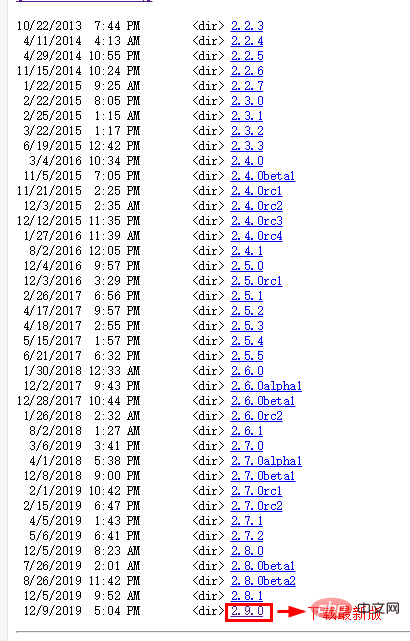
下载想要的对应版本:
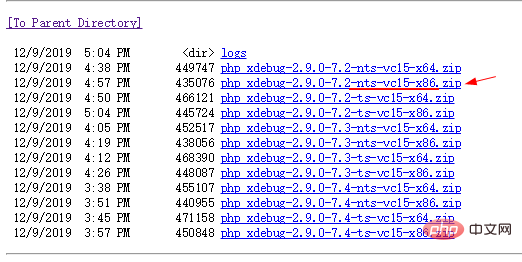
下载地址2,官网下载: https://xdebug.org/download
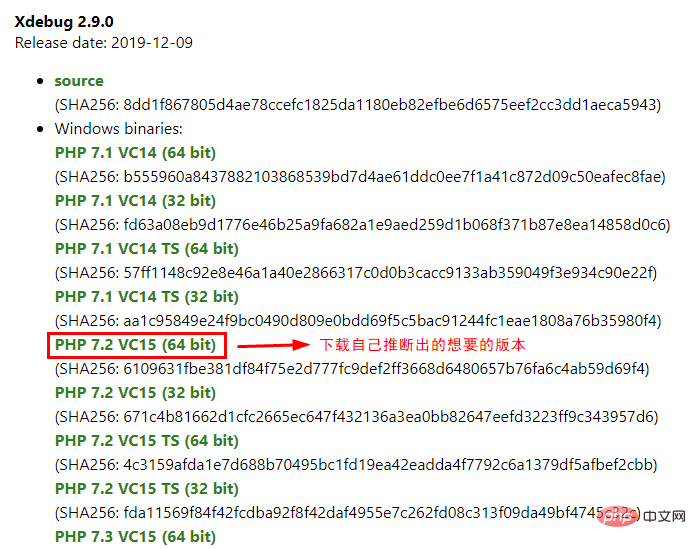
或者点击打开 custom installation instructions. 也就是地址: https://xdebug.org/wizard 来计算出自己的电脑版本php对应的xdebug库版本信息: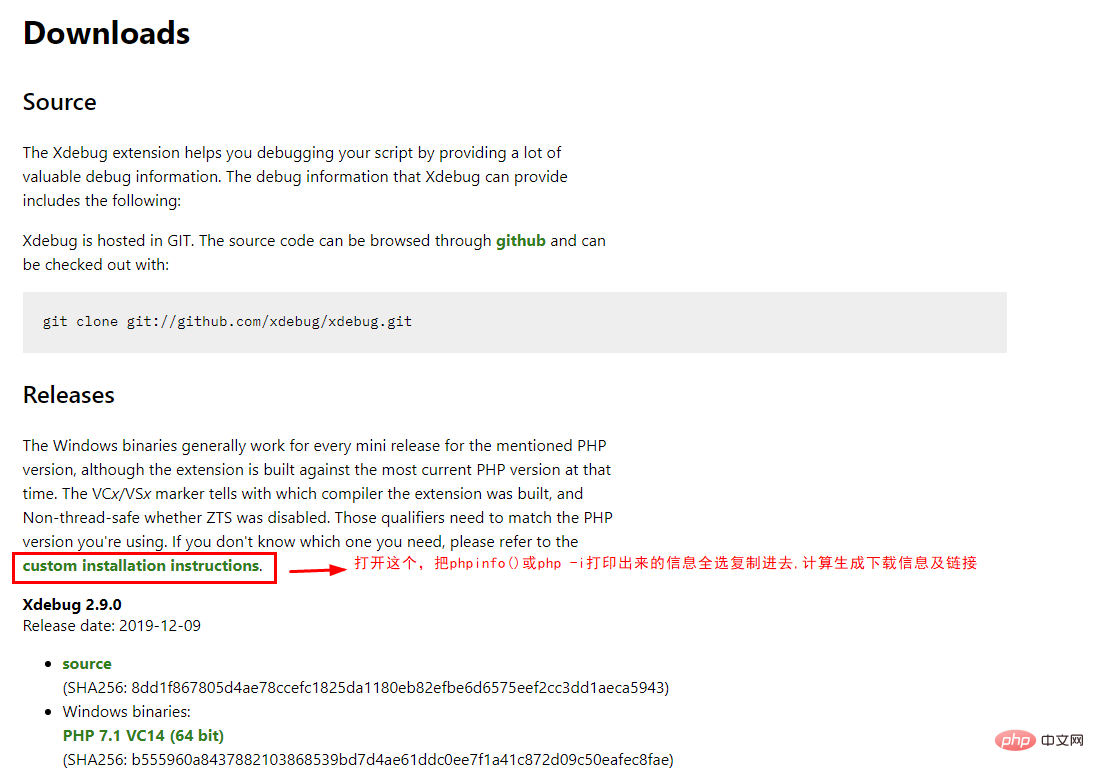
进入页面后把 phpinfo() 或 php -i 打印出来的信息全选复制进去:
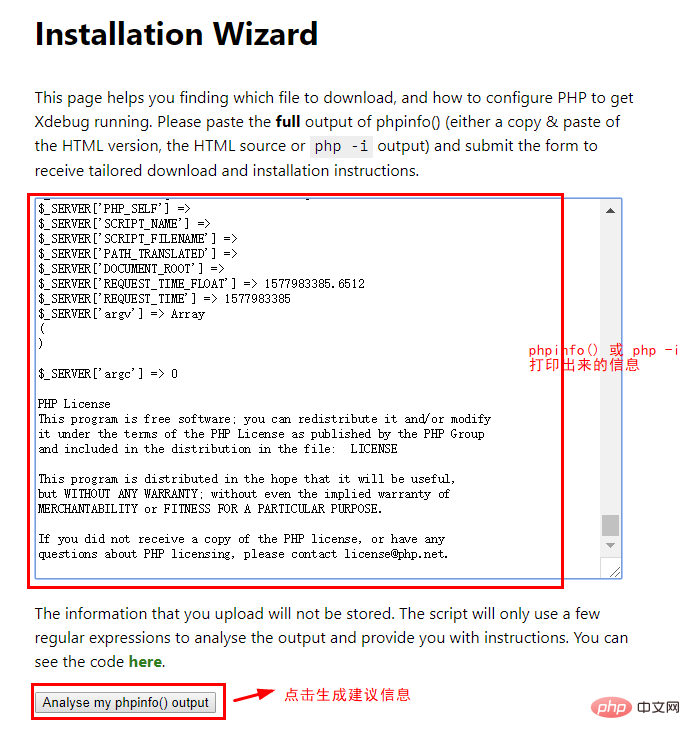
最后得出的结论:
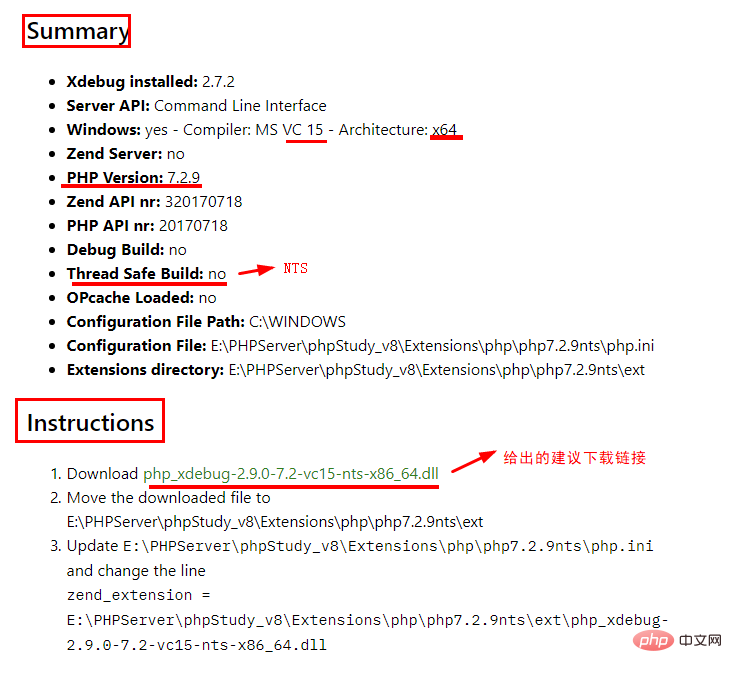
把 php_xdebug.dll 文件放入 ext 文件夹下,配置 php.ini, 然后重启服务器。
附: xdebug的php.ini配置信息:
[XDebug]
;指定Xdebug扩展文件的绝对路径
zend_extension="E:\PHPServer\phpStudy_v8\Extensions\php\php7.2.9nts\ext\php_xdebug.dll";指定堆栈跟踪文件的存放目录
xdebug.trace_output_dir="E:\PHPServer\phpStudy_v8\Extensions\tmp\xdebug";是否开启远程调试
xdebug.remote_enable= on
xdebug.remote_autostart = on
xdebug.remote_mode=req
;指定远程调试的处理协议
xdebug.remote_handler="dbgp";指定远程调试的主机名
xdebug.remote_host="127.0.0.1";指定远程调试的端口号
xdebug.remote_port=9100;是否启用Xdebug的性能分析,并创建性能信息文件
;xdebug.profiler_enable=on
;xdebug.profiler_enable_trigger=0;指定性能分析信息文件的输出目录
xdebug.profiler_output_dir="E:\PHPServer\phpStudy_v8\Extensions\tmp\xdebug";指定传递给DBGp调试器处理程序的IDE Key
xdebug.idekey="PHPSTORM";启用代码自动跟踪
;xdebug.auto_trace=on
;允许收集传递给函数的参数变量
xdebug.collect_params=on
;允许收集函数调用的返回值
xdebug.collect_return=on
推荐学习:《PHP视频教程》
Ce qui précède est le contenu détaillé de. pour plus d'informations, suivez d'autres articles connexes sur le site Web de PHP en chinois!

Outils d'IA chauds

Undresser.AI Undress
Application basée sur l'IA pour créer des photos de nu réalistes

AI Clothes Remover
Outil d'IA en ligne pour supprimer les vêtements des photos.

Undress AI Tool
Images de déshabillage gratuites

Clothoff.io
Dissolvant de vêtements AI

AI Hentai Generator
Générez AI Hentai gratuitement.

Article chaud

Outils chauds

Bloc-notes++7.3.1
Éditeur de code facile à utiliser et gratuit

SublimeText3 version chinoise
Version chinoise, très simple à utiliser

Envoyer Studio 13.0.1
Puissant environnement de développement intégré PHP

Dreamweaver CS6
Outils de développement Web visuel

SublimeText3 version Mac
Logiciel d'édition de code au niveau de Dieu (SublimeText3)

Sujets chauds
 1359
1359
 52
52
 Expliquez la liaison statique tardive en PHP (statique: :).
Apr 03, 2025 am 12:04 AM
Liaison statique (statique: :) implémente la liaison statique tardive (LSB) dans PHP, permettant à des classes d'appel d'être référencées dans des contextes statiques plutôt que de définir des classes. 1) Le processus d'analyse est effectué au moment de l'exécution, 2) Recherchez la classe d'appel dans la relation de succession, 3) il peut apporter des frais généraux de performance.
 Expliquez les jetons Web JSON (JWT) et leur cas d'utilisation dans les API PHP.
Apr 05, 2025 am 12:04 AM
JWT est une norme ouverte basée sur JSON, utilisée pour transmettre en toute sécurité des informations entre les parties, principalement pour l'authentification de l'identité et l'échange d'informations. 1. JWT se compose de trois parties: en-tête, charge utile et signature. 2. Le principe de travail de JWT comprend trois étapes: la génération de JWT, la vérification de la charge utile JWT et l'analyse. 3. Lorsque vous utilisez JWT pour l'authentification en PHP, JWT peut être généré et vérifié, et les informations sur le rôle et l'autorisation des utilisateurs peuvent être incluses dans l'utilisation avancée. 4. Les erreurs courantes incluent une défaillance de vérification de signature, l'expiration des jetons et la charge utile surdimensionnée. Les compétences de débogage incluent l'utilisation des outils de débogage et de l'exploitation forestière. 5. L'optimisation des performances et les meilleures pratiques incluent l'utilisation des algorithmes de signature appropriés, la définition des périodes de validité raisonnablement,
 Quelles sont les méthodes PHP Magic (__construct, __ destruct, __ call, __get, __set, etc.) et fournir des cas d'utilisation?
Apr 03, 2025 am 12:03 AM
Quelles sont les méthodes magiques de PHP? Les méthodes magiques de PHP incluent: 1. \ _ \ _ Construct, utilisé pour initialiser les objets; 2. \ _ \ _ Destruct, utilisé pour nettoyer les ressources; 3. \ _ \ _ Appel, gérer les appels de méthode inexistants; 4. \ _ \ _ GET, Implémentez l'accès à l'attribut dynamique; 5. \ _ \ _ SET, Implémentez les paramètres d'attribut dynamique. Ces méthodes sont automatiquement appelées dans certaines situations, améliorant la flexibilité et l'efficacité du code.
 Pourquoi mon code ne peut-il pas faire renvoyer les données par l'API? Comment résoudre ce problème?
Apr 01, 2025 pm 08:09 PM
Pourquoi mon code ne peut-il pas faire renvoyer les données par l'API? En programmation, nous rencontrons souvent le problème du retour des valeurs nulles lorsque l'API appelle, ce qui n'est pas seulement déroutant ...
 Comment surveiller les performances du système via les journaux debian
Apr 02, 2025 am 08:00 AM
La maîtrise de la surveillance du journal du système Debian est la clé d'un fonctionnement et d'une maintenance efficaces. Il peut vous aider à comprendre les conditions de fonctionnement du système en temps opportun, à localiser rapidement les défauts et à optimiser les performances du système. Cet article présentera plusieurs méthodes et outils de surveillance couramment utilisés. Surveillance des ressources système avec la boîte à outils Sysstat La boîte à outils Sysstat fournit une série d'outils de ligne de commande puissants pour collecter, analyser et signaler diverses mesures de ressources système, y compris la charge du processeur, l'utilisation de la mémoire, les E / S de disque, le débit de réseau, etc. MPSTAT: Statistiques des processeurs multi-fond. pidsta
 Comment lire efficacement les journaux du système Windows et obtenir uniquement des informations des derniers jours?
Apr 01, 2025 pm 11:21 PM
Lecture efficace des journaux du système Windows: Traversé réversement des fichiers EVTX Lors de l'utilisation de Python pour traiter les fichiers journaux système Windows (.EVTX), la lecture directe sera du premier ...
 Quatre façons d'implémenter le multithreading dans le langage C
Apr 03, 2025 pm 03:00 PM
Le multithreading dans la langue peut considérablement améliorer l'efficacité du programme. Il existe quatre façons principales d'implémenter le multithreading dans le langage C: créer des processus indépendants: créer plusieurs processus en cours d'exécution indépendante, chaque processus a son propre espace mémoire. Pseudo-Multithreading: Créez plusieurs flux d'exécution dans un processus qui partagent le même espace mémoire et exécutent alternativement. Bibliothèque multi-thread: Utilisez des bibliothèques multi-threades telles que PTHEADS pour créer et gérer des threads, en fournissant des fonctions de fonctionnement de thread riches. Coroutine: une implémentation multi-thread légère qui divise les tâches en petites sous-tâches et les exécute tour à tour.
 Python multiplateform de bureau de bureau de bureau: quelle bibliothèque GUI est la meilleure pour vous?
Apr 01, 2025 pm 05:24 PM
Choix de la bibliothèque de développement d'applications de bureau multiplateforme Python De nombreux développeurs Python souhaitent développer des applications de bureau pouvant s'exécuter sur Windows et Linux Systems ...


