
Cet article vous apporte des connaissances pertinentes sur laravel, qui présente principalement les problèmes liés au cycle de vie de Laravel. Le cycle de vie de Laravel commence à partir de publicindex.php et se termine par publicindex.php. .

【Recommandation associée : tutoriel vidéo laravel】
Tout dans le monde a un cycle de vie Lorsque nous utilisons un outil, nous devons comprendre son principe de fonctionnement, donc quand nous l'utilisons. utilisez-le, ce sera pratique, et il en va de même pour le développement d’applications. Une fois que vous aurez compris ses principes, vous pourrez l’utiliser en toute simplicité.
Avant de comprendre le cycle de vie de Laravel, passons d'abord en revue le cycle de vie de PHP.
Les deux modes de fonctionnement de PHP sont le mode WEB et le mode CLI.
Lorsque nous tapons la commande php dans le terminal, nous utilisons le mode CLI.
Lorsque vous utilisez Nginx ou un autre serveur Web comme hôte pour gérer une requête entrante, le mode WEB est utilisé.
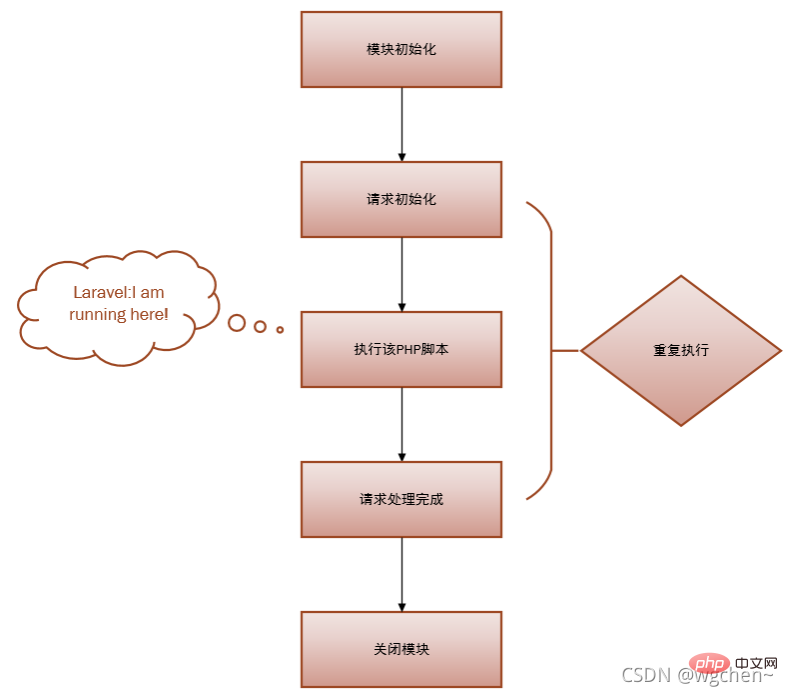
Lorsque nous demandons un fichier php, PHP passera par 5 étapes de changement de cycle de vie afin de compléter la demande :
1 Initialisation du module (MINIT), c'est-à-dire appeler The La fonction d'initialisation de l'extension spécifiée dans php.ini effectue un travail d'initialisation, comme l'extension mysql.
2 Initialisation de la demande (RINIT), qui consiste à initialiser la table de symboles des noms de variables et du contenu des valeurs de variable requis pour exécuter ce script, comme la variable $_SESSION.
3 Exécutez le script PHP.
4 Une fois le traitement de la demande terminé (Request Shutdown), appelez la méthode RSHUTDOWN de chaque module dans l'ordre et appelez la fonction unset sur chaque variable, telle que la variable unset $_SESSION.
5 Arrêtez le module (Module Shutdown). PHP appelle la méthode MSHUTDOWN de chaque extension. C'est la dernière chance pour chaque module de libérer de la mémoire. Cela signifie qu'il n'y a pas de prochaine demande.
Le mode WEB est très similaire au mode CLI (ligne de commande), la différence est :
Le mode CLI effectuera 5 cycles complets à chaque fois que le script est exécuté, car il n'y aura pas de téléchargement une fois votre script exécuté. Une requête
Le mode WEB peut utiliser le multi-threading afin de gérer la concurrence, donc les cycles de vie 1 et 5 ne peuvent être exécutés qu'une seule fois, et le cycle de vie 2 à 4 le sera. être répété la prochaine fois que la demande arrive, économisant ainsi la surcharge causée par l'initialisation du module système.
On voit que le cycle de vie de PHP est très symétrique. Cela dit, il s'agit simplement de localiser où Laravel s'exécute Oui, Laravel ne s'exécute que dans la troisième étape :
Comprenez-les, vous pouvez optimiser votre code Laravel et approfondir Comprendre le singleton de Laravel. (cas unique).
Au moins, vous savez qu'après la fin de chaque requête, les variables PHP ne seront pas définies. Le singleton de Laravel n'est qu'un singleton lors d'une certaine requête ;
Vos variables statiques dans Laravel ne peuvent pas être utilisées dans plusieurs requêtes. autre, car il sera désactivé à la fin de chaque requête.
Comprendre ces concepts est la première et la plus critique étape pour écrire du code de haute qualité. N'oubliez donc pas que PHP est un langage de script et que toutes les variables ne prendront effet que dans cette requête et seront réinitialisées lors de la requête suivante, contrairement aux variables statiques Java qui ont des effets globaux.
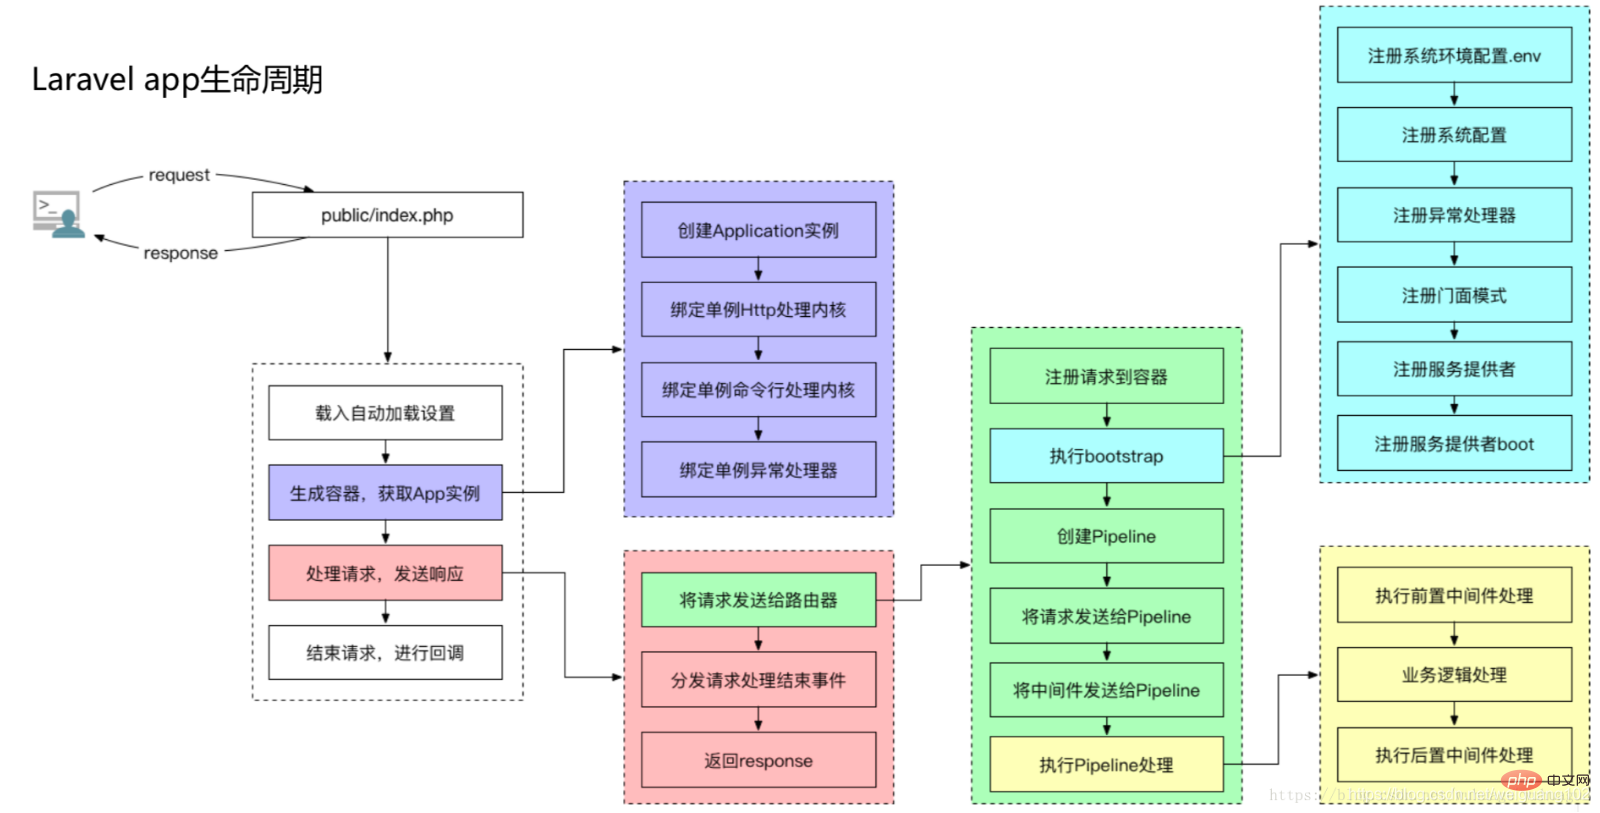
Aperçu
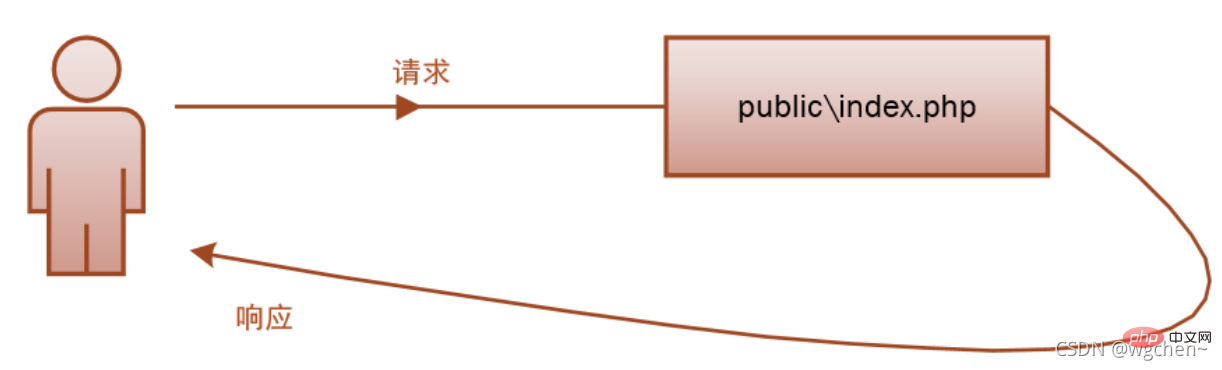
Le cycle de vie de Laravel commence à partir de publicindex.php et se termine à partir de publicindex.php.
Ce qui suit est le code source complet de publicindex.php, qui peut être divisé en quatre étapes plus spécifiquement :
<?php define('LARAVEL_START', microtime(true)); require __DIR__.'/../vendor/autoload.php'; $app = require_once __DIR__.'/../bootstrap/app.php'; $kernel = $app->make(Illuminate\Contracts\Http\Kernel::class); $response = $kernel->handle( $request = Illuminate\Http\Request::capture() ); $response->send(); $kernel->terminate($request, $response);
Ce qui suit est une explication détaillée des quatre étapes : Le chargement automatique du compositeur nécessite la classe
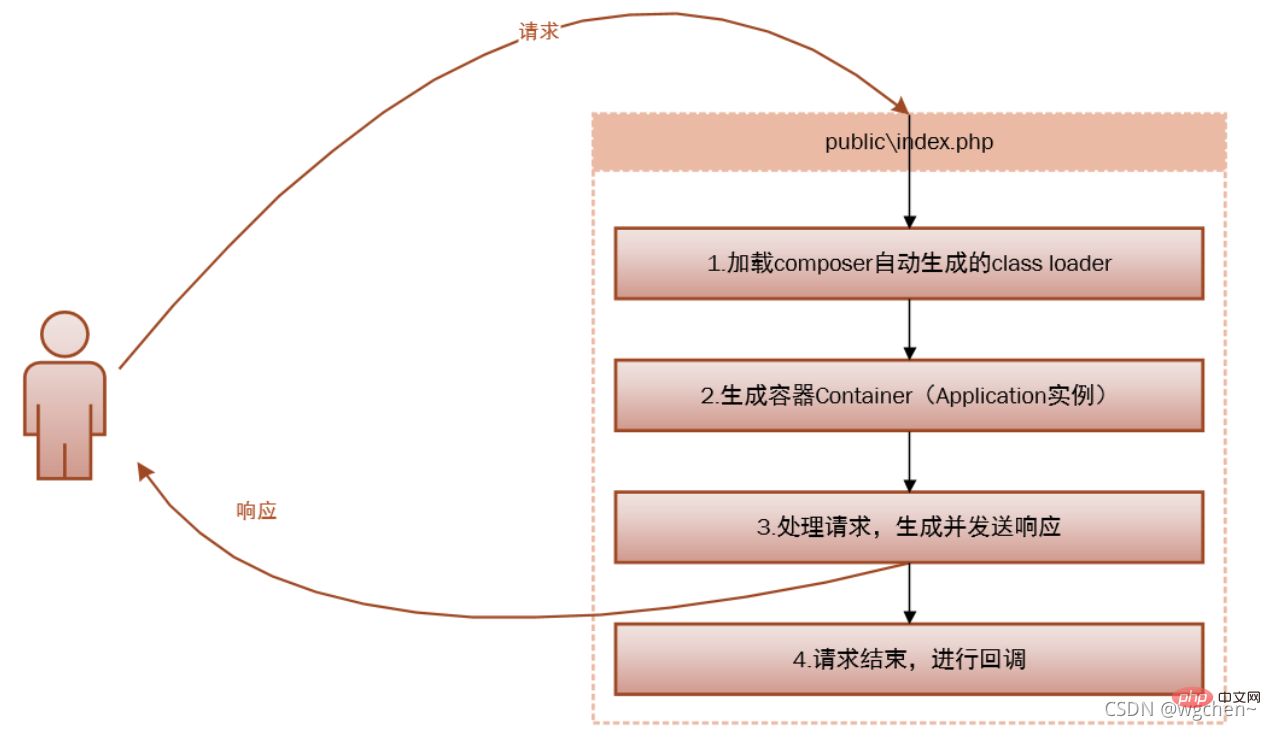
第一步:注册加载composer自动生成的class loader
就是加载初始化第三方依赖。
第二步:生成容器 Container
并向容器注册核心组件,是从 bootstrap/app.php 脚本获取 Laravel 应用实例,
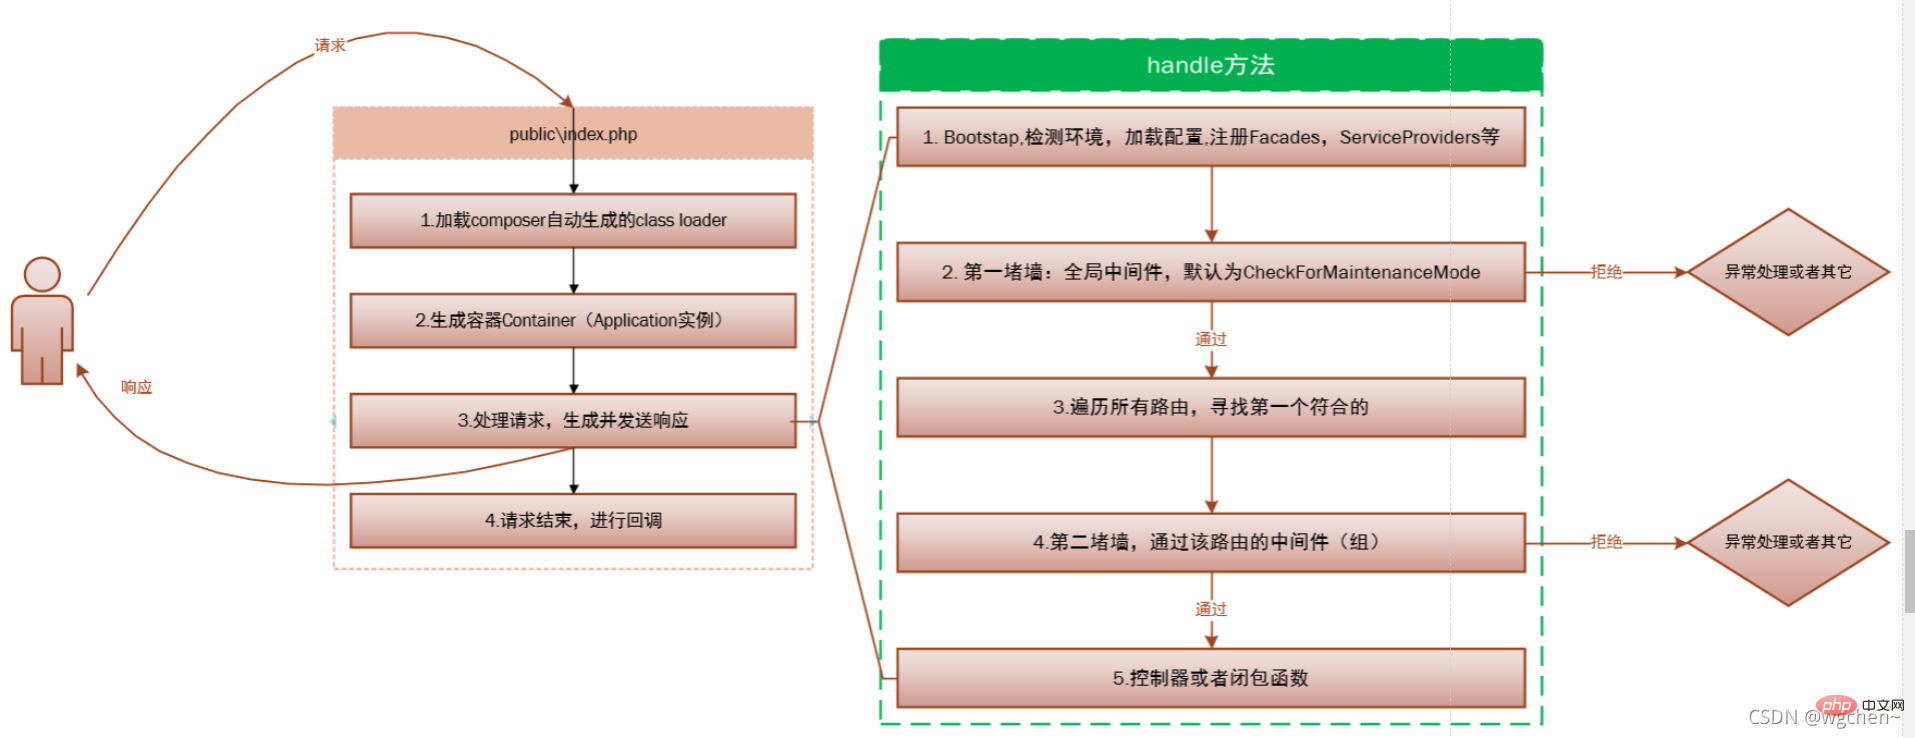
第三步:这一步是重点,处理请求,并生成发送响应。
请求被发送到 HTTP 内核或 Console 内核,这取决于进入应用的请求类型。
取决于是通过浏览器请求还是通过控制台请求。这里我们主要是通过浏览器请求。
HTTP 内核继承自 Illuminate\Foundation\Http\Kernel 类,该类定义了一个 bootstrappers 数组,这个数组中的类在请求被执行前运行,这些 bootstrappers 配置了错误处理、日志、检测应用环境以及其它在请求被处理前需要执行的任务。
protected $bootstrappers = [ //注册系统环境配置 (.env) 'Illuminate\Foundation\Bootstrap\DetectEnvironment', //注册系统配置(config) 'Illuminate\Foundation\Bootstrap\LoadConfiguration', //注册日志配置 'Illuminate\Foundation\Bootstrap\ConfigureLogging', //注册异常处理 'Illuminate\Foundation\Bootstrap\HandleExceptions', //注册服务容器的门面,Facade 是个提供从容器访问对象的类。 'Illuminate\Foundation\Bootstrap\RegisterFacades', //注册服务提供者 'Illuminate\Foundation\Bootstrap\RegisterProviders', //注册服务提供者 `boot` 'Illuminate\Foundation\Bootstrap\BootProviders', ];
/**
 * laravel的启动时间
 */
define('LARAVEL_START', microtime(true));

/**
 * 加载项目依赖。
 * 现代PHP依赖于Composer包管理器,入口文件通过引入由Composer包管理器。
 * 自动生成的类加载程序,可以轻松注册并加载所依赖的第三方组件库。
 */
require __DIR__.'/../vendor/autoload.php';

/**
 * 创建laravel应用实例。
 */
$app = require_once __DIR__.'/../bootstrap/app.php';

// 接受请求并响应
$kernel = $app->make(Illuminate\Contracts\Http\Kernel::class);

$response = $kernel->handle(
    $request = Illuminate\Http\Request::capture()
);

// 结束请求,进行回调
$response->send();

// 终止程序
$kernel->terminate($request, $response);# 第一部分:创建应用实例 $app = new Illuminate\Foundation\Application( realpath(__DIR__.'/../') ); # 第二部分:完成内核绑定 $app->singleton( Illuminate\Contracts\Http\Kernel::class, App\Http\Kernel::class ); $app->singleton( Illuminate\Contracts\Console\Kernel::class, App\Console\Kernel::class ); $app->singleton( Illuminate\Contracts\Debug\ExceptionHandler::class, App\Exceptions\Handler::class ); return $app;
class Kernel implements KernelContract
{
    protected $bootstrappers = [
        \Illuminate\Foundation\Bootstrap\LoadEnvironmentVariables::class, // 注册系统环境配置
        \Illuminate\Foundation\Bootstrap\LoadConfiguration::class,              // 注册系统配置
        \Illuminate\Foundation\Bootstrap\HandleExceptions::class,              // 注册异常注册
        \Illuminate\Foundation\Bootstrap\RegisterFacades::class,                // 注册门面模式
        \Illuminate\Foundation\Bootstrap\RegisterProviders::class,              // 注册服务提供者
        \Illuminate\Foundation\Bootstrap\BootProviders::class,                    // 注册服务提供者boot
    ];

    // 处理请求
    public function handle($request)
    {
        try {
            $request->enableHttpMethodParameterOverride();

            $response = $this->sendRequestThroughRouter($request);
        } catch (Exception $e) {
            $this->reportException($e);

            $response = $this->renderException($request, $e);
        } catch (Throwable $e) {
            $this->reportException($e = new FatalThrowableError($e));

            $response = $this->renderException($request, $e);
        }

        $this->app['events']->dispatch(
            new Events\RequestHandled($request, $response)
        );

        return $response;
    }

    protected function sendRequestThroughRouter($request)
    {
        # 一、将$request实例注册到APP容器
        $this->app->instance('request', $request);

        # 二、清除之前的$request实例缓存
        Facade::clearResolvedInstance('request');

        # 三、启动引导程序
        $this->bootstrap();

        # 四、发送请求
        return (new Pipeline($this->app)) //创建管道
                    ->send($request)      //发送请求
                    ->through($this->app->shouldSkipMiddleware() ? [] : $this->middleware)  //通过中间件
                    ->then($this->dispatchToRouter());  //分发到路由
    }

    # 启动引导程序
    public function bootstrap()
    {
        if (! $this->app->hasBeenBootstrapped()) {
            $this->app->bootstrapWith($this->bootstrappers());
        }
    }

    # 路由分发
    protected function dispatchToRouter()
    {
        return function ($request) {
            $this->app->instance('request', $request);

            return $this->router->dispatch($request);
        };
    }

    #  终止程序
    public function terminate($request, $response)
    {
        $this->terminateMiddleware($request, $response);

        $this->app->terminate();
}服务容器是一个用于管理类依赖和执行依赖注入的强大工具。是整个框架的核心;
几乎所有的服务容器绑定都是在服务提供者中完成。
在框架直接生成服务容器的只有一处,在<span style="font-size: 14px;">bootstrap/app.php</span>,通过<span style="font-size: 14px;">require</span>引用会返回服务容器实例。通过<span style="font-size: 14px;">require</span>引用有两处,一处是<span style="font-size: 14px;">public/index.php</span>,服务器访问的入口;另一处是<span style="font-size: 14px;">tests/CreatesApplication.php</span>,是单元测试的入口;
如果想在项目各处中调用,可以调用<span style="font-size: 14px;">$app = Illuminate\Container\Container::getInstance()</span>或者全局帮助函数<span style="font-size: 14px;">app()</span>获取服务容器实例(也就是<span style="font-size: 14px;">Illuminate\Foundation/Application</span>实例);
<span style="font-size: 14px;">Illuminate\Foundation/Application</span>是对<span style="font-size: 14px;">Illuminate\Container\Container</span>的又一层封装;
那么实例化<span style="font-size: 14px;">Illuminate\Foundation/Application</span>时,做了什么呢?
第一步,设置应用的根目录,并同时注册核心目录到服务容器中;核心的目录有以下
<code><span style="font-size: 14px;">path</span>:目录<span style="font-size: 14px;">app</span>的位置
<span style="font-size: 14px;">path.base</span>:项目根目录的位置
<span style="font-size: 14px;">path.lang</span>:目录<span style="font-size: 14px;">resources/lang</span>的位置
<span style="font-size: 14px;">path.config</span>:目录<span style="font-size: 14px;">config</span>的位置
<span style="font-size: 14px;">path.public</span>:目录<span style="font-size: 14px;">public</span>的位置
<span style="font-size: 14px;">path.storage</span>:目录<span style="font-size: 14px;">storage</span>的位置
<span style="font-size: 14px;">path.database</span>:目录<span style="font-size: 14px;">database</span>的位置
<span style="font-size: 14px;">path.resources</span>:目录<span style="font-size: 14px;">resources</span>的位置
<span style="font-size: 14px;">path.bootstrap</span>:目录<span style="font-size: 14px;">bootstrap</span>的位置
第二步,将当前<span style="font-size: 14px;">IlluminateFoundation/Application</span>实例保存到<span style="font-size: 14px;">$instance</span>类变量,并同时绑定到服务容器作单例绑定,绑定名为<span style="font-size: 14px;">app</span>或<span style="font-size: 14px;">Container::class</span>;
第三步,顺序分别执行注册<span style="font-size: 14px;">IlluminateEventsEventServiceProvider</span>、<span style="font-size: 14px;">IlluminateLogLogServiceProvider</span>和<span style="font-size: 14px;">IlluminateRoutingRoutingServiceProvider</span>三个服务提供者;
注册服务提供者的顺序如下:
如果类变量<span style="font-size: 14px;">$serviceProviders</span>已经存在该服务提供者并且不需要强制重新注册,则返回服务提供者实例<span style="font-size: 14px;">$provider</span>;
未注册过当前服务提供者,则继续执行以下;
如果存在<span style="font-size: 14px;">register</span>方法,执行服务提供者的<span style="font-size: 14px;">register</span>方法;
将当前服务提供者<span style="font-size: 14px;">$provider</span>实例保存到类变量<span style="font-size: 14px;">$serviceProviders</span>数组中,同时标记类变量<span style="font-size: 14px;">$loadedProviders[get_class($provider)]</span>的值为<span style="font-size: 14px;">true</span>path : L'emplacement du répertoire
🎜app🎜🎜🎜🎜🎜path.base🎜 code> 🎜 : L'emplacement du répertoire racine du projet 🎜🎜🎜🎜<code>🎜path.lang🎜🎜 : L'emplacement du répertoire 🎜🎜resources/lang🎜🎜🎜🎜 li>🎜🎜🎜path.config🎜🎜 : L'emplacement du répertoire 🎜🎜config🎜🎜🎜🎜🎜🎜🎜path.public🎜🎜 : L'emplacement du répertoire 🎜🎜public🎜🎜 L'emplacement de 🎜🎜🎜🎜🎜🎜 path.database🎜🎜 : Répertoire 🎜🎜database🎜L'emplacement de 🎜🎜🎜 🎜🎜🎜path.resources🎜🎜 : L'emplacement du répertoire 🎜🎜resources🎜🎜🎜🎜🎜🎜🎜path.bootstrap🎜🎜 : L'emplacement du répertoire 🎜🎜bootstrap🎜🎜🎜🎜
🎜IlluminateFoundation/ L'application🎜🎜 actuelle est enregistrée dans le 🎜 🎜$instance🎜🎜 variable de classe, et est également liée au conteneur de service pour la liaison singleton. Le nom de liaison est 🎜🎜app🎜 🎜 ou 🎜🎜Container. ::class🎜🎜; 🎜🎜🎜🎜La troisième étape, effectuez l'enregistrement séparément dans l'ordre 🎜🎜IlluminateEventsEventServiceProvider🎜 code>🎜, 🎜<code>🎜IlluminateLogLogServiceProvider🎜 🎜 et 🎜🎜IlluminateRoutingRoutingServiceProvider🎜🎜trois fournisseurs de services 🎜🎜🎜🎜L'ordre d'enregistrement des fournisseurs de services est le suivant : 🎜🎜🎜 🎜🎜🎜Si la variable de classe 🎜 🎜$serviceProviders🎜🎜 existe déjà et aucune réinscription forcée n'est requise, renvoyez l'instance du fournisseur de services 🎜🎜$provider🎜 🎜;🎜🎜🎜🎜🎜Si le le fournisseur de services actuel n'a pas été enregistré, continuez à exécuter ce qui suit 🎜🎜🎜🎜🎜S'il existe une méthode 🎜🎜register🎜🎜, exécutez la méthode 🎜🎜 du fournisseur de services ; méthode register🎜🎜 ; 🎜🎜🎜🎜🎜 enregistre l'instance du fournisseur de services actuel 🎜🎜$provider🎜🎜 dans une variable de classe 🎜🎜$serviceProviders🎜🎜array, marquez également la variable de classe 🎜<code>🎜$loadedProviders[get_class($provider)]🎜🎜La valeur est 🎜🎜true🎜 🎜;🎜🎜判断类变量<span style="font-size: 14px;">$booted</span>是否为<span style="font-size: 14px;">true</span>,如果是<span style="font-size: 14px;">true</span>,则执行服务提供者的<span style="font-size: 14px;">boot</span>方法;(类变量<span style="font-size: 14px;">$booted</span>应该是标志是否所有服务提供者均注册,框架是否启动)
第四步,注册核心类别名;
比如<span style="font-size: 14px;">\Illuminate\Foundation\Application::class</span>、<span style="font-size: 14px;">\Illuminate\Contracts\Container\Container::class</span>起别名为<span style="font-size: 14px;">app</span>;
启动代码很简洁,
Route::get('dev', 'Dev@index');

public function index()
{
     // require 初始化分析上面已经介绍了
    $app = require base_path('bootstrap/app.php');
    $kernel = $app->make('Illuminate\Contracts\Http\Kernel');

    dd($kernel);
}
构造函数主要干了一件事,注册一个<span style="font-size: 14px;">booted</span>完成后的回调函数,函数执行的内容为“注册 <span style="font-size: 14px;">Schedule</span>实例到服务提供者,同时加载用户定义的<span style="font-size: 14px;">Schedule</span>任务清单”;
<span style="font-size: 14px;">bootstrap</span>方法的执行内容如下:
加载<span style="font-size: 14px;">Illuminate/Foundation/Console/Kernel</span>中<span style="font-size: 14px;">$bootstrappers</span>变量数组中的类,执行它们的<span style="font-size: 14px;">bootstrap</span>方法;
protected $bootstrappers = [
    // 加载 .env 文件
    \Illuminate\Foundation\Bootstrap\LoadEnvironmentVariables::class,
    // 加载 config 目录下的配置文件
    \Illuminate\Foundation\Bootstrap\LoadConfiguration::class,
    // 自定义错误报告,错误处理方法及呈现
    \Illuminate\Foundation\Bootstrap\HandleExceptions::class,
    // 为 config/app.php 中的 aliases 数组注册类别名
    \Illuminate\Foundation\Bootstrap\RegisterFacades::class,
    // 在服务容器中单例绑定一个 request 对象,控制台命令会用到
    \Illuminate\Foundation\Bootstrap\SetRequestForConsole::class,
    // 注册 config\app.php 中的 providers 服务提供者
    \Illuminate\Foundation\Bootstrap\RegisterProviders::class,
    // 项目启动,执行每个 ServiceProvider 的 boot 方法,
    \Illuminate\Foundation\Bootstrap\BootProviders::class,
];加载延迟的服务提供者;
启动入口文件在<span style="font-size: 14px;">public\index.php</span>
$app = require_once __DIR__.'/../bootstrap/app.php';

// 实例化 Illuminate/Foundation/Http/Kernel 对象
$kernel = $app->make(Illuminate\Contracts\Http\Kernel::class);

// 中间件处理、业务逻辑处理
$response = $kernel->handle(
    // 根据 Symfony 的 request 对象封装出 Illuminate\Http\Request
    $request = Illuminate\Http\Request::capture()
);

$response->send();

// 执行所有中间件的 terminate 方法,执行 Application 中的 terminatingCallbacks 回调函数
$kernel->terminate($request, $response);维护 类与别名 的数组;键名为 类的全限定类名,键值为 数组,每一个元素都是该类的别名;
判断指定类是否有别名:
<span style="font-size: 14px;">app()->isAlias($name)</span>;
获取指定类的别名:<span style="font-size: 14px;">app()->getAlias($abstract)</span>;
维护 类与别名 的数组;键名为 别名,键值为 类的全限定类名;
维护 类与实例的数组;键名为 类的全限定类名,键值为该类的实例;
移除绑定类:
<span style="font-size: 14px;">app()->forgetInstance($abstract);</span>
移除所有绑定类:<span style="font-size: 14px;">app()->forgetInstances();</span>
通过 <span style="font-size: 14px;">bind</span> 方法实现 接口类与实现的绑定;
获取
<span style="font-size: 14px;">bindings</span>数组中的内容:<span style="font-size: 14px;">app()->getBindings()</span>
键名为 类的全限定类名,键值为布尔值类型(<span style="font-size: 14px;">true</span>表示已解析过,<span style="font-size: 14px;">false</span>表示未解析过);
在<span style="font-size: 14px;">resolved</span>过程中,会有一些参数;<span style="font-size: 14px;">with</span>数组就是参数栈,开始解析时将参数入栈,结束解析时参数出栈;
上下文绑定数组;第一维数组键名为 场合类(比如某个<span style="font-size: 14px;">Controller</span>类的类名),第二维数组键名为 抽象类(需要实现的接口类),键值为 <span style="font-size: 14px;">Closure</span> 或 某个具体类的类名;
维护 标签与类 的数组;键名是 标签名,键值是 对应要绑定的类的名称;
如果调用<span style="font-size: 14px;">tagged</span>方法,会将键值数组中的类都<span style="font-size: 14px;">make</span>出来,并以数组形式返回;
在<span style="font-size: 14px;">make</span>或<span style="font-size: 14px;">resolve</span>出对象的时候,会执行
foreach ($this->getExtenders($abstract) as $extender) { $object = $extender($object, $this);}能对解析出来的对象进行修饰;
向容器绑定方法与及实现:
<span style="font-size: 14px;">app()->bindMethod($method, $callback)</span>
判断容器内是否有指定方法的实现:<span style="font-size: 14px;">app()->hasMethodBinding($method)</span>
执行方法的实现:<span style="font-size: 14px;">app()->callMethodBinding($method, $instance)</span>或者<span style="font-size: 14px;">app()->call($method)</span>
调用<span style="font-size: 14px;">build</span>方法时维护的栈,栈中存放的是当前要<span style="font-size: 14px;">new</span>的类名;
当调用<span style="font-size: 14px;">rebound</span>函数时,会触发<span style="font-size: 14px;">rebound</span>中为此<span style="font-size: 14px;">$abstract</span>设置的回调函数;
注册入口:
<span style="font-size: 14px;">app()->rebinding($abstract, Closure $callback);</span>
已在系统注册的服务提供者<span style="font-size: 14px;">ServiceProvider</span>;
数组内存放的是<span style="font-size: 14px;">loadedProviders</span>键名对应类的实例;
系统已加载的<span style="font-size: 14px;">ServiceProvider</span>的集合;键名为<span style="font-size: 14px;">ServiceProvider</span>的全限定类名,键值为布尔值(<span style="font-size: 14px;">true</span>表示已加载,<span style="font-size: 14px;">false</span>表示未加载);
获取延迟加载对象:
<span style="font-size: 14px;">app()->getLoadedProviders()</span>;
有些服务提供者是会延迟加载的;这时候会将这些服务提供者声明的服务登录在<span style="font-size: 14px;">deferredServices</span>数组,键名为延迟加载对象名 ,键值为该延迟加载对象所在的<span style="font-size: 14px;">ServiceProvider</span>;
获取延迟加载对象:
<span style="font-size: 14px;">app()->getDeferredServices()</span>;
项目启动前执行的回调函数;(项目启动是在执行<span style="font-size: 14px;">\Illuminate\Foundation\Bootstrap\BootProviders::class</span>的时候)
注册入口:
<span style="font-size: 14px;">app()->booting($callback);</span>
项目启动后执行的回调函数;(项目启动是在执行<span style="font-size: 14px;">\Illuminate\Foundation\Bootstrap\BootProviders::class</span>的时候)
注册入口:
<span style="font-size: 14px;">app()->booted($callback);</span>
解析时回调函数集合;键名为 类名, 键值为 回调函数数组,每一个元素都是回调函数;
注册入口:
<span style="font-size: 14px;">app()->resolving($abstract, $callback);</span>
解析后回调函数集合;键名为 类名, 键值为 回调函数数组,每一个元素都是回调函数;
注册入口:
<span style="font-size: 14px;">app()->afterResolving($abstract, $callback);</span>
全局解析时回调函数集合;每一次<span style="font-size: 14px;">resolve</span>方法调用时都会执行的回调函数集合;
注册入口:
<span style="font-size: 14px;">app()->resolving($callback);</span>
全局解析后回调函数集合;每一次<span style="font-size: 14px;">resolve</span>方法调用后都会执行的回调函数集合;
注册入口:
<span style="font-size: 14px;">app()->afterResolving($callback);</span>
系统在返回<span style="font-size: 14px;">response</span>之后,会执行<span style="font-size: 14px;">terminate</span>方法,来做应用结束前的扫尾处理;
这个数组就是执行<span style="font-size: 14px;">terminate</span>方法时会执行的回调函数集合;
注册入口:
<span style="font-size: 14px;">app()->terminating(Closure $callback)</span>;
public function bind($abstract, $concrete = null, $shared = false)
第一个参数是要注册的类名或接口名,第二个参数是返回类的实例的闭包(或类的实例类名),第三个参数是否是单例;
方法内部流程:
<span style="font-size: 14px;">unset</span> 掉 instances 和 aliases 数组中键值为 <span style="font-size: 14px;">$abstract</span> 的元素;
如果 <span style="font-size: 14px;">$concrete</span> 值为 <span style="font-size: 14px;">null</span> ,将 <span style="font-size: 14px;">$abstract</span> 赋值给 <span style="font-size: 14px;">$concrete</span>;
如果 <span style="font-size: 14px;">$concrete</span> 不是 <span style="font-size: 14px;">Closure</span> 对象,则封装成闭包;
将 <span style="font-size: 14px;">$concrete</span> 和 <span style="font-size: 14px;">$shared</span> 通过 <span style="font-size: 14px;">compact</span>,添加进 bindings 数组,键名为 <span style="font-size: 14px;">$abstract</span>;
判断 <span style="font-size: 14px;">$abstract</span> 在 resolved 和 instances 数组中是否存在,如果存在,则执行第 6 步;
触发 <span style="font-size: 14px;">rebound</span>回调函数;如果 <span style="font-size: 14px;">reboundCallbacks</span> 数组中注册以 <span style="font-size: 14px;">$abstract</span> 为键名的回调函数,则执行这些回调函数;
涉及数组:
<span style="font-size: 14px;">instances</span>和<span style="font-size: 14px;">aliases</span>(unset 操作)、<span style="font-size: 14px;">bindings</span>(add 操作)
单例绑定;
public function singleton($abstract, $concrete = null) $this->bind($abstract, $concrete, true);}
涉及数组:
<span style="font-size: 14px;">instances</span>和<span style="font-size: 14px;">aliases</span>(unset 操作)、<span style="font-size: 14px;">bindings</span>(add 操作)
单例绑定;
public function bindIf($abstract, $concrete = null, $shared = false) {
    if (! $this->bound($abstract)) {
        $this->bind($abstract, $concrete, $shared);
    }
}涉及数组:
<span style="font-size: 14px;">instances</span>和<span style="font-size: 14px;">aliases</span>(unset 操作)、<span style="font-size: 14px;">bindings</span>(add 操作)
绑定实例;
public function instance($abstract, $instance)
方法内部流程:
如果<span style="font-size: 14px;">$abstract</span>在<span style="font-size: 14px;">aliases</span>数组中存在,则从<span style="font-size: 14px;">abstractAliases</span>中所有的值数组中移除该类;
<span style="font-size: 14px;">unset</span> 掉 <span style="font-size: 14px;">aliases</span> 数组中键名为 <span style="font-size: 14px;">$abstract</span>的元素;
赋值操作:<span style="font-size: 14px;">$this->instances[$abstract] = $instance;</span>
判断 <span style="font-size: 14px;">$abstract</span> 在 resolved 和 instances 数组中是否存在,如果存在,则执行第 5 步;
触发 <span style="font-size: 14px;">rebound</span>回调函数;如果 <span style="font-size: 14px;">reboundCallbacks</span> 数组中注册以 <span style="font-size: 14px;">$abstract</span> 为键名的回调函数,则执行这些回调函数;
涉及数组:
<span style="font-size: 14px;">instances</span>(add 操作)、<span style="font-size: 14px;">aliases</span>和<span style="font-size: 14px;">abstractAliases</span>(unset 操作)
public function make($abstract) { return $this->resolve($abstract);}给类起别名;
public function alias($abstract, $alias) {
    $this->aliases[$alias] = $abstract;

    $this->abstractAliases[$abstract][] = $alias;
}涉及数组:
<span style="font-size: 14px;">aliases</span>和<span style="font-size: 14px;">abstractAliases</span>(add 操作)
第一步 Laravel 应用的所有请求入口都是 public/index.php 文件。打开 index.php 发现代码也就几行。
下面我们来讲一下每一句代码的作用是什么?
// 定义了laravel一个请求的开始时间
define('LARAVEL_START', microtime(true));

// composer自动加载机制
require __DIR__.'/../vendor/autoload.php';

// 这句话你就可以理解laravel,在最开始引入了一个ioc容器。
$app = require_once __DIR__.'/../bootstrap/app.php';

// 打开__DIR__.'/../bootstrap/app.php';你会发现这段代码,绑定了Illuminate\Contracts\Http\Kernel::class,
// 这个你可以理解成之前我们所说的$ioc->bind();方法。
// $app->singleton(
//     Illuminate\Contracts\Http\Kernel::class,
//    App\Http\Kernel::class
// );

// 这个相当于我们创建了Kernel::class的服务提供者
$kernel = $app->make(Illuminate\Contracts\Http\Kernel::class);

// 获取一个 Request ,返回一个 Response。以把该内核想象作一个代表整个应用的大黑盒子,输入 HTTP 请求,返回 HTTP 响应。
$response = $kernel->handle(
    $request = Illuminate\Http\Request::capture()
);

// 就是把我们服务器的结果返回给浏览器。
$response->send();

// 这个就是执行我们比较耗时的请求,
$kernel->terminate($request, $response);走到这里你会发现,是不是在我们学会了 ioc,服务提供者理解起来就比较简单了。那 $middleware,服务提供者都是在哪个文件注册运行的呢?
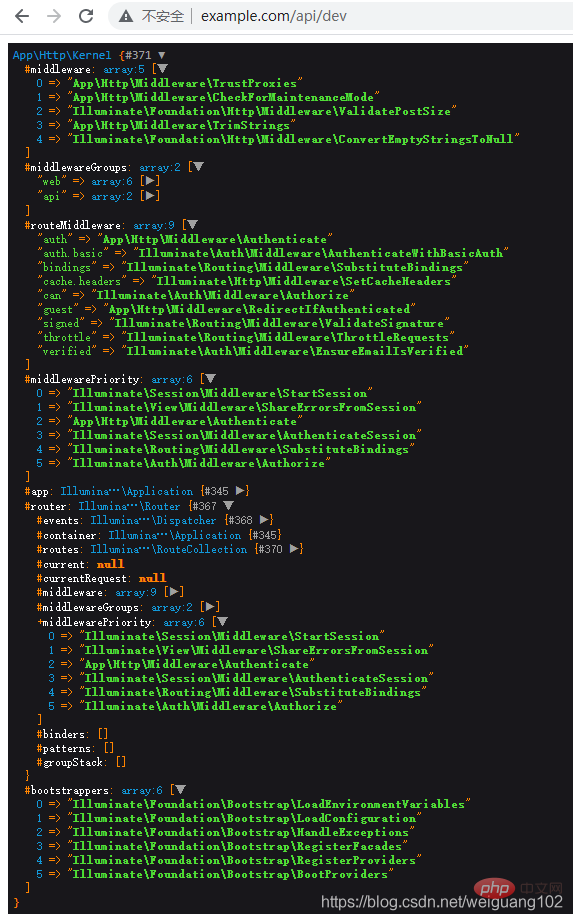
打开 App\Http\Kernel::class 这个文件,你会发现定义了一堆需要加载的 $middleware。这个 kernel 的主要方法还是在他的父类里面 Illuminate\Foundation\Http\Kernel 中。
打开 Illuminate\Foundation\Http\Kernel,你会发现定义了启动时需要做的事呢?
protected $bootstrappers = [
    \Illuminate\Foundation\Bootstrap\LoadEnvironmentVariables::class,
    \Illuminate\Foundation\Bootstrap\LoadConfiguration::class,
    \Illuminate\Foundation\Bootstrap\HandleExceptions::class,
    \Illuminate\Foundation\Bootstrap\RegisterFacades::class,
    \Illuminate\Foundation\Bootstrap\RegisterProviders::class,
    \Illuminate\Foundation\Bootstrap\BootProviders::class,
];$bootstrappers 就定义了我们的 RegisterFacades.class,RegisterProviders.class 这两个类的意思就是要将我们在 app.config 中的 Providers,Facades 注入到我们的 Ioc 容器中。
【相关推荐:laravel视频教程】
Ce qui précède est le contenu détaillé de. pour plus d'informations, suivez d'autres articles connexes sur le site Web de PHP en chinois!
 Introduction aux composants Laravel
 Introduction au middleware Laravel
 Quels sont les modèles de conception utilisés par Laravel ?
 Lequel est le plus simple, thinkphp ou laravel ?
 Tutoriel Laravel
 Comment résoudre une page HTML tronquée
 Solution à l'erreur d'échec de récupération
 Utilisation du cordon
 qu'est-ce que la fonction


![[Web front-end] Démarrage rapide de Node.js](https://img.php.cn/upload/course/000/000/067/662b5d34ba7c0227.png)


