Maison > développement back-end > Tutoriel Python > Comprendre l'utilisation de Tkinter en python en un seul article

Comprendre l'utilisation de Tkinter en python en un seul article

WBOY
Libérer: 2022-07-05 20:47:06
avant
4228 Les gens l'ont consulté

Cet article vous apporte des connaissances pertinentes sur Python. Il organise principalement les problèmes liés à Tkinter est un module qui utilise Python pour la conception de fenêtres. J'espère qu'il sera utile à tout le monde.
Comprendre l'utilisation de Tkinter en python en un seul article

【Recommandations associées : Tutoriel vidéo Python3

1. Introduction

1.1. Qu'est-ce que Tkinter

  • Tkinter est un module de conception de fenêtres utilisant Python. Le module Tkinter (« interface Tk ») est une interface vers la boîte à outils Tk GUI standard de Python. En tant qu'interface GUI spécifique à Python, il s'agit d'une fenêtre d'image. Tkinter est une interface GUI fournie avec Python et peut être modifiée. Elle est très nécessaire pour démarrer et se familiariser avec l'utilisation de Windows.

2. Préparation

2.1. Configurer l'environnement de démonstration Windows

  • Installer python3.7
  • Installer l'éditeur et démontrer le code Visual Studio utilisé

3.

Nous importons d'abord la bibliothèque tkinter

    import tkinter as tk  # 在代码里面导入库,起一个别名,以后代码里面就用这个别名root = tk.Tk()  # 这个库里面有Tk()这个方法,这个方法的作用就是创建一个窗口
    Copier après la connexion
  • Si nous exécutons simplement les deux lignes de code ci-dessus, il n'y aura aucune réponse lors de l'exécution du programme, car il n'y a qu'une seule fonction principale, et elle disparaîtra après son exécution depuis de haut en bas. Cette fenêtre est également très rapide. Elle disparaît, donc ce que nous devons faire maintenant est de garder la fenêtre affichée, puis nous pouvons ajouter une boucle
  • Le nom de la fenêtre créée est root, alors nous pouvons l'utiliser. root pour faire fonctionner cette fenêtre plus tard.

      root.mainloop()  # 加上这一句,就可以看见窗口了
      Copier après la connexion
    • Exécutez les 3 lignes de code ci-dessus, et nous pouvons voir la fenêtre
    • 3.2 Donnez un titre à la fenêtre

      root.title('演示窗口')
      Copier après la connexion
      Comprendre lutilisation de Tkinter en python en un seul article
      3.3 Paramètres de la fenêtre

      Comprendre lutilisation de Tkinter en python en un seul article
      Avec le code suivant, nous pouvons définir la longueur. et la largeur de la fenêtre Et la position de la fenêtre sur l'écran

        root.geometry("300x100+630+80")  # 长x宽+x*y
        Copier après la connexion
      • 3.3. Créez un bouton et ajoutez un événement de clic au bouton

        Comprendre lutilisation de Tkinter en python en un seul article
        Il y a une méthode Button() dans cette bibliothèque. cette méthode est appelée, nous pouvons créer ce composant. Nous attribuons ce composant à une constante, et nous pouvons utiliser cette constante pour faire fonctionner le bouton à l'avenir. Le paramètre dans cette méthode nous oblige à écrire le nom de la fenêtre

          Button. (racine). Cela signifie que le bouton que nous avons créé est placé. Allez dans cette fenêtre
        btn1 = tk.Button(root)
        Copier après la connexion
      • Donnez un nom au bouton
          btn1["text"] = "点击"
          Copier après la connexion
        • Le composant bouton que nous avons créé a été placé dans la fenêtre, mais à l'endroit où il est placé. la fenêtre, sud-est, nord-ouest, nous pouvons utiliser pack () Aller à la position (d'autres méthodes de positionnement seront introduites plus tard)
            btn1.pack()  # 按钮在窗口里面的定位
            Copier après la connexion
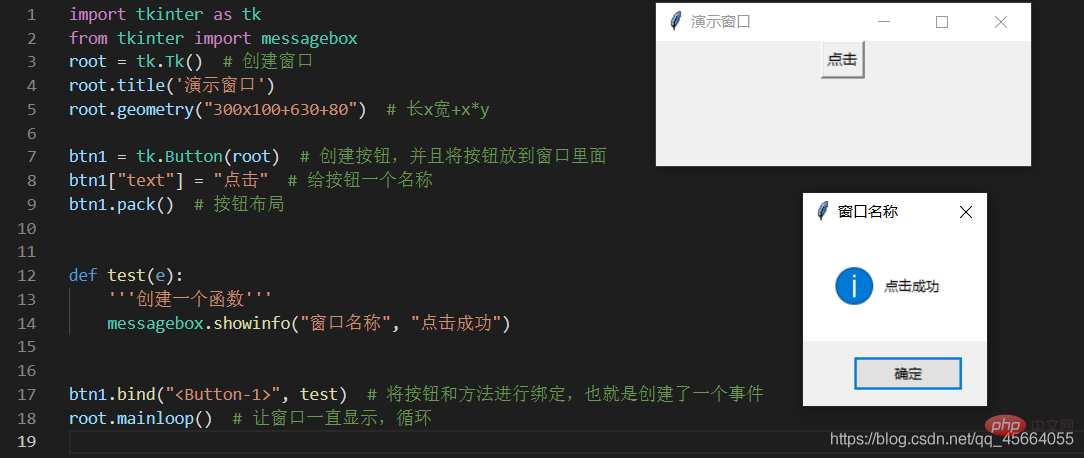
          • Créez une fenêtre contextuelle pour les événements du bouton de clic. Première boîte de message d'importation.
              from tkinter import messageboxdef test(e):
                  messagebox.showinfo("窗口名称","点击成功")
              Copier après la connexion
            • Maintenant que j'ai un bouton et une méthode, je veux. Ce que vous faites est d'exécuter cette méthode dès que vous cliquez sur le bouton, vous devez alors lier le bouton et la méthode
                btn1.bind("<button-1>",test) #第一个参数为:按鼠标左键的事件 第二个参数为:要执行的方法的名字</button-1>
                Copier après la connexion
              • Il y a un méthode bind() dans le composant bouton. Cette méthode peut réaliser la liaison
              • Code complet

                  import tkinter as tkfrom tkinter import messagebox
                  root = tk.Tk()  # 创建窗口root.title('演示窗口')root.geometry("300x100+630+80")  # 长x宽+x*ybtn1 = tk.Button(root)  # 创建按钮,并且将按钮放到窗口里面btn1["text"] = "点击"  # 给按钮一个名称btn1.pack()  # 按钮布局def test(e):
                      '''创建弹窗'''
                      messagebox.showinfo("窗口名称", "点击成功")btn1.bind("", test)  # 将按钮和方法进行绑定,也就是创建了一个事件root.mainloop()  # 让窗口一直显示,循环
                  Copier après la connexion
                • 3.4. Disposition des composants dans la fenêtre

                  Comprendre lutilisation de Tkinter en python en un seul article
                  3 gestionnaires de mise en page : pack - grille - place

                    pack 
                    这个布局管理器,要么将组件垂直的排列,要么水平的排列
                    Copier après la connexion
                    grid 
                    Grid(网格)布局管理器会将控件放置到一个二维的表格里。
                    主控件被分割成一系列的行和列,表格中的每个单元(cell)都可以放置一个控件。
                    Copier après la connexion
                  • OptionsDescriptioncolumnnuméro de colonne de cellule, un entier positif à partir de 0columnspan s'étend sur les colonnes, le nombre de colonnes couvertes, un entier positifligneLe numéro de ligne de la cellule, un entier positif commençant à 0rowspanà travers les lignes, le nombre de lignes couvertes, un entier positifipadx, ipadyDéfinir l'intervalle entre les sous-composants, dans la direction x ou y, l'unité par défaut est le pixel, nombre à virgule non flottante, la valeur par défaut est 0,0padx, padyL'espacement entre les composants qui lui sont juxtaposés, dans la direction x ou y, l'unité par défaut est le pixel, nombre à virgule non flottante, la valeur par défaut est 0,0stickyLe composant est proche d'un certain pied de la cellule où il se trouve, correspondant au centre sud-est et nord-ouest et aux 4 coins. est = "e", sud = "s", ouest = "w", nord = "n", "ne", "se", "sw", "nw" ;
                    • grid_info() 查看组件默认的参数
                    import tkinter as tk
                    root = tk.Tk()# 默认按钮btn1 = tk.Button(root)btn1["text"] = "按钮1"btn1.grid()print(btn1.grid_info())root.title('演示窗口')root.geometry("300x150+1000+300")root.mainloop()
                    Copier après la connexion

                    Comprendre lutilisation de Tkinter en python en un seul article

                    • column 指定控件所在的列
                    import tkinter as tk
                    root = tk.Tk()# 按钮1btn1 = tk.Button(root)btn1["text"] = "按钮1"btn1.grid(column=0)# 按钮2btn2 = tk.Button(root)btn2["text"] = "按钮2"btn2.grid(column=1)root.title('演示窗口')root.geometry("300x100+1000+300")root.mainloop()
                    Copier après la connexion

                    Comprendre lutilisation de Tkinter en python en un seul article

                    • columnspan 指定每个控件横跨的列数
                    • 什么是columnspan?

                    类似excel的合并单元格
                    Comprendre lutilisation de Tkinter en python en un seul article
                    a占了两个格子的宽度,colunmspan就是2

                    "python
                    import tkinter as tk
                    root = tk.Tk()
                    
                    # 按钮1
                    btn1 = tk.Button(root)
                    btn1["text"] = "按钮1"
                    btn1.grid(column=0, columnspan=2)
                    
                    # 按钮2
                    btn2 = tk.Button(root)
                    btn2["text"] = "按钮2"
                    btn2.grid(column=1, columnspan=1)
                    
                    
                    root.title('演示窗口')
                    root.geometry("300x100+1000+300")
                    root.mainloop()
                    Copier après la connexion

                    Comprendre lutilisation de Tkinter en python en un seul article

                    • row 指定控件所在的行
                    import tkinter as tk
                    root = tk.Tk()# 按钮1btn1 = tk.Button(root)btn1["text"] = "按钮1"btn1.grid(row=0)# 按钮2btn2 = tk.Button(root)btn2["text"] = "按钮2"btn2.grid(row=1)# 按钮3btn3 = tk.Button(root)btn3["text"] = "按钮2"btn3.grid(row=2)root.title('演示窗口')root.geometry("300x100+1000+300")root.mainloop()
                    Copier après la connexion

                    Comprendre lutilisation de Tkinter en python en un seul article

                    • rowspan 指定每个控件横跨的行数

                    • 什么是rowspan ?

                    类似excel的合并单元格
                    Comprendre lutilisation de Tkinter en python en un seul article
                    a占了两个格子的高度,rowspan就是2

                    import tkinter as tk
                    root = tk.Tk()# 按钮1btn1 = tk.Button(root)btn1["text"] = "按钮1"btn1.grid(row=0, rowspan=2)# 按钮2btn2 = tk.Button(root)btn2["text"] = "按钮2"btn2.grid(row=2, rowspan=1)root.title('演示窗口')root.geometry("300x100+1000+300")root.mainloop()
                    Copier après la connexion

                    Comprendre lutilisation de Tkinter en python en un seul article

                    • ipadx 水平方向内边距
                    import tkinter as tk
                    root = tk.Tk()# 按钮1btn1 = tk.Button(root)btn1["text"] = "按钮1"btn1.grid(ipadx=20)# 按钮2btn2 = tk.Button(root)btn2["text"] = "按钮2"btn2.grid(ipadx=5)root.title('演示窗口')root.geometry("300x100+1000+300")root.mainloop()
                    Copier après la connexion

                    Comprendre lutilisation de Tkinter en python en un seul article

                    • ipady 垂直方向内边距
                    import tkinter as tk
                    root = tk.Tk()# 按钮1btn1 = tk.Button(root)btn1["text"] = "按钮1"btn1.grid(ipady=20)# 按钮2btn2 = tk.Button(root)btn2["text"] = "按钮2"btn2.grid(ipady=5)root.title('演示窗口')root.geometry("300x150+1000+300")root.mainloop()
                    Copier après la connexion

                    Comprendre lutilisation de Tkinter en python en un seul article

                    • padx 水平方向外边距
                    import tkinter as tk
                    root = tk.Tk()# 按钮1btn1 = tk.Button(root)btn1["text"] = "按钮1"btn1.grid(padx=50)# 按钮2btn2 = tk.Button(root)btn2["text"] = "按钮2"btn2.grid(column=1, padx=20)root.title('演示窗口')root.geometry("300x150+1000+300")root.mainloop()
                    Copier après la connexion

                    Comprendre lutilisation de Tkinter en python en un seul article

                    • pady 垂直方向外边距
                    import tkinter as tk
                    root = tk.Tk()# 按钮1btn1 = tk.Button(root)btn1["text"] = "按钮1"btn1.grid(pady=30)# 按钮2btn2 = tk.Button(root)btn2["text"] = "按钮2"btn2.grid(pady=20)root.title('演示窗口')root.geometry("300x150+1000+300")root.mainloop()
                    Copier après la connexion

                    Comprendre lutilisation de Tkinter en python en un seul article

                    • sticky 组件东南西北的方向
                    import tkinter as tk
                    root = tk.Tk()# 默认按钮btn1 = tk.Button(root)btn1["text"] = "默认按钮演示效果"btn1.grid(ipadx=50)# 按钮2btn2 = tk.Button(root)btn2["text"] = "按钮2"btn2.grid(row=1, sticky="w")# 按钮3btn3 = tk.Button(root)btn3["text"] = "按钮3"btn3.grid(row=1, sticky="e")root.title('演示窗口')root.geometry("300x150+1000+300")root.mainloop()
                    Copier après la connexion

                    Comprendre lutilisation de Tkinter en python en un seul article

                    place布局管理器
                    place布局管理器可以通过坐标精确控制组件的位置,适用于一些布局更加灵活的场景
                    Copier après la connexion
                    选项 说明
                    x,y 组件左上角的绝对坐标(相当于窗口)
                    relx ,rely 组件左上角的坐标(相对于父容器)
                    width , height 组件的宽度和高度
                    relwidth , relheight 组件的宽度和高度(相对于父容器)
                    anchor 对齐方式,左对齐“w”,右对齐“e”,顶对齐“n”,底对齐“s”
                    import tkinter as tk
                    root = tk.Tk()but1 = tk.Button(root, text="按钮1")but1.place(relx=0.2, x=100, y=20, relwidth=0.2, relheight=0.5)root.title('演示窗口')root.geometry("300x150+1000+300")root.mainloop()
                    Copier après la connexion

                    Comprendre lutilisation de Tkinter en python en un seul article

                    四、Tkinter基本控件介绍

                    4.1、封装

                    import tkinter as tk# from tkinter import ttk -下拉选择框class GUI:
                    
                        def __init__(self):
                            self.root = tk.Tk()
                            self.root.title('演示窗口')
                            self.root.geometry("500x200+1100+150")
                            self.interface()
                    
                        def interface(self):
                            """"界面编写位置"""
                            passif __name__ == '__main__':
                        a = GUI()
                        a.root.mainloop()
                    Copier après la connexion

                    4.2、文本显示_Label

                        def interface(self):
                            """"界面编写位置"""
                            self.Label0 = tk.Label(self.root, text="文本显示")
                            self.Label0.grid(row=0, column=0)
                    Copier après la connexion

                    4.3、按钮显示_Button

                        def interface(self):
                            """"界面编写位置"""
                            self.Button0 = tk.Button(self.root, text="按钮显示")
                            self.Button0.grid(row=0, column=0)
                    Copier après la connexion

                    4.4、输入框显示_Entry

                        def interface(self):
                            """"界面编写位置"""
                            self.Entry0 = tk.Entry(self.root)
                            self.Entry0.grid(row=0, column=0)
                    Copier après la connexion

                    4.5、文本输入框显示_Text

                    # pack布局
                        def interface(self):
                            """"界面编写位置"""
                            self.w1 = tk.Text(self.root, width=80, height=10)
                            self.w1.pack(pady=0, padx=30)# grid布局
                        def interface(self):
                            """"界面编写位置"""
                            self.w1 = tk.Text(self.root, width=80, height=10)
                            self.w1.grid(row=1, column=0)
                    Copier après la connexion

                    4.6、复选按钮_Checkbutton

                        def interface(self):
                            """"界面编写位置"""
                            self.Checkbutton01 = tk.Checkbutton(self.root, text="名称")
                            self.Checkbutton01.grid(row=0, column=2)
                    Copier après la connexion

                    4.7、单选按钮_Radiobutton

                        def interface(self):
                            """"界面编写位置"""
                            self.Radiobutton01 = tk.Radiobutton(self.root, text="名称")
                            self.Radiobutton01.grid(row=0, column=2)
                    Copier après la connexion

                    4.8、下拉选择框_Combobox

                    def interface(self):
                            """"界面编写位置"""
                            values = ['1', '2', '3', '4']
                            self.combobox = ttk.Combobox(
                                master=self.root,  # 父容器
                                height=10,  # 高度,下拉显示的条目数量
                                width=20,  # 宽度
                                state='',  # 设置状态 normal(可选可输入)、readonly(只可选)、 disabled(禁止输入选择)
                                cursor='arrow',  # 鼠标移动时样式 arrow, circle, cross, plus...
                                font=('', 15),  # 字体、字号
                                textvariable='',  # 通过StringVar设置可改变的值
                                values=values,  # 设置下拉框的选项
                                )
                            self.combobox.grid(padx=150)
                    Copier après la connexion

                    4.9、菜单-主菜单、子菜单

                    import tkinter as tkfrom tkinter import Menuclass GUI:
                    
                        def __init__(self):
                            self.root = tk.Tk()
                            self.root.title('演示窗口')
                            self.root.geometry("500x200+1100+150")
                            # 创建主菜单实例
                            self.menubar = Menu(self.root)
                            # 显示菜单,将root根窗口的主菜单设置为menu
                            self.root.config(menu=self.menubar)
                            self.interface()
                    
                        def interface(self):
                            """"界面编写位置"""
                            # 在 menubar 上设置菜单名,并关联一系列子菜单
                            self.menubar.add_cascade(label="文件", menu=self.papers())
                            self.menubar.add_cascade(label="查看", menu=self.about())
                    
                        def papers(self):
                            """
                            fmenu = Menu(self.menubar): 创建子菜单实例
                            tearoff=1: 1的话多了一个虚线,如果点击的话就会发现,这个菜单框可以独立出来显示
                            fmenu.add_separator(): 添加分隔符"--------"
                            """
                            fmenu = Menu(self.menubar, tearoff=0)
                            # 创建单选框
                            for item in ['新建', '打开', '保存', '另存为']:
                                fmenu.add_command(label=item)
                    
                            return fmenu    def about(self):
                            amenu = Menu(self.menubar, tearoff=0)
                            # 添加复选框
                            for item in ['项目复选框', '文件扩展名', '隐藏的项目']:
                                amenu.add_checkbutton(label=item)
                    
                            return amenuif __name__ == '__main__':
                        a = GUI()
                        a.root.mainloop()
                    Copier après la connexion

                    五、组件使用方法介绍

                    5.1、按钮(Button)绑定事件

                        def interface(self):
                            """"界面编写位置"""
                            self.Button0 = tk.Button(self.root, text="运行", command=self.event)
                            self.Button0.grid(row=0, column=0)
                            
                    		self.Button1 = tk.Button(self.root, text="退出", command=self.root.destroy, bg="Gray")  # bg=颜色
                            self.Button1.grid(row=0, column=1, sticky="e", ipadx=10)
                    
                    
                        def event(self):
                            """按钮事件"""
                            print("运行成功")
                    Copier après la connexion

                    5.2、输入框(Entry)内容获取

                        def interface(self):
                            """"界面编写位置"""
                            self.entry00 = tk.StringVar()
                            self.entry00.set("默认信息")
                    
                            self.entry0 = tk.Entry(self.root, textvariable=self.entry00)
                            self.entry0.grid(row=1, column=0)
                    
                            self.Button0 = tk.Button(self.root, text="运行", command=self.event)
                            self.Button0.grid(row=0, column=0)
                    
                        def event(self):
                            """按钮事件,获取文本信息"""
                            a = self.entry00.get()
                            print(a)
                    Copier après la connexion

                    5.2、文本输入框(Text),写入文本信息和清除文本信息

                        def interface(self):
                            """"界面编写位置"""
                            self.Button0 = tk.Button(self.root, text="清除", command=self.event)
                            self.Button0.grid(row=0, column=0)
                    
                            self.w1 = tk.Text(self.root, width=80, height=10)
                            self.w1.grid(row=1, column=0)
                            self.w1.insert("insert", "默认信息")
                    
                        def event(self):
                            '''清空输入框'''
                            self.w1.delete(1.0, "end")
                    Copier après la connexion

                    5.3、获取复选按钮(Checkbutton)的状态

                      def interface(self):
                            """"界面编写位置"""
                            self.Button0 = tk.Button(self.root, text="确定", command=self.event)
                            self.Button0.grid(row=0, column=0)
                    
                            self.v1 = tk.IntVar()
                            self.Checkbutton01 = tk.Checkbutton(self.root, text="复选框", command=self.Check_box, variable=self.v1)
                            self.Checkbutton01.grid(row=1, column=0)
                    
                            self.w1 = tk.Text(self.root, width=80, height=10)
                            self.w1.grid(row=2, column=0)
                    
                        def event(self):
                            '''按钮事件,获取复选框的状态,1表示勾选,0表示未勾选'''
                            a = self.v1.get()
                            self.w1.insert(1.0, str(a)+'\n')
                    
                        def Check_box(self):
                            '''复选框事件'''
                            if self.v1.get() == 1:
                                self.w1.insert(1.0, "勾选"+'\n')
                            else:
                                self.w1.insert(1.0, "未勾选"+'\n')
                    Copier après la connexion

                    5.4、清除控件

                        def interface(self):
                            """"界面编写位置"""
                            self.Button0 = tk.Button(self.root, text="确定", command=self.event)
                            self.Button0.grid(row=0, column=0)
                    
                            self.Label0 = tk.Label(self.root, text="文本显示")
                            self.Label0.grid(row=1, column=0)
                    
                            self.Entry0 = tk.Entry(self.root)
                            self.Entry0.grid(row=2, column=0)
                    
                            self.w1 = tk.Text(self.root, width=80, height=10)
                            self.w1.grid(row=3, column=0)
                    
                        def event(self):
                            '''按钮事件,清除Label、Entry、Text组件'''
                            a = [self.Label0, self.Entry0, self.w1]
                            for i in a:
                                i.grid_forget()
                    Copier après la connexion

                    5.5、清除复选框勾选状态

                        def interface(self):
                            """"界面编写位置"""
                            self.Button0 = tk.Button(self.root, text="确定", command=self.event)
                            self.Button0.grid(row=0, column=0)
                    
                            self.v1 = tk.IntVar()
                            self.Checkbutton01 = tk.Checkbutton(self.root, text="复选框", command=self.Check_box, variable=self.v1)
                            self.Checkbutton01.grid(row=1, column=0)
                    
                            self.w1 = tk.Text(self.root, width=80, height=10)
                            self.w1.grid(row=2, column=0)
                    
                        def event(self):
                            '''按钮事件,清除复选框勾选状态'''
                            self.Checkbutton01.deselect()
                    
                        def Check_box(self):
                            '''复选框事件'''
                            if self.v1.get() == 1:
                                self.w1.insert(1.0, "勾选"+'\n')
                            else:
                                self.w1.insert(1.0, "未勾选"+'\n')
                    Copier après la connexion

                    5.6、文本框(Text)内容获取

                        def interface(self):
                            """"界面编写位置"""
                            self.Button0 = tk.Button(self.root, text="确定", command=self.event)
                            self.Button0.grid(row=0, column=0)
                    
                            self.w1 = tk.Text(self.root, width=80, height=10)
                            self.w1.grid(row=1, column=0)
                    
                        def event(self):
                            a = self.w1.get('0.0', 'end')
                            print(a)
                    Copier après la connexion

                    5.7、下拉选择框绑定事件

                        def interface(self):
                            """"界面编写位置"""
                            self.value = tk.StringVar()
                            self.value.set('2')  # 默认值 
                            values = ['1', '2', '3', '4']
                            self.combobox = ttk.Combobox(
                                master=self.root,  # 父容器
                                height=10,  # 高度,下拉显示的条目数量
                                width=20,  # 宽度
                                state='',  # 设置状态 normal(可选可输入)、readonly(只可选)、 disabled(禁止输入选择)
                                cursor='arrow',  # 鼠标移动时样式 arrow, circle, cross, plus...
                                font=('', 15),  # 字体
                                textvariable=self.value,  # 通过StringVar设置可改变的值
                                values=values,  # 设置下拉框的选项
                                )
                            # 绑定事件,下拉列表框被选中时,绑定pick()函数
                            self.combobox.bind(">", self.pick)
                            self.combobox.grid(padx=150)
                    
                        def pick(self, *args):  # 处理事件,*args表示可变参数
                            print('选中的数据:{}'.format(self.combobox.get()))
                            print('value的值:{}'.format(self.value.get()))
                    Copier après la connexion

                    六、Tkinter使用多线程

                    6.1、为什么要使用多线程

                    • 以下为单线程运行
                        def interface(self):
                            """"界面编写位置"""
                            self.Button0 = tk.Button(self.root, text="确定", command=self.event)
                            self.Button0.grid(row=0, column=0)
                    
                            self.w1 = tk.Text(self.root, width=80, height=10)
                            self.w1.grid(row=1, column=0)
                    
                        def event(self):
                            '''按钮事件,一直循环'''
                            a = 0
                            while True:
                                a += 1
                                self.w1.insert(1.0, str(a)+'\n')
                    Copier après la connexion

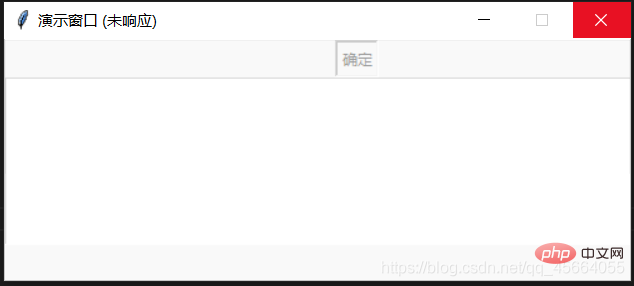
                    单线程下,主线程需要运行窗口,如果这个时候点击“确定”按钮,主线程就会去执行event方法,那界面就会出现“无响应”状态,如果要界面正常显示,那我们就需要用到多线程(threading)
                    Comprendre lutilisation de Tkinter en python en un seul article

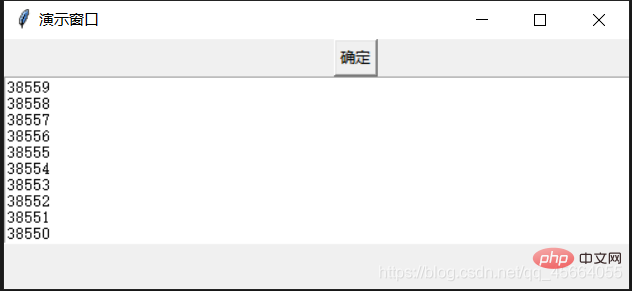
                    • 多线程,完整代码
                    import tkinter as tkimport threading  # 导入多线程模块class GUI:
                    
                        def __init__(self):
                            self.root = tk.Tk()
                            self.root.title('演示窗口')
                            self.root.geometry("500x200+1100+150")
                            self.interface()
                    
                        def interface(self):
                            """"界面编写位置"""
                            self.Button0 = tk.Button(self.root, text="确定", command=self.start)
                            self.Button0.grid(row=0, column=0)
                    
                            self.w1 = tk.Text(self.root, width=80, height=10)
                            self.w1.grid(row=1, column=0)
                    
                        def event(self):
                            '''按钮事件,一直循环'''
                            a = 0
                            while True:
                                a += 1
                                self.w1.insert(1.0, str(a)+'\n')
                    
                        def start(self):
                            self.T = threading.Thread(target=self.event)  # 多线程
                            self.T.setDaemon(True)  # 线程守护,即主进程结束后,此线程也结束。否则主进程结束子进程不结束
                            self.T.start()  # 启动if __name__ == '__main__':
                        a = GUI()
                        a.root.mainloop()
                    Copier après la connexion

                    Comprendre lutilisation de Tkinter en python en un seul article

                    七、Tkinter多线程暂停和继续

                    import tkinter as tkimport threadingfrom time import sleep
                    
                    event = threading.Event()class GUI:
                    
                        def __init__(self):
                            self.root = tk.Tk()
                            self.root.title('演示窗口')
                            self.root.geometry("500x200+1100+150")
                            self.interface()
                    
                        def interface(self):
                            """"界面编写位置"""
                            self.Button0 = tk.Button(self.root, text="启动", command=self.start)
                            self.Button0.grid(row=0, column=0)
                    
                            self.Button0 = tk.Button(self.root, text="暂停", command=self.stop)
                            self.Button0.grid(row=0, column=1)
                    
                            self.Button0 = tk.Button(self.root, text="继续", command=self.conti)
                            self.Button0.grid(row=0, column=2)
                    
                            self.w1 = tk.Text(self.root, width=70, height=10)
                            self.w1.grid(row=1, column=0, columnspan=3)
                    
                        def event(self):
                            '''按钮事件,一直循环'''
                            while True:
                                sleep(1)
                                event.wait()
                                self.w1.insert(1.0, '运行中'+'\n')
                    
                        def start(self):
                            event.set()
                            self.T = threading.Thread(target=self.event)
                            self.T.setDaemon(True)
                            self.T.start()
                    
                        def stop(self):
                            event.clear()
                            self.w1.insert(1.0, '暂停'+'\n')
                    
                        def conti(self):
                            event.set()
                            self.w1.insert(1.0, '继续'+'\n')if __name__ == '__main__':
                        a = GUI()
                        a.root.mainloop()
                    Copier après la connexion

                    八、Tkinter文件之间的调用

                    8.1、准备工作

                    • a.py文件 - -界面逻辑+线程
                    • b.py 文件 - -业务逻辑
                    • 以上文件在同一个目录下

                    8.2、方法

                    # a.py 文件import tkinter as tkimport threadingfrom b import logic  # 调用b文件中的logic类class GUI:
                        def __init__(self):
                            self.root = tk.Tk()
                            self.root.title('演示窗口')
                            self.root.geometry("500x260+1100+150")
                            self.interface()
                    
                        def interface(self):
                            """"界面编写位置"""
                            self.Button0 = tk.Button(self.root, text="确定执行", command=self.start, bg="#7bbfea")
                            self.Button0.grid(row=0, column=1, pady=10)
                    
                            self.entry00 = tk.StringVar()
                            self.entry00.set("")
                    
                            self.entry0 = tk.Entry(self.root, textvariable=self.entry00)
                            self.entry0.grid(row=1, column=1, pady=15)
                    
                            self.w1 = tk.Text(self.root, width=50, height=8)
                            self.w1.grid(row=2, column=0, columnspan=3, padx=60)
                    
                        def seal(self):
                            '''把b文件的类单独写一个方法'''
                            a = self.entry00.get()
                            w1 = self.w1
                            logic().event(a, w1)
                    
                        def start(self):
                            '''子线程无法直接执行b的类,需要把b文件单独写一个方法,然后执行'''
                            self.T = threading.Thread(target=self.seal)
                            self.T.setDaemon(True)
                            self.T.start()if __name__ == '__main__':
                        a = GUI()
                        a.root.mainloop()
                    Copier après la connexion
                    # b.py 文件import timeclass logic():
                        def __init__(self):
                            pass
                    
                        def main(self, a, x):
                            while True:
                                y = int(a)+int(x)
                                self.w1.insert(1.0, str(y)+'\n')
                                time.sleep(1)
                                x += 1
                    
                        def event(self, a, w1):
                            '''调用main的方法'''
                            self.w1 = w1
                            x = 1
                            self.main(a, x)
                    Copier après la connexion

                    【相关推荐:Python3视频教程

                    Ce qui précède est le contenu détaillé de. pour plus d'informations, suivez d'autres articles connexes sur le site Web de PHP en chinois!

                  • Étiquettes associées:
                    source:csdn.net
                    Déclaration de ce site Web
                    Le contenu de cet article est volontairement contribué par les internautes et les droits d'auteur appartiennent à l'auteur original. Ce site n'assume aucune responsabilité légale correspondante. Si vous trouvez un contenu suspecté de plagiat ou de contrefaçon, veuillez contacter admin@php.cn
                    Tutoriels populaires
                    Plus>
                    Derniers téléchargements
                    Plus>
                    effets Web
                    Code source du site Web
                    Matériel du site Web
                    Modèle frontal