Une brève analyse de la façon dont le nœud implémente ocr
Comment mettre en œuvre l'OCR (reconnaissance optique de caractères) ? L'article suivant vous présentera comment utiliser node pour implémenter l'OCR. J'espère qu'il vous sera utile !

ocr est la reconnaissance optique de caractères. En termes simples, il s'agit de reconnaître le texte sur l'image.
Malheureusement, je ne suis qu'un programmeur Web de bas niveau ? Je ne connais pas grand chose en IA. Si je souhaite implémenter l'OCR, je ne peux trouver qu'une bibliothèque tierce.
Il existe de nombreuses bibliothèques tierces pour l'OCR dans le langage python. Je cherchais depuis longtemps une bibliothèque tierce pour nodejs pour implémenter l'OCR. Finalement, j'ai trouvé que la bibliothèque tesseract.js peut toujours implémenter l'OCR. très commodément. [Recommandations de didacticiel associées : Tutoriel vidéo Nodejs]
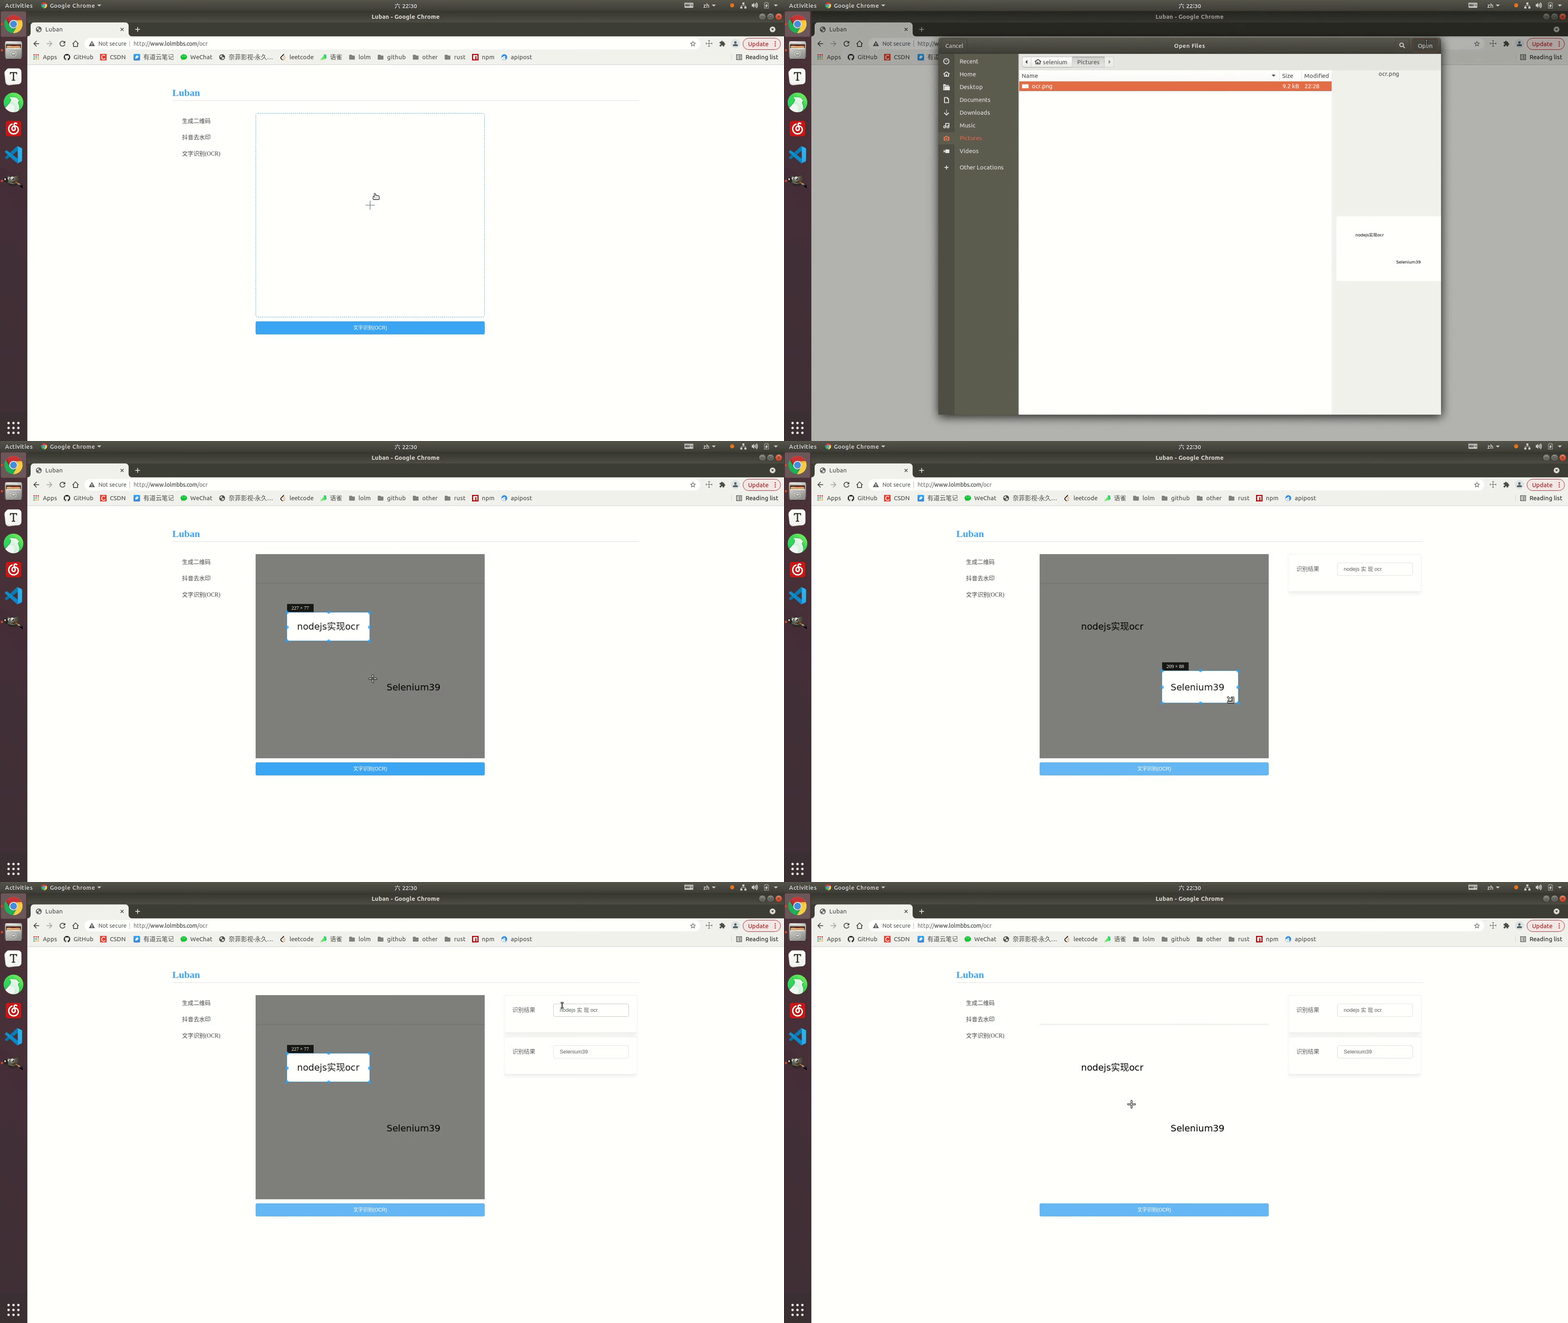
Affichage des effets
Exemple en ligne : http://www.lolmbbs.com/tool/ocr

Code détaillé
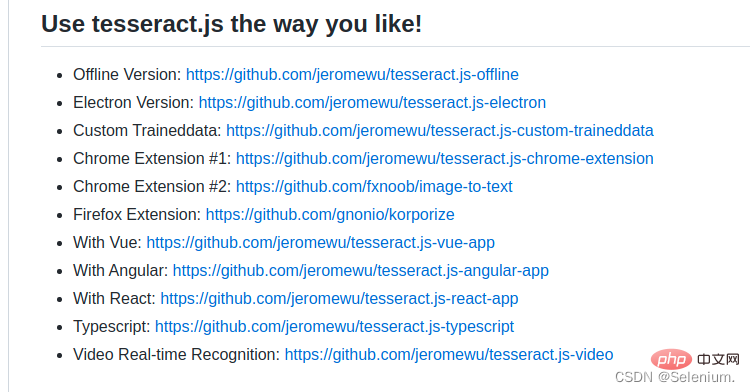
tesserract.js this La bibliothèque propose plusieurs versions parmi lesquelles choisir. J'utilise la version hors ligne tesseract.js-offline Après tout, tout le monde est affecté par de mauvaises conditions de réseau. 
Exemple de code par défaut默认示例代码
const { createWorker } = require('tesseract.js');
const path = require('path');

const worker = createWorker({
  langPath: path.join(__dirname, '..', 'lang-data'),
  logger: m => console.log(m),
});

(async () => {
  await worker.load();
  await worker.loadLanguage('eng');
  await worker.initialize('eng');
  const { data: { text } } = await worker.recognize(path.join(__dirname, '..', 'images', 'testocr.png'));
  console.log(text);
  await worker.terminate();
})();1. 支持多语言识别
tesseract.js 离线版本默认示例代码只支持识别英文,如果识别中文,结果会是一堆问号。但是幸运的是你可以导入多个训练好的语言模型,让它支持多个语言的识别。
从https://github.com/naptha/tessdata/tree/gh-pages/4.0.0这里下载你需要的对应语言模型,放入到根目录下的lang-data目录下
我这里选择了中(chi_sim.traineddata.gz)日(jpn.traineddata.gz)英(eng.traineddata.gz)三国语言模型。修改代码中加载和初始化模型的语言项配置,来同时支持中日英三国语言。
await worker.loadLanguage('chi_sim+jpn+eng');
await worker.initialize('chi_sim+jpn+eng');
为了方便大家的测试,我在示例的离线版本,已经放入了中日韩三国语言的训练模型和实例代码以及测试图片。
https://github.com/Selenium39/tesseract.js-offline
2. 提高识别性能
如果你运行了离线的版本,你会发现模型的加载和ocr的识别有点慢。可以通过这两个步骤优化。
web项目中,你可以在应用一启动的时候就加载模型,这样后续接收到ocr请求的时候就可以不用等待模型加载了。
参照Why I refactor tesseract.js v2?这篇博客,可以通过
createScheduler方法添加多个worker线程来并发的处理ocr请求。
多线程并发处理ocr请求示例
const Koa = require('koa')
const Router = require('koa-router')
const router = new Router()
const app = new Koa()
const path = require('path')
const moment = require('moment')
const { createWorker, createScheduler } = require('tesseract.js')
;(async () => {
const scheduler = createScheduler()
for (let i = 0; i < 4; i++) {
const worker = createWorker({
langPath: path.join(__dirname, '.', 'lang-data'),
cachePath: path.join(__dirname, '.'),
logger: m => console.log(`${moment().format('YYYY-MM-DD HH:mm:ss')}-${JSON.stringify(m)}`)
})
await worker.load()
await worker.loadLanguage('chi_sim+jpn+eng')
await worker.initialize('chi_sim+jpn+eng')
scheduler.addWorker(worker)
}
app.context.scheduler = scheduler
})()
router.get('/test', async (ctx) => {
const { data: { text } } = await ctx.scheduler.addJob('recognize', path.join(__dirname, '.', 'images', 'chinese.png'))
// await ctx.scheduler.terminate()
ctx.body = text
})
app.use(router.routes(), router.allowedMethods())
app.listen(3002)发起并发请求,可以看到多个worker再并发执行ocr任务
ab -n 4 -c 4 localhost:3002/test
<template>
<div>
<div style="margin-top:30px;height:500px">
<div class="show">
<vueCropper
v-if="imgBase64"
ref="cropper"
:img="imgBase64"
:output-size="option.size"
:output-type="option.outputType"
:info="true"
:full="option.full"
:can-move="option.canMove"
:can-move-box="option.canMoveBox"
:original="option.original"
:auto-crop="option.autoCrop"
:fixed="option.fixed"
:fixed-number="option.fixedNumber"
:center-box="option.centerBox"
:info-true="option.infoTrue"
:fixed-box="option.fixedBox"
:max-img-size="option.maxImgSize"
style="background-image:none"
@mouseenter.native="enter"
@mouseleave.native="leave"
></vueCropper>
<el-upload
v-else
ref="uploader"
class="avatar-uploader"
drag
multiple
action=""
:show-file-list="false"
:limit="1"
:http-request="upload"
>
<i class="el-icon-plus avatar-uploader-icon"></i>
</el-upload>
</div>
<div
class="ocr"
@mouseleave="leaveCard"
>
<el-card
v-for="(item,index) in ocrResult"
:key="index"
class="card-box"
@mouseenter.native="enterCard(item)"
>
<el-form
size="small"
label-width="100px"
label-position="left"
>
<el-form-item label="识别结果">
<el-input v-model="item.text"></el-input>
</el-form-item>
</el-form>
</el-card>
</div>
</div>
<div style="margin-top:10px">
<el-button
size="small"
type="primary"
style="width:60%"
@click="doOcr"
>
文字识别(OCR)
</el-button>
</div>
</div>
</template>
<script>
import { uploadImage, ocr } from '../utils/api'
export default {
name: 'Ocr',
data () {
return {
imgSrc: '',
imgBase64: '',
option: {
info: true, // 裁剪框的大小信息
outputSize: 0.8, // 裁剪生成图片的质量
outputType: 'jpeg', // 裁剪生成图片的格式
canScale: false, // 图片是否允许滚轮缩放
autoCrop: true, // 是否默认生成截图框
fixedBox: false, // 固定截图框大小 不允许改变
fixed: false, // 是否开启截图框宽高固定比例
fixedNumber: [7, 5], // 截图框的宽高比例
full: true, // 是否输出原图比例的截图
canMove: false, // 时候可以移动原图
canMoveBox: true, // 截图框能否拖动
original: false, // 上传图片按照原始比例渲染
centerBox: true, // 截图框是否被限制在图片里面
infoTrue: true, // true 为展示真实输出图片宽高 false 展示看到的截图框宽高
maxImgSize: 10000
},
ocrResult: []
}
},
methods: {
upload (fileObj) {
const file = fileObj.file
const reader = new FileReader()
reader.readAsDataURL(file)
reader.onload = () => {
this.imgBase64 = reader.result
}
const formData = new FormData()
formData.append('image', file)
uploadImage(formData).then(res => {
this.imgUrl = res.imgUrl
})
},
doOcr () {
const cropAxis = this.$refs.cropper.getCropAxis()
const imgAxis = this.$refs.cropper.getImgAxis()
const cropWidth = this.$refs.cropper.cropW
const cropHeight = this.$refs.cropper.cropH
const position = [
(cropAxis.x1 - imgAxis.x1) / this.$refs.cropper.scale,
(cropAxis.y1 - imgAxis.y1) / this.$refs.cropper.scale,
cropWidth / this.$refs.cropper.scale,
cropHeight / this.$refs.cropper.scale
]
const rectangle = {
top: position[1],
left: position[0],
width: position[2],
height: position[3]
}
if (this.imgUrl) {
ocr({ imgUrl: this.imgUrl, rectangle }).then(res => {
this.ocrResult.push(
{
text: res.text,
cropInfo: { //截图框显示的大小
width: cropWidth,
height: cropHeight,
left: cropAxis.x1,
top: cropAxis.y1
},
realInfo: rectangle //截图框在图片上真正的大小
})
})
}
},
enterCard (item) {
this.$refs.cropper.goAutoCrop()// 重新生成自动裁剪框
this.$nextTick(() => {
// if cropped and has position message, update crop box
// 设置自动裁剪框的宽高和位置
this.$refs.cropper.cropOffsertX = item.cropInfo.left
this.$refs.cropper.cropOffsertY = item.cropInfo.top
this.$refs.cropper.cropW = item.cropInfo.width
this.$refs.cropper.cropH = item.cropInfo.height
})
},
leaveCard () {
this.$refs.cropper.clearCrop()
},
enter () {
if (this.imgBase64 === '') {
return
}
this.$refs.cropper.startCrop() // 开始裁剪
},
leave () {
this.$refs.cropper.stopCrop()// 停止裁剪
}
}
}
</script>1. Prise en charge de la reconnaissance multilingue
tesseract.js L'exemple de code par défaut pour la version hors ligne ne prend en charge que la reconnaissance de l'anglais. le résultat sera un tas de points d’interrogation. Mais heureusement, vous pouvez importer plusieurs modèles linguistiques entraînés pour prendre en charge la reconnaissance de plusieurs langues.
Téléchargez le modèle de langage correspondant dont vous avez besoin depuis https://github.com/naptha/tessdata/tree/gh-pages/4.0.0 , mettez-le dans le répertoire lang-data du répertoire racine
J'ai choisi le chinois (chi_sim.traineddata.gz) le japonais (jpn.traineddata.gz) l'anglais ( eng.traineddata.gz) Modèle linguistique à trois pays.
https://github.com/Selenium39/tesseract.js-offline
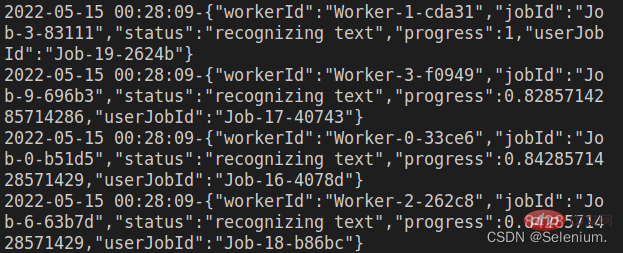
2. Améliorez les performances de reconnaissanceSi vous exécutez la version hors ligne, vous constaterez que le chargement du modèle et la reconnaissance de l'OCR sont un un peu lent. Il peut être optimisé grâce à ces deux étapes. Dans les projets web, vous pouvez charger le modèle dès le démarrage de l'application, afin de ne pas avoir à attendre que le modèle soit chargé lorsque vous recevez une demande OCR plus tard.
createScheduler pour traiter les requêtes ocr simultanément. 🎜Exemple de traitement simultané multithread de requêtes OCR🎜rrreee🎜Initiez des requêtes simultanées, vous pouvez voir plusieurs travailleurs exécuter des tâches OCR simultanément🎜🎜ab - n 4 -c 4 localhost:3002/test🎜🎜🎜🎜🎜🎜3. Code frontal 🎜🎜🎜Le code frontal dans l'affichage des effets est principalement implémenté à l'aide du composant elementui et de vue-cropper. composant. 🎜🎜Composant vue-cropper Pour une utilisation spécifique, veuillez vous référer à mon blog vue image recadrage : Utilisation de vue-cropper pour le recadrage d'image🎜🎜🎜ps : 🎜Lors du téléchargement d'images, vous pouvez d'abord charger le base64 de l'image téléchargée sur le front-end , voyez d'abord Télécharger l'image, puis demandez au backend de télécharger l'image, ce qui offre une meilleure expérience utilisateur🎜🎜Le code complet est le suivant🎜rrreee🎜Pour plus de connaissances sur les nœuds, veuillez visiter : 🎜Tutoriel Nodejs🎜 ! 🎜Ce qui précède est le contenu détaillé de. pour plus d'informations, suivez d'autres articles connexes sur le site Web de PHP en chinois!

Outils d'IA chauds

Undresser.AI Undress
Application basée sur l'IA pour créer des photos de nu réalistes

AI Clothes Remover
Outil d'IA en ligne pour supprimer les vêtements des photos.

Undress AI Tool
Images de déshabillage gratuites

Clothoff.io
Dissolvant de vêtements AI

Video Face Swap
Échangez les visages dans n'importe quelle vidéo sans effort grâce à notre outil d'échange de visage AI entièrement gratuit !

Article chaud

Outils chauds

Bloc-notes++7.3.1
Éditeur de code facile à utiliser et gratuit

SublimeText3 version chinoise
Version chinoise, très simple à utiliser

Envoyer Studio 13.0.1
Puissant environnement de développement intégré PHP

Dreamweaver CS6
Outils de développement Web visuel

SublimeText3 version Mac
Logiciel d'édition de code au niveau de Dieu (SublimeText3)
 Nodejs est-il un framework backend ?
Apr 21, 2024 am 05:09 AM
Node.js peut être utilisé comme framework backend car il offre des fonctionnalités telles que des performances élevées, l'évolutivité, la prise en charge multiplateforme, un écosystème riche et une facilité de développement.
 Comment connecter Nodejs à la base de données MySQL
Apr 21, 2024 am 06:13 AM
Pour vous connecter à une base de données MySQL, vous devez suivre ces étapes : Installez le pilote mysql2. Utilisez mysql2.createConnection() pour créer un objet de connexion contenant l'adresse de l'hôte, le port, le nom d'utilisateur, le mot de passe et le nom de la base de données. Utilisez connection.query() pour effectuer des requêtes. Enfin, utilisez connection.end() pour mettre fin à la connexion.
 Quelles sont les variables globales dans nodejs
Apr 21, 2024 am 04:54 AM
Les variables globales suivantes existent dans Node.js : Objet global : global Module principal : processus, console, nécessiter Variables d'environnement d'exécution : __dirname, __filename, __line, __column Constantes : undefined, null, NaN, Infinity, -Infinity
 Quelle est la différence entre les fichiers npm et npm.cmd dans le répertoire d'installation de nodejs ?
Apr 21, 2024 am 05:18 AM
Il existe deux fichiers liés à npm dans le répertoire d'installation de Node.js : npm et npm.cmd. Les différences sont les suivantes : différentes extensions : npm est un fichier exécutable et npm.cmd est un raccourci de fenêtre de commande. Utilisateurs Windows : npm.cmd peut être utilisé à partir de l'invite de commande, npm ne peut être exécuté qu'à partir de la ligne de commande. Compatibilité : npm.cmd est spécifique aux systèmes Windows, npm est disponible multiplateforme. Recommandations d'utilisation : les utilisateurs Windows utilisent npm.cmd, les autres systèmes d'exploitation utilisent npm.
 Enseignement du nœud PI: Qu'est-ce qu'un nœud PI? Comment installer et configurer le nœud PI?
Mar 05, 2025 pm 05:57 PM
Explication détaillée et guide d'installation pour les nœuds de pignon Cet article introduira l'écosystème de pignon en détail - nœuds PI, un rôle clé dans l'écosystème de pignon et fournir des étapes complètes pour l'installation et la configuration. Après le lancement du réseau de test de la blockchain pèse, les nœuds PI sont devenus une partie importante de nombreux pionniers participant activement aux tests, se préparant à la prochaine version du réseau principal. Si vous ne connaissez pas encore Pinetwork, veuillez vous référer à ce qu'est Picoin? Quel est le prix de l'inscription? PI Utilisation, exploitation minière et sécurité. Qu'est-ce que Pinetwork? Le projet Pinetwork a commencé en 2019 et possède sa pièce exclusive de crypto-monnaie PI. Le projet vise à en créer un que tout le monde peut participer
 Y a-t-il une grande différence entre nodejs et java ?
Apr 21, 2024 am 06:12 AM
Les principales différences entre Node.js et Java résident dans la conception et les fonctionnalités : Piloté par les événements ou piloté par les threads : Node.js est piloté par les événements et Java est piloté par les threads. Monothread ou multithread : Node.js utilise une boucle d'événements monothread et Java utilise une architecture multithread. Environnement d'exécution : Node.js s'exécute sur le moteur JavaScript V8, tandis que Java s'exécute sur la JVM. Syntaxe : Node.js utilise la syntaxe JavaScript, tandis que Java utilise la syntaxe Java. Objectif : Node.js convient aux tâches gourmandes en E/S, tandis que Java convient aux applications de grande entreprise.
 Nodejs est-il un langage de développement back-end ?
Apr 21, 2024 am 05:09 AM
Oui, Node.js est un langage de développement backend. Il est utilisé pour le développement back-end, notamment la gestion de la logique métier côté serveur, la gestion des connexions à la base de données et la fourniture d'API.
 Comment déployer le projet nodejs sur le serveur
Apr 21, 2024 am 04:40 AM
Étapes de déploiement de serveur pour un projet Node.js : Préparez l'environnement de déploiement : obtenez l'accès au serveur, installez Node.js, configurez un référentiel Git. Créez l'application : utilisez npm run build pour générer du code et des dépendances déployables. Téléchargez le code sur le serveur : via Git ou File Transfer Protocol. Installer les dépendances : connectez-vous en SSH au serveur et installez les dépendances de l'application à l'aide de npm install. Démarrez l'application : utilisez une commande telle que node index.js pour démarrer l'application ou utilisez un gestionnaire de processus tel que pm2. Configurer un proxy inverse (facultatif) : utilisez un proxy inverse tel que Nginx ou Apache pour acheminer le trafic vers votre application


