

Cet article vous apporte des connaissances pertinentes sur JavaScript. Il présente principalement comment obtenir l'effet de guidage pour les novices grâce à de simples CSS et JS. Les amis intéressés peuvent jeter un œil ci-dessous.
Commencez par des bêtises : utilisez des CSS et JS simples pour obtenir l'effet d'orientation des novices
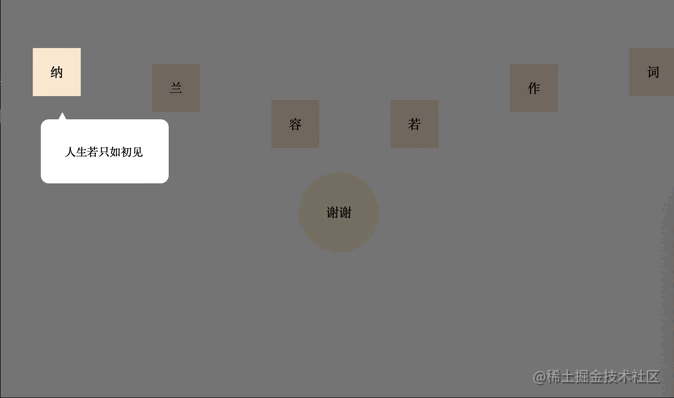
1. Implémentez l'effet
2. Implémentez
La mise en œuvre est en fait très simple mask Mask consiste à carreler un écran entier div, à définir la couleur d'arrière-plan sur transparent transparent, puis à définir contour sur semi-transparent et suffisamment large, puis à créer une flèche de la même manière. façon Suivez la balise AVERTISSEMENT.
1. Utilisation
let maskIntroduceManage = new MaskIntroduceManage([
    new MaskIntroduceItem('one','人生若只如初见'),
    new MaskIntroduceItem('two','何事秋风悲画扇'),
    new MaskIntroduceItem('five','等闲却变故人心'),
    new MaskIntroduceItem('six','骊山语罢清宵半'),
    new MaskIntroduceItem('four','却道故人心易变'),
    new MaskIntroduceItem('finally','谢谢大家支持!')
])
maskIntroduceManage.benginIntroduce()2. HTML
<!DOCTYPE html>
<html>
<head>
<meta charset="utf-8">
</head>
<style type="text/css">
*{
    padding: 0;
    margin: 0;
}
.content {
    padding: 0;
    display: flex;
    flex-direction: row;
    justify-content: space-between;
    align-items: center;
    width: 100%;
}
span {
    width: 60px;
    height: 60px;
    line-height: 60px;
    margin-left: 40px;
    margin-top: 140px;
    margin-bottom: 0px;
    text-align: center;
    display: block;
    background-color: antiquewhite;
}

.finally {
    width: 100px;
    height: 100px;
    background-color: cornsilk;
    border-radius: 50%;
    line-height: 100px;
    text-align: center;
    margin-top: 30px;
    margin-left: auto;
    margin-right: auto;
}
span:nth-of-type(1){
    margin-top: 30px;
}
span:nth-of-type(2){
    margin-top: 70px;
}
span:nth-of-type(3){
    margin-top: 160px;
}
span:nth-of-type(4){
    margin-top: 160px;
}
span:nth-of-type(5){
    margin-top: 70px;
}
span:nth-of-type(6){
    margin-top: 30px;
}
</style>
<body>
<div class="content">
    <span id="one">纳</span>
    <span id="two">兰</span>
    <span id="three">容</span>
    <span id="four">若</span>
    <span id="five">作</span>
    <span id="six">词</span>
</div>
<div class="finally" id="finally">
    谢谢
</div>
</body>
<script src="./maskIntroduce.js"></script>
<script>
let maskIntroduceManage = new MaskIntroduceManage([
    new MaskIntroduceItem('one','人生若只如初见'),
    new MaskIntroduceItem('two','何事秋风悲画扇'),
    new MaskIntroduceItem('five','等闲却变故人心'),
    new MaskIntroduceItem('six','骊山语罢清宵半'),
    new MaskIntroduceItem('four','却道故人心易变'),
    new MaskIntroduceItem('finally','谢谢大家支持!')
])
maskIntroduceManage.benginIntroduce()
</script>
</html>3. JS
// 单元信息model
class MaskIntroduceItem {
    // 需要引导的dom的ID
    id
    // 需要引导的dom功能描述
    warming
    constructor(id,warming){
        this.id = id
        this.warming = warming
    }
}

// 遮罩操作类
class MaskIntroduceManage {
    // 消息展示类集合
    maskIntroduceItems
    // 遮罩层
    el
    // 遮罩层提示框
    warmingEl
    // 指引肩头
    guidanceEl
    // 展示的第几个
    currentShowIndex = 0
    // 记录window事件
    windowEvent = null

    constructor(maskIntroduceItems){
        this.maskIntroduceItems = maskIntroduceItems
    }

    // 添加消息展示类
    addIntroduceItem(introduceItem){
        this.maskIntroduceItems.push(introduceItem)
    }

    // body增加遮罩
    addMaskToBody(){
        //添加遮罩框
        this.el = document.createElement('div')
        this.el.style.cssText = 'position: fixed;background: transparent;outline:rgba(0, 0, 0, 0.5) 3500px solid;'
        let body = document.getElementsByTagName('body')[0]
        body.appendChild(this.el)
        //添加提示框
        this.warmingEl = document.createElement('div')
        this.warmingEl.style.cssText = 'position:fixed;width:100px;background:white;border-radius: 10px;padding: 30px;font-size: 14px;'
        body.appendChild(this.warmingEl)
        //添加指引箭头
        this.guidanceEl = document.createElement('div')
        this.guidanceEl.style.cssText = 'position:fixed;width: 14px; height: 13px; background-color: white;clip-path: polygon(50% 0,100% 100%,0 100%);'
        body.appendChild(this.guidanceEl)
        //设置body禁止滚动
        body.style.overflow = 'hidden'
        //保留window事件
        if(window.onclick){
            this.windowEvent = window.onclick
        }
        window.onclick = ()=>{
            this.nextIntroduce()
        }
    }

    // 开始引导
    benginIntroduce(){
        this.addMaskToBody()
        this.nextIntroduce()
    }

    // 下一步
    nextIntroduce(){
        let maskIntroduceItem = this.maskIntroduceItems.length > 0 ? this.maskIntroduceItems[this.currentShowIndex] : null
        if(!maskIntroduceItem){
            return
        }
        let needIntroduceEl = document.getElementById(maskIntroduceItem.id)
        //遮罩层的镂空位置
        this.el.style.width = needIntroduceEl.offsetWidth + 'px'
        this.el.style.height = needIntroduceEl.offsetHeight + 'px'
        this.el.style.top = this.getElementPosition(needIntroduceEl).top + 'px'
        this.el.style.left = this.getElementPosition(needIntroduceEl).left + 'px'
        //设置对应倒角,但是由于背景颜色是透明的,所以,没有效果(???)
        //this.el.style.borderRadius = window.getComputedStyle(needIntroduceEl,null)['border-radius']
        this.currentShowIndex ++
        //指引箭头位置
        let guidanceElLeft = this.getElementPosition(needIntroduceEl).left + needIntroduceEl.offsetWidth / 2.0
        this.guidanceEl.style.top = this.getElementPosition(needIntroduceEl).top + needIntroduceEl.offsetHeight + 20 + 'px'
        this.guidanceEl.style.left = guidanceElLeft + 'px'
        //提示框的位置
        this.warmingEl.style.top = this.getElementPosition(this.guidanceEl).top + this.guidanceEl.offsetHeight - 4 + 'px'
        let warmingElLeft = this.getElementPosition(needIntroduceEl).left - ((this.warmingEl.offsetWidth - needIntroduceEl.offsetWidth) / 2.0)
        if(warmingElLeft < 0){
            warmingElLeft = this.getElementPosition(needIntroduceEl).left + 10
        }
        if(warmingElLeft + this.warmingEl.offsetWidth > document.getElementsByTagName('body')[0].offsetWidth){
            warmingElLeft = warmingElLeft - 10 - (this.warmingEl.offsetWidth - needIntroduceEl.offsetWidth) / 2.0
        }
        this.warmingEl.style.left = warmingElLeft + 'px'
        this.warmingEl.innerHTML = maskIntroduceItem.warming
        //最后一个展示完恢复window点击事件
        if(this.currentShowIndex >= this.maskIntroduceItems.length){
            setTimeout(() => {
                //移除当前遮罩
                this.el.remove()
                //移除当前提示框
                this.warmingEl.remove()
                //移除箭头
                this.guidanceEl.remove()
                //设置body可以滚动
                document.getElementsByTagName('body')[0].style.overflow = 'auto'
                //恢复window事件
                if(this.windowEvent){
                    window.onclick = this.windowEvent
                }
            }, 2000);
        }
    }

    // 获取元素在屏幕的位置
    getElementPosition(element){
        var top = element.offsetTop
        var left = element.offsetLeft
        var currentParent = element.offsetParent;
        while (currentParent !== null) {
            top += currentParent.offsetTop
            left += currentParent.offsetLeft
            currentParent = currentParent.offsetParent
        }
        return {top,left}
    }
}3. , je pense que la valeur du chanfrein de la partie creuse est définie via le borderRadius
de la balise actuelle "needs introduction", mais la couleur d'arrière-plan est transparente, elle est donc définie, ce qui peut prendre effet mais n'a aucun effet. Le code est maladroit, ne vous moquez pas du maître~Etude recommandée : "Tutoriel vidéo JavaScript
"Ce qui précède est le contenu détaillé de. pour plus d'informations, suivez d'autres articles connexes sur le site Web de PHP en chinois!


![Développement pratique de l'imitation Meituan APP [Un projet JavaScript incontournable pour les programmeurs front-end]](https://img.php.cn/upload/course/000/000/068/6242bebc05ca9210.png)
![Syntaxe de base JavaScript [dom|bom|es6 nouvelle syntaxe|jQuery|echarts de visualisation de données]](https://img.php.cn/upload/course/000/000/068/6242bb730fb11708.png)


![[Web front-end] Démarrage rapide de Node.js](https://img.php.cn/upload/course/000/000/067/662b5d34ba7c0227.png)


