Cinq scripts Python intéressants
Python peut être utilisé dans de nombreuses directions, telles que les robots d'exploration, l'analyse prédictive, l'interface graphique, l'automatisation, le traitement d'image, la visualisation, etc. Vous n'aurez peut-être besoin que d'une douzaine de lignes de code pour réaliser des fonctions intéressantes.
Étant donné que Python est un langage de script dynamique, la logique du code est beaucoup plus simple que Java et il faut écrire beaucoup moins de code pour obtenir la même fonction. De plus, l'écosystème Python dispose de nombreuses bibliothèques d'outils tierces qui encapsulent des fonctions dans des packages. Il vous suffit d'appeler l'interface pour utiliser des fonctions complexes.
Voici quelques exemples de scripts simples et amusants. Les débutants peuvent suivre le code et maîtriser rapidement la syntaxe python.
1. Utilisez PIL, Matplotlib et Numpy pour réparer les vieilles photos floues

import numpy as np
import matplotlib.pyplot as plt
from PIL import Image
import os.path

img_path = "E:\test.jpg"
img = Image.open(img_path)


img = np.asarray(img)
flat = img.flatten()


def get_histogram(image, bins):

histogram = np.zeros(bins)

for pixel in image:
histogram[pixel] += 1

return histogram


hist = get_histogram(flat, 256)


cs = np.cumsum(hist)


nj = (cs - cs.min()) * 255
N = cs.max() - cs.min()


cs = nj / N


cs = cs.astype('uint8')


img_new = cs[flat]


img_new = np.reshape(img_new, img.shape)


fig = plt.figure()
fig.set_figheight(15)
fig.set_figwidth(15)


fig.add_subplot(1, 2, 1)
plt.imshow(img, cmap='gray')
plt.title("Image 'Before' Contrast Adjustment")


fig.add_subplot(1, 2, 2)
plt.imshow(img_new, cmap='gray')
plt.title("Image 'After' Contrast Adjustment")
filename = os.path.basename(img_path)


plt.show()2 Compressez les fichiers par lots et utilisez la bibliothèque de fichiers zip
import os
import zipfile
from random import randrange


def zip_dir(path, zip_handler):
for root, dirs, files in os.walk(path):
for file in files:
zip_handler.write(os.path.join(root, file))


if __name__ == '__main__':
to_zip = input("""
Enter the name of the folder you want to zip
(N.B.: The folder name should not contain blank spaces)
>
""")
to_zip = to_zip.strip() + "/"
zip_file_name = f'zip{randrange(0,10000)}.zip'
zip_file = zipfile.ZipFile(zip_file_name, 'w', zipfile.ZIP_DEFLATED)
zip_dir(to_zip, zip_file)
zip_file.close()
print(f'File Saved as {zip_file_name}')3 Utilisez tkinter pour créer une calculatrice GUI
tkinter est fournie avec. Bibliothèque GUI python, adaptée aux débutants pour s'entraîner à la création de petits logiciels
import tkinter as tk

root = tk.Tk()
root.title("Standard Calculator")
root.resizable(0, 0)


e = tk.Entry(root,
 width=35,
 bg='#f0ffff',
 fg='black',
 borderwidth=5,
 justify='right',
 font='Calibri 15')
e.grid(row=0, column=0, columnspan=3, padx=12, pady=12)


def buttonClick(num):
temp = e.get(
)
e.delete(0, tk.END)
e.insert(0, temp + num)


def buttonClear():
e.delete(0, tk.END)4 Convertir un PDF en fichier Word
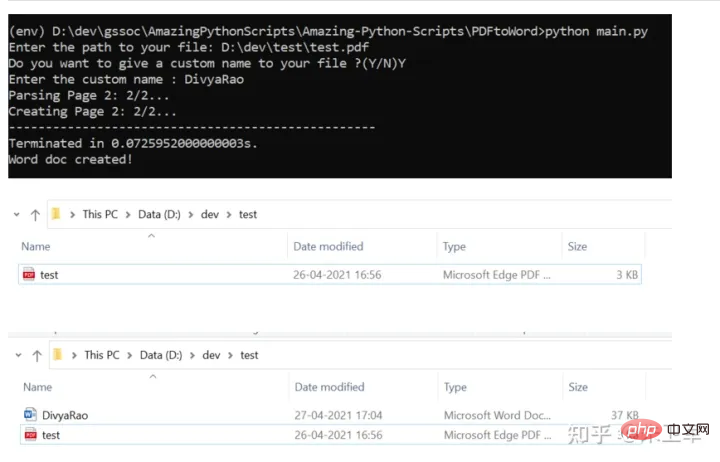
Utilisez la bibliothèque pdf2docx pour convertir des fichiers PDF au format Word

from pdf2docx import Converter
import os
import sys


pdf = input("Enter the path to your file: ")
assert os.path.exists(pdf), "File not found at, "+str(pdf)
f = open(pdf,'r+')


doc_name_choice = input("Do you want to give a custom name to your file ?(Y/N)")

if(doc_name_choice == 'Y' or doc_name_choice == 'y'):

doc_name = input("Enter the custom name : ")+".docx"

else:


pdf_name = os.path.basename(pdf)

doc_name =os.path.splitext(pdf_name)[0] + ".docx"


cv = Converter(pdf)


path = os.path.dirname(pdf)

cv.convert(os.path.join(path, "", doc_name) , start=0, end=None)
print("Word doc created!")
cv.close()5.
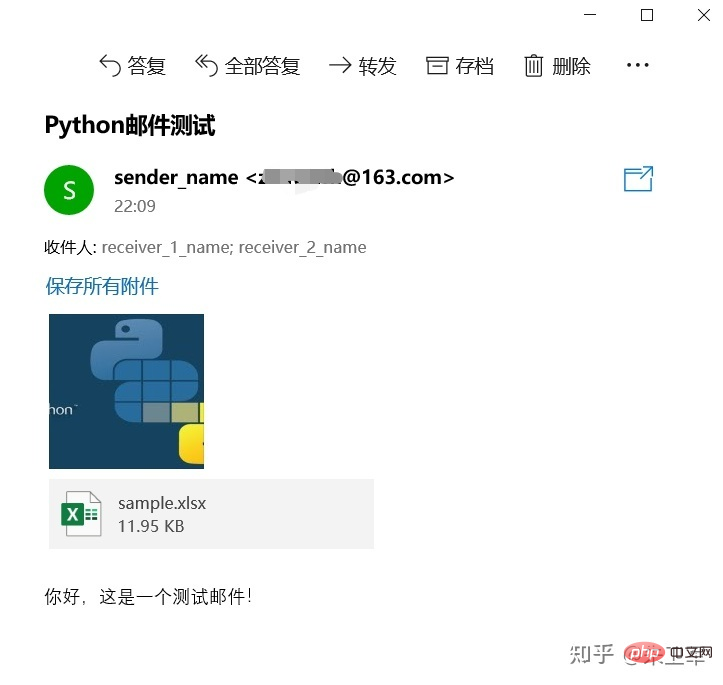
Les bibliothèques smtplib et email peuvent implémenter des scripts pour envoyer des emails.
import smtplib
import email

from email.mime.text import MIMEText

from email.mime.image import MIMEImage

from email.mime.multipart import MIMEMultipart
from email.header import Header


mail_host = "smtp.163.com"

mail_sender = "******@163.com"

mail_license = "********"

mail_receivers = ["******@qq.com","******@outlook.com"]

mm = MIMEMultipart('related')


subject_content = """Python邮件测试"""

mm["From"] = "sender_name<******@163.com>"

mm["To"] = "receiver_1_name<******@qq.com>,receiver_2_name<******@outlook.com>"

mm["Subject"] = Header(subject_content,'utf-8')


body_content = """你好,这是一个测试邮件!"""

message_text = MIMEText(body_content,"plain","utf-8")

mm.attach(message_text)


image_data = open('a.jpg','rb')

message_image = MIMEImage(image_data.read())

image_data.close()

mm.attach(message_image)


atta = MIMEText(open('sample.xlsx', 'rb').read(), 'base64', 'utf-8')

atta["Content-Disposition"] = 'attachment; filename="sample.xlsx"'

mm.attach(atta)


stp = smtplib.SMTP()

stp.connect(mail_host, 25)

stp.set_debuglevel(1)

stp.login(mail_sender,mail_license)

stp.sendmail(mail_sender, mail_receivers, mm.as_string())
print("邮件发送成功")

stp.quit()Résumé
Python propose également de nombreux petits scripts amusants, que vous pouvez écrire selon vos propres scénarios, ou vous pouvez utiliser des bibliothèques tierces prêtes à l'emploi.Ce qui précède est le contenu détaillé de. pour plus d'informations, suivez d'autres articles connexes sur le site Web de PHP en chinois!

Outils d'IA chauds

Undresser.AI Undress
Application basée sur l'IA pour créer des photos de nu réalistes

AI Clothes Remover
Outil d'IA en ligne pour supprimer les vêtements des photos.

Undress AI Tool
Images de déshabillage gratuites

Clothoff.io
Dissolvant de vêtements AI

AI Hentai Generator
Générez AI Hentai gratuitement.

Article chaud

Outils chauds

Bloc-notes++7.3.1
Éditeur de code facile à utiliser et gratuit

SublimeText3 version chinoise
Version chinoise, très simple à utiliser

Envoyer Studio 13.0.1
Puissant environnement de développement intégré PHP

Dreamweaver CS6
Outils de développement Web visuel

SublimeText3 version Mac
Logiciel d'édition de code au niveau de Dieu (SublimeText3)
 Python: jeux, GUIS, et plus
Apr 13, 2025 am 12:14 AM
Python excelle dans les jeux et le développement de l'interface graphique. 1) Le développement de jeux utilise Pygame, fournissant des fonctions de dessin, audio et d'autres fonctions, qui conviennent à la création de jeux 2D. 2) Le développement de l'interface graphique peut choisir Tkinter ou Pyqt. Tkinter est simple et facile à utiliser, PYQT a des fonctions riches et convient au développement professionnel.
 PHP et Python: comparaison de deux langages de programmation populaires
Apr 14, 2025 am 12:13 AM
PHP et Python ont chacun leurs propres avantages et choisissent en fonction des exigences du projet. 1.Php convient au développement Web, en particulier pour le développement rapide et la maintenance des sites Web. 2. Python convient à la science des données, à l'apprentissage automatique et à l'intelligence artificielle, avec syntaxe concise et adaptée aux débutants.
 Comment Debian Readdir s'intègre à d'autres outils
Apr 13, 2025 am 09:42 AM
La fonction ReadDir dans le système Debian est un appel système utilisé pour lire le contenu des répertoires et est souvent utilisé dans la programmation C. Cet article expliquera comment intégrer ReadDir avec d'autres outils pour améliorer sa fonctionnalité. Méthode 1: combinant d'abord le programme de langue C et le pipeline, écrivez un programme C pour appeler la fonction readdir et sortir le résultat: # include # include # include # includeIntmain (intargc, char * argv []) {dir * dir; structDirent * entrée; if (argc! = 2) {
 Python et temps: tirer le meilleur parti de votre temps d'étude
Apr 14, 2025 am 12:02 AM
Pour maximiser l'efficacité de l'apprentissage de Python dans un temps limité, vous pouvez utiliser les modules DateTime, Time et Schedule de Python. 1. Le module DateTime est utilisé pour enregistrer et planifier le temps d'apprentissage. 2. Le module de temps aide à définir l'étude et le temps de repos. 3. Le module de planification organise automatiquement des tâches d'apprentissage hebdomadaires.
 Certificat NGINX SSL Mise à jour du tutoriel Debian
Apr 13, 2025 am 07:21 AM
Cet article vous guidera sur la façon de mettre à jour votre certificat NGINXSSL sur votre système Debian. Étape 1: Installez d'abord CERTBOT, assurez-vous que votre système a des packages CERTBOT et Python3-CERTBOT-NGINX installés. Si ce n'est pas installé, veuillez exécuter la commande suivante: Sudoapt-getUpDaSuDoapt-GetInstallCertBotpyThon3-Certerbot-Nginx Étape 2: Obtenez et configurez le certificat Utilisez la commande Certbot pour obtenir le certificat LETSCRYPT et configure
 Comment configurer le serveur HTTPS dans Debian OpenSSL
Apr 13, 2025 am 11:03 AM
La configuration d'un serveur HTTPS sur un système Debian implique plusieurs étapes, notamment l'installation du logiciel nécessaire, la génération d'un certificat SSL et la configuration d'un serveur Web (tel qu'Apache ou Nginx) pour utiliser un certificat SSL. Voici un guide de base, en supposant que vous utilisez un serveur Apacheweb. 1. Installez d'abord le logiciel nécessaire, assurez-vous que votre système est à jour et installez Apache et OpenSSL: SudoaptupDaSuDoaptupgradeSudoaptinsta
 Guide de développement du plug-in de Gitlab sur Debian
Apr 13, 2025 am 08:24 AM
Développer un plugin Gitlab sur Debian nécessite des étapes et des connaissances spécifiques. Voici un guide de base pour vous aider à démarrer avec ce processus. Installation de GitLab Tout d'abord, vous devez installer GitLab sur votre système Debian. Vous pouvez vous référer au manuel d'installation officiel de Gitlab. Obtenez un jeton d'accès API avant d'effectuer l'intégration de l'API, vous devez d'abord obtenir le jeton d'accès API de GitLab. Ouvrez le tableau de bord GitLab, recherchez l'option "AccessTokens" dans les paramètres utilisateur et générez un nouveau jeton d'accès. Sera généré
 Quel service est Apache
Apr 13, 2025 pm 12:06 PM
Apache est le héros derrière Internet. Ce n'est pas seulement un serveur Web, mais aussi une plate-forme puissante qui prend en charge un trafic énorme et fournit un contenu dynamique. Il offre une flexibilité extrêmement élevée grâce à une conception modulaire, permettant l'expansion de diverses fonctions au besoin. Cependant, la modularité présente également des défis de configuration et de performance qui nécessitent une gestion minutieuse. Apache convient aux scénarios de serveur qui nécessitent des besoins complexes hautement personnalisables.


