 développement back-end
 Tutoriel Python
 Bases de Python Matplotlib : utilisation courante et exemples
Bases de Python Matplotlib : utilisation courante et exemples
Matplotlib
Matplotlib est un outil de dessin similaire à MATLAB en Python Si vous êtes familier avec MATLAB, vous pouvez rapidement démarrer avec Matplotlib.
1. Comprendre Matploblib
1.1 Figure
Avant tout dessin, nous avons besoin d'un objet Figure, ce qui peut être compris comme nous avons besoin d'une planche à dessin pour commencer à dessiner.
import matplotlib.pyplot as plt
fig = plt.figure()
1.2 Axes
Après avoir l'objet Figure, nous avons besoin d'axes avant de dessiner. Sans axes, il n'y aura pas de référence de dessin, nous devons donc ajouter des axes. Il peut également être compris comme du papier qui peut réellement être utilisé pour dessiner. Le code sur
fig = plt.figure()
ax = fig.add_subplot(111)
ax.set(xlim=[0.5, 4.5], ylim=[-2, 8], title='An Example Axes',
       ylabel='Y-Axis', xlabel='X-Axis')
plt.show()ajoute un Axes à une image, puis définit la plage de valeurs de l'axe X et de l'axe Y des Axes (ces paramètres ne sont pas obligatoires, et nous parlerons de ces paramètres plus tard), L'effet est la suivante :
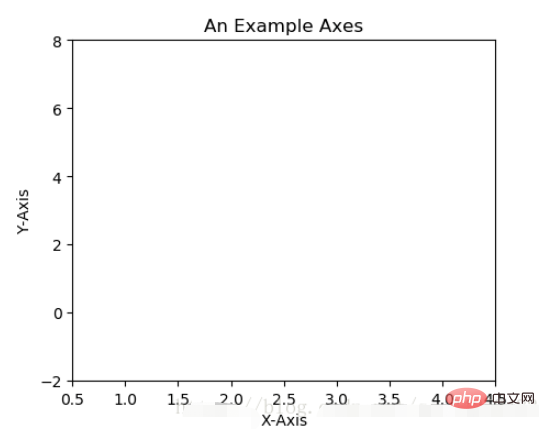
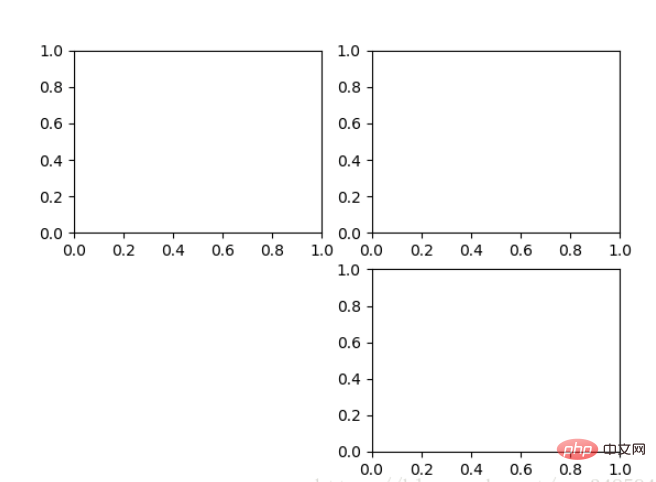
Pour ce qui précède, fig.add_subplot(111) consiste à ajouter des axes, l'explication du paramètre est générée en première position de la 1ère ligne et de la 1ère colonne de la planche à dessin . Objet haches à préparer pour la peinture. Les axes peuvent également être générés via fig.add_subplot(2, 2, 1) Les deux premiers paramètres déterminent la division du panneau, comme 2. 2 divisera l'ensemble du panneau en 2 * 2 carrés. . grille, la troisième plage de valeurs du paramètre est [1, 2*2] indiquant quels axes. Comme l'exemple suivant : fig.add_subplot(111)就是添加Axes的,参数的解释的在画板的第1行第1列的第一个位置生成一个Axes对象来准备作画。也可以通过fig.add_subplot(2, 2, 1)的方式生成Axes,前面两个参数确定了面板的划分,例如 2, 2会将整个面板划分成 2 * 2 的方格,第三个参数取值范围是 [1, 2*2] 表示第几个Axes。如下面的例子:
fig = plt.figure()
ax1 = fig.add_subplot(221)
ax2 = fig.add_subplot(222)
ax3 = fig.add_subplot(224)
1.3 Multiple Axes
可以发现我们上面添加 Axes 似乎有点弱鸡,所以提供了下面的方式一次性生成所有 Axes:
fig, axes = plt.subplots(nrows=2, ncols=2)
axes[0,0].set(title='Upper Left')
axes[0,1].set(title='Upper Right')
axes[1,0].set(title='Lower Left')
axes[1,1].set(title='Lower Right')
fig 还是我们熟悉的画板, axes 成了我们常用二维数组的形式访问,这在循环绘图时,额外好用。
1.4 Axes Vs .pyplot
相信不少人看过下面的代码,很简单并易懂,但是下面的作画方式只适合简单的绘图,快速的将图绘出。在处理复杂的绘图工作时,我们还是需要使用 Axes 来完成作画的。
plt.plot([1, 2, 3, 4], [10, 20, 25, 30], color='lightblue', linewidth=3)
plt.xlim(0.5, 4.5)
plt.show()
2. 基本绘图2D
2.1 线
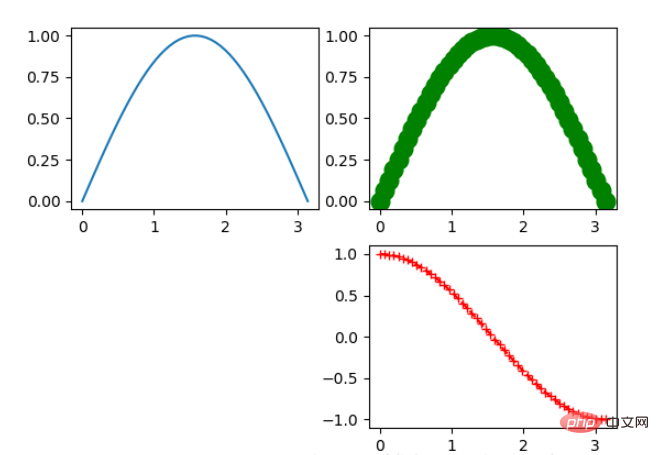
plot()函数画出一系列的点,并且用线将它们连接起来。看下例子:
x = np.linspace(0, np.pi)
y_sin = np.sin(x)
y_cos = np.cos(x)

ax1.plot(x, y_sin)
ax2.plot(x, y_sin, 'go--', linewidth=2, markersize=12)
ax3.plot(x, y_cos, color='red', marker='+', linestyle='dashed')
在上面的三个Axes上作画。plot,前面两个参数为x轴、y轴数据。ax2的第三个参数是 MATLAB风格的绘图,对应ax3上的颜色,marker,线型。
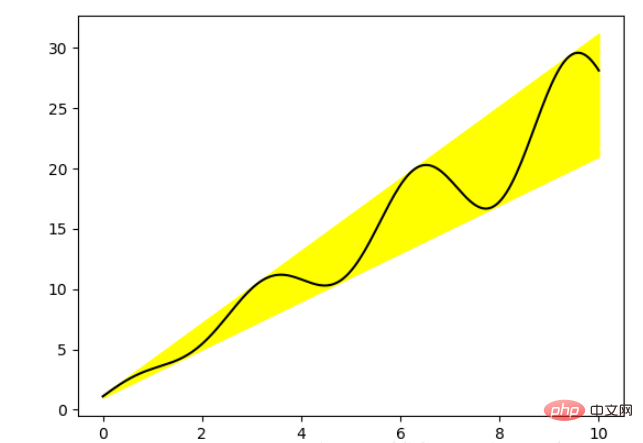
另外,我们可以通过关键字参数的方式绘图,如下例:
x = np.linspace(0, 10, 200)
data_obj = {'x': x,
            'y1': 2 * x + 1,
            'y2': 3 * x + 1.2,
            'mean': 0.5 * x * np.cos(2*x) + 2.5 * x + 1.1}

fig, ax = plt.subplots()

#填充两条线之间的颜色
ax.fill_between('x', 'y1', 'y2', color='yellow', data=data_obj)

# Plot the "centerline" with `plot`
ax.plot('x', 'mean', color='black', data=data_obj)

plt.show()发现上面的作图,在数据部分只传入了字符串,这些字符串对一个这 data_obj 中的关键字,当以这种方式作画时,将会在传入给 data 中寻找对应关键字的数据来绘图。
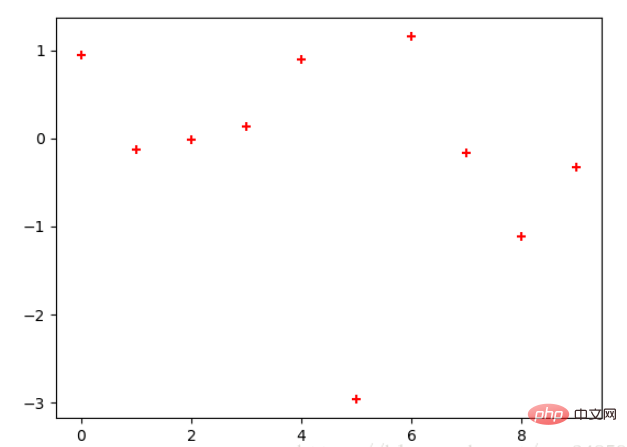
2.2 散点图
只画点,但是不用线连接起来。
x = np.arange(10)
y = np.random.randn(10)
plt.scatter(x, y, color='red', marker='+')
plt.show()
2.3 条形图
条形图分两种,一种是水平的,一种是垂直的,见下例子:
np.random.seed(1)
x = np.arange(5)
y = np.random.randn(5)

fig, axes = plt.subplots(ncols=2, figsize=plt.figaspect(1./2))

vert_bars = axes[0].bar(x, y, color='lightblue', align='center')
horiz_bars = axes[1].barh(x, y, color='lightblue', align='center')
#在水平或者垂直方向上画线
axes[0].axhline(0, color='gray', linewidth=2)
axes[1].axvline(0, color='gray', linewidth=2)
plt.show()
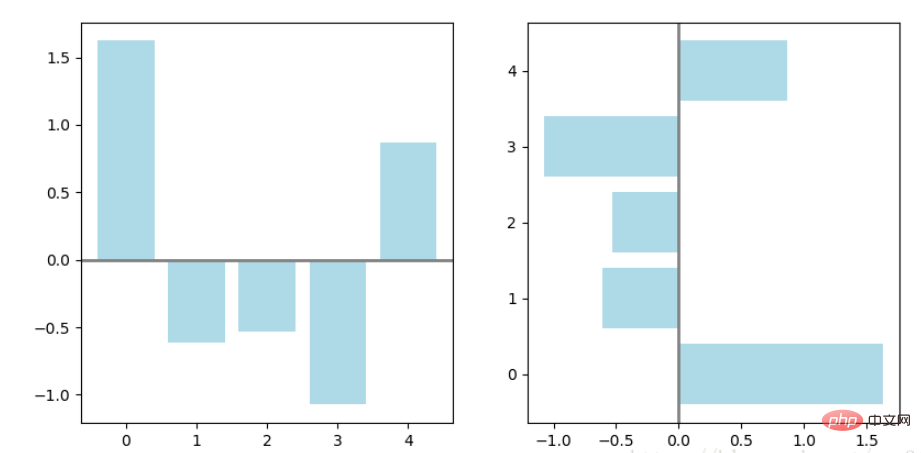
条形图还返回了一个Artists 数组,对应着每个条形,例如上图 Artists 数组的大小为5,我们可以通过这些 Artists 对条形图的样式进行更改,如下例:
fig, ax = plt.subplots()
vert_bars = ax.bar(x, y, color='lightblue', align='center')
# We could have also done this with two separate calls to `ax.bar` and numpy boolean indexing.
for bar, height in zip(vert_bars, y):
if height < 0:
bar.set(edgecolor='darkred', color='salmon', linewidth=3)
plt.show()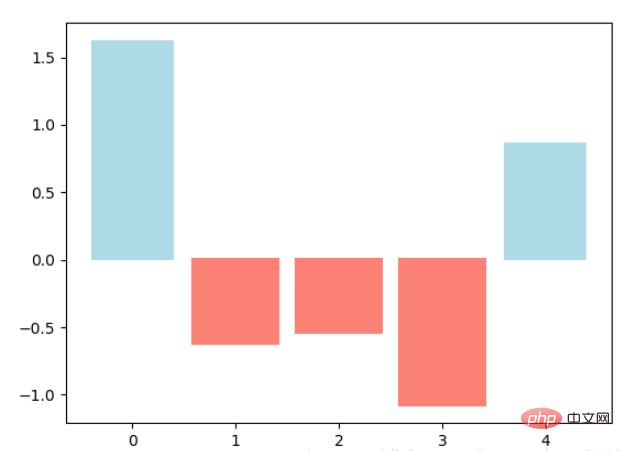
2.4 直方图
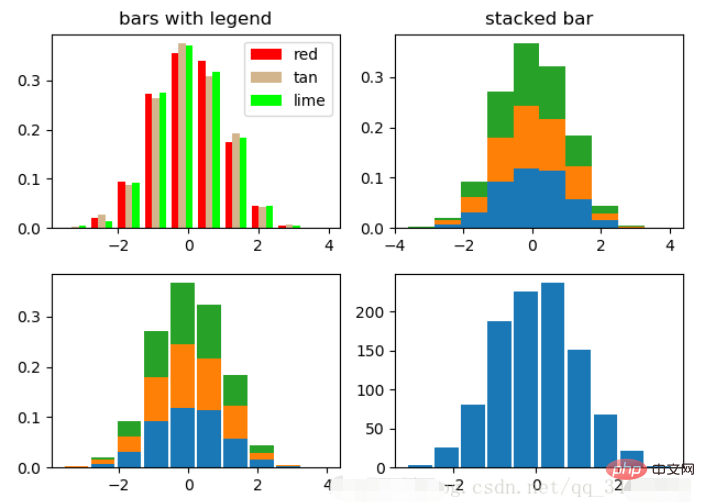
直方图用于统计数据出现的次数或者频率,有多种参数可以调整,见下例:
np.random.seed(19680801)

n_bins = 10
x = np.random.randn(1000, 3)

fig, axes = plt.subplots(nrows=2, ncols=2)
ax0, ax1, ax2, ax3 = axes.flatten()

colors = ['red', 'tan', 'lime']
ax0.hist(x, n_bins, density=True, histtype='bar', color=colors, label=colors)
ax0.legend(prop={'size': 10})
ax0.set_title('bars with legend')

ax1.hist(x, n_bins, density=True, histtype='barstacked')
ax1.set_title('stacked bar')

ax2.hist(x,  histtype='barstacked', rwidth=0.9)

ax3.hist(x[:, 0], rwidth=0.9)
ax3.set_title('different sample sizes')

fig.tight_layout()
plt.show()参数中density控制Y轴是概率还是数量,与返回的第一个的变量对应。histtype控制着直方图的样式,默认是 ‘bar’,对于多个条形时就相邻的方式呈现如子图1, ‘barstacked’ 就是叠在一起,如子图2、3。 rwidth 控制着宽度,这样可以空出一些间隙,比较图2、3. 图4是只有一条数据时。
2.5 饼图
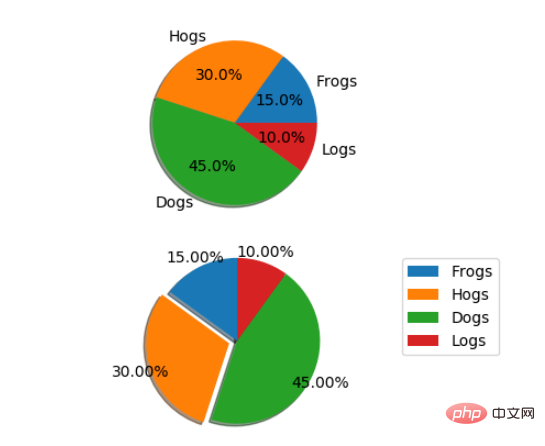
labels = 'Frogs', 'Hogs', 'Dogs', 'Logs'
sizes = [15, 30, 45, 10]
explode = (0, 0.1, 0, 0)  # only "explode" the 2nd slice (i.e. 'Hogs')

fig1, (ax1, ax2) = plt.subplots(2)
ax1.pie(sizes, labels=labels, autopct='%1.1f%%', shadow=True)
ax1.axis('equal')
ax2.pie(sizes, autopct='%1.2f%%', shadow=True, startangle=90, explode=explode,
    pctdistance=1.12)
ax2.axis('equal')
ax2.legend(labels=labels, loc='upper right')

plt.show()饼图自动根据数据的百分比画饼.。labels是各个块的标签,如子图一。autopct=%1.1f%%表示格式化百分比精确输出,explode,突出某些块,不同的值突出的效果不一样。pctdistance=1.12
fig, (ax1, ax2) = plt.subplots(2)
ax1.boxplot(data)
ax2.boxplot(data2, vert=False) #控制方向

 1.3 Axes multiples
np.random.seed(19680801)


N = 50
x = np.random.rand(N)
y = np.random.rand(N)
colors = np.random.rand(N)
area = (30 * np.random.rand(N))**2  # 0 to 15 point radii

plt.scatter(x, y, s=area, c=colors, alpha=0.5)
plt.show()
fig, (ax1, ax2) = plt.subplots(2)
x = np.arange(-5, 5, 0.1)
y = np.arange(-5, 5, 0.1)
xx, yy = np.meshgrid(x, y, sparse=True)
z = np.sin(xx**2 + yy**2) / (xx**2 + yy**2)
ax1.contourf(x, y, z)
ax2.contour(x, y, z)
ax.set_xlim([xmin, xmax])   #设置X轴的区间
ax.set_ylim([ymin, ymax])   #Y轴区间
ax.axis([xmin, xmax, ymin, ymax])   #X、Y轴区间
ax.set_ylim(bottom=-10)     #Y轴下限
ax.set_xlim(right=25)       #X轴上限
 🎜🎜De plus, nous pouvons utiliser Drawing sous la forme de paramètres de mot-clé, comme dans l'exemple suivant : 🎜
x = np.linspace(0, 2*np.pi)
y = np.sin(x)
fig, (ax1, ax2) = plt.subplots(2)
ax1.plot(x, y)
ax2.plot(x, y)
ax2.set_xlim([-1, 6])
ax2.set_ylim([-1, 3])
plt.show()
 🎜🎜2.2 Nuage de points 🎜 🎜Dessinez simplement des points, mais ne les connectez pas avec des lignes. 🎜
fig, ax = plt.subplots()
ax.plot([1, 2, 3, 4], [10, 20, 25, 30], label='Philadelphia')
ax.plot([1, 2, 3, 4], [30, 23, 13, 4], label='Boston')
ax.scatter([1, 2, 3, 4], [20, 10, 30, 15], label='Point')
ax.set(ylabel='Temperature (deg C)', xlabel='Time', title='A tale of two cities')
ax.legend()
plt.show()
 🎜🎜2.3 Bar graphique 🎜🎜Il existe deux types de graphiques à barres, l'un est horizontal et l'autre vertical, voir l'exemple ci-dessous : 🎜
data = [('apples', 2), ('oranges', 3), ('peaches', 1)]
fruit, value = zip(*data)

fig, (ax1, ax2) = plt.subplots(2)
x = np.arange(len(fruit))
ax1.bar(x, value, align='center', color='gray')
ax2.bar(x, value, align='center', color='gray')

ax2.set(xticks=x, xticklabels=fruit)

#ax.tick_params(axis='y', direction='inout', length=10) #修改 ticks 的方向以及长度
plt.show()
 🎜🎜Le graphique à barres renvoie également un tableau Artistes, correspondant à chaque barre. Par exemple, la taille du tableau Artistes dans l'image ci-dessus est 5, nous pouvons utiliser ces artistes pour changer le style du graphique à barres, comme dans l'exemple suivant : 🎜
fig, axes = plt.subplots(2, 2, figsize=(9, 9))
fig.subplots_adjust(wspace=0.5, hspace=0.3,
                    left=0.125, right=0.9,
                    top=0.9,    bottom=0.1)

#fig.tight_layout() #自动调整布局,使标题之间不重叠
plt.show() 🎜🎜2.4 Histogramme🎜🎜L'histogramme est utilisé pour compter le nombre ou la fréquence des occurrences de données. De nombreux paramètres peuvent être ajustés, voir le exemple suivant : 🎜
fig, (ax1, ax2) = plt.subplots(1, 2, sharex=True, sharey=True)
ax1.plot([1, 2, 3, 4], [1, 2, 3, 4])
ax2.plot([3, 4, 5, 6], [6, 5, 4, 3])
plt.show()
density</ dans le code des paramètres>Contrôlez si l'axe Y est une probabilité ou une quantité, correspondant à la première variable renvoyée. <code>histtype contrôle le style de l'histogramme. La valeur par défaut est «bar». Pour plusieurs barres, elles seront affichées adjacentes comme indiqué dans le sous-graphique 1. «barstacked» sous-graphique 1. Figures 2 et 3. rwidth contrôle la largeur, ce qui peut laisser des espaces. Comparez les figures 2 et 3. La figure 4 correspond à une seule donnée. 🎜🎜 🎜🎜2.5 Diagramme circulaire 🎜
fig, ax = plt.subplots()
ax.plot([-2, 2, 3, 4], [-10, 20, 25, 5])
ax.spines['top'].set_visible(False)     #顶边界不可见
ax.xaxis.set_ticks_position('bottom')  # ticks 的位置为下方,分上下的。
ax.spines['right'].set_visible(False)   #右边界不可见
ax.yaxis.set_ticks_position('left')

# "outward"
# 移动左、下边界离 Axes 10 个距离
#ax.spines['bottom'].set_position(('outward', 10))
#ax.spines['left'].set_position(('outward', 10))

# "data"
# 移动左、下边界到 (0, 0) 处相交
ax.spines['bottom'].set_position(('data', 0))
ax.spines['left'].set_position(('data', 0))

# "axes"
# 移动边界,按 Axes 的百分比位置
#ax.spines['bottom'].set_position(('axes', 0.75))
#ax.spines['left'].set_position(('axes', 0.3))

plt.show()
labels est l'étiquette de chaque bloc, comme la sous-image 1. autopct=%1.1f%% signifie une sortie formatée avec un pourcentage précis, explode met en évidence certains blocs et différentes valeurs ont des effets de mise en évidence différents. pctdistance=1.12La distance entre le pourcentage et le centre du cercle, la valeur par défaut est 0,6.🎜🎜🎜🎜2.6 箱形图
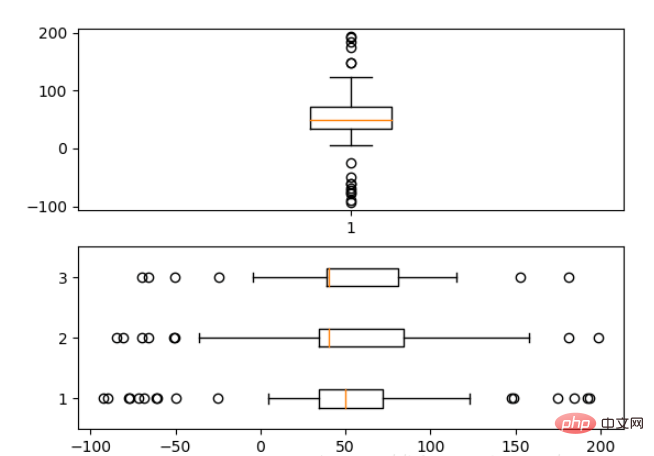
为了专注于如何画图,省去数据的处理部分。 data 的 shape 为 (n, ), data2 的 shape 为 (n, 3)。
fig, (ax1, ax2) = plt.subplots(2)
ax1.boxplot(data)
ax2.boxplot(data2, vert=False) #控制方向
2.7 泡泡图
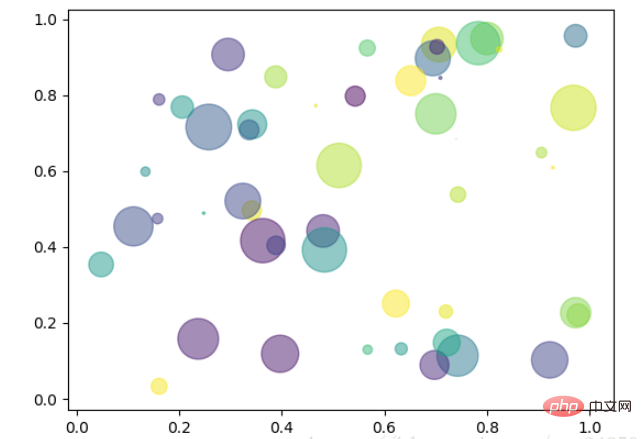
散点图的一种,加入了第三个值 s 可以理解成普通散点,画的是二维,泡泡图体现了Z的大小,如下例:
np.random.seed(19680801)


N = 50
x = np.random.rand(N)
y = np.random.rand(N)
colors = np.random.rand(N)
area = (30 * np.random.rand(N))**2  # 0 to 15 point radii

plt.scatter(x, y, s=area, c=colors, alpha=0.5)
plt.show()
2.8 等高线(轮廓图)
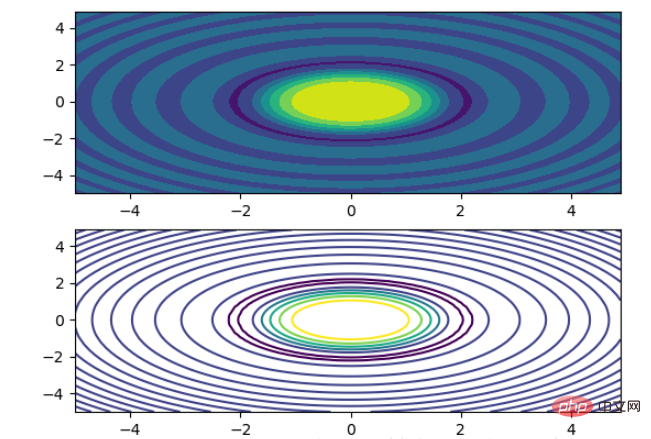
有时候需要描绘边界的时候,就会用到轮廓图,机器学习用的决策边界也常用轮廓图来绘画,见下例:
fig, (ax1, ax2) = plt.subplots(2)
x = np.arange(-5, 5, 0.1)
y = np.arange(-5, 5, 0.1)
xx, yy = np.meshgrid(x, y, sparse=True)
z = np.sin(xx**2 + yy**2) / (xx**2 + yy**2)
ax1.contourf(x, y, z)
ax2.contour(x, y, z)
上面画了两个一样的轮廓图,contourf会填充轮廓线之间的颜色。数据x, y, z通常是具有相同 shape 的二维矩阵。x, y 可以为一维向量,但是必需有 z.shape = (y.n, x.n) ,这里 y.n 和 x.n 分别表示x、y的长度。Z通常表示的是距离X-Y平面的距离,传入X、Y则是控制了绘制等高线的范围。
3 布局、图例说明、边界等
3.1区间上下限
当绘画完成后,会发现X、Y轴的区间是会自动调整的,并不是跟我们传入的X、Y轴数据中的最值相同。为了调整区间我们使用下面的方式:
ax.set_xlim([xmin, xmax])   #设置X轴的区间
ax.set_ylim([ymin, ymax])   #Y轴区间
ax.axis([xmin, xmax, ymin, ymax])   #X、Y轴区间
ax.set_ylim(bottom=-10)     #Y轴下限
ax.set_xlim(right=25)       #X轴上限
具体效果见下例:
x = np.linspace(0, 2*np.pi)
y = np.sin(x)
fig, (ax1, ax2) = plt.subplots(2)
ax1.plot(x, y)
ax2.plot(x, y)
ax2.set_xlim([-1, 6])
ax2.set_ylim([-1, 3])
plt.show()
可以看出修改了区间之后影响了图片显示的效果。
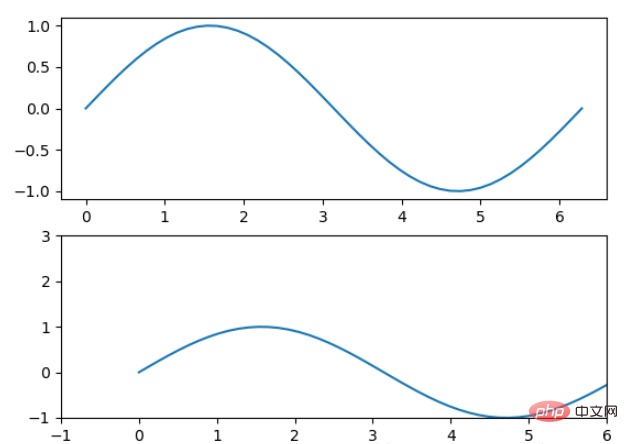
3.2 图例说明
我们如果我们在一个Axes上做多次绘画,那么可能出现分不清哪条线或点所代表的意思。这个时间添加图例说明,就可以解决这个问题了,见下例:
fig, ax = plt.subplots()
ax.plot([1, 2, 3, 4], [10, 20, 25, 30], label='Philadelphia')
ax.plot([1, 2, 3, 4], [30, 23, 13, 4], label='Boston')
ax.scatter([1, 2, 3, 4], [20, 10, 30, 15], label='Point')
ax.set(ylabel='Temperature (deg C)', xlabel='Time', title='A tale of two cities')
ax.legend()
plt.show()
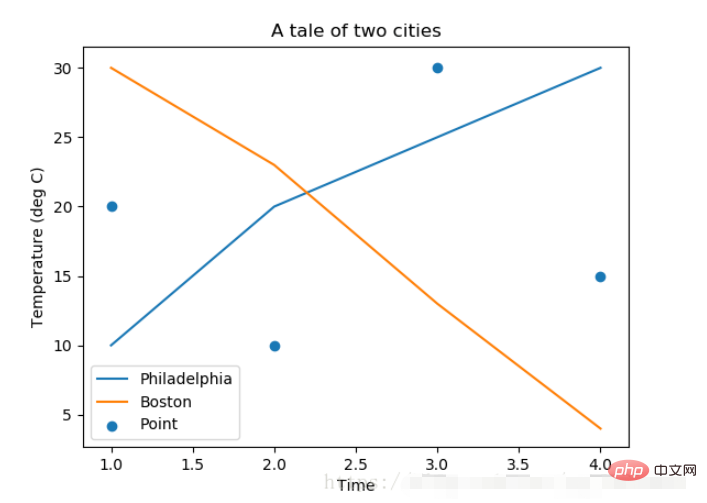
在绘图时传入 label 参数,并最后调用ax.legend()显示体力说明,对于 legend 还是传入参数,控制图例说明显示的位置:
| Location String | Location Code |
|---|---|
| ‘best’ | 0 |
| ‘upper right’ | 1 |
| ‘upper left’ | 2 |
| ‘lower left’ | 3 |
| ‘lower right’ | 4 |
| ‘right’ | 5 |
| ‘center left’ | 6 |
| ‘center right’ | 7 |
| ‘lower center’ | 8 |
| ‘upper center’ | 9 |
| ‘center’ | 10 |
3.3 区间分段
默认情况下,绘图结束之后,Axes 会自动的控制区间的分段。见下例:
data = [('apples', 2), ('oranges', 3), ('peaches', 1)]
fruit, value = zip(*data)

fig, (ax1, ax2) = plt.subplots(2)
x = np.arange(len(fruit))
ax1.bar(x, value, align='center', color='gray')
ax2.bar(x, value, align='center', color='gray')

ax2.set(xticks=x, xticklabels=fruit)

#ax.tick_params(axis='y', direction='inout', length=10) #修改 ticks 的方向以及长度
plt.show()
上面不仅修改了X轴的区间段,并且修改了显示的信息为文本。
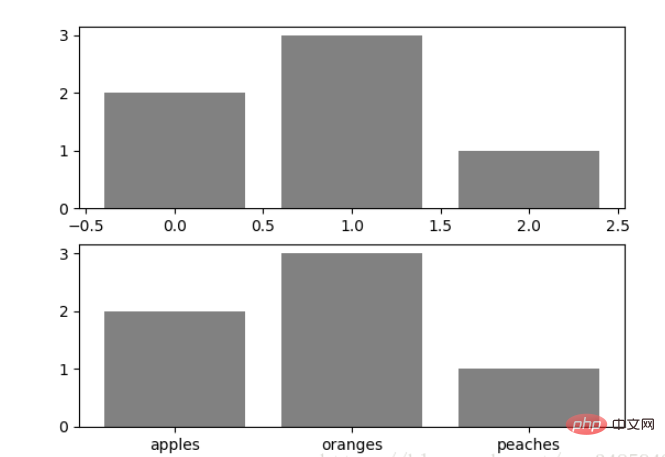
3.4 布局
当我们绘画多个子图时,就会有一些美观的问题存在,例如子图之间的间隔,子图与画板的外边间距以及子图的内边距,下面说明这个问题:
fig, axes = plt.subplots(2, 2, figsize=(9, 9))
fig.subplots_adjust(wspace=0.5, hspace=0.3,
                    left=0.125, right=0.9,
                    top=0.9,    bottom=0.1)

#fig.tight_layout() #自动调整布局,使标题之间不重叠
plt.show()通过fig.subplots_adjust()我们修改了子图水平之间的间隔wspace=0.5,垂直方向上的间距hspace=0.3,左边距left=0.125 等等,这里数值都是百分比的。以 [0, 1] 为区间,选择left、right、bottom、top 注意 top 和 right 是 0.9 表示上、右边距为百分之10。不确定如果调整的时候,fig.tight_layout()是一个很好的选择。之前说到了内边距,内边距是子图的,也就是 Axes 对象,所以这样使用 ax.margins(x=0.1, y=0.1),当值传入一个值时,表示同时修改水平和垂直方向的内边距。
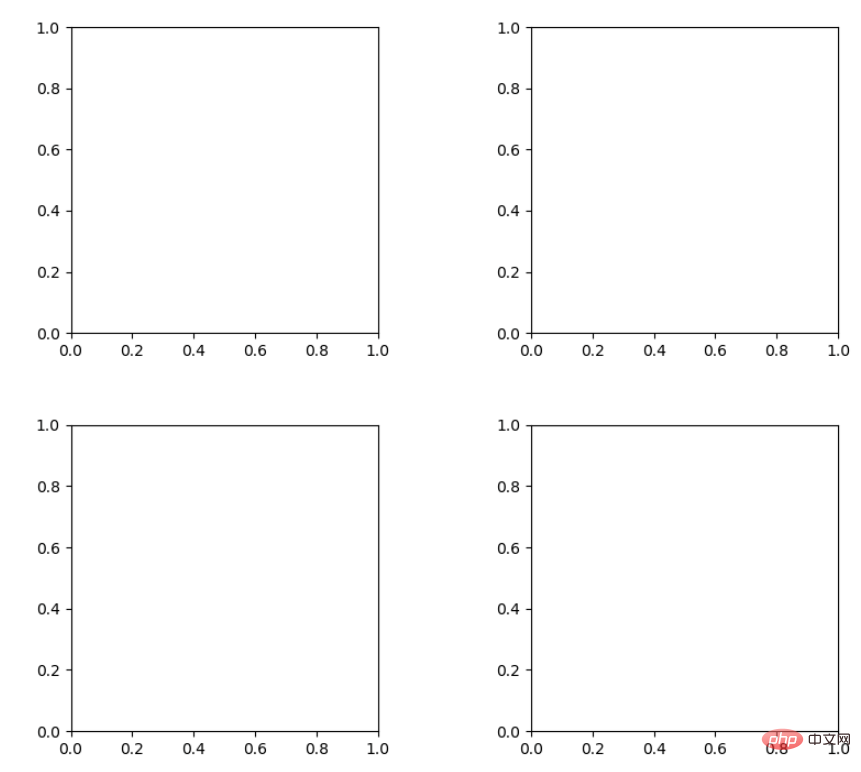
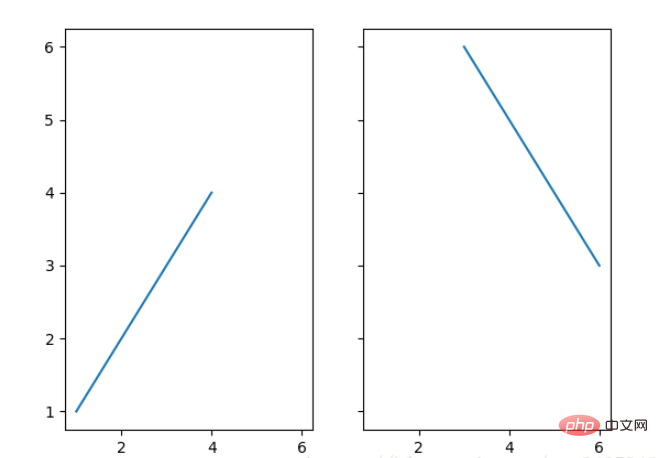
观察上面的四个子图,可以发现他们的X、Y的区间是一致的,而且这样显示并不美观,所以可以调整使他们使用一样的X、Y轴:
fig, (ax1, ax2) = plt.subplots(1, 2, sharex=True, sharey=True)
ax1.plot([1, 2, 3, 4], [1, 2, 3, 4])
ax2.plot([3, 4, 5, 6], [6, 5, 4, 3])
plt.show()
3.5 轴相关
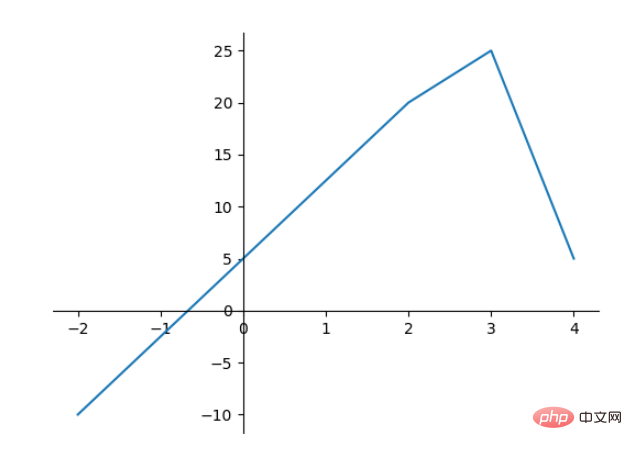
改变边界的位置,去掉四周的边框:
fig, ax = plt.subplots()
ax.plot([-2, 2, 3, 4], [-10, 20, 25, 5])
ax.spines['top'].set_visible(False)     #顶边界不可见
ax.xaxis.set_ticks_position('bottom')  # ticks 的位置为下方,分上下的。
ax.spines['right'].set_visible(False)   #右边界不可见
ax.yaxis.set_ticks_position('left')

# "outward"
# 移动左、下边界离 Axes 10 个距离
#ax.spines['bottom'].set_position(('outward', 10))
#ax.spines['left'].set_position(('outward', 10))

# "data"
# 移动左、下边界到 (0, 0) 处相交
ax.spines['bottom'].set_position(('data', 0))
ax.spines['left'].set_position(('data', 0))

# "axes"
# 移动边界,按 Axes 的百分比位置
#ax.spines['bottom'].set_position(('axes', 0.75))
#ax.spines['left'].set_position(('axes', 0.3))

plt.show()
Ce qui précède est le contenu détaillé de. pour plus d'informations, suivez d'autres articles connexes sur le site Web de PHP en chinois!

Outils d'IA chauds

Undresser.AI Undress
Application basée sur l'IA pour créer des photos de nu réalistes

AI Clothes Remover
Outil d'IA en ligne pour supprimer les vêtements des photos.

Undress AI Tool
Images de déshabillage gratuites

Clothoff.io
Dissolvant de vêtements AI

AI Hentai Generator
Générez AI Hentai gratuitement.

Article chaud

Outils chauds

Bloc-notes++7.3.1
Éditeur de code facile à utiliser et gratuit

SublimeText3 version chinoise
Version chinoise, très simple à utiliser

Envoyer Studio 13.0.1
Puissant environnement de développement intégré PHP

Dreamweaver CS6
Outils de développement Web visuel

SublimeText3 version Mac
Logiciel d'édition de code au niveau de Dieu (SublimeText3)
 MySQL doit-il payer
Apr 08, 2025 pm 05:36 PM
MySQL a une version communautaire gratuite et une version d'entreprise payante. La version communautaire peut être utilisée et modifiée gratuitement, mais le support est limité et convient aux applications avec des exigences de stabilité faibles et des capacités techniques solides. L'Enterprise Edition fournit une prise en charge commerciale complète pour les applications qui nécessitent une base de données stable, fiable et haute performance et disposées à payer pour le soutien. Les facteurs pris en compte lors du choix d'une version comprennent la criticité des applications, la budgétisation et les compétences techniques. Il n'y a pas d'option parfaite, seulement l'option la plus appropriée, et vous devez choisir soigneusement en fonction de la situation spécifique.
 Comment utiliser MySQL après l'installation
Apr 08, 2025 am 11:48 AM
L'article présente le fonctionnement de la base de données MySQL. Tout d'abord, vous devez installer un client MySQL, tel que MySQLWorkBench ou le client de ligne de commande. 1. Utilisez la commande MySQL-UROot-P pour vous connecter au serveur et connecter avec le mot de passe du compte racine; 2. Utilisez Createdatabase pour créer une base de données et utilisez Sélectionner une base de données; 3. Utilisez CreateTable pour créer une table, définissez des champs et des types de données; 4. Utilisez InsertInto pour insérer des données, remettre en question les données, mettre à jour les données par mise à jour et supprimer les données par Supprimer. Ce n'est qu'en maîtrisant ces étapes, en apprenant à faire face à des problèmes courants et à l'optimisation des performances de la base de données que vous pouvez utiliser efficacement MySQL.
 MySQL ne peut pas être installé après le téléchargement
Apr 08, 2025 am 11:24 AM
Les principales raisons de la défaillance de l'installation de MySQL sont les suivantes: 1. Problèmes d'autorisation, vous devez s'exécuter en tant qu'administrateur ou utiliser la commande sudo; 2. Des dépendances sont manquantes et vous devez installer des packages de développement pertinents; 3. Conflits du port, vous devez fermer le programme qui occupe le port 3306 ou modifier le fichier de configuration; 4. Le package d'installation est corrompu, vous devez télécharger et vérifier l'intégrité; 5. La variable d'environnement est mal configurée et les variables d'environnement doivent être correctement configurées en fonction du système d'exploitation. Résolvez ces problèmes et vérifiez soigneusement chaque étape pour installer avec succès MySQL.
 Le fichier de téléchargement MySQL est endommagé et ne peut pas être installé. Réparer la solution
Apr 08, 2025 am 11:21 AM
Le fichier de téléchargement mysql est corrompu, que dois-je faire? Hélas, si vous téléchargez MySQL, vous pouvez rencontrer la corruption des fichiers. Ce n'est vraiment pas facile ces jours-ci! Cet article expliquera comment résoudre ce problème afin que tout le monde puisse éviter les détours. Après l'avoir lu, vous pouvez non seulement réparer le package d'installation MySQL endommagé, mais aussi avoir une compréhension plus approfondie du processus de téléchargement et d'installation pour éviter de rester coincé à l'avenir. Parlons d'abord de la raison pour laquelle le téléchargement des fichiers est endommagé. Il y a de nombreuses raisons à cela. Les problèmes de réseau sont le coupable. L'interruption du processus de téléchargement et l'instabilité du réseau peut conduire à la corruption des fichiers. Il y a aussi le problème avec la source de téléchargement elle-même. Le fichier serveur lui-même est cassé, et bien sûr, il est également cassé si vous le téléchargez. De plus, la numérisation excessive "passionnée" de certains logiciels antivirus peut également entraîner une corruption des fichiers. Problème de diagnostic: déterminer si le fichier est vraiment corrompu
 MySQL a-t-il besoin d'Internet
Apr 08, 2025 pm 02:18 PM
MySQL peut s'exécuter sans connexions réseau pour le stockage et la gestion des données de base. Cependant, la connexion réseau est requise pour l'interaction avec d'autres systèmes, l'accès à distance ou l'utilisation de fonctionnalités avancées telles que la réplication et le clustering. De plus, les mesures de sécurité (telles que les pare-feu), l'optimisation des performances (choisissez la bonne connexion réseau) et la sauvegarde des données sont essentielles pour se connecter à Internet.
 Comment optimiser les performances MySQL pour les applications de haute charge?
Apr 08, 2025 pm 06:03 PM
Guide d'optimisation des performances de la base de données MySQL dans les applications à forte intensité de ressources, la base de données MySQL joue un rôle crucial et est responsable de la gestion des transactions massives. Cependant, à mesure que l'échelle de l'application se développe, les goulots d'étranglement des performances de la base de données deviennent souvent une contrainte. Cet article explorera une série de stratégies efficaces d'optimisation des performances MySQL pour garantir que votre application reste efficace et réactive dans des charges élevées. Nous combinerons des cas réels pour expliquer les technologies clés approfondies telles que l'indexation, l'optimisation des requêtes, la conception de la base de données et la mise en cache. 1. La conception de l'architecture de la base de données et l'architecture optimisée de la base de données sont la pierre angulaire de l'optimisation des performances MySQL. Voici quelques principes de base: sélectionner le bon type de données et sélectionner le plus petit type de données qui répond aux besoins peut non seulement économiser un espace de stockage, mais également améliorer la vitesse de traitement des données.
 Solutions au service qui ne peuvent pas être démarrées après l'installation de MySQL
Apr 08, 2025 am 11:18 AM
MySQL a refusé de commencer? Ne paniquez pas, vérifions-le! De nombreux amis ont découvert que le service ne pouvait pas être démarré après avoir installé MySQL, et ils étaient si anxieux! Ne vous inquiétez pas, cet article vous emmènera pour le faire face calmement et découvrez le cerveau derrière! Après l'avoir lu, vous pouvez non seulement résoudre ce problème, mais aussi améliorer votre compréhension des services MySQL et vos idées de problèmes de dépannage, et devenir un administrateur de base de données plus puissant! Le service MySQL n'a pas réussi et il y a de nombreuses raisons, allant des erreurs de configuration simples aux problèmes système complexes. Commençons par les aspects les plus courants. Connaissances de base: une brève description du processus de démarrage du service MySQL Service Startup. Autrement dit, le système d'exploitation charge les fichiers liés à MySQL, puis démarre le démon mysql. Cela implique la configuration
 Comment optimiser les performances de la base de données après l'installation de MySQL
Apr 08, 2025 am 11:36 AM
L'optimisation des performances MySQL doit commencer à partir de trois aspects: configuration d'installation, indexation et optimisation des requêtes, surveillance et réglage. 1. Après l'installation, vous devez ajuster le fichier my.cnf en fonction de la configuration du serveur, tel que le paramètre innodb_buffer_pool_size, et fermer query_cache_size; 2. Créez un index approprié pour éviter les index excessifs et optimiser les instructions de requête, telles que l'utilisation de la commande Explication pour analyser le plan d'exécution; 3. Utilisez le propre outil de surveillance de MySQL (ShowProcessList, Showstatus) pour surveiller la santé de la base de données, et sauvegarde régulièrement et organisez la base de données. Ce n'est qu'en optimisant en continu ces étapes que les performances de la base de données MySQL peuvent être améliorées.


