 développement back-end
 Tutoriel Python
 Comment utiliser l'outil de mise en page Python GUI Tkinter
Comment utiliser l'outil de mise en page Python GUI Tkinter
Interface utilisateur graphique (GUI)
L'interface utilisateur graphique (GUI) n'est rien d'autre qu'une application de bureau qui nous aide à interagir avec l'ordinateur
Une application GUI comme un éditeur de texte peut créer, lire, mettre à jour et supprimer différents types de fichiers
Des applications comme Sudoku, Chess et Solitaire sont des versions de jeu de programmes GUI
Il existe également des applications GUI comme Google Chrome, Firefox et Microsoft Edge. Elles sont utilisées pour naviguer sur Internet
Ce sont différents types d'applications GUI que nous utilisons quotidiennement sur les ordinateurs. En fait, nous pouvons également créer des applications similaires simples via Tkinter
Aujourd'hui, nous sommes une introduction à l'interface graphique, une application GUI très simple et belle sera créée
Python. bibliothèque de création de GUI
Python dispose d'un grand nombre de bibliothèques tierces Pour les bibliothèques GUI, il y a principalement les suivantes :
Kivy
Python QT
wxPython
-
Tkinter
.
Parmi eux, Tkinter est le premier choix pour de nombreux apprenants et développeurs car il est facile à utiliser et est livré avec une installation Python
Bases de Tkinter
L'image ci-dessous montre comment l'application s'exécute réellement dans Tkinter

nous importons d'abord le modèle Tkinter, puis nous créons la fenêtre principale, dans cette fenêtre nous effectuerons des opérations et afficherons tous les effets visuels, ensuite nous ajoutons des widgets, et enfin nous entrons dans la boucle de l'événement principal
Il y a 2 mots-clés importants ici
Widgets
Boucle d'événement principal
La boucle d'événement indique essentiellement au code de continuer à afficher la fenêtre jusqu'à ce que nous la fermions manuellement, ce qui est la boucle infinie exécutée en arrière-plan
Pour les widgets, nous l'étudierons séparément plus tard
L'exemple de code suivant vous donnera une compréhension plus approfondie
import tkinter
window = tkinter.Tk()
# to rename the title of the window window.title("GUI")
# pack is used to show the object in the window
label = tkinter.Label(window, text = "Hello World!").pack()
window.mainloop()Nous importons le package Tkinter et définissons une fenêtre, puis nous pouvons modifier le titre d'une fenêtre à chaque fois que l'application est ouverte, le titre sera affiché sur le titre. tab
Enfin, nous définissons également une étiquette, qui n'est rien d'autre que la sortie qui doit être affichée sur la fenêtre, dans l'exemple c'est hello world

Tkinter Widgets
Donc au final, que sont les Widgets
Les widgets sont similaires aux éléments en HTML, nous pouvons trouver différents types de widgets pour différents types d'éléments dans Tkinter
Voyons une brève introduction de tous ces widgets dans Tkinter

Canvas - Canvas est utilisé pour dessiner formes dans l'interface graphique
Button – Le bouton est utilisé pour placer des boutons dans Tkinter
Checkbutton –
Frame – Frame est utilisé comme conteneur dans Tkinter- Label - L'étiquette est utilisée pour créer des widgets sur une seule ligne, tels que du texte, des images, etc.
- Menu - Le menu est utilisé dans Créer un menu dans GUI
- Jetons un coup d'œil à l'utilisation de chaque widget un par un
Label
L'étiquette est utilisée pour créer du texte et des images et tout ce qui s'y rapporte, et il convient de noter qu'il ne peut s'agir que d'une définition sur une seule ligne.
l1 = Label(window, text="萝卜大杂烩!", font=("ArialBold", 50))
l1.grid(column=0, row=0)l1 = Label(window, text="萝卜大杂烩!", font=("ArialBold", 50))
window.geometry('350x200') Suivant est le bouton
Bouton
Les boutons sont très similaires aux étiquettes, nous créons une variable et utilisons la syntaxe des widgets pour définir ce que le bouton veut exprimer
window.geometry('350x200')
bt = Button(window, text="Enter")
bt = Button(window, text="Enter", bg="orange", fg="red")
bt.grid(column=1, row=0)

def clicked():
    l1.configure(text="按钮被点击了!!")
bt = Button(window, text="Enter", bg="orange", fg="red", command=clicked) Nous appelons c'est un événement de clic, nous devons écrire une fonction sur ce qui devrait se passer lorsqu'un bouton est cliqué ou qu'un événement de clic est déclenché
 Nous définissons une fonction appelée cliqué qui peut afficher un message texte et nous ajoutons un paramètre appelé commande dans le bouton définition pour appeler un événement de clic

Entry
它用于在 GUI 中创建输入字段以接收文本输入
txt = Entry(window, width=10)
txt.grid(column=1, row=0)
def clicked():
    res = "Welcome to " + txt.get()
    l1.configure(text=res)
bt = Button(window, text="Enter", bg="orange", fg="red", command=clicked)在这里,我们使用 Tkinter Entry 类创建一个文本框,grid 定义我们希望窗口小部件位于何处
同时 clicked 函数接收 Entry 的文本信息

Combobox
这是一个带有某些选项的下拉菜单
from tkinter.ttk import *
combo = Combobox(window)
combo['values']= (1, 2, 3, 4, 5, "Text")
combo.current(3)
combo.grid(column=0, row=0)

这样一个下拉菜单就完成了
Checkbutton
复选按钮是非常常用的组件
chk_state = BooleanVar()
chk_state.set (True)
chk = Checkbutton(window, text="Select", var=chk_state)
chk.grid(column=4, row=0)
我们首先创建一个 booleanvar 类型的变量,这是一个 Tkinter 变量
默认情况下,我们将设置状态保持为 true,这代表按钮已经被选中 接下来,我们将 chk_state 传递给 checkbutton 类来为我们设置检查状态

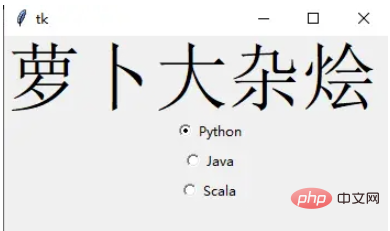
Radio Button
单选按钮也是非常常用的
rad1 = Radiobutton(window, text=Python', value=1)
rad2 = Radiobutton(window, text=Java', value=2)
rad3 = Radiobutton(window, text=Scala', value=3)
rad1.grid(column=0, row=0)
rad2.grid(column=1, row=0)
rad3.grid(column=2, row=0)
在这里,我们使用了不同的参数值,1,2和3,如果它们相同,则会导致冲突并出现错误
它们的文本数据是可以相同,在这里,我们使用了 Python、Java 和 Scala
Scrolled Text
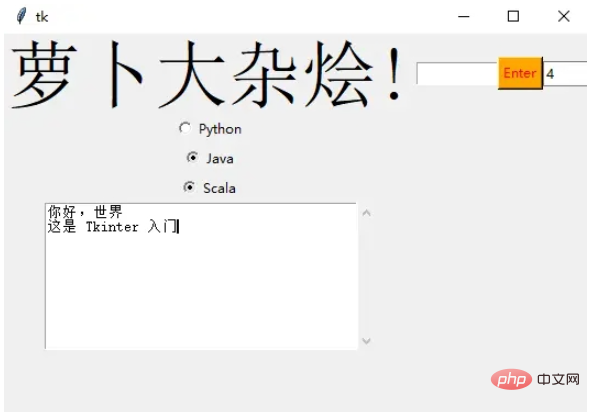
滚动文本组件
scro_txt = scrolledtext.ScrolledText(window, width=40,height=10)
scro_txt.grid(column=0, row=4)
我们指定了窗口的高和宽,否则默认会填充整个 Windiws 窗口
Message Box
消息组件可以方便的弹出提醒消息
def clicked():
    messagebox.showinfo('Message title', 'Message content')
btn = Button(window,text=‘ENTER', command=clicked)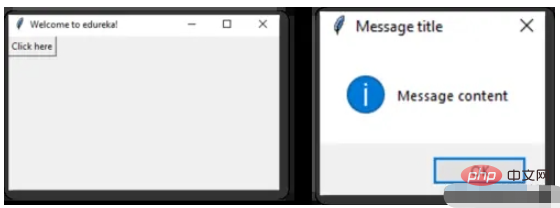
SpinBox
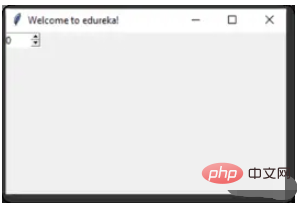
Spinbox 也是一个常见的组件,有两个选项卡,存在向上和向下滚动选项卡
pin = Spinbox(window, from_=0, to=100, width=5)
有 3 个参数——from、to 和 width
From – 告诉我们范围的开始和默认值
to – 给我们范围的上限阈值
width 基本上是将 widget 的大小设置为5个字符的空格
Geometry
Tkinter 中的所有 Widgets 都会有一些位置信息,这些度量使得我们可以组织 Widgets 及其父框架、窗口等
Tkinter 具有以下三个布局方式
pack():- 它在块中组织 Widgets,这意味着它占据了整个可用宽度,这是在窗口中显示 Widgets 的标准方法
grid():- 它以类似表格的结构组织 Widgets
place():- 它将 Widgets 放置在我们想要的特定位置
组织布局
为了在窗口中安排布局,我们将使用 Frame 类
Frame -- 在窗口中创建分区,我们可以根据需要使用 pack() 方法的侧面参数对齐框架
Button -- 在窗口中创建一个按钮,需要传递几个参数,如文本(按钮的值)、fg(文本的颜色)、bg(背景颜色)
在下面的代码中,我们使用 window、top_frame、bottom_frame 来布局
import tkinter
window = tkinter.Tk()
window.title("GUI")
# creating 2 frames TOP and BOTTOM
top_frame = tkinter.Frame(window).pack()
bottom_frame = tkinter.Frame(window).pack(side = "bottom")
# now, create some widgets in the top_frame and bottom_frame
btn1 = tkinter.Button(top_frame, text = "Button1", fg = "red").pack()# 'fg - foreground' is used to color the contents
btn2 = tkinter.Button(top_frame, text = "Button2", fg = "green").pack()# 'text' is used to write the text on the Button
btn3 = tkinter.Button(bottom_frame, text = "Button2", fg = "purple").pack(side = "left")# 'side' is used to align the widgets
btn4 = tkinter.Button(bottom_frame, text = "Button2", fg = "orange").pack(side = "left")
window.mainloop()
再来看一个登录的小栗子
import tkinter
window = tkinter.Tk()
window.title("GUI")
# creating 2 text labels and input labels
tkinter.Label(window, text = "Username").grid(row = 0) # this is placed in 0 0
# 'Entry' is used to display the input-field
tkinter.Entry(window).grid(row = 0, column = 1) # this is placed in 0 1
tkinter.Label(window, text = "Password").grid(row = 1) # this is placed in 1 0
tkinter.Entry(window).grid(row = 1, column = 1) # this is placed in 1 1
# 'Checkbutton' is used to create the check buttons
tkinter.Checkbutton(window, text = "Keep Me Logged In").grid(columnspan = 2) # 'columnspan' tells to take the width of 2 columns
# you can also use 'rowspan' in the similar manner
window.mainloop()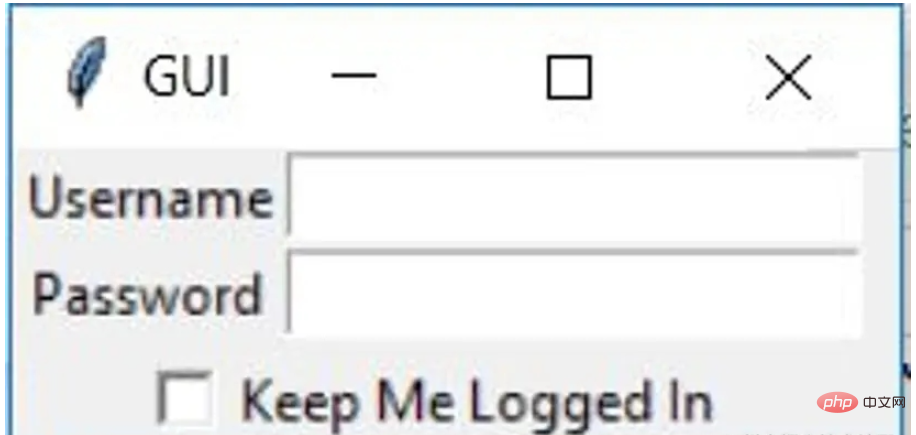
下面我们来了解 binding 函数
binding 函数
每当事件发生时调用函数就是绑定函数
在下面的示例中,当单击按钮时,它会调用一个名为 say_hi 的函数。 函数 say_hi 会创建一个带有文本 Hi 的新标签
import tkinter
window = tkinter.Tk()
window.title("GUI")
# creating a function called say_hi()
def say_hi():
    tkinter.Label(window, text = "Hi").pack()
tkinter.Button(window, text = "Click Me!", command = say_hi).pack() # 'command' is executed when you click the button
# in this above case we're calling the function 'say_hi'.
window.mainloop()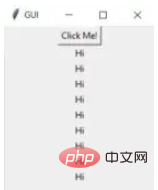
另一种绑定函数的方法是使用事件,事件类似于鼠标移动、鼠标悬停、单击和滚动等等
import tkinter
window = tkinter.Tk()
window.title("GUI")
# creating a function with an arguments 'event'
def say_hi(event): # you can rename 'event' to anything you want
    tkinter.Label(window, text = "Hi").pack()
btn = tkinter.Button(window, text = "Click Me!")
btn.bind("Button-1", say_hi) # 'bind' takes 2 parameters 1st is 'event' 2nd is 'function'
btn.pack()
window.mainloop()单击事件有 3 种不同的类型,分别是 leftClick、middleClick 和 rightClick
下面的代码将使用对于的文本创建一个新标签
import tkinter
window = tkinter.Tk()
window.title("GUI")
#creating 3 different functions for 3 events
def left_click(event):
    tkinter.Label(window, text = "Left Click!").pack()
def middle_click(event):
    tkinter.Label(window, text = "Middle Click!").pack()
def right_click(event):
    tkinter.Label(window, text = "Right Click!").pack()
window.bind("Button-1", left_click)
window.bind("Button-2", middle_click)
window.bind("Button-3", right_click)
window.mainloop()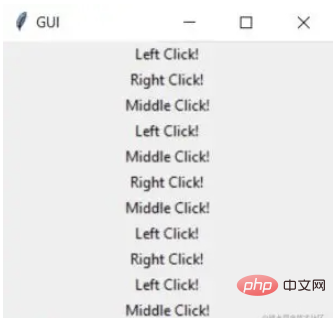
Images 和 Icons
我们可以使用 PhotoImage 方法添加图像和图标
import tkinter
window = tkinter.Tk()
window.title("GUI")
# taking image from the directory and storing the source in a variable
icon = tkinter.PhotoImage(file = "4.PNG")
# displaying the picture using a 'Label' by passing the 'picture' variriable to 'image' parameter
label = tkinter.Label(window, image = icon)
label.pack()
window.mainloop()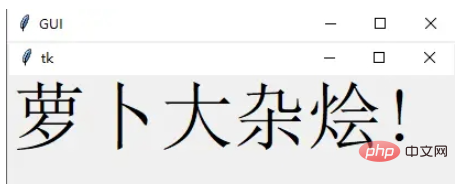
好了,进步的 Tkinter 知识我们都梳理完毕了,下面就完成一个简单的实战项目吧
计算器 APP
首先初始化页面
window = Tk()
window.geometry("350x380")
window.resizable(0, 0)  # this prevents from resizing the window
window.title("小小计算器")接下来定义输入数字框
input_text = StringVar()
input_frame = Frame(window, width=312, height=50, bd=0, highlightbackground="black", highlightcolor="black",
                    highlightthickness=1)
input_frame.pack(side=TOP)
input_field = Entry(input_frame, font=('arial', 18, 'bold'), textvariable=input_text, width=50, bg="#eee", bd=0,
                    justify=RIGHT)
input_field.grid(row=0, column=0)
input_field.pack(ipady=10)然后定义按钮方法,我们以清除按钮和除法按钮为例
clear = Button(btns_frame, text="C", fg="black", width=32, height=3, bd=0, bg="#eee", cursor="hand2",
               command=lambda: btn_clear()).grid(row=0, column=0, columnspan=3, padx=1, pady=1)
divide = Button(btns_frame, text="/", fg="black", width=10, height=3, bd=0, bg="#eee", cursor="hand2",
command=lambda: btn_click("/")).grid(row=0, column=3, padx=1, pady=1)最后就是计算equal逻辑
equals = Button(btns_frame, text="=", fg="black", width=10, height=3, bd=0, bg="#eee", cursor="hand2",
               command=lambda: btn_equal()).grid(row=4, column=3, padx=1, pady=1)
def btn_equal():
   global expression
   result = str(eval(expression))
   input_text.set(result)
expression = ""Ce qui précède est le contenu détaillé de. pour plus d'informations, suivez d'autres articles connexes sur le site Web de PHP en chinois!

Outils d'IA chauds

Undresser.AI Undress
Application basée sur l'IA pour créer des photos de nu réalistes

AI Clothes Remover
Outil d'IA en ligne pour supprimer les vêtements des photos.

Undress AI Tool
Images de déshabillage gratuites

Clothoff.io
Dissolvant de vêtements AI

AI Hentai Generator
Générez AI Hentai gratuitement.

Article chaud

Outils chauds

Bloc-notes++7.3.1
Éditeur de code facile à utiliser et gratuit

SublimeText3 version chinoise
Version chinoise, très simple à utiliser

Envoyer Studio 13.0.1
Puissant environnement de développement intégré PHP

Dreamweaver CS6
Outils de développement Web visuel

SublimeText3 version Mac
Logiciel d'édition de code au niveau de Dieu (SublimeText3)
 MySQL doit-il payer
Apr 08, 2025 pm 05:36 PM
MySQL a une version communautaire gratuite et une version d'entreprise payante. La version communautaire peut être utilisée et modifiée gratuitement, mais le support est limité et convient aux applications avec des exigences de stabilité faibles et des capacités techniques solides. L'Enterprise Edition fournit une prise en charge commerciale complète pour les applications qui nécessitent une base de données stable, fiable et haute performance et disposées à payer pour le soutien. Les facteurs pris en compte lors du choix d'une version comprennent la criticité des applications, la budgétisation et les compétences techniques. Il n'y a pas d'option parfaite, seulement l'option la plus appropriée, et vous devez choisir soigneusement en fonction de la situation spécifique.
 HaDIDB: une base de données légère et évolutive horizontalement dans Python
Apr 08, 2025 pm 06:12 PM
HaDIDB: Une base de données Python évolutive de haut niveau légère HaDIDB (HaDIDB) est une base de données légère écrite en Python, avec un niveau élevé d'évolutivité. Installez HaDIDB à l'aide de l'installation PIP: PiPinStallHaDIDB User Management Créer un utilisateur: CreateUser () pour créer un nouvel utilisateur. La méthode Authentication () authentifie l'identité de l'utilisateur. FromHadidb.OperationMportUserUser_OBJ = User ("Admin", "Admin") User_OBJ.
 Méthode de Navicat pour afficher le mot de passe de la base de données MongoDB
Apr 08, 2025 pm 09:39 PM
Il est impossible de visualiser le mot de passe MongoDB directement via NAVICAT car il est stocké sous forme de valeurs de hachage. Comment récupérer les mots de passe perdus: 1. Réinitialiser les mots de passe; 2. Vérifiez les fichiers de configuration (peut contenir des valeurs de hachage); 3. Vérifiez les codes (May Code Hardcode).
 MySQL Workbench peut-il se connecter à MariaDB
Apr 08, 2025 pm 02:33 PM
MySQL Workbench peut se connecter à MARIADB, à condition que la configuration soit correcte. Sélectionnez d'abord "MariADB" comme type de connecteur. Dans la configuration de la connexion, définissez correctement l'hôte, le port, l'utilisateur, le mot de passe et la base de données. Lorsque vous testez la connexion, vérifiez que le service MARIADB est démarré, si le nom d'utilisateur et le mot de passe sont corrects, si le numéro de port est correct, si le pare-feu autorise les connexions et si la base de données existe. Dans une utilisation avancée, utilisez la technologie de mise en commun des connexions pour optimiser les performances. Les erreurs courantes incluent des autorisations insuffisantes, des problèmes de connexion réseau, etc. Lors des erreurs de débogage, analysez soigneusement les informations d'erreur et utilisez des outils de débogage. L'optimisation de la configuration du réseau peut améliorer les performances
 MySQL a-t-il besoin d'Internet
Apr 08, 2025 pm 02:18 PM
MySQL peut s'exécuter sans connexions réseau pour le stockage et la gestion des données de base. Cependant, la connexion réseau est requise pour l'interaction avec d'autres systèmes, l'accès à distance ou l'utilisation de fonctionnalités avancées telles que la réplication et le clustering. De plus, les mesures de sécurité (telles que les pare-feu), l'optimisation des performances (choisissez la bonne connexion réseau) et la sauvegarde des données sont essentielles pour se connecter à Internet.
 Comment résoudre MySQL ne peut pas se connecter à l'hôte local
Apr 08, 2025 pm 02:24 PM
La connexion MySQL peut être due aux raisons suivantes: le service MySQL n'est pas démarré, le pare-feu intercepte la connexion, le numéro de port est incorrect, le nom d'utilisateur ou le mot de passe est incorrect, l'adresse d'écoute dans my.cnf est mal configurée, etc. 2. Ajustez les paramètres du pare-feu pour permettre à MySQL d'écouter le port 3306; 3. Confirmez que le numéro de port est cohérent avec le numéro de port réel; 4. Vérifiez si le nom d'utilisateur et le mot de passe sont corrects; 5. Assurez-vous que les paramètres d'adresse de liaison dans My.cnf sont corrects.
 Comment optimiser les performances MySQL pour les applications de haute charge?
Apr 08, 2025 pm 06:03 PM
Guide d'optimisation des performances de la base de données MySQL dans les applications à forte intensité de ressources, la base de données MySQL joue un rôle crucial et est responsable de la gestion des transactions massives. Cependant, à mesure que l'échelle de l'application se développe, les goulots d'étranglement des performances de la base de données deviennent souvent une contrainte. Cet article explorera une série de stratégies efficaces d'optimisation des performances MySQL pour garantir que votre application reste efficace et réactive dans des charges élevées. Nous combinerons des cas réels pour expliquer les technologies clés approfondies telles que l'indexation, l'optimisation des requêtes, la conception de la base de données et la mise en cache. 1. La conception de l'architecture de la base de données et l'architecture optimisée de la base de données sont la pierre angulaire de l'optimisation des performances MySQL. Voici quelques principes de base: sélectionner le bon type de données et sélectionner le plus petit type de données qui répond aux besoins peut non seulement économiser un espace de stockage, mais également améliorer la vitesse de traitement des données.
 Comment utiliser Aws Glue Crawler avec Amazon Athena
Apr 09, 2025 pm 03:09 PM
En tant que professionnel des données, vous devez traiter de grandes quantités de données provenant de diverses sources. Cela peut poser des défis à la gestion et à l'analyse des données. Heureusement, deux services AWS peuvent aider: AWS Glue et Amazon Athena.


