
Entrez la commande pour changer la source de téléchargement d'Ubuntu
sudo nano /etc/apt/sources.list
deb http://mirrors.aliyun.com/ubuntu/ bionic main restricted
deb http://mirrors.aliyun.com/ubuntu/ bionic-updates main restricted
deb http://mirrors.aliyun.com/ubuntu/ bionic universe
deb http://mirrors.aliyun.com/ubuntu/ bionic-updates universe
deb http://mirrors.aliyun.com/ubuntu/ bionic multiverse
deb http://mirrors.aliyun.com/ubuntu/ bionic-updates multiverse
deb http://mirrors.aliyun.com/ubuntu/ bionic-backports main restricted universe multiverse
deb http://mirrors.aliyun.com/ubuntu/ bionic-security main restricted
deb http://mirrors.aliyun.com/ubuntu/ bionic-security universe
deb [arch=amd64] https://mirrors.aliyun.com/docker-ce/linux/ubuntu bionic stable
分别输入以下命令,更新源
sudo apt update
sudo apt upgrade
# 安装python3
sudo apt install python3
# 查看python安装路径:
which python
# 查看python版本:建议使用3.6之后的版本,因为其他的笔者没试过,笔者用的是3.6.9版本
python
# 安装 openssh-server
sudo apt install openssh-server
#开启:
sudo service ssh start

# 安装net-tools
sudo apt install net-tools
# 查看虚拟机ip:
ifconfig
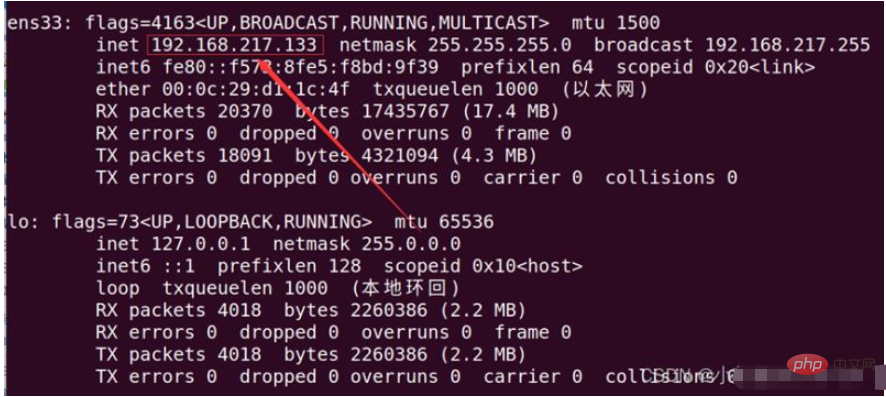 Installation de l'environnement d'exécution de Django
#安装django运行环境:
sudo apt install virtualenv
# 创建环境
virtualenv --python=/usr/bin/python3 myblog
# 进入环境:
cd myblog
# 激活环境:
source bin/activate
pip3 install DjangoCréer un projet : django-admin.py startproject blogpip3 install Django
创建项目:django-admin.py startproject blog
激活并且创建好项目之后就基本和下图所示差不多了

# 进入到blog中安装 uwsgi:
pip3 install uwsgi
安装好之后我们再写一个测试文件,用来测试我们项目的运行方式,实际项目也是一样的。这里我用的是nano编辑写入方式,你也可以使用vim,方式不限,能创建写入即可写入命令为:
sudo nano test.py
需要写入的文件内容为:
def application(env,start_response):
        start_response('200 ok',[('Content-Type','text/html')])
return [b"Hello World"]测试命令为:uwsgi --http :8000 --wsgi-file test.py
回车之后,我们在浏览器输入ip加port端口号,我的是192.168.217.133:8000。在浏览器打开发现报了以下错误。
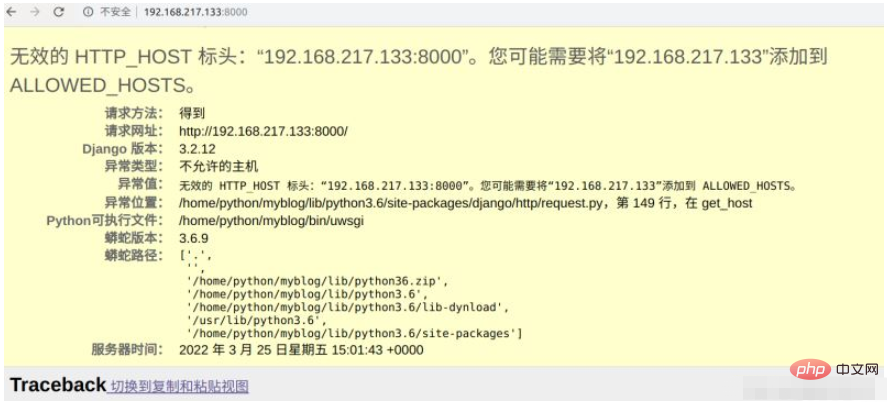
对于这个错误,我们只需要打开项目文件的settings.py文件,在ALLOWED_HOSTS里面添加自己虚拟机的地址,就ok了,然后我们再测试运行,发现正常,网页输出hello world。这里说明uwsgi能够正常运行测试文件。

但是我们并不是为了运行test.py文件,我们是为了运行自己的django项目,这里我们需要对上一个命令进行修改,改为:uwsgi --http :8000 --module blog.wsgi
为了避免在输入ip时,不输入端口号也能正常使用,我们引入轻量级的nginx,这里我们用命令行安装并且启动nginx
安装:sudo apt install nginx
启动:sudo service nginx start
输入命令:sudo nano /etc/nginx/sites-available/blog_nginx.conf
新建一个conf文件,并且写入以下内容,将里面涉及路径的地方全部改为你自己项目的路径:
upstream django {
    # server unix:///home/python/myblog/blog/blog.sock; # 这里的路径改为你自己项目路径
    server 127.0.0.1:8001; # for a web port socket (we'll use this first)
}
server {
    listen      8000;
    server_name 192.168.217.133; # 将这里的ip地址改为你自己的虚拟机或者服务器地址
    charset     utf-8;
    client_max_body_size 75M;   # adjust to taste
    location /media  {
        alias /home/python/myblog/blog/media;  # your Django project's media files - amend as required
    }
    location /static {
        alias /home/python/myblog/blog/static; # your Django project's static files - amend as required
    }
    location / {
        uwsgi_pass  django;
        include     /home/python/myblog/blog/uwsgi_params; # the uwsgi_params file you installed
    }
}创建好文件之后,我们需要对该文件创建一个软链接,需要输入以下命令:
sudo ln -s /etc/nginx/sites-available/blog_nginx.conf /etc/nginx/sites-enabled
完成之后我们可以通过ll /etc/nginx/sites-enabled/这个命令来查看一下,是否设置正确,参考下图

这里我们需要创建一个uwsgi_params文件,创建命令为:sudo nano uwsgi_params
并且将下面内容一字不差的写入到uwsgi_params文件中保存并退出
uwsgi_param  QUERY_STRING       $query_string;
uwsgi_param  REQUEST_METHOD     $request_method;
uwsgi_param  CONTENT_TYPE       $content_type;
uwsgi_param  CONTENT_LENGTH     $content_length;
uwsgi_param  REQUEST_URI        $request_uri;
uwsgi_param  PATH_INFO          $document_uri;
uwsgi_param  DOCUMENT_ROOT      $document_root;
uwsgi_param  SERVER_PROTOCOL    $server_protocol;
uwsgi_param  REQUEST_SCHEME     $scheme;
uwsgi_param  HTTPS              $https if_not_empty;
uwsgi_param  REMOTE_ADDR        $remote_addr;
uwsgi_param  REMOTE_PORT        $remote_port;
uwsgi_param  SERVER_PORT        $server_port;
uwsgi_param  SERVER_NAME        $server_name;
文件保存之后重启一下nginx即可
打开django项目的settings.py文件,添加静态文件的路径,如下图:
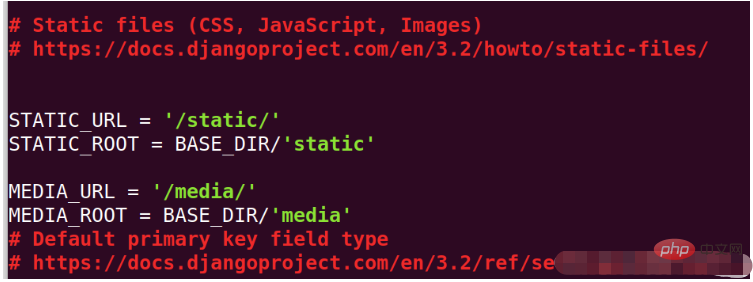
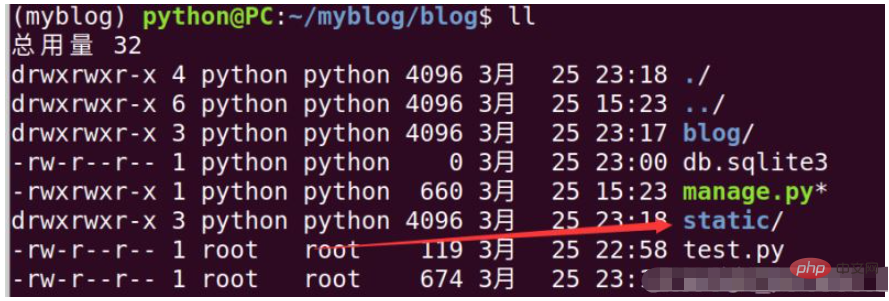
然后保存退出并复制映射静态文件,命令为:python manage.py collectstatic
创建media文件夹:mkdir mediaActiver et créez Une fois le projet terminé, il ressemblera essentiellement à l'image ci-dessous
# mysite_uwsgi.ini file
[uwsgi]
# Django-related settings
# the base directory (full path)
chdir = /home/python/myblog/blog
# Django's wsgi file
module = blog.wsgi
# the virtualenv (full path)
home = /home/python/myblog
# process-related settings
# master
master = true
# maximum number of worker processes
processes = 10
# the socket (use the full path to be safe
socket = /home/python/myblog/blog/mysite.sock
# ... with appropriate permissions - may be needed
chmod-socket = 664
# clear environment on exit
vacuum = true
# daemonize uwsgi and write messages into given log
daemonize = /home/python/myblog/blog/uwsgi.log
Étape 3 : Écrivez le fichier de test et testez
sudo nano test.py#🎜. 🎜## 🎜🎜#Le contenu du fichier qui doit être écrit est :
rrreee2 Test exécuté
La commande de test est : uwsgi --. http :8000 --wsgi-file test.py
Après avoir appuyé sur Entrée, nous entrons l'adresse IP et le numéro de port dans le navigateur. Le mien est 192.168.217.133:8000. Lorsque je l'ai ouvert dans le navigateur, j'ai trouvé l'erreur suivante.
#🎜🎜# #🎜🎜##🎜🎜# Pour cette erreur, il suffit d'ouvrir le fichier settings.py du fichier projet, d'ajouter l'adresse de notre machine virtuelle dans ALLOWED_HOSTS, et tout ira bien. Ensuite, nous testons l'opération et constate que c'est normal. La page Web affiche Hello World. Cela montre que uwsgi peut exécuter le fichier de test normalement. #🎜🎜##🎜🎜#
 #🎜🎜##🎜🎜#Mais nous n'exécutons pas le fichier test.py, nous exécutons notre propre projet Django. Ici, nous devons modifier la commande précédente en : uwsgi --http :8000 --module blog.wsgi#🎜🎜##🎜🎜#Étape 4 : Présentez nginx#🎜🎜##🎜🎜#1. Installez et démarrez nginx#🎜🎜##🎜🎜#Afin d'éviter de ne pas saisir l'adresse IP lors de la saisie. Le numéro de port peut également être utilisé normalement. Nous introduisons nginx léger Ici, nous utilisons la ligne de commande pour installer et démarrer nginx#🎜🎜##🎜🎜#Installation :
 sudo apt install nginx#🎜🎜##. 🎜🎜#Démarrer : sudo service nginx start#🎜🎜##🎜🎜#2 Écrivez le fichier de configuration de conf#🎜🎜##🎜🎜#Entrez la commande : sudo nano /etc. / nginx/sites-available/blog_nginx.conf#🎜🎜##🎜🎜#Créez un fichier de configuration et écrivez le contenu suivant : remplacez tous les chemins impliqués par le chemin de votre propre projet : #🎜🎜. #rrreee#🎜🎜#Après avoir créé le fichier, nous devons créer un lien symbolique vers le fichier et entrer la commande suivante : #🎜🎜##🎜🎜#sudo ln -s /etc/nginx/sites-available / blog_nginx.conf /etc/nginx/sites-enabled#🎜🎜##🎜🎜#Une fois terminé, nous pouvons utiliser la commande ll /etc/nginx/sites-enabled/ pour vérifier si les paramètres sont corrects, reportez-vous à l'image suivante#🎜🎜##🎜🎜#
 #🎜🎜##🎜🎜#3. Créez le fichier uwsgi_params et la configuration du dossier statique #🎜🎜#
sudo nano uwsgi_params#🎜🎜##🎜🎜# et écrivez le contenu suivant textuellement dans le fichier uwsgi_params, enregistrez et quittez #🎜🎜#rrreee#🎜🎜# Enregistrez le fichier Puis redémarrez nginx#🎜🎜# # 🎜🎜##🎜🎜#Ensuite, enregistrez, quittez et copiez le fichier statique mappé. La commande est :
 python manage.py collectstatic#🎜🎜##🎜🎜#Créer le média dossier : mkdir media< /code>#🎜🎜##🎜🎜#Enfin, entrez la commande pour vérifier si le dossier statique est correctement configuré : #🎜🎜##🎜🎜##🎜🎜##🎜🎜## 🎜🎜#Étape 5 : Créer la communication uwsgi et nginx Pipe#🎜🎜##🎜🎜#Changez la communication http en communication socket dans uwsgi, modifiez la commande en : uwsgi --socket :8001 --wsgi-file test.py#🎜 🎜##🎜🎜#À ce moment, entrez le blocage, entrez l'adresse IP : 192.168.217.133:8000 dans le navigateur et constatez qu'il peut être ouvert, affichant Hello World avec succès. Cela signifie que la communication entre uesgi et nginx est normale #🎜🎜##🎜🎜#Entrez le fichier de configuration nginx : sudo nano /etc/nginx/sites-available/blog_nginx.conf#🎜🎜##🎜🎜#Modifiez ce qui suit deux lignes dans le fichier Commentez la deuxième ligne et activez la première ligne, mais le chemin doit être correct et utiliser la communication pipeline à la place#🎜🎜#<blockquote><p> server unix:///home/python/myblog/blog.sock; # for a file socket</p><p> # server 127.0.0.1:8001; # for a web port socket (we'll use this first)</p></blockquote><p>保存退出,重启nginx:sudo service nginx restart</p><p>将uwsgi参数套节字改为blog.sock</p><blockquote><p>uwsgi --socket blog.sock --wsgi-file test.py</p></blockquote><p>回到浏览器输入:192.168.217.133:8000得到502:如图</p><p><img src="/static/imghw/default1.png" data-src="https://img.php.cn/upload/article/000/887/227/168390060840029.png" class="lazy" alt="Comment déployer votre propre projet Django avec nginx+uwsgi" /></p><p> 我们查看一下错误日志,发现是因为权限问题,解决办法,在命令行后面加入--chmod=666</p><blockquote><p>uwsgi --socket blog.sock --wsgi-file test.py --chmod=666</p></blockquote><p>运行之后发现没有问题,并且正常显示Hello World界面。</p><p>现在我们运行django项目,命令为:<code>uwsgi --socket blog.sock --module blog.wsgi --chmod=666刷新192.168.217.133:8000得到django的基础页面。
目前可以说明nginx和uwsgi管道通信正常。
创建一个uwsgi的配置文件:sudo nano blog_uwsgi.ini
写入一下内容,将其中的路径改为自己的项目路径
# mysite_uwsgi.ini file
[uwsgi]
# Django-related settings
# the base directory (full path)
chdir = /home/python/myblog/blog
# Django's wsgi file
module = blog.wsgi
# the virtualenv (full path)
home = /home/python/myblog
# process-related settings
# master
master = true
# maximum number of worker processes
processes = 10
# the socket (use the full path to be safe
socket = /home/python/myblog/blog/mysite.sock
# ... with appropriate permissions - may be needed
chmod-socket = 664
# clear environment on exit
vacuum = true
# daemonize uwsgi and write messages into given log
daemonize = /home/python/myblog/blog/uwsgi.log
保存退出并且启动配置文件,命令为:uwsgi --ini blog_uwsgi.ini
我们可以查看一下后台进程,是否正常启动,输入:ps aux
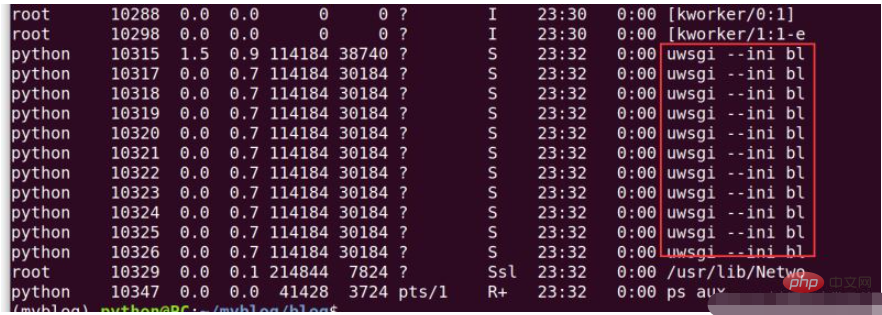
最后回到nginx配置文件中,将监听端口改为80,重启nginx即可。在浏览器中输192.168.217.133得到django页面结果,表示项目运行正常。
Ce qui précède est le contenu détaillé de. pour plus d'informations, suivez d'autres articles connexes sur le site Web de PHP en chinois!
 redémarrage de nginx
 Explication détaillée de la configuration de nginx
 Explication détaillée de la configuration de nginx
 Quelles sont les différences entre Tomcat et Nginx
 Comment utiliser la fonction de longueur dans Matlab
 Plateforme de trading en masse
 L'ordinateur indique que msvcr110.dll est manquant et comment le résoudre
 méthode d'initialisation du tableau c