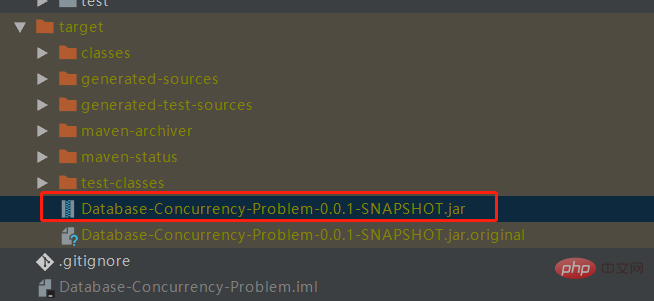
1、创建一个springbooot项目并且打成jar包

2、在linux中创建一个文件夹,来做docker测试
[root@izwz90lvzs7171wgdhul8az ~]# mkdir /root/docker_test
3、将jar包上传到linux中
创建存放jar包的文件夹
[root@izwz90lvzs7171wgdhul8az docker_test]# mkdir /root/docker_test/jar
然后利用xshell上传jar包到上面的文件夹中
4、编写dockerfile文件
# 基于java镜像创建新镜像
from java:8
# 作者
maintainer howinfun
# 将jar包添加到容器中并更名为app.jar
add jar/app.jar /root/docker_test/app.jar
# 运行jar包
entrypoint ["nohup","java","-jar","/root/docker_test/app.jar","&"]
注意:add 、 copy 指令用法一样,唯一不同的是 add 支持将归档文件(tar, gzip, bzip2, etc)做提取和解压操作。还有需要注意的是,copy 指令需要复制的目录一定要放在 dockerfile 文件的同级目录下。
5、制作镜像
[root@izwz90lvzs7171wgdhul8az docker_test]# docker build -t sbdemo .
命令参数:
-t:指定新镜像名
.:表示dockfile在当前路径
如果我们的 dockerfile 文件路径不在这个目录下,或者有另外的文件名,我们可以通过 -f 选项单独给出 dockerfile 文件的路径
[root@izwz90lvzs7171wgdhul8az docker_test]# docker build -t sbdemo -f /root/docker_test/dockerfile /root/docker_test/
命令参数:
-f:第一个参数是dockerfile的路径 第二个参数是dockerfile所在文件夹制作完成后通过docker images命令查看我们制作的镜像:
[root@izwz90lvzs7171wgdhul8az docker_test]# docker images | grep sbdemo
sbdemo       latest       7efac46ef997    4 hours ago     686mb
6、启动容器
[root@izwz90lvzs7171wgdhul8az docker_test]# docker run -d -p 8888:8888 --name mysbdemo sbdemo:latest
命令参数:
-d:后台运行
-p:公开指定端口号
--name:给容器命名
启动后可通过docker ps查看正在运行的容器:
[root@izwz90lvzs7171wgdhul8az docker_test]# docker ps
container id    image        command         created       status       ports          names
5096c8c7b36f    sbdemo       "nohup java -jar /ro??  4 seconds ago    up 2 seconds    0.0.0.0:8888->8888/tcp  mysbdemo
7、查看容器启动日志
我们可以通过 docker logs 查看指定容器的日志:
[root@izwz90lvzs7171wgdhul8az docker_test]# docker logs mysbdemo

 .  ____     _      __ _ _
 /\\ / ___'_ __ _ _(_)_ __ __ _ \ \ \ \
( ( )\___ | '_ | '_| | '_ \/ _` | \ \ \ \
 \\/ ___)| |_)| | | | | || (_| | ) ) ) )
 ' |____| .__|_| |_|_| |_\__, | / / / /
 =========|_|==============|___/=/_/_/_/
 :: spring boot ::    (v2.1.6.release)

2019-10-11 02:10:46.264 info 1 --- [      main] com.hyf.databaseapplication       : starting databaseapplication v0.0.1-snapshot on 6d85ac5d8751 with pid 1 (/root/docker_test/app.jar started by root in /)
2019-10-11 02:10:46.267 debug 1 --- [      main] com.hyf.databaseapplication       : running with spring boot v2.1.6.release, spring v5.1.8.release
2019-10-11 02:10:46.268 info 1 --- [      main] com.hyf.databaseapplication       : no active profile set, falling back to default profiles: default
2019-10-11 02:10:49.139 warn 1 --- [      main] o.m.s.mapper.classpathmapperscanner   : skipping mapperfactorybean with name 'bookmapper' and 'com.hyf.mapper.bookmapper' mapperinterface. bean already defined with the same name!
2019-10-11 02:10:49.139 warn 1 --- [      main] o.m.s.mapper.classpathmapperscanner   : no mybatis mapper was found in '[com.hyf]' package. please check your configuration.
2019-10-11 02:10:49.246 info 1 --- [      main] .s.d.r.c.repositoryconfigurationdelegate : multiple spring data modules found, entering strict repository configuration mode!
2019-10-11 02:10:49.257 info 1 --- [      main] .s.d.r.c.repositoryconfigurationdelegate : bootstrapping spring data repositories in default mode.
2019-10-11 02:10:49.328 info 1 --- [      main] .s.d.r.c.repositoryconfigurationdelegate : finished spring data repository scanning in 39ms. found 0 repository interfaces.
2019-10-11 02:10:50.345 info 1 --- [      main] trationdelegate$beanpostprocessorchecker : bean 'org.springframework.transaction.annotation.proxytransactionmanagementconfiguration' of type [org.springframework.transaction.annotation.proxytransactionmanagementconfiguration$$enhancerbyspringcglib$$2c6b335] is not eligible for getting processed by all beanpostprocessors (for example: not eligible for auto-proxying)
2019-10-11 02:10:51.255 info 1 --- [      main] o.s.b.w.embedded.tomcat.tomcatwebserver : tomcat initialized with port(s): 8888 (http)
2019-10-11 02:10:51.359 info 1 --- [      main] o.apache.catalina.core.standardservice  : starting service [tomcat]
2019-10-11 02:10:51.359 info 1 --- [      main] org.apache.catalina.core.standardengine : starting servlet engine: [apache tomcat/9.0.21]
2019-10-11 02:10:51.778 info 1 --- [      main] o.a.c.c.c.[tomcat].[localhost].[/]    : initializing spring embedded webapplicationcontext
2019-10-11 02:10:51.779 info 1 --- [      main] o.s.web.context.contextloader      : root webapplicationcontext: initialization completed in 5104 ms
2019-10-11 02:10:54.164 info 1 --- [      main] o.s.s.concurrent.threadpooltaskexecutor : initializing executorservice 'applicationtaskexecutor'
2019-10-11 02:10:56.081 info 1 --- [      main] o.s.b.w.embedded.tomcat.tomcatwebserver : tomcat started on port(s): 8888 (http) with context path ''
2019-10-11 02:10:56.090 info 1 --- [      main] com.hyf.databaseapplication       : started databaseapplication in 11.49 seconds (jvm running for 12.624)
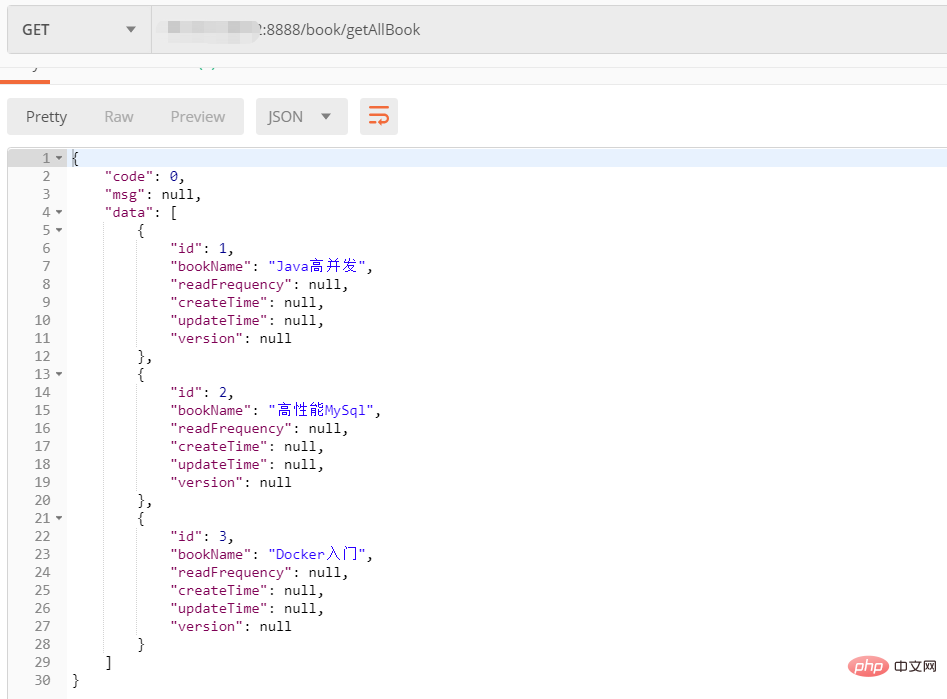
8、访问接口
容器启动后,我们尝试使用postman或者其他http工具去访问部署在容器中的应用接口。

Ce qui précède est le contenu détaillé de. pour plus d'informations, suivez d'autres articles connexes sur le site Web de PHP en chinois!
 Étapes de création du projet SpringBoot
 Quelle est la différence entre j2ee et springboot
 Quel fichier est mydrivers
 Quels sont les paramètres du chapiteau ?
 Configurer l'environnement d'exécution Java
 Quelles sont les conditions pour ouvrir un compte en monnaie numérique ? C'est gratuit?
 Quel logiciel est Unity ?
 obtenirelementbyid
 Dans quel langage le vscode peut-il être écrit ?