La programmation multithread peut être effectuée en Java, et une classe Thread est fournie dans la bibliothèque standard Java pour représenter les opérations de thread. La classe Thread peut être considérée comme un ensemble d'API fournies par la bibliothèque standard Java pour résoudre la programmation multithread
L'instance Thread créée correspond un à un aux threads du système d'exploitation. Le système d'exploitation fournit une API sur les threads (style langage C) et Java l'encapsule dans la classe Thread.
class MyThread extends Thread{
    @Override
    public void run() {
        //此时只是定义处理一个线程类,在系统中总是还没有创建出 新的线程。
        System.out.println("hello thread");
    }
}
public class TestDemo11 {
    public static void main(String[] args) {
        //创建线程
        Thread t = new MyThread();
        //启动线程,在系统中创建出了新的线程
        t.start();
    }
}
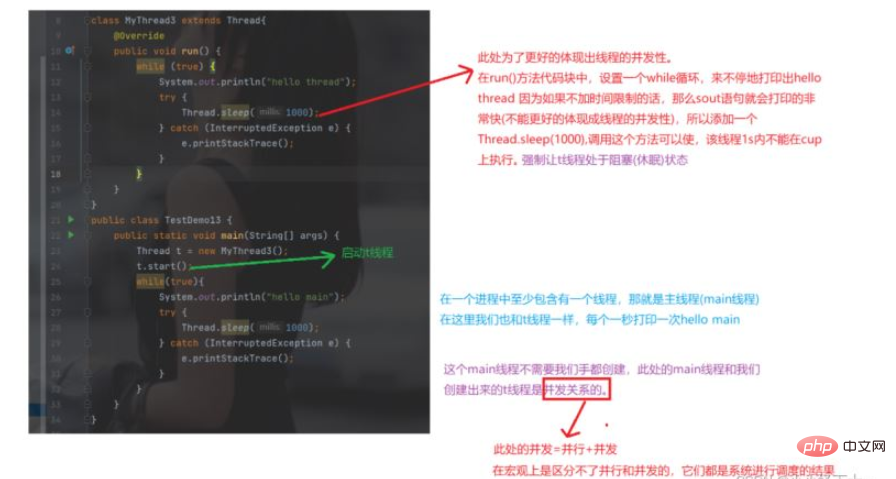
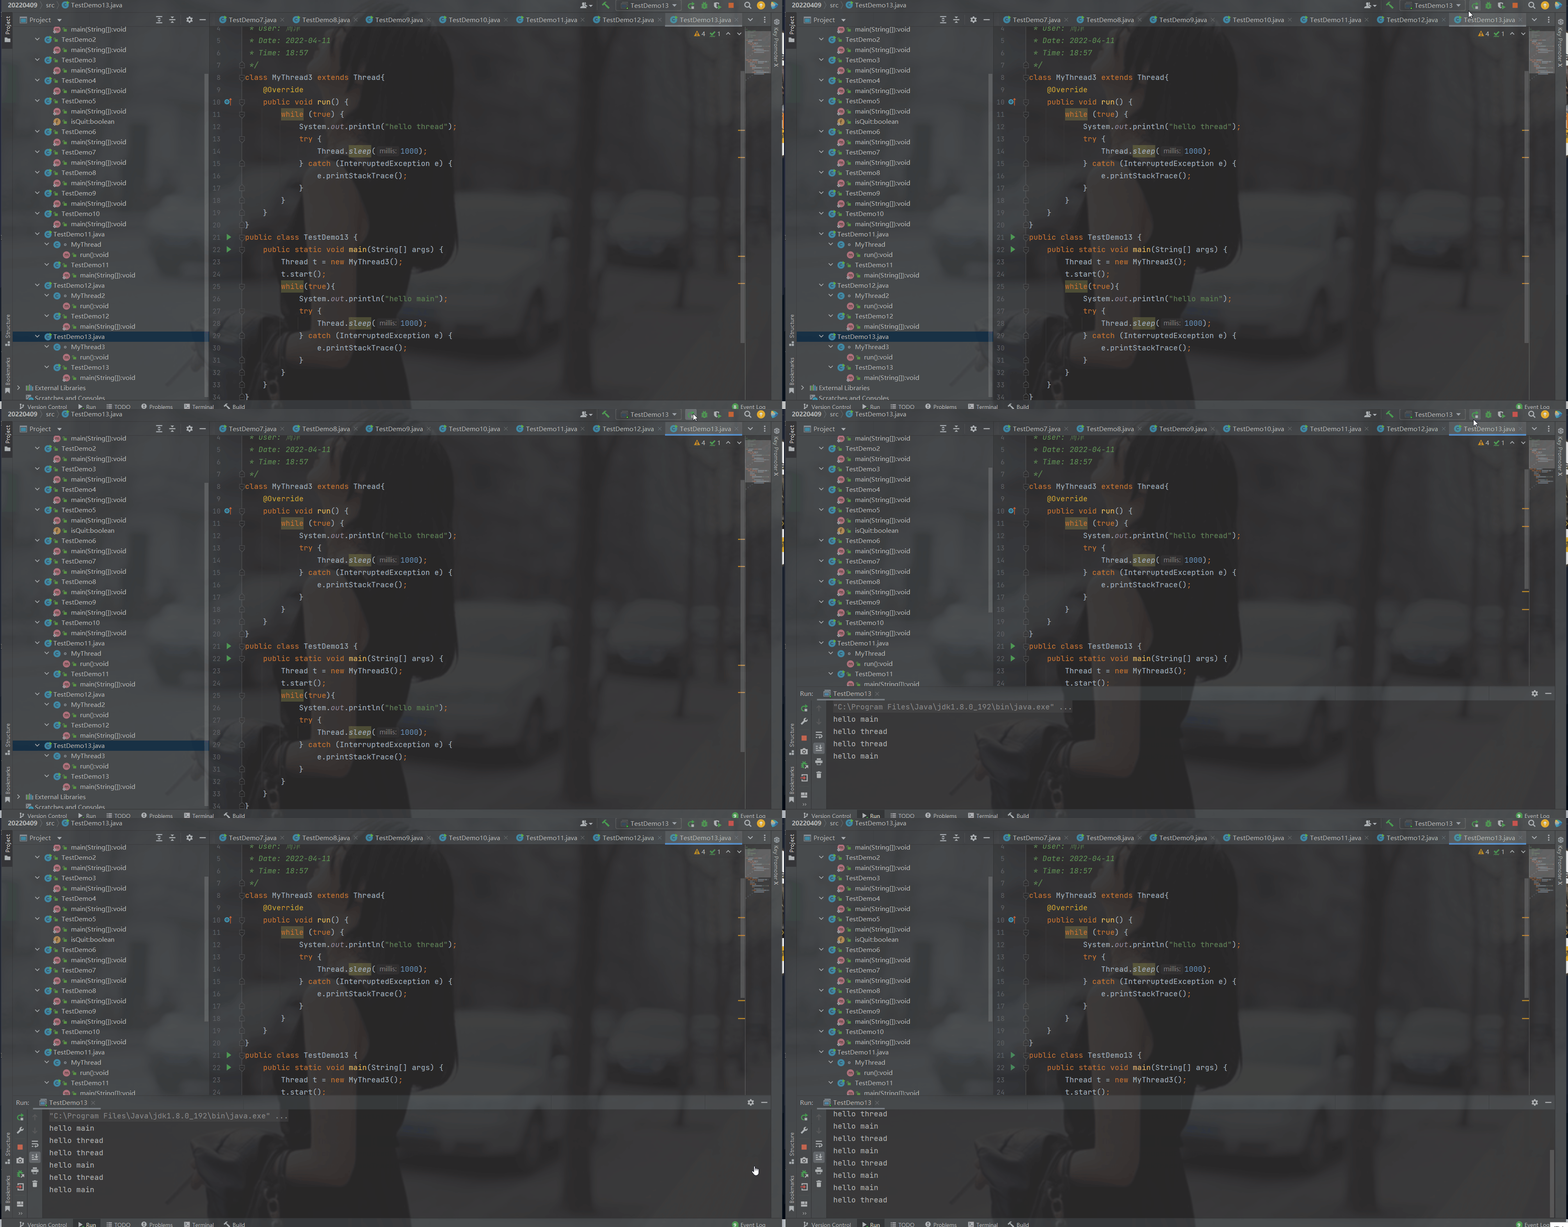
Thread Il y a des exécutions simultanées
class MyThread3 extends Thread{
    @Override
    public void run() { //定义一个线程类
        while (true) {
            System.out.println("hello thread");
            try {
                Thread.sleep(1000);
            } catch (InterruptedException e) {
                e.printStackTrace();
            }
        }
    }
}
public class TestDemo13 {
    public static void main(String[] args) {
        Thread t = new MyThread3();
        t.start();//启动t线程
        while(true){
            System.out.println("hello main");
            try {
                Thread.sleep(1000);
            } catch (InterruptedException e) {
                e.printStackTrace();
            }
        }
    }
}

Nous pouvons voir#🎜🎜 # Entrez le état de blocage, alors quel thread doit être réveillé la seconde suivante ? 1s当执行一个线程中的代码之后
Ici, nous allons expliquer la méthode Thread.sleep(), sleep( ) Cette méthode est pas si précis au niveau ms. Après avoir appelé cette méthode, le thread est forcé d'être dans un blocage moyen (état de veille), mais lorsque le temps de blocage est terminé, le thread ne continuera pas à s'exécuter immédiatement sur la tasse If Thread.sleep(1000), après 1 s. passe, le temps de blocage se termine, mais à 1001 ms, le thread peut ne pas s'exécuter immédiatement. Peut-être que la coupe du système d'exploitation est occupée par d'autres threads. Peut-être que le thread est exécuté à 1006 ms.Méthode 2 : Implémenter la méthode run() dans l'interface Runnable
//Runnable其实就是描述一个任务
//创建一个类,实现Runnable接口,重写Runnable类中的run方法,在run()方法中,描述的是该线程要指向的哪些任务。
class MyThread2 implements Runnable{
    @Override
    public void run() {
        System.out.println("hello thread");
    }
}
public class TestDemo12 {
    public static void main(String[] args) {
        //创建线程,把创建好的Runnable实例传给Thread实例
        Thread t = new Thread(new MyThread2());
        t.start();
    }
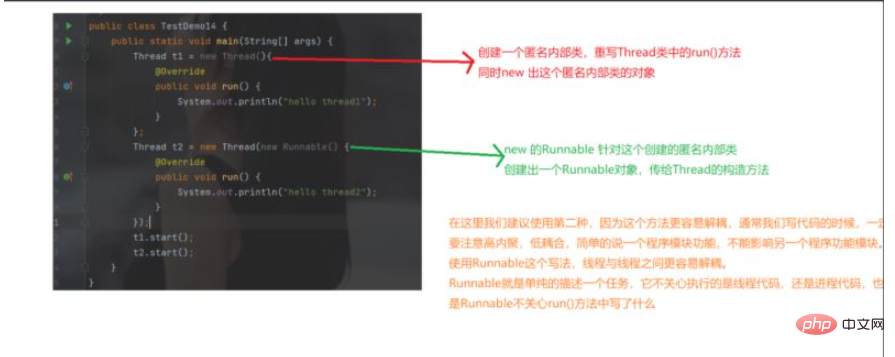
}public class TestDemo14 {
public static void main(String[] args) {
Thread t1 = new MyThread(){
@Override
public void run() {
System.out.println("hello thread1");
}
};
Thread t2 = new Thread(new Runnable() {
@Override
public void run() {
System.out.println("hello thread2");
}
});
t1.start();
t2.start();
}
}
 Méthode 4 : Utiliser l'expression lambmd
public class TestDemo15 {
    public static void main(String[] args) {
        //其实就是使用lambad表达式代替Runnable
        Thread t1 = new Thread(()->{
            //()表示无参的run()方法
            System.out.println("hello thread1");
        });

    }
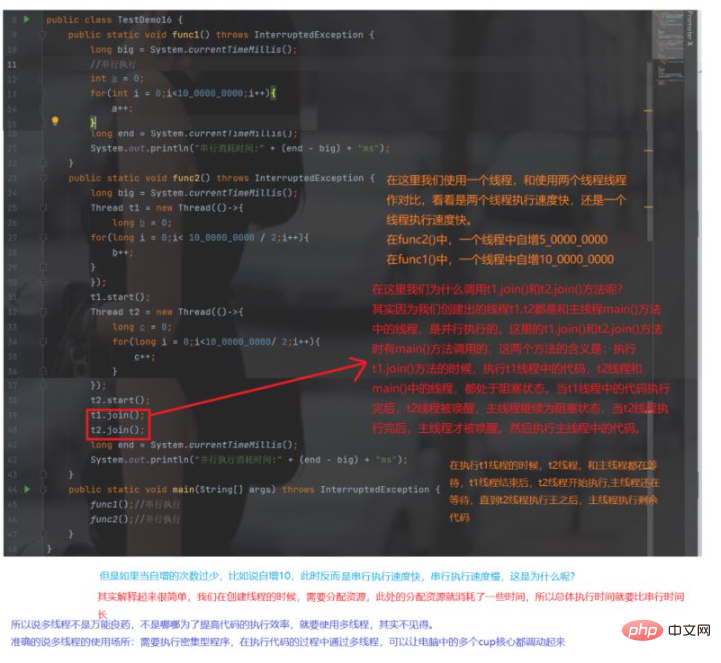
}public class TestDemo16 {
public static void func1() throws InterruptedException {
long big = System.currentTimeMillis();
//串行执行
Thread t = new Thread(()->{
long a = 0;
for(long i = 0;i<10_0000_0000;i++){
a++;
}
});
t.start();
t.join();
long end = System.currentTimeMillis();
System.out.println("串行消耗时间:" + (end - big) + "ms");
}
public static void func2() throws InterruptedException {
long big = System.currentTimeMillis();
Thread t1 = new Thread(()->{
long b = 0;
for(long i = 0;i< 10_0000_0000 / 2;i++){
b++;
}
});
t1.start();
Thread t2 = new Thread(()->{
long c = 0;
for(long i = 0;i<10_0000_0000/ 2;i++){
c++;
}
});
t2.start();
t1.join();
t2.join();
long end = System.currentTimeMillis();
System.out.println("并行执行消耗时间:" + (end - big) + "ms");
}
public static void main(String[] args) throws InterruptedException {
func1();//串行执行
func2();//并行执行
}
} On voit clairement que le temps série est beaucoup plus long que le temps parallèle, et le temps série est presque deux fois le temps parallèle. 
Autres propriétés et méthodes de la classe Thread
| ID | |
|---|---|
| Name | getName() |
| Status | # 🎜 🎜 # getState () # 🎜🎜 ## 🎜🎜 ## 🎜🎜 ## 🎜🎜 # Priority # 🎜🎜 ## 🎜🎜 # getPriority () # 🎜🎜 ## 🎜🎜 ## 🎜🎜 ## 🎜🎜 # # Si le fil d'arrière-plan |
| Si le fil est vivant | |
| Le fil de discussion est-il interrompu ? | isinterrupted() |
给一个线程起名字
public class TestDemo17 {
    public static void main(String[] args) {
        //给线程器名字
        Thread t1 = new Thread(()->{
            while(true) {
                System.out.println("hello thread1");
                try {
                    Thread.sleep(1000);
                } catch (InterruptedException e) {
                    e.printStackTrace();
                }
            }
        },"thread1");

        Thread t2 = new Thread(()->{
            while(true) {
                System.out.println("hello thread2");
                try {
                    Thread.sleep(1000);
                } catch (InterruptedException e) {
                    e.printStackTrace();
                }
            }
        },"thread2");
        t1.start();
        t2.start();
    }
}
Copier après la connexion 那么怎样才能看到,我们定义好的线程名字呢? 注意:当我们要查看线程名字的时候,程序必须要正在执行,否则我们查找不到对应的线程名字。
判断一个线程是否存活简单的说就是操作系统中我们创建出来的线程是否还存在 Thread t 的生命周期和操作系统中对应的线程的生命周期并不是完全一致的。 我们在定义一个线程类后,在调用t.start()方法之前,操作系统中是没有我们创建出来的线程的。在线程类中的run()方法执行完之后,我们在操作系统中创建出来的线程就被销毁了!但是线程t对象还存在。
public class TestDemo18 {
    public static void main(String[] args) {
        Thread t = new Thread(()->{
            System.out.println("hello thread");
        });
        t.start();
        System.out.println(t.isDaemon());
    }
}
//因为我们创建的是一个前台线程,所以返回false
Copier après la connexion Thread的其他常见属性创建线程创建线程:定义出一个线程类,然后启动线程t.start(),其中start()方法决定系统是不是真的创建出线程。
线程的中断中断线程简单的可以理解成为就是让该线程中的run()方法执行结束。还有一个特殊的就是main线程,如果想要中断main线程,那么就需要把main线程执行完。 中断线程方法一:设置一个标志位 public class TestDemo21 {
public static void main(String[] args) {
Thread t = new Thread(()->{
while(!Thread.currentThread().isInterrupted()) {
System.out.println("hello thread");
try {
Thread.sleep(1000);
} catch (InterruptedException e) {
e.printStackTrace();
}
}
});
//启动t线程
t.start();
//在main线程中中断t线程
//5s之后中断t线程
try {
Thread.sleep(5000);
} catch (InterruptedException e) {
e.printStackTrace();
}
t.interrupt();
}
}Copier après la connexion Copier après la connexion 运行结果:当t线程中的sout语句被执行5次之后,线程停止。 上面的这种写法不够严谨,只适用于该场合,如果化作是别的代码场合的话,有可能不会终止线程。 这里用一种较好的方法,使用Thread类中自带的检查线程是否断开。 Thread.interrputed() 这是一个静态方法 Thread.currentThread().isinterrupted() 其中Thread.cerrentThread()可以获得线程的引用。 t.interrupted()用于中断线程 public class TestDemo21 {
public static void main(String[] args) {
Thread t = new Thread(()->{
while(!Thread.currentThread().isInterrupted()) {
System.out.println("hello thread");
try {
Thread.sleep(1000);
} catch (InterruptedException e) {
e.printStackTrace();
}
}
});
//启动t线程
t.start();
//在main线程中中断t线程
//5s之后中断t线程
try {
Thread.sleep(5000);
} catch (InterruptedException e) {
e.printStackTrace();
}
t.interrupt();
}
}Copier après la connexion Copier après la connexion
线程的等待
public class TestDemo22 {<!--{C}%3C!%2D%2D%20%2D%2D%3E--> public static void main(String[] args) throws InterruptedException {<!--{C}%3C!%2D%2D%20%2D%2D%3E--> Thread t = new Thread(()->{<!--{C}%3C!%2D%2D%20%2D%2D%3E--> for(int i = 0;i<5;i++){<!--{C}%3C!%2D%2D%20%2D%2D%3E--> System.out.println("hello thread"); try {<!--{C}%3C!%2D%2D%20%2D%2D%3E--> Thread.sleep(1000); } catch (InterruptedException e) {<!--{C}%3C!%2D%2D%20%2D%2D%3E--> e.printStackTrace(); } } }); t.start(); t.join();//main线程调用t.join()方法,main线程就处于阻塞状态,当t线程执行完后,唤醒main线程执行后序代码 System.out.println("hello main"); }}Copier après la connexion
获取线程的引用使用方法Thread.currentTread()就可以该线程的实例。 public class TestDemo23 {
public static void main(String[] args) {
Thread t = new Thread(){
@Override
public void run() {
//获取当前线程的引用
//System.out.println(Thread.currentThread().getName());
//因为当前使用的匿名内部类是继承自Thread类,Thread就是该匿名内部类的父类,所以可以通过this得到当前Thread的实例
System.out.println(this.getName());
}
};
t.start();
}
}Copier après la connexion
线程的休眠
Ce qui précède est le contenu détaillé de. pour plus d'informations, suivez d'autres articles connexes sur le site Web de PHP en chinois!
Article précédent:Comment configurer le composant Actuator dans SpringBoot2
Article suivant:Comment implémenter l'algorithme de Floyd en Java
Déclaration de ce site Web
Le contenu de cet article est volontairement contribué par les internautes et les droits d'auteur appartiennent à l'auteur original. Ce site n'assume aucune responsabilité légale correspondante. Si vous trouvez un contenu suspecté de plagiat ou de contrefaçon, veuillez contacter admin@php.cn
Derniers articles par auteur
Derniers numéros
Rubriques connexes
Plus>
|