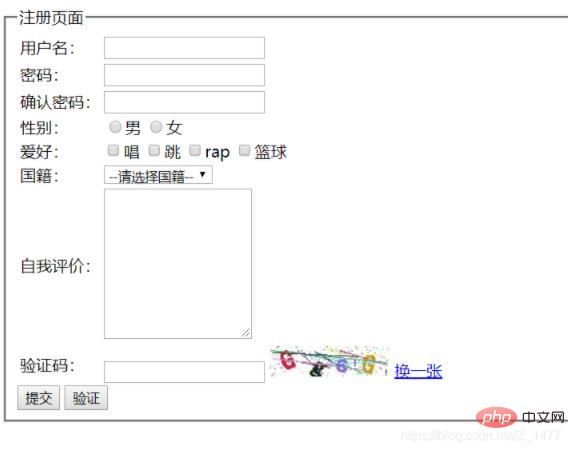
La page de connexion et d'enregistrement implémentée en Java réalise l'interaction des données du client (navigateur) vers le serveur (Tomcat) puis vers le backend (programme de servlet). La vérification du code de vérification est ajoutée à la page d'inscription.
Code HTML enregistré
<body>
<fieldset id="">
  <legend>注册页面</legend>
  <form action="/day02/register2" method="post" id="form" ">
    <table>
      <tr>
        <td>用户名:</td>
        <td><input type="text" name="userName" /><span id="span1"></span></td>
      </tr>
      <tr>
        <td>
          密码:
        </td>
        <td>
          <input type="password" name="password" />
        </td>
      </tr>
      <tr>
        <td>
          确认密码:
        </td>
        <td>
          <input type="password" name="repassword" />
          <span id="span2"></span>
        </td>

      </tr>
      <tr id="tr4">
        <td>
          性别:
        </td>
        <td>
          <input type="radio" name="sex" value="男" />男
          <input type="radio" name="sex" value="女" />女
          <span id="span3"></span>
        </td>
      </tr>
      <tr>
        <td>爱好:</td>
        <td>
          <input type="checkbox" name="hobby" value="唱" />唱
          <input type="checkbox" name="hobby" value="跳" />跳
          <input type="checkbox" name="hobby" value="rap" />rap
          <input type="checkbox" name="hobby" value="篮球" />篮球
          <span id="span4"></span>
        </td>
      </tr>
      <tr>
        <td>国籍:</td>
        <td>
          <select name="country" id="country">
            <option value="none">--请选择国籍--</option>
            <option value="中国">中国</option>
            <option value="韩国">韩国</option>
            <option value="日本">日本</option>
            <option value="美国">美国</option>
          </select>
          <span id="span5"></span>
        </td>
      </tr>
      <tr>
        <td>自我评价:</td>
        <td>
          <textarea rows="10px" cols="20px" id="textarea" name="describe" ></textarea>
        </td>
      </tr>
    <tr>
        <td>
          验证码:
        </td>
        <td>
          <input type="text" name="check"/>
          <img  src="/static/imghw/default1.png"  data-src="/day02/demo"  class="lazy"   id="img" onclick="checkImg()" style = "cursor: pointer" alt="Comment implémenter la page de connexion et d'inscription en Java" >
          <a href="javascript:void(0);" onclick="checkImg()">换一张</a>
        </td>
      </tr>
    </table>
    <input type="submit" id="btn2" value="提交" />
    <input type="button" id="btn1" value="验证" />
  </form>

</fieldset>
</body>
<script type="text/javascript">
  function checkImg() {
    var img = document.getElementById("img");
    img.src ="/day02/demo?"+new Date().getTime()

  }
</script>Capture d'écran de la page d'inscription

Ce qu'il convient de noter ici, c'est que j'utilise le serveur Tomcat, car il n'a pas de pilote MySQL, il doit donc être ajouté manuellement au Tomcat répertoire lib.
Nous avons également ajouté une configuration globale dans le code web.
<context-param>
        <param-name>encode</param-name>
        <param-value>UTF-8</param-value>
</context-param>La page de connexion est également très moche. Il ne s'agit que de trois balises de saisie simples
Code HTML de la page de connexion@WebServlet(urlPatterns = "/demo")
public class CheckImg extends HttpServlet {
//复写HttpServlet中的doGet方法
public void doGet(HttpServletRequest req, HttpServletResponse resp) throws ServletException,
IOException{
//准备一张画纸,将验证码中的数字字母写到这张画纸中
int width = 120;
int height = 30;
BufferedImage bufi = new BufferedImage(width, height, BufferedImage.TYPE_INT_RGB);
//这里面的width、height、就是这张画纸的长宽。BufferedImage.TYPE_INT_RGB就是这张画纸基于
//RGB三原色来进行画
//获取一个画笔对象,给图片上画画
Graphics2D g = (Graphics2D) bufi.getGraphics();
//设置画笔颜色
g.setColor(Color.WHITE);
//将这个颜色填充到整个画纸
g.fillRect(0,0,width,height);
//定义图片上可以写什么数据
String data = "QWERTYUIOPASDFGHJKLZXCVBNMqwertyuiopasdfghjklzxcvbnm1234567890";
//定义书写在画纸上的起始位置
int x =15;
int y =25;
//定义一个随机数
Random r = new Random();
//创建一个字符串缓冲区
StringBuilder sb = new StringBuilder();
//定义一个循环给画纸上写四个数
for(int i = 0; i < 4; i++){
//从data中随机获取一个下标的数据
char c = data.charAt(r.nextInt(data.length()));
sb.append(c+"");
//随机生成画笔的颜色,RGB三原色随机在0-256中随机生成
g.setColor(new Color(r.nextInt(256),r.nextInt(256),r.nextInt(256)));
//设置字体
g.setFont(new Font("黑体",Font.BOLD,26));
double theta =(30 - (r.nextInt(60)))*Math.PI/180;
g.rotate(theta,x,24);
//设置数据旋转
//g.rotate((20)*Math.PI/180,x,y);
//将数据写到画纸上
g.drawString(c+"",x,y);
g.rotate(-theta,x,24);
//设置完旋转要调回,防止数据旋转的看不到
//g.rotate(-((20)*Math.PI/180),x,y);
//每写完一个调整下一个数据写的位置
x += 25;
}
HttpSession session = req.getSession();
session.setAttribute("checkNum",sb.toString());
//添加线类型的干扰信息
for(int i = 0; i < 15 ; i++){
//同样设置线的颜色
g.setColor(new Color(r.nextInt(256),r.nextInt(256),r.nextInt(256)));
//开始划线,这里需要的四个参数中前两个是线开头的左边,后边两个是线结束的坐标
g.drawLine(r.nextInt(width),r.nextInt(height),r.nextInt(width),r.nextInt(height));
}
//添加点类型干扰信息
for (int i = 0 ; i < 150 ; i++){
//设置点的颜色
g.setColor(new Color(r.nextInt(256),r.nextInt(256),r.nextInt(256)));
//开始画点,实质上这是画椭圆,将上半轴半径,左半轴半径设置为0就可以看成是一个点
g.drawOval(r.nextInt(width),r.nextInt(height),0,0);
}
//这个时候并没有在这张纸上书写任何内容,但是已经可以像客户端响应请求了
ImageIO.write(bufi, "jpg", resp.getOutputStream());
}
} Code Java de la page de connexion
@WebServlet(urlPatterns = "/register2")
public class Register extends HttpServlet {
//
@Override
protected void doGet(HttpServletRequest req, HttpServletResponse resp) throws ServletException, IOException {
doPost(req,resp);
}
@Override
protected void doPost(HttpServletRequest req, HttpServletResponse resp) throws ServletException, IOException {
//获取在web.xml中的配置的全局属性
String encode = req.getServletContext().getInitParameter("encode");
//为了防止乱码设置编码
req.setCharacterEncoding(encode);
resp.setContentType("text/html;charset="+encode);
//获得请求过来的资源
String userName = req.getParameter("userName");
String password = req.getParameter("password");
String repassword = req.getParameter("repassword");
String sex = req.getParameter("sex");
String[] hobby = req.getParameterValues("hobby");
String country = req.getParameter("country");
String describe = req.getParameter("describe");
//这里将获取到的请求数据都在控制台上打印了一遍
//看是否拿到了这些数据
System.out.println(userName);
System.out.println(password);
System.out.println(repassword);
System.out.println(sex);
System.out.println(hobby[0]);
System.out.println(country);
System.out.println(describe);
//这里只加了简单的判断,判断帐号是否填写,以及两次密码是否一致
//判断信息是否填写
if(userName==null||password==null||repassword==null||sex==null||hobby==null||country==null||describe==null){
resp.getWriter().write("所有的数据都不能为空,请重新<a href = '/day02'>填写</a>");
return;
}
//判断两次密码是否一致
if(!password.equals(repassword)){
resp.getWriter().write("两次密码输入不一致,请重新<a href = '/day02'>填写</a>");
return;
}
//判断验证码输入是否正确
if(!checkImg.equalsIgnoreCase(check)){
resp.getWriter().write("验证码输入错误");
return;
}
try {
//加载MySQL的数据库驱动
Class.forName("com.mysql.jdbc.Driver");
//这里我在数据库中添加了一个名为day02的数据库
String url = "jdbc:mysql:///day02";
//默认是系统管理员的账户
String user = "root";
//这里你自己设置的数据库密码
String passw = "xxxxxx";
//获取到数据库的连接
Connection connection = DriverManager.getConnection(url, user, passw);
//获取到执行器
Statement stmt = connection.createStatement();
//需要执行的sql语句
String sql = "insert into users values (null,'"+userName+"','"+password+"','"+repassword+"','"+sex+"','"+ Arrays.toString(hobby)+"','"+country+"','"+describe+"')";
//建议打印一下sql语句,放在数据库中看是否能将数据添加到数据库中
System.out.println(sql);
//执行sql语句
int i = stmt.executeUpdate(sql);
//添加成功上边这个执行器就会返回1
if(i==1){
resp.getWriter().write("注册成功,请<a href = '/day02/login.html'>登录</a>");
}else{
resp.getWriter().write("注册失败,请返回重新<a href = '/day02/'></a>");
}
stmt.close();
connection.close();
}catch (Exception e){
e.printStackTrace();
}
}
}Ce qui précède est le contenu détaillé de. pour plus d'informations, suivez d'autres articles connexes sur le site Web de PHP en chinois!