
 Opération et maintenance
Nginx
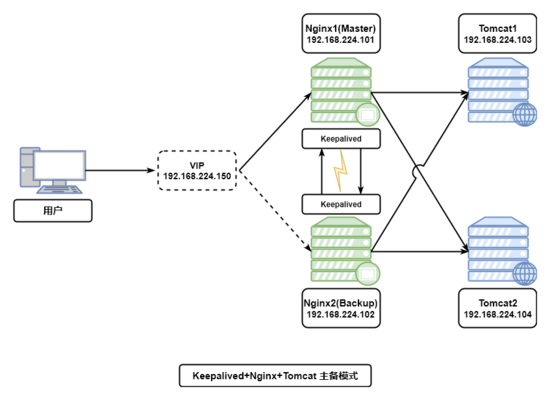
Comment utiliser Keepalived+Nginx+Tomcat pour implémenter un cluster Web haute disponibilité
Opération et maintenance
Nginx
Comment utiliser Keepalived+Nginx+Tomcat pour implémenter un cluster Web haute disponibilité
Comment utiliser Keepalived+Nginx+Tomcat pour implémenter un cluster Web haute disponibilité

keepalived+nginx+tomcat 实现高可用web集群
一、nginx的安装过程
1.下载nginx安装包,安装依赖环境包
(1)安装 c++编译环境
yum -y install gcc #c++
(2)安装pcre
yum -y install pcre-devel
(3)安装zlib
yum -y install zlib-devel
(4)安装nginx
定位到nginx 解压文件位置,执行编译安装命令
[root@localhost nginx-1.12.2]# pwd
/usr/local/nginx/nginx-1.12.2
[root@localhost nginx-1.12.2]# ./configure && make && make install
(5)启动nginx
安装完成后先寻找那安装完成的目录位置
[root@localhost nginx-1.12.2]# whereis nginx
nginx: /usr/local/nginx
[root@localhost nginx-1.12.2]#
进入nginx子目录sbin启动nginx
[root@localhost sbin]# ls
nginx
[root@localhost sbin]# ./nginx &
[1] 5768
[root@localhost sbin]#
查看nginx是否启动

或通过进程查看nginx启动情况
[root@localhost sbin]# ps -aux|grep nginx
root  5769 0.0 0.0 20484 608 ?  ss 14:03 0:00 nginx: master process ./nginx
nobody  5770 0.0 0.0 23012 1620 ?  s 14:03 0:00 nginx: worker process
root  5796 0.0 0.0 112668 972 pts/0 r+ 14:07 0:00 grep --color=auto nginx
[1]+ 完成     ./nginx
[root@localhost sbin]#
到此nginx安装完成并启动成功。
(6)nginx快捷启动和开机启动配置
编辑nginx快捷启动脚本【 注意nginx安装路径 , 需要根据自己的nginx路径进行改动 】
[root@localhost init.d]# vim /etc/rc.d/init.d/nginx
#!/bin/sh
#
# nginx - this script starts and stops the nginx daemon
#
# chkconfig: - 85 15
# description: nginx is an http(s) server, http(s) reverse \
# proxy and imap/pop3 proxy server
# processname: nginx
# config: /etc/nginx/nginx.conf
# config: /usr/local/nginx/conf/nginx.conf
# pidfile: /usr/local/nginx/logs/nginx.pid

# source function library.
. /etc/rc.d/init.d/functions

# source networking configuration.
. /etc/sysconfig/network

# check that networking is up.
[ "$networking" = "no" ] && exit 0
nginx="/usr/local/nginx/sbin/nginx"
prog=$(basename $nginx)
nginx_conf_file="/usr/local/nginx/conf/nginx.conf"
[ -f /etc/sysconfig/nginx ] && . /etc/sysconfig/nginx
lockfile=/var/lock/subsys/nginx

make_dirs() {
 # make required directories
 user=`$nginx -v 2>&1 | grep "configure arguments:" | sed 's/[^*]*--user=\([^ ]*\).*/\1/g' -`
 if [ -z "`grep $user /etc/passwd`" ]; then
 useradd -m -s /bin/nologin $user
 fi
 options=`$nginx -v 2>&1 | grep 'configure arguments:'`
 for opt in $options; do
 if [ `echo $opt | grep '.*-temp-path'` ]; then
 value=`echo $opt | cut -d "=" -f 2`
 if [ ! -d "$value" ]; then
 # echo "creating" $value
 mkdir -p $value && chown -r $user $value
 fi
 fi
 done
}

start() {
 [ -x $nginx ] || exit 5
 [ -f $nginx_conf_file ] || exit 6
 make_dirs
 echo -n $"starting $prog: "
 daemon $nginx -c $nginx_conf_file
 retval=$?
 echo
 [ $retval -eq 0 ] && touch $lockfile
 return $retval
}

stop() {
 echo -n $"stopping $prog: "
 killproc $prog -quit
 retval=$?
 echo
 [ $retval -eq 0 ] && rm -f $lockfile
 return $retval
}

restart() {
 #configtest || return $?
 stop
 sleep 1
 start
}

reload() {
 #configtest || return $?
 echo -n $"reloading $prog: "
 killproc $nginx -hup
 retval=$?
 echo
}

force_reload() {
 restart
}

configtest() {
 $nginx -t -c $nginx_conf_file
}

rh_status() {
 status $prog
}

rh_status_q() {
 rh_status >/dev/null 2>&1
}

case "$1" in
start)
rh_status_q && exit 0
$1
;;
stop)

rh_status_q || exit 0
$1
;;
restart|configtest)
$1
;;
reload)
rh_status_q || exit 7
$1
;;
force-reload)
force_reload
;;
status)
rh_status
;;
condrestart|try-restart)
rh_status_q || exit 0
;;
*)
echo $"usage: $0 {start|stop|status|restart|condrestart|try-restart|reload|force-reload|configtest}"
exit 2
esac为启动脚本授权 并加入开机启动
[root@localhost init.d]# chmod -r 777 /etc/rc.d/init.d/nginx
[root@localhost init.d]# chkconfig nginx
启动nginx
[root@localhost init.d]# ./nginx start
将nginx加入系统环境变量
[root@localhost init.d]# echo 'export path=$path:/usr/local/nginx/sbin'>>/etc/profile && source /etc/profile
nginx命令 [ service nginx (start|stop|restart) ]
[root@localhost init.d]# service nginx start
starting nginx (via systemctl):       [ 确定 ]
tips: 快捷命令
service nginx (start|stop|restart)
二、keepalived安装和配置
1.安装keepalived依赖环境
yum install -y popt-devel
yum install -y ipvsadm
yum install -y libnl*
yum install -y libnf*
yum install -y openssl-devel
2.编译keepalived并安装
[root@localhost keepalived-1.3.9]# ./configure
[root@localhost keepalived-1.3.9]# make && make install
3.将keepalive 安装成系统服务
[root@localhost etc]# mkdir /etc/keepalived
[root@localhost etc]# cp /usr/local/keepalived/etc/keepalived/keepalived.conf /etc/keepalived/
手动复制默认的配置文件到默认路径
[root@localhost etc]# mkdir /etc/keepalived
[root@localhost etc]# cp /usr/local/keepalived/etc/sysconfig/keepalived /etc/sysconfig/
[root@localhost etc]# cp /usr/local/keepalived/etc/keepalived/keepalived.conf /etc/keepalived/
为keepalived 创建软链接
[root@localhost sysconfig]# ln -s /usr/local/keepalived/sbin/keepalived /usr/sbin/
设置keepalived开机自启动
[root@localhost sysconfig]# chkconfig keepalived on
注意:正在将请求转发到“systemctl enable keepalived.service”。
created symlink from /etc/systemd/system/multi-user.target.wants/keepalived.service to /usr/lib/systemd/system/keepalived.service
启动keepalived服务
[root@localhost keepalived]# keepalived -d -f /etc/keepalived/keepalived.conf
关闭keepalived服务
[root@localhost keepalived]# killall keepalived
三、集群规划和搭建
环境准备:
centos 7.2
keepalived version 1.4.0 - december 29, 2017
nginx version: nginx/1.12.2
tomcat version:8
集群规划清单
| 虚拟机 | ip | 说明 |
|---|---|---|
| keepalived+nginx1[master] | 192.168.43.101 | nginx server 01 |
| keeepalived+nginx[backup] | 192.168.43.102 | nginx server 02 |
| tomcat01 | 192.168.43.103 | tomcat web server01 |
| tomcat02 | 192.168.43.104 | tomcat web server02 |
| vip | 192.168.43.150 | 虚拟漂移ip |
1.更改tomcat默认欢迎页面,用于标识切换web
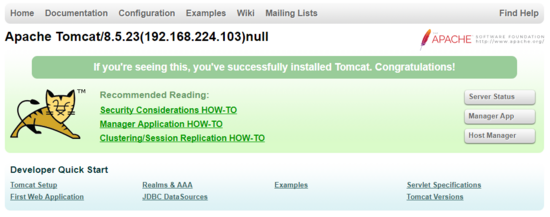
更改tomcatserver01 节点root/index.jsp 信息,加入tomcatip地址,并加入nginx值,即修改节点192.168.43.103信息如下:
<div id="asf-box">
 <h1 id="pagecontext-servletcontext-serverinfo-request-getheader-x-nginx">${pagecontext.servletcontext.serverinfo}(192.168.224.103)<%=request.getheader("x-nginx")%></h1>
</div>更改tomcatserver02 节点root/index.jsp信息,加入tomcatip地址,并加入nginx值,即修改节点192.168.43.104信息如下:
<div id="asf-box">
 <h1 id="pagecontext-servletcontext-serverinfo-request-getheader-x-nginx">${pagecontext.servletcontext.serverinfo}(192.168.224.104)<%=request.getheader("x-nginx")%></h1>
</div>2.启动tomcat服务,查看tomcat服务ip信息,此时nginx未启动,因此request-header没有nginx信息。
3.配置nginx代理信息
1.配置master节点[192.168.43.101]代理信息
upstream tomcat {
 server 192.168.43.103:8080 weight=1;
 server 192.168.43.104:8080 weight=1;
}
server{
 location / {
  proxy_pass http://tomcat;
 proxy_set_header x-nginx "nginx-1";
 }
 #......其他省略
}2.配置backup节点[192.168.43.102]代理信息
upstream tomcat {
 server 192.168.43.103:8080 weight=1;
 server 192.168.43.104:8080 weight=1;
}
server{
 location / {
  proxy_pass http://tomcat;
 proxy_set_header x-nginx "nginx-2";
 }
 #......其他省略
}3.启动master 节点nginx服务
[root@localhost init.d]# service nginx start
starting nginx (via systemctl):       [ 确定 ]
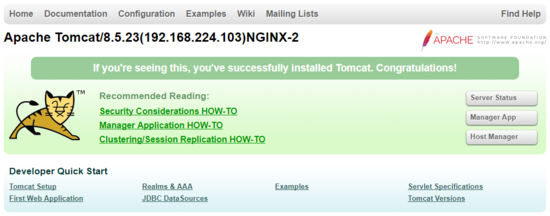
此时访问 192.168.43.101 可以看到103和104节点tcomat交替显示,说明nginx服务已经将请求负载到了2台tomcat上。

4.同理配置backup[192.168.43.102] nginx信息,启动nginx后,访问192.168.43.102后可以看到backup节点已起到负载的效果。
4.配置keepalived 脚本信息
1. 在master节点和slave节点 /etc/keepalived目录下添加check_nginx.sh 文件,用于检测nginx的存货状况,添加keepalived.conf文件
check_nginx.sh文件信息如下:
#!/bin/bash
#时间变量,用于记录日志
d=`date --date today +%y%m%d_%h:%m:%s`
#计算nginx进程数量
n=`ps -c nginx --no-heading|wc -l`
#如果进程为0,则启动nginx,并且再次检测nginx进程数量,
#如果还为0,说明nginx无法启动,此时需要关闭keepalived
if [ $n -eq "0" ]; then
  /etc/rc.d/init.d/nginx start
  n2=`ps -c nginx --no-heading|wc -l`
  if [ $n2 -eq "0" ]; then
    echo "$d nginx down,keepalived will stop" >> /var/log/check_ng.log
    systemctl stop keepalived
  fi
fi添加完成后,为check_nginx.sh 文件授权,便于脚本获得执行权限。
[root@localhost keepalived]# chmod -r 777 /etc/keepalived/check_nginx.sh
2.在master 节点 /etc/keepalived目录下,添加keepalived.conf 文件,具体信息如下:
vrrp_script chk_nginx {
 script "/etc/keepalived/check_nginx.sh" //检测nginx进程的脚本
 interval 2
 weight -20
}

global_defs {
 notification_email {
  //可以添加邮件提醒
 }
}
vrrp_instance vi_1 {
 state master     #标示状态为master 备份机为backup
 interface ens33    #设置实例绑定的网卡(ip addr查看,需要根据个人网卡绑定)
 virtual_router_id 51   #同一实例下virtual_router_id必须相同
 mcast_src_ip 192.168.43.101
 priority 250     #master权重要高于backup 比如backup为240
 advert_int 1     #master与backup负载均衡器之间同步检查的时间间隔,单位是秒
 nopreempt      #非抢占模式
 authentication {    #设置认证
  auth_type pass   #主从服务器验证方式
  auth_pass 123456
 }
 track_script {
  check_nginx
 }
 virtual_ipaddress {   #设置vip
  192.168.43.150   #可以多个虚拟ip,换行即可
 }
}3.在backup节点 etc/keepalived目录下添加 keepalived.conf 配置文件
信息如下:
vrrp_script chk_nginx {
 script "/etc/keepalived/check_nginx.sh" //检测nginx进程的脚本
 interval 2
 weight -20
}

global_defs {
 notification_email {
  //可以添加邮件提醒
 }
}
vrrp_instance vi_1 {
 state backup     #标示状态为master 备份机为backup
 interface ens33    #设置实例绑定的网卡(ip addr查看)
 virtual_router_id 51   #同一实例下virtual_router_id必须相同
 mcast_src_ip 192.168.43.102
 priority 240     #master权重要高于backup 比如backup为240
 advert_int 1     #master与backup负载均衡器之间同步检查的时间间隔,单位是秒
 nopreempt      #非抢占模式
 authentication {    #设置认证
  auth_type pass   #主从服务器验证方式
  auth_pass 123456
 }
 track_script {
  check_nginx
 }
 virtual_ipaddress {   #设置vip
  192.168.43.150   #可以多个虚拟ip,换行即可
 }
}tips: 关于配置信息的几点说明
state - 主服务器需配成master,从服务器需配成backup
interface - 这个是网卡名,我使用的是vm12.0的版本,所以这里网卡名为ens33
mcast_src_ip - 配置各自的实际ip地址
priority - 主服务器的优先级必须比从服务器的高,这里主服务器配置成250,从服务器配置成240
virtual_ipaddress - 配置虚拟ip(192.168.43.150)
authentication - auth_pass主从服务器必须一致,keepalived靠这个来通信
virtual_router_id - 主从服务器必须保持一致
5.集群高可用(ha)验证
step1 启动master机器的keepalived和 nginx服务
[root@localhost keepalived]# keepalived -d -f /etc/keepalived/keepalived.conf
[root@localhost keepalived]# service nginx start
查看服务启动进程
[root@localhost keepalived]# ps -aux|grep nginx
root  6390 0.0 0.0 20484 612 ?  ss 19:13 0:00 nginx: master process /usr/local/nginx/sbin/nginx -c /usr/local/nginx/conf/nginx.conf
nobody  6392 0.0 0.0 23008 1628 ?  s 19:13 0:00 nginx: worker process
root  6978 0.0 0.0 112672 968 pts/0 s+ 20:08 0:00 grep --color=auto nginx
查看keepalived启动进程
[root@localhost keepalived]# ps -aux|grep keepalived
root  6402 0.0 0.0 45920 1016 ?  ss 19:13 0:00 keepalived -d -f /etc/keepalived/keepalived.conf
root  6403 0.0 0.0 48044 1468 ?  s 19:13 0:00 keepalived -d -f /etc/keepalived/keepalived.conf
root  6404 0.0 0.0 50128 1780 ?  s 19:13 0:00 keepalived -d -f /etc/keepalived/keepalived.conf
root  7004 0.0 0.0 112672 976 pts/0 s+ 20:10 0:00 grep --color=auto keepalived
使用 ip add 查看虚拟ip绑定情况,如出现192.168.43.150 节点信息则绑定到master节点
[root@localhost keepalived]# ip add
1: lo: <loopback,up,lower_up> mtu 65536 qdisc noqueue state unknown qlen 1
 link/loopback 00:00:00:00:00:00 brd 00:00:00:00:00:00
 inet 127.0.0.1/8 scope host lo
  valid_lft forever preferred_lft forever
 inet6 ::1/128 scope host
  valid_lft forever preferred_lft forever
2: ens33: <broadcast,multicast,up,lower_up> mtu 1500 qdisc pfifo_fast state up qlen 1000
 link/ether 00:0c:29:91:bf:59 brd ff:ff:ff:ff:ff:ff
 inet 192.168.43.101/24 brd 192.168.43.255 scope global ens33
  valid_lft forever preferred_lft forever
 inet 192.168.43.150/32 scope global ens33
  valid_lft forever preferred_lft forever
 inet6 fe80::9abb:4544:f6db:8255/64 scope link
  valid_lft forever preferred_lft forever
 inet6 fe80::b0b3:d0ca:7382:2779/64 scope link tentative dadfailed
  valid_lft forever preferred_lft forever
 inet6 fe80::314f:5fe7:4e4b:64ed/64 scope link tentative dadfailed
  valid_lft forever preferred_lft forever
3: virbr0: <no-carrier,broadcast,multicast,up> mtu 1500 qdisc noqueue state down qlen 1000
 link/ether 52:54:00:2b:74:aa brd ff:ff:ff:ff:ff:ff
 inet 192.168.122.1/24 brd 192.168.122.255 scope global virbr0
  valid_lft forever preferred_lft forever
4: virbr0-nic: <broadcast,multicast> mtu 1500 qdisc pfifo_fast master virbr0 state down qlen 1000
 link/ether 52:54:00:2b:74:aa brd ff:ff:ff:ff:ff:ff
step 2 启动backup节点nginx服务和keepalived服务,查看服务启动情况,如backup节点出现了虚拟ip,则keepalvied配置文件有问题,此情况称为脑裂。
[root@localhost keepalived]# clear
[root@localhost keepalived]# ip add
1: lo: <loopback,up,lower_up> mtu 65536 qdisc noqueue state unknown qlen 1
 link/loopback 00:00:00:00:00:00 brd 00:00:00:00:00:00
 inet 127.0.0.1/8 scope host lo
  valid_lft forever preferred_lft forever
 inet6 ::1/128 scope host
  valid_lft forever preferred_lft forever
2: ens33: <broadcast,multicast,up,lower_up> mtu 1500 qdisc pfifo_fast state up qlen 1000
 link/ether 00:0c:29:14:df:79 brd ff:ff:ff:ff:ff:ff
 inet 192.168.43.102/24 brd 192.168.43.255 scope global ens33
  valid_lft forever preferred_lft forever
 inet6 fe80::314f:5fe7:4e4b:64ed/64 scope link
  valid_lft forever preferred_lft forever
3: virbr0: <no-carrier,broadcast,multicast,up> mtu 1500 qdisc noqueue state down qlen 1000
 link/ether 52:54:00:2b:74:aa brd ff:ff:ff:ff:ff:ff
 inet 192.168.122.1/24 brd 192.168.122.255 scope global virbr0
  valid_lft forever preferred_lft forever
4: virbr0-nic: <broadcast,multicast> mtu 1500 qdisc pfifo_fast master virbr0 state down qlen 1000
 link/ether 52:54:00:2b:74:aa brd ff:ff:ff:ff:ff:ff
step 3 验证服务
浏览并多次强制刷新地址: http://192.168.43.150 ,可以看到103和104多次交替显示,并显示nginx-1,则表明 master节点在进行web服务转发。
step 4 关闭master keepalived服务和nginx服务,访问web服务观察服务转移情况
[root@localhost keepalived]# killall keepalived
[root@localhost keepalived]# service nginx stop
此时强制刷新192.168.43.150发现 页面交替显示103和104并显示nginx-2 ,vip已转移到192.168.43.102上,已证明服务自动切换到备份节点上。
step 5 启动master keepalived 服务和nginx服务
此时再次验证发现,vip已被master重新夺回,并页面交替显示 103和104,此时显示nginx-1
四、keepalived抢占模式和非抢占模式
keepalived的ha分为抢占模式和非抢占模式,抢占模式即master从故障中恢复后,会将vip从backup节点中抢占过来。非抢占模式即master恢复后不抢占backup升级为master后的vip。
非抢占模式配置:
1> 在vrrp_instance块下两个节点各增加了nopreempt指令,表示不争抢vip
2> 节点的state都为backup 两个keepalived节点都启动后,默认都是backup状态,双方在发送组播信息后,会根据优先级来选举一个master出来。由于两者都配置了nopreempt,所以master从故障中恢复后,不会抢占vip。这样会避免vip切换可能造成的服务延迟。
Ce qui précède est le contenu détaillé de. pour plus d'informations, suivez d'autres articles connexes sur le site Web de PHP en chinois!

Outils d'IA chauds

Undresser.AI Undress
Application basée sur l'IA pour créer des photos de nu réalistes

AI Clothes Remover
Outil d'IA en ligne pour supprimer les vêtements des photos.

Undress AI Tool
Images de déshabillage gratuites

Clothoff.io
Dissolvant de vêtements AI

AI Hentai Generator
Générez AI Hentai gratuitement.

Article chaud
Outils chauds

Bloc-notes++7.3.1
Éditeur de code facile à utiliser et gratuit

SublimeText3 version chinoise
Version chinoise, très simple à utiliser

Envoyer Studio 13.0.1
Puissant environnement de développement intégré PHP

Dreamweaver CS6
Outils de développement Web visuel

SublimeText3 version Mac
Logiciel d'édition de code au niveau de Dieu (SublimeText3)


 Comment vérifier si Nginx est démarré
Apr 14, 2025 pm 01:03 PM
Comment vérifier si Nginx est démarré
Apr 14, 2025 pm 01:03 PM
Comment confirmer si Nginx est démarré: 1. Utilisez la ligne de commande: SystemCTl Status Nginx (Linux / Unix), netStat -ano | Findstr 80 (Windows); 2. Vérifiez si le port 80 est ouvert; 3. Vérifiez le message de démarrage NGINX dans le journal système; 4. Utilisez des outils tiers, tels que Nagios, Zabbix et Icinga.
 Comment démarrer le serveur Nginx
Apr 14, 2025 pm 12:27 PM
Comment démarrer le serveur Nginx
Apr 14, 2025 pm 12:27 PM
Le démarrage d'un serveur Nginx nécessite différentes étapes en fonction des différents systèmes d'exploitation: Système Linux / Unix: Installez le package NGINX (par exemple, en utilisant Apt-Get ou Yum). Utilisez SystemCTL pour démarrer un service NGINX (par exemple, sudo systemctl start nginx). Système Windows: téléchargez et installez les fichiers binaires Windows. Démarrer Nginx à l'aide de l'exécutable Nginx.exe (par exemple, nginx.exe -c conf \ nginx.conf). Peu importe le système d'exploitation que vous utilisez, vous pouvez accéder au serveur IP
 Comment configurer le nom de domaine du serveur cloud dans nginx
Apr 14, 2025 pm 12:18 PM
Comment configurer le nom de domaine du serveur cloud dans nginx
Apr 14, 2025 pm 12:18 PM
Comment configurer un nom de domaine NGINX sur un serveur cloud: Créez un enregistrement A pointant vers l'adresse IP publique du serveur cloud. Ajoutez des blocs d'hôtes virtuels dans le fichier de configuration Nginx, en spécifiant le port d'écoute, le nom de domaine et le répertoire racine du site Web. Redémarrez Nginx pour appliquer les modifications. Accéder à la configuration du test de nom de domaine. Autres notes: Installez le certificat SSL pour activer HTTPS, assurez-vous que le pare-feu autorise le trafic Port 80 et attendez que la résolution DNS prenne effet.
 Comment démarrer Nginx dans Linux
Apr 14, 2025 pm 12:51 PM
Comment démarrer Nginx dans Linux
Apr 14, 2025 pm 12:51 PM
Étapes pour démarrer Nginx dans Linux: Vérifiez si Nginx est installé. Utilisez SystemCTL Start Nginx pour démarrer le service NGINX. Utilisez SystemCTL Activer Nginx pour activer le démarrage automatique de Nginx au démarrage du système. Utilisez SystemCTL Status Nginx pour vérifier que le démarrage est réussi. Visitez http: // localhost dans un navigateur Web pour afficher la page de bienvenue par défaut.
 Comment résoudre nginx403
Apr 14, 2025 am 10:33 AM
Comment résoudre nginx403
Apr 14, 2025 am 10:33 AM
Comment corriger l'erreur interdite Nginx 403? Vérifier les autorisations de fichier ou de répertoire; 2. Vérifier le fichier .htaccess; 3. Vérifiez le fichier de configuration NGINX; 4. Redémarrer Nginx. D'autres causes possibles incluent les règles de pare-feu, les paramètres de Selinux ou les problèmes d'application.
 Comment vérifier si Nginx est démarré?
Apr 14, 2025 pm 12:48 PM
Comment vérifier si Nginx est démarré?
Apr 14, 2025 pm 12:48 PM
Dans Linux, utilisez la commande suivante pour vérifier si Nginx est démarré: SystemCTL Status Nginx Juges Basé sur la sortie de la commande: si "Active: Active (Running)" s'affiche, Nginx est démarré. Si "Active: Inactive (Dead)" est affiché, Nginx est arrêté.
 Comment configurer Nginx dans Windows
Apr 14, 2025 pm 12:57 PM
Comment configurer Nginx dans Windows
Apr 14, 2025 pm 12:57 PM
Comment configurer Nginx dans Windows? Installez Nginx et créez une configuration d'hôte virtuelle. Modifiez le fichier de configuration principale et incluez la configuration de l'hôte virtuel. Démarrer ou recharger nginx. Testez la configuration et affichez le site Web. Activer sélectivement SSL et configurer les certificats SSL. Définissez sélectivement le pare-feu pour permettre le trafic Port 80 et 443.
 Comment résoudre le problème du domaine croisé nginx
Apr 14, 2025 am 10:15 AM
Comment résoudre le problème du domaine croisé nginx
Apr 14, 2025 am 10:15 AM
Il existe deux façons de résoudre le problème du domaine transversal NGINX: modifiez les en-têtes de réponse transversale: ajoutez des directives pour autoriser les demandes de domaine croisé, spécifier des méthodes et des en-têtes autorisés et définir le temps du cache. Utilisez le module CORS: Activez les modules et configurez les règles CORS pour permettre des demandes, des méthodes, des en-têtes et du temps de cache.
