Bien que les objets du monde objectif soient en trois dimensions, les images que nous Les images obtenues sont bidimensionnelles, mais nous pouvons percevoir les informations tridimensionnelles de la cible à partir de ces images bidimensionnelles. La technologie de reconstruction tridimensionnelle traite les images d'une certaine manière pour obtenir des informations tridimensionnelles pouvant être reconnues par les ordinateurs, analysant ainsi la cible. La reconstruction monoculaire 3D simule la vision binoculaire basée sur le mouvement d'une seule caméra pour obtenir des informations visuelles tridimensionnelles sur les objets dans l'espace, où monoculaire fait référence à une seule caméra.
Dans le processus de reconstruction tridimensionnelle monoculaire d'objets, l'environnement opérationnel pertinent est le suivant :
#🎜 🎜 # Matplotlib 3.3.4 # 🎜🎜 # # Numpy 1.19.5 # 🎜🎜 # OpenCV-Contrib-Python 3.4.2.16 # 🎜🎜 # OpenCV-Python 3.4.2.16 # 🎜🎜 # # oreiller 8.2.0 # 🎜🎜 # Python 3.6 .2# 🎜🎜#(3) Reconstruction tridimensionnelle
La reconstruction comprend principalement les étapes suivantes :
(1) Calibrage de la caméra
(2) Extraction des caractéristiques de l'image et matching #🎜 🎜#
Ensuite, regardons en détail la mise en œuvre spécifique de chaque étape :
(1) Caméra calibrage#🎜 🎜#
Il existe de nombreux appareils photo dans notre vie quotidienne, tels que les appareils photo des téléphones portables, les appareils photo numériques, les appareils photo à modules fonctionnels, etc. Les paramètres de chaque appareil photo sont différents, c'est-à-dire la résolution des photos prise par l'appareil photo, le mode, etc. En supposant que lorsque nous effectuons une reconstruction tridimensionnelle d'un objet, nous ne connaissons pas à l'avance les paramètres matriciels de notre caméra, nous devons alors calculer les paramètres matriciels de la caméra. Cette étape est appelée calibrage de la caméra. Je ne présenterai pas les principes pertinents de l'étalonnage des caméras. De nombreuses personnes sur Internet l'ont expliqué en détail. La mise en œuvre spécifique du calibrage est la suivante :def camera_calibration(ImagePath):
# 循环中断
criteria = (cv2.TERM_CRITERIA_EPS + cv2.TERM_CRITERIA_MAX_ITER, 30, 0.001)
# 棋盘格尺寸(棋盘格的交叉点的个数)
row = 11
column = 8
objpoint = np.zeros((row * column, 3), np.float32)
objpoint[:, :2] = np.mgrid[0:row, 0:column].T.reshape(-1, 2)
objpoints = [] # 3d point in real world space
imgpoints = [] # 2d points in image plane.
batch_images = glob.glob(ImagePath + '/*.jpg')
for i, fname in enumerate(batch_images):
img = cv2.imread(batch_images[i])
imgGray = cv2.cvtColor(img, cv2.COLOR_BGR2GRAY)
# find chess board corners
ret, corners = cv2.findChessboardCorners(imgGray, (row, column), None)
# if found, add object points, image points (after refining them)
if ret:
objpoints.append(objpoint)
corners2 = cv2.cornerSubPix(imgGray, corners, (11, 11), (-1, -1), criteria)
imgpoints.append(corners2)
# Draw and display the corners
img = cv2.drawChessboardCorners(img, (row, column), corners2, ret)
cv2.imwrite('Checkerboard_Image/Temp_JPG/Temp_' + str(i) + '.jpg', img)
print("成功提取:", len(batch_images), "张图片角点!")
ret, mtx, dist, rvecs, tvecs = cv2.calibrateCamera(objpoints, imgpoints, imgGray.shape[::-1], None, None)
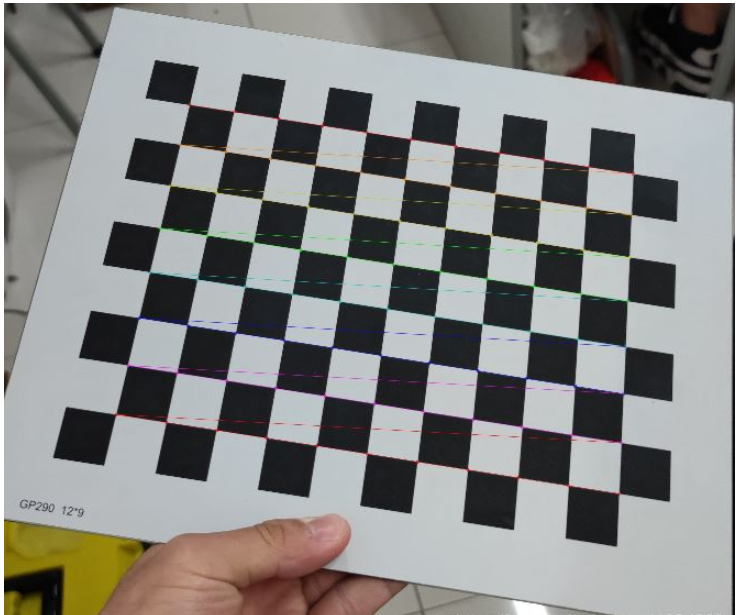
Figure 1 : Extraction des points de coin en damier
(2) Extraction et correspondance des caractéristiques de l'image
#🎜 🎜# tout au long du processus de reconstruction 3D, cette étape est l'étape la plus critique et la plus complexe. La qualité de l'extraction des caractéristiques de l'image détermine votre effet de reconstruction final.Parmi les algorithmes d'extraction de points caractéristiques d'images, il existe trois algorithmes couramment utilisés, à savoir : l'algorithme SIFT, l'algorithme SURF et l'algorithme ORB. Grâce à une analyse et une comparaison complètes, nous utilisons l'algorithme SURF pour extraire les points caractéristiques de l'image au cours de cette étape. Si vous souhaitez comparer les effets d'extraction de points caractéristiques des trois algorithmes, vous pouvez effectuer une recherche en ligne et y jeter un œil. Je ne les comparerai pas un par un ici. L'implémentation spécifique est la suivante :
def epipolar_geometric(Images_Path, K):
    IMG = glob.glob(Images_Path)
    img1, img2 = cv2.imread(IMG[0]), cv2.imread(IMG[1])
    img1_gray = cv2.cvtColor(img1, cv2.COLOR_BGR2GRAY)
    img2_gray = cv2.cvtColor(img2, cv2.COLOR_BGR2GRAY)

    # Initiate SURF detector
    SURF = cv2.xfeatures2d_SURF.create()

    # compute keypoint & descriptions
    keypoint1, descriptor1 = SURF.detectAndCompute(img1_gray, None)
    keypoint2, descriptor2 = SURF.detectAndCompute(img2_gray, None)
    print("角点数量:", len(keypoint1), len(keypoint2))

    # Find point matches
    bf = cv2.BFMatcher(cv2.NORM_L2, crossCheck=True)
    matches = bf.match(descriptor1, descriptor2)
    print("匹配点数量:", len(matches))

    src_pts = np.asarray([keypoint1[m.queryIdx].pt for m in matches])
    dst_pts = np.asarray([keypoint2[m.trainIdx].pt for m in matches])
    # plot
    knn_image = cv2.drawMatches(img1_gray, keypoint1, img2_gray, keypoint2, matches[:-1], None, flags=2)
    image_ = Image.fromarray(np.uint8(knn_image))
    image_.save("MatchesImage.jpg")

    # Constrain matches to fit homography
    retval, mask = cv2.findHomography(src_pts, dst_pts, cv2.RANSAC, 100.0)

    # We select only inlier points
    points1 = src_pts[mask.ravel() == 1]
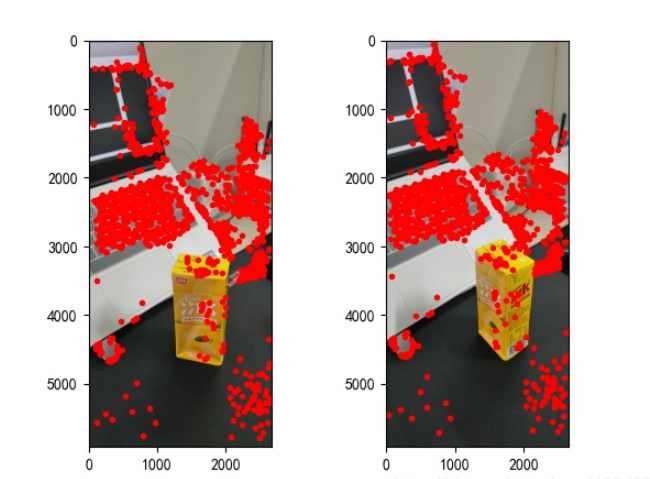
points2 = dst_pts[mask.ravel() == 1]Les points caractéristiques trouvés sont les suivants : 
Après avoir trouvé les points caractéristiques de l'image et les avoir fait correspondre, nous pouvons commencer la reconstruction tridimensionnelle. comme suit :
points1 = cart2hom(points1.T)
points2 = cart2hom(points2.T)
# plot
fig, ax = plt.subplots(1, 2)
ax[0].autoscale_view('tight')
ax[0].imshow(cv2.cvtColor(img1, cv2.COLOR_BGR2RGB))
ax[0].plot(points1[0], points1[1], 'r.')
ax[1].autoscale_view('tight')
ax[1].imshow(cv2.cvtColor(img2, cv2.COLOR_BGR2RGB))
ax[1].plot(points2[0], points2[1], 'r.')
plt.savefig('MatchesPoints.jpg')
fig.show()
#

points1n = np.dot(np.linalg.inv(K), points1)
points2n = np.dot(np.linalg.inv(K), points2)
E = compute_essential_normalized(points1n, points2n)
print('Computed essential matrix:', (-E / E[0][1]))

P1 = np.array([[1, 0, 0, 0], [0, 1, 0, 0], [0, 0, 1, 0]])
P2s = compute_P_from_essential(E)

ind = -1
for i, P2 in enumerate(P2s):
    # Find the correct camera parameters
    d1 = reconstruct_one_point(points1n[:, 0], points2n[:, 0], P1, P2)
    # Convert P2 from camera view to world view
    P2_homogenous = np.linalg.inv(np.vstack([P2, [0, 0, 0, 1]]))
    d2 = np.dot(P2_homogenous[:3, :4], d1)
    if d1[2] > 0 and d2[2] > 0:
        ind = i

P2 = np.linalg.inv(np.vstack([P2s[ind], [0, 0, 0, 1]]))[:3, :4]
Points3D = linear_triangulation(points1n, points2n, P1, P2)

fig = plt.figure()
fig.suptitle('3D reconstructed', fontsize=16)
ax = fig.gca(projection='3d')
ax.plot(Points3D[0], Points3D[1], Points3D[2], 'b.')
ax.set_xlabel('x axis')
ax.set_ylabel('y axis')
ax.set_zlabel('z axis')
ax.view_init(elev=135, azim=90)
plt.savefig('Reconstruction.jpg')
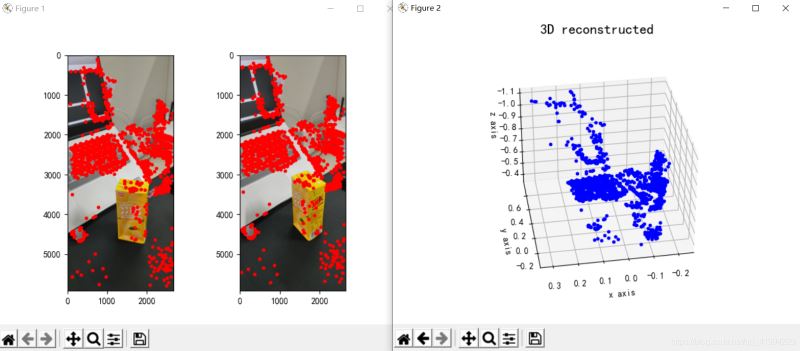
plt.show()Sa reconstruction L'effet est le suivant (l'effet est moyen) :

Figure 3 : Trois -reconstruction dimensionnelle
(1) Formulaire de prise de vue photo. S'il s'agit d'une tâche de reconstruction tridimensionnelle monoculaire, il est préférable de continuer à déplacer l'appareil photo parallèlement lors de la prise de vue, et il est préférable de prendre des photos de face, c'est-à-dire de ne pas prendre de photos sous un angle ou sous un angle spécial. ;
(2) Lors de la prise de vue d'interférences provenant de l'environnement. Il est préférable de choisir un seul emplacement de prise de vue pour réduire les interférences provenant d'objets non pertinents ;
(3) Problèmes de source de lumière lors de la prise de vue. L'emplacement photo choisi doit garantir une luminosité appropriée (vous devrez tester la situation spécifique pour savoir si votre source lumineuse répond à la norme), et lors du déplacement de l'appareil photo, vous devez également vous assurer que la source lumineuse est cohérente entre le moment précédent et celui-ci. moment. 
import cv2
import json
import numpy as np
import glob
from PIL import Image
import matplotlib.pyplot as plt
plt.rcParams['font.sans-serif'] = ['SimHei']
plt.rcParams['axes.unicode_minus'] = False


def cart2hom(arr):
    """ Convert catesian to homogenous points by appending a row of 1s
    :param arr: array of shape (num_dimension x num_points)
    :returns: array of shape ((num_dimension+1) x num_points)
    """
    if arr.ndim == 1:
        return np.hstack([arr, 1])
    return np.asarray(np.vstack([arr, np.ones(arr.shape[1])]))


def compute_P_from_essential(E):
    """ Compute the second camera matrix (assuming P1 = [I 0])
        from an essential matrix. E = [t]R
    :returns: list of 4 possible camera matrices.
    """
    U, S, V = np.linalg.svd(E)

    # Ensure rotation matrix are right-handed with positive determinant
    if np.linalg.det(np.dot(U, V)) < 0:
        V = -V

    # create 4 possible camera matrices (Hartley p 258)
    W = np.array([[0, -1, 0], [1, 0, 0], [0, 0, 1]])
    P2s = [np.vstack((np.dot(U, np.dot(W, V)).T, U[:, 2])).T,
           np.vstack((np.dot(U, np.dot(W, V)).T, -U[:, 2])).T,
           np.vstack((np.dot(U, np.dot(W.T, V)).T, U[:, 2])).T,
           np.vstack((np.dot(U, np.dot(W.T, V)).T, -U[:, 2])).T]

    return P2s


def correspondence_matrix(p1, p2):
    p1x, p1y = p1[:2]
    p2x, p2y = p2[:2]

    return np.array([
        p1x * p2x, p1x * p2y, p1x,
        p1y * p2x, p1y * p2y, p1y,
        p2x, p2y, np.ones(len(p1x))
    ]).T

    return np.array([
        p2x * p1x, p2x * p1y, p2x,
        p2y * p1x, p2y * p1y, p2y,
        p1x, p1y, np.ones(len(p1x))
    ]).T


def scale_and_translate_points(points):
    """ Scale and translate image points so that centroid of the points
        are at the origin and avg distance to the origin is equal to sqrt(2).
    :param points: array of homogenous point (3 x n)
    :returns: array of same input shape and its normalization matrix
    """
    x = points[0]
    y = points[1]
    center = points.mean(axis=1)  # mean of each row
    cx = x - center[0]  # center the points
    cy = y - center[1]
    dist = np.sqrt(np.power(cx, 2) + np.power(cy, 2))
    scale = np.sqrt(2) / dist.mean()
    norm3d = np.array([
        [scale, 0, -scale * center[0]],
        [0, scale, -scale * center[1]],
        [0, 0, 1]
    ])

    return np.dot(norm3d, points), norm3d


def compute_image_to_image_matrix(x1, x2, compute_essential=False):
    """ Compute the fundamental or essential matrix from corresponding points
        (x1, x2 3*n arrays) using the 8 point algorithm.
        Each row in the A matrix below is constructed as
        [x'*x, x'*y, x', y'*x, y'*y, y', x, y, 1]
    """
    A = correspondence_matrix(x1, x2)
    # compute linear least square solution
    U, S, V = np.linalg.svd(A)
    F = V[-1].reshape(3, 3)

    # constrain F. Make rank 2 by zeroing out last singular value
    U, S, V = np.linalg.svd(F)
    S[-1] = 0
    if compute_essential:
        S = [1, 1, 0]  # Force rank 2 and equal eigenvalues
    F = np.dot(U, np.dot(np.diag(S), V))

    return F


def compute_normalized_image_to_image_matrix(p1, p2, compute_essential=False):
    """ Computes the fundamental or essential matrix from corresponding points
        using the normalized 8 point algorithm.
    :input p1, p2: corresponding points with shape 3 x n
    :returns: fundamental or essential matrix with shape 3 x 3
    """
    n = p1.shape[1]
    if p2.shape[1] != n:
        raise ValueError('Number of points do not match.')

    # preprocess image coordinates
    p1n, T1 = scale_and_translate_points(p1)
    p2n, T2 = scale_and_translate_points(p2)

    # compute F or E with the coordinates
    F = compute_image_to_image_matrix(p1n, p2n, compute_essential)

    # reverse preprocessing of coordinates
    # We know that P1' E P2 = 0
    F = np.dot(T1.T, np.dot(F, T2))

    return F / F[2, 2]


def compute_fundamental_normalized(p1, p2):
    return compute_normalized_image_to_image_matrix(p1, p2)


def compute_essential_normalized(p1, p2):
    return compute_normalized_image_to_image_matrix(p1, p2, compute_essential=True)


def skew(x):
    """ Create a skew symmetric matrix *A* from a 3d vector *x*.
        Property: np.cross(A, v) == np.dot(x, v)
    :param x: 3d vector
    :returns: 3 x 3 skew symmetric matrix from *x*
    """
    return np.array([
        [0, -x[2], x[1]],
        [x[2], 0, -x[0]],
        [-x[1], x[0], 0]
    ])


def reconstruct_one_point(pt1, pt2, m1, m2):
    """
        pt1 and m1 * X are parallel and cross product = 0
        pt1 x m1 * X  =  pt2 x m2 * X  =  0
    """
    A = np.vstack([
        np.dot(skew(pt1), m1),
        np.dot(skew(pt2), m2)
    ])
    U, S, V = np.linalg.svd(A)
    P = np.ravel(V[-1, :4])

    return P / P[3]


def linear_triangulation(p1, p2, m1, m2):
    """
    Linear triangulation (Hartley ch 12.2 pg 312) to find the 3D point X
    where p1 = m1 * X and p2 = m2 * X. Solve AX = 0.
    :param p1, p2: 2D points in homo. or catesian coordinates. Shape (3 x n)
    :param m1, m2: Camera matrices associated with p1 and p2. Shape (3 x 4)
    :returns: 4 x n homogenous 3d triangulated points
    """
    num_points = p1.shape[1]
    res = np.ones((4, num_points))

    for i in range(num_points):
        A = np.asarray([
            (p1[0, i] * m1[2, :] - m1[0, :]),
            (p1[1, i] * m1[2, :] - m1[1, :]),
            (p2[0, i] * m2[2, :] - m2[0, :]),
            (p2[1, i] * m2[2, :] - m2[1, :])
        ])

        _, _, V = np.linalg.svd(A)
        X = V[-1, :4]
        res[:, i] = X / X[3]

    return res


def writetofile(dict, path):
    for index, item in enumerate(dict):
        dict[item] = np.array(dict[item])
        dict[item] = dict[item].tolist()
    js = json.dumps(dict)
    with open(path, 'w') as f:
        f.write(js)
        print("参数已成功保存到文件")


def readfromfile(path):
    with open(path, 'r') as f:
        js = f.read()
        mydict = json.loads(js)
    print("参数读取成功")
    return mydict


def camera_calibration(SaveParamPath, ImagePath):
    # 循环中断
    criteria = (cv2.TERM_CRITERIA_EPS + cv2.TERM_CRITERIA_MAX_ITER, 30, 0.001)
    # 棋盘格尺寸
    row = 11
    column = 8
    objpoint = np.zeros((row * column, 3), np.float32)
    objpoint[:, :2] = np.mgrid[0:row, 0:column].T.reshape(-1, 2)

    objpoints = []  # 3d point in real world space
    imgpoints = []  # 2d points in image plane.
    batch_images = glob.glob(ImagePath + '/*.jpg')
    for i, fname in enumerate(batch_images):
        img = cv2.imread(batch_images[i])
        imgGray = cv2.cvtColor(img, cv2.COLOR_BGR2GRAY)
        # find chess board corners
        ret, corners = cv2.findChessboardCorners(imgGray, (row, column), None)
        # if found, add object points, image points (after refining them)
        if ret:
            objpoints.append(objpoint)
            corners2 = cv2.cornerSubPix(imgGray, corners, (11, 11), (-1, -1), criteria)
            imgpoints.append(corners2)
            # Draw and display the corners
            img = cv2.drawChessboardCorners(img, (row, column), corners2, ret)
            cv2.imwrite('Checkerboard_Image/Temp_JPG/Temp_' + str(i) + '.jpg', img)
    print("成功提取:", len(batch_images), "张图片角点!")
    ret, mtx, dist, rvecs, tvecs = cv2.calibrateCamera(objpoints, imgpoints, imgGray.shape[::-1], None, None)
    dict = {'ret': ret, 'mtx': mtx, 'dist': dist, 'rvecs': rvecs, 'tvecs': tvecs}
    writetofile(dict, SaveParamPath)

    meanError = 0
    for i in range(len(objpoints)):
        imgpoints2, _ = cv2.projectPoints(objpoints[i], rvecs[i], tvecs[i], mtx, dist)
        error = cv2.norm(imgpoints[i], imgpoints2, cv2.NORM_L2) / len(imgpoints2)
        meanError += error
    print("total error: ", meanError / len(objpoints))


def epipolar_geometric(Images_Path, K):
    IMG = glob.glob(Images_Path)
    img1, img2 = cv2.imread(IMG[0]), cv2.imread(IMG[1])
    img1_gray = cv2.cvtColor(img1, cv2.COLOR_BGR2GRAY)
    img2_gray = cv2.cvtColor(img2, cv2.COLOR_BGR2GRAY)

    # Initiate SURF detector
    SURF = cv2.xfeatures2d_SURF.create()

    # compute keypoint & descriptions
    keypoint1, descriptor1 = SURF.detectAndCompute(img1_gray, None)
    keypoint2, descriptor2 = SURF.detectAndCompute(img2_gray, None)
    print("角点数量:", len(keypoint1), len(keypoint2))

    # Find point matches
    bf = cv2.BFMatcher(cv2.NORM_L2, crossCheck=True)
    matches = bf.match(descriptor1, descriptor2)
    print("匹配点数量:", len(matches))

    src_pts = np.asarray([keypoint1[m.queryIdx].pt for m in matches])
    dst_pts = np.asarray([keypoint2[m.trainIdx].pt for m in matches])
    # plot
    knn_image = cv2.drawMatches(img1_gray, keypoint1, img2_gray, keypoint2, matches[:-1], None, flags=2)
    image_ = Image.fromarray(np.uint8(knn_image))
    image_.save("MatchesImage.jpg")

    # Constrain matches to fit homography
    retval, mask = cv2.findHomography(src_pts, dst_pts, cv2.RANSAC, 100.0)

    # We select only inlier points
    points1 = src_pts[mask.ravel() == 1]
    points2 = dst_pts[mask.ravel() == 1]

    points1 = cart2hom(points1.T)
    points2 = cart2hom(points2.T)
    # plot
    fig, ax = plt.subplots(1, 2)
    ax[0].autoscale_view('tight')
    ax[0].imshow(cv2.cvtColor(img1, cv2.COLOR_BGR2RGB))
    ax[0].plot(points1[0], points1[1], 'r.')
    ax[1].autoscale_view('tight')
    ax[1].imshow(cv2.cvtColor(img2, cv2.COLOR_BGR2RGB))
    ax[1].plot(points2[0], points2[1], 'r.')
    plt.savefig('MatchesPoints.jpg')
    fig.show()
    #

    points1n = np.dot(np.linalg.inv(K), points1)
    points2n = np.dot(np.linalg.inv(K), points2)
    E = compute_essential_normalized(points1n, points2n)
    print('Computed essential matrix:', (-E / E[0][1]))

    P1 = np.array([[1, 0, 0, 0], [0, 1, 0, 0], [0, 0, 1, 0]])
    P2s = compute_P_from_essential(E)

    ind = -1
    for i, P2 in enumerate(P2s):
        # Find the correct camera parameters
        d1 = reconstruct_one_point(points1n[:, 0], points2n[:, 0], P1, P2)
        # Convert P2 from camera view to world view
        P2_homogenous = np.linalg.inv(np.vstack([P2, [0, 0, 0, 1]]))
        d2 = np.dot(P2_homogenous[:3, :4], d1)
        if d1[2] > 0 and d2[2] > 0:
            ind = i

    P2 = np.linalg.inv(np.vstack([P2s[ind], [0, 0, 0, 1]]))[:3, :4]
    Points3D = linear_triangulation(points1n, points2n, P1, P2)

    return Points3D


def main():
    CameraParam_Path = 'CameraParam.txt'
    CheckerboardImage_Path = 'Checkerboard_Image'
    Images_Path = 'SubstitutionCalibration_Image/*.jpg'

    # 计算相机参数
    camera_calibration(CameraParam_Path, CheckerboardImage_Path)
    # 读取相机参数
    config = readfromfile(CameraParam_Path)
    K = np.array(config['mtx'])
    # 计算3D点
    Points3D = epipolar_geometric(Images_Path, K)
    # 重建3D点
    fig = plt.figure()
    fig.suptitle('3D reconstructed', fontsize=16)
    ax = fig.gca(projection='3d')
    ax.plot(Points3D[0], Points3D[1], Points3D[2], 'b.')
    ax.set_xlabel('x axis')
    ax.set_ylabel('y axis')
    ax.set_zlabel('z axis')
    ax.view_init(elev=135, azim=90)
    plt.savefig('Reconstruction.jpg')
    plt.show()


if __name__ == '__main__':
main()Ce qui précède est le contenu détaillé de. pour plus d'informations, suivez d'autres articles connexes sur le site Web de PHP en chinois!