 Java
Java
 javaDidacticiel
 Comment utiliser Spring Boot+Vue pour implémenter le push de notification Socket
Comment utiliser Spring Boot+Vue pour implémenter le push de notification Socket
Côté Spring Boot
La première étape consiste à introduire les dépendances
Nous devons d'abord introduire les dépendances requises pour WebSocket et les dépendances pour le traitement du format de sortie
<!--格式转换-->
<!-- https://mvnrepository.com/artifact/com.alibaba/fastjson -->
<dependency>
   <groupId>com.alibaba</groupId>
   <artifactId>fastjson</artifactId>
   <version>1.2.73</version>
</dependency>
<!--WebSocket依赖-->
<dependency>
    <groupId>org.springframework.boot</groupId>
    <artifactId>spring-boot-starter-websocket</artifactId>
</dependency>La deuxième étape consiste à créer la classe de configuration WebSocket
import org.springframework.context.annotation.Bean;
import org.springframework.context.annotation.Configuration;
import org.springframework.web.socket.server.standard.ServerEndpointExporter;

/**
 * @author: tjp
 * @create: 2023-04-03 09:58
 * @Description: WebSocket配置
 */
@Configuration
public class WebSocketConfig {
    @Bean
    public ServerEndpointExporter serverEndpointExporter() {
        return new ServerEndpointExporter();
    }

}Le la troisième étape consiste à créer le service WebSocket
Dans cette étape, nous utilisons userId comme identifiant pour distinguer les utilisateurs correspondants dans le système. Nous pouvons également effectuer d'autres étapes opérationnelles sur cette base plus tard.
import com.alibaba.fastjson.JSON;
import com.alibaba.fastjson.JSONObject;
import com.alibaba.excel.util.StringUtils;
import lombok.extern.slf4j.Slf4j;
import org.springframework.stereotype.Component;

import javax.websocket.*;
import javax.websocket.server.PathParam;
import javax.websocket.server.ServerEndpoint;
import java.io.IOException;
import java.util.HashMap;
import java.util.Iterator;
import java.util.concurrent.ConcurrentHashMap;

/**
 * @author: tjp
 * @create: 2023-04-03 13:55
 * @Description: WebSocket服务
 */

@ServerEndpoint("/websocket/{userId}")
@Slf4j
@Component
public class WebSocketServer {
    /**
     * 静态变量,用来记录当前在线连接数。应该把它设计成线程安全的。
     */
    private static int onlineCount = 0;
    /**
     * concurrent包的线程安全Set,用来存放每个客户端对应的MyWebSocket对象。
     */
    private static ConcurrentHashMap<String, WebSocketServer> webSocketMap = new ConcurrentHashMap<>();
    /**
     * 与某个客户端的连接会话,需要通过它来给客户端发送数据
     */
    private Session session;
    /**
     * 接收userId
     */
    private String userId = "";

    /**
     * 连接建立成功调用的方法
     */
    @OnOpen
    public void onOpen(Session session, @PathParam("userId") String userId) {
        this.session = session;
        this.userId = userId;
        if (webSocketMap.containsKey(userId)) {
            webSocketMap.remove(userId);
            //加入set中
        } else {
            webSocketMap.put(userId, this);
            //加入set中
            addOnlineCount();
            //在线数加1
        }

        log.info("用户连接:" + userId + ",当前在线人数为:" + getOnlineCount());

        try {
            HashMap<Object, Object> map = new HashMap<>();
            map.put("key", "连接成功");
            sendMessage(JSON.toJSONString(map));
        } catch (IOException e) {
            log.error("用户:" + userId + ",网络异常!!!!!!");
        }
    }


    /**
     * 连接关闭调用的方法
     */
    @OnClose
    public void onClose() {
        if (webSocketMap.containsKey(userId)) {
            webSocketMap.remove(userId);
            //从set中删除
            subOnlineCount();
        }
        log.info("用户退出:" + userId + ",当前在线人数为:" + getOnlineCount());
    }

    /**
     * 收到客户端消息后调用的方法
     *
     * @param message 客户端发送过来的消息
     */
    @OnMessage
    public void onMessage(String message, Session session) {
        log.info("用户消息:" + userId + ",报文:" + message);
        //可以群发消息
        //消息保存到数据库、redis
        if (StringUtils.isNotBlank(message)) {
            try {
                //解析发送的报文
                JSONObject jsonObject = JSONObject.parseObject(message);
                //追加发送人(防止串改)
                jsonObject.put("fromUserId", this.userId);
                String fromUserId = jsonObject.getString("fromUserId");
                //传送给对应toUserId用户的websocket
                if (StringUtils.isNotBlank(fromUserId) && webSocketMap.containsKey(fromUserId)) {
                    webSocketMap.get(fromUserId).sendMessage(jsonObject.toJSONString());
                    //自定义-业务处理

//                    DeviceLocalThread.paramData.put(jsonObject.getString("group"),jsonObject.toJSONString());
                } else {
                    log.error("请求的userId:" + fromUserId + "不在该服务器上");
                    //否则不在这个服务器上,发送到mysql或者redis
                }
            } catch (Exception e) {
                e.printStackTrace();
            }
        }
    }

    /**
     * 发生错误时候
     *
     * @param session
     * @param error
     */
    @OnError
    public void onError(Session session, Throwable error) {
        log.error("用户错误:" + this.userId + ",原因:" + error.getMessage());
        error.printStackTrace();
    }

    /**
     * 实现服务器主动推送
     */
    public void sendMessage(String message) throws IOException {
        //加入线程锁
        synchronized (session) {
            try {
                //同步发送信息
                this.session.getBasicRemote().sendText(message);
            } catch (IOException e) {
                log.error("服务器推送失败:" + e.getMessage());
            }
        }
    }


    /**
     * 发送自定义消息
     * */
    /**
     * 发送自定义消息
     *
     * @param message  发送的信息
     * @param toUserId 如果为null默认发送所有
     * @throws IOException
     */
    public static void sendInfo(String message, String toUserId) throws IOException {
        //如果userId为空,向所有群体发送
        if (StringUtils.isEmpty(toUserId)) {
            //向所有用户发送信息
            Iterator<String> itera = webSocketMap.keySet().iterator();
            while (itera.hasNext()) {
                String keys = itera.next();
                WebSocketServer item = webSocketMap.get(keys);
                item.sendMessage(message);
            }
        }
        //如果不为空,则发送指定用户信息
        else if (webSocketMap.containsKey(toUserId)) {
            WebSocketServer item = webSocketMap.get(toUserId);
            item.sendMessage(message);
        } else {
            log.error("请求的userId:" + toUserId + "不在该服务器上");
        }
    }

    public static synchronized int getOnlineCount() {
        return onlineCount;
    }

    public static synchronized void addOnlineCount() {
        WebSocketServer.onlineCount++;
    }

    public static synchronized void subOnlineCount() {
        WebSocketServer.onlineCount--;
    }

    public static synchronized ConcurrentHashMap<String, WebSocketServer> getWebSocketMap() {
        return WebSocketServer.webSocketMap;
    }

}La quatrième étape, créer un contrôleur pour l'envoi du test
Obtenir le nombre actuel de personnes en ligne
import com.......WebSocketServer;

@ApiOperation(value = "获取当前在线人数")
@GetMapping("/getOnlineCount")
public Integer getOnlineCount() {
    return WebSocketServer.getOnlineCount();
}Envoyer des messages aux utilisateurs frontaux via l'interface
import com.......WebSocketServer;
import org.springframework.web.bind.annotation.GetMapping;
import org.springframework.web.bind.annotation.RequestMapping;
import org.springframework.web.bind.annotation.RestController;

import java.io.IOException;

/**
 * @author: tjp
 * @create: 2023-04-03 13:57
 * @Description: 测试
 */
@RestController
@RequestMapping("/news")
public class NewsController {
    @GetMapping("/send")
    public String send() {
        try {
            WebSocketServer.sendInfo("这是websocket发送过来的消息!", "需要推送的用户的编号");
        } catch (IOException e) {
            throw new RuntimeException(e);
        }
        return "发送消息成功";
    }

}Côté Vue
La première étape, créer l'outil de connexion class
Créez la classe d'outils websocket .js, le userId ici est l'userId utilisé comme identifiant
/**
 * @author: tjp
 * @create: 2023-04-03 11:22
 * @Description: Socket客户端
 */
export class WebSocketClient {
  constructor(userId) {
    this.userId = userId;
    this.websocket = null;
    this.timeout = 10000; // 心跳超时时间,单位ms
    this.timeoutObj = null; // 心跳定时器
    this.serverTimeoutObj = null; // 服务器超时定时器
    this.lockReconnect = false; // 避免重复连接
    this.timeoutnum = null; // 重连延迟定时器
  }

  // 初始化WebSocket连接
  initWebSocket() {
    let wsUrl = `ws://127.0.0.1:8080/websocket/${this.userId}`;
    this.websocket = new WebSocket(wsUrl);
    this.websocket.onopen = this.websocketonopen.bind(this);
    this.websocket.onerror = this.websocketonerror.bind(this);
    this.websocket.onmessage = this.setOnmessageMessage.bind(this);
    this.websocket.onclose = this.websocketclose.bind(this);
    // 监听窗口关闭事件,当窗口关闭时,主动去关闭websocket连接,防止连接还没断开就关闭窗口,server端会抛异常。
    window.onbeforeunload = this.websocketclose.bind(this);
  }

  // 启动心跳
  start() {
    console.log('start');
    // 清除延时器
    this.timeoutObj && clearTimeout(this.timeoutObj);
    this.serverTimeoutObj && clearTimeout(this.serverTimeoutObj);
    /*// 向服务器发送心跳消息
    let actions = { "test": "12345" };
    this.websocket && this.websocket.readyState == 1 && this.websocket.send(JSON.stringify(actions));
    // 启动心跳定时器
    this.timeoutObj = setTimeout(() => {
      this.start();
      // 定义一个延时器等待服务器响应,若超时,则关闭连接,重新请求server建立socket连接
      this.serverTimeoutObj = setTimeout(() => {
        this.websocket.close();
      }, this.timeout)
    }, this.timeout)*/
  }

  // 重置心跳
  reset() {
    // 清除时间
    clearTimeout(this.timeoutObj);
    clearTimeout(this.serverTimeoutObj);
    // 重启心跳
    this.start();
  }

  // 重新连接
  reconnect() {
    if (this.lockReconnect) return;
    this.lockReconnect = true;
    // 没连接上会一直重连,设置延迟避免请求过多
    this.timeoutnum && clearTimeout(this.timeoutnum);
    this.timeoutnum = setTimeout(() => {
      this.initWebSocket();
      this.lockReconnect = false;
    }, 5000)
  }

  // 处理收到的消息
  async setOnmessageMessage(event) {
    console.log(event.data, '获得消息');
    // 重置心跳
    // this.reset();
    // 自定义全局监听事件
    window.dispatchEvent(new CustomEvent('onmessageWS', {
      detail: {
        data: event.data
      }
    }))
    // //发现消息进入    开始处理前端触发逻辑
    // if (event.data === 'success' || event.data === 'heartBath') return
  }

  // WebSocket连接成功回调
  websocketonopen() {
    // 开启心跳
    this.start();
    console.log("WebSocket连接成功!!!" + new Date() + "----" + this.websocket.readyState);
    clearInterval(this.otimer);//停止
  }

  // WebSocket连接错误回调
  websocketonerror(e) {
    console.log("WebSocket连接发生错误" + e);
  }

  // WebSocket连接关闭回调
  websocketclose(e) {
    this.websocket.close();
    clearTimeout(this.timeoutObj);
    clearTimeout(this.serverTimeoutObj);
    console.log("websocketcloe关闭连接")
  }

  // 关闭WebSocket连接
  closeWebSocket() {
    this.websocket.close();
    console.log("closeWebSocket关闭连接")
  }

  // 监听窗口关闭事件
  onbeforeunload() {
    this.closeWebSocket();
  }
}La deuxième étape consiste à établir une connexion
Établissez une connexion Socket sur n'importe quelle page sur laquelle vous souhaitez établir une connexion
Pour exemple, après que l'utilisateur a cliqué sur le bouton de connexion
Ici, vous pouvez utiliser le prototype pour créer un objet de connexion et démarrer la connexion
<script>
import Vue from "vue";
import {WebSocketClient} from "@/utils/websocket";
......
......
methods:{
handleLogin() {
this.$refs.loginForm.validate(valid => {
if (valid) {
this.loading = true
this.$store.dispatch('user/login', this.loginForm).then(() => {
this.$router.push({path: this.redirect || '/'})
this.loading = false
/*-----------在此处放入原型中------------*/
Vue.prototype.$WebSocketClientInstance = new WebSocketClient('t');
Vue.prototype.$WebSocketClientInstance.initWebSocket()
/*-----------------end------------*/
}).catch(() => {
this.loading = false
})
} else {
this.$message({message: '请填写正确格式的用户名或密码', type: 'error'})
return false
}
})
}
}
.....
.....
</script>
La troisième étape consiste à écouter les messages envoyés par le serveur
Sur la page vous souhaitez surveiller, utilisez l'écouteur pour écouter
<script>
....
....
mounted() {
// 添加socket通知监听
window.addEventListener('onmessageWS', this.getSocketData)
},
methods: {
// 收到消息处理
getSocketData(res) {
console.log(res.detail)
console.log("llll")
},
}
....
....
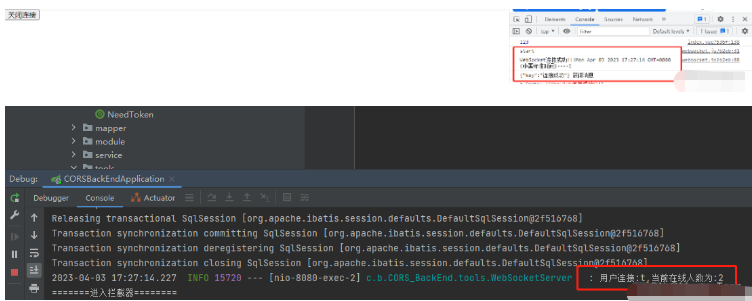
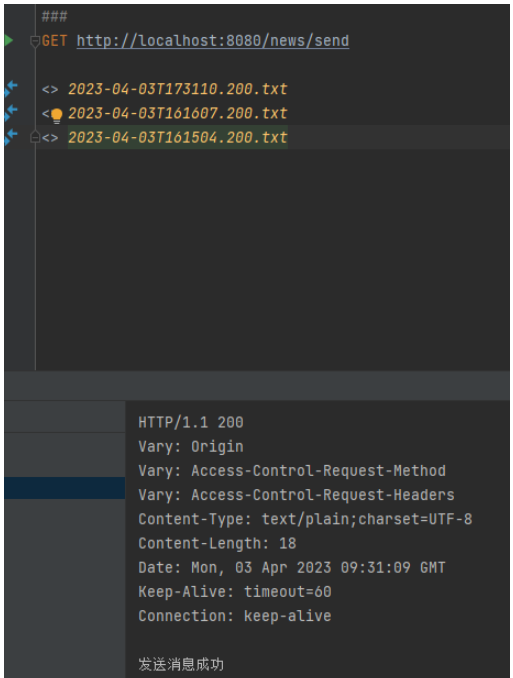
</script>À ce moment, vous Il peut être envoyé via l'interface backend
Faites un test


La quatrième étape consiste à fermer la connexion
Faire un bouton
<template>
  <div>
    <button @click="closeConnect">关闭连接</button>
  </div>
</template>

<script>
import {WebSocketClient} from "@/utils/websocket";
import Vue from "vue";

export default {
  methods: {
    closeConnect() {
      console.dir(Vue.prototype)
      Vue.prototype.$WebSocketClientInstance.closeWebSocket();
    },
  }
}
</script>
Ce qui précède est le contenu détaillé de. pour plus d'informations, suivez d'autres articles connexes sur le site Web de PHP en chinois!

Outils d'IA chauds

Undresser.AI Undress
Application basée sur l'IA pour créer des photos de nu réalistes

AI Clothes Remover
Outil d'IA en ligne pour supprimer les vêtements des photos.

Undress AI Tool
Images de déshabillage gratuites

Clothoff.io
Dissolvant de vêtements AI

AI Hentai Generator
Générez AI Hentai gratuitement.

Article chaud

Outils chauds

Bloc-notes++7.3.1
Éditeur de code facile à utiliser et gratuit

SublimeText3 version chinoise
Version chinoise, très simple à utiliser

Envoyer Studio 13.0.1
Puissant environnement de développement intégré PHP

Dreamweaver CS6
Outils de développement Web visuel

SublimeText3 version Mac
Logiciel d'édition de code au niveau de Dieu (SublimeText3)
 Comment ajouter des fonctions aux boutons pour Vue
Apr 08, 2025 am 08:51 AM
Vous pouvez ajouter une fonction au bouton VUE en liant le bouton dans le modèle HTML à une méthode. Définissez la logique de la fonction de méthode et d'écriture dans l'instance Vue.
 Comment référencer le fichier JS avec Vue.js
Apr 07, 2025 pm 11:27 PM
Il existe trois façons de se référer aux fichiers JS dans Vue.js: spécifiez directement le chemin à l'aide du & lt; script & gt; étiqueter;; importation dynamique à l'aide du crochet de cycle de vie monté (); et l'importation via la bibliothèque de gestion de l'État Vuex.
 Comment utiliser Bootstrap en Vue
Apr 07, 2025 pm 11:33 PM
L'utilisation de bootstrap dans vue.js est divisée en cinq étapes: installer bootstrap. Importer un bootstrap dans main.js. Utilisez le composant bootstrap directement dans le modèle. Facultatif: style personnalisé. Facultatif: utilisez des plug-ins.
 Comment utiliser Watch in Vue
Apr 07, 2025 pm 11:36 PM
L'option Watch dans Vue.js permet aux développeurs d'écouter des modifications de données spécifiques. Lorsque les données changent, regardez déclenche une fonction de rappel pour effectuer des vues de mise à jour ou d'autres tâches. Ses options de configuration incluent immédiatement, qui spécifie s'il faut exécuter un rappel immédiatement, et profond, ce qui spécifie s'il faut écouter récursivement les modifications des objets ou des tableaux.
 Comment revenir à la page précédente par Vue
Apr 07, 2025 pm 11:30 PM
Vue.js dispose de quatre méthodes pour revenir à la page précédente: $ router.go (-1) $ router.back () utilise & lt; router-link to = & quot; / & quot; Composant Window.History.back (), et la sélection de la méthode dépend de la scène.
 Vue réalise l'effet de défilement de chapiteau / texte
Apr 07, 2025 pm 10:51 PM
Implémentez les effets de défilement marquee / texte dans VUE, en utilisant des animations CSS ou des bibliothèques tierces. Cet article présente comment utiliser l'animation CSS: créer du texte de défilement et envelopper du texte avec & lt; div & gt;. Définissez les animations CSS et défini: caché, largeur et animation. Définissez les images clés, Set Transforment: Translatex () au début et à la fin de l'animation. Ajustez les propriétés d'animation telles que la durée, la vitesse de défilement et la direction.
 Comment interroger la version de Vue
Apr 07, 2025 pm 11:24 PM
Vous pouvez interroger la version Vue en utilisant Vue Devtools pour afficher l'onglet Vue dans la console du navigateur. Utilisez NPM pour exécuter la commande "NPM List -g Vue". Recherchez l'élément VUE dans l'objet "dépendances" du fichier package.json. Pour les projets Vue CLI, exécutez la commande "Vue --version". Vérifiez les informations de la version dans le & lt; script & gt; Tag dans le fichier html qui fait référence au fichier VUE.
 Comment utiliser Vue Traversal
Apr 07, 2025 pm 11:48 PM
Il existe trois méthodes courantes pour que Vue.js traverse les tableaux et les objets: la directive V-FOR est utilisée pour traverser chaque élément et les modèles de rendu; La directive V-Bind peut être utilisée avec V-FOR pour définir dynamiquement les valeurs d'attribut pour chaque élément; et la méthode .map peut convertir les éléments du tableau en nouveaux tableaux.


