1, master:127.0.0.1:6379
2, slave1:127.0.0.1:6380
3 . esclave2 : 127.0.0.1:6381
4, sentinelle1:127.0.0.1:26379
5, sentinelle2:127.0.0.1:26479
6, sentinelle3:127.0.0 .1:26579
7、 Nom de l'hôte de surveillance : mymaster
8. Attachez la configuration de sentinel1
port 26379
sentinel monitor mymaster 127.0.0.1 6379 2
sentinel down-after-milliseconds mymaster 5000
sentinel parallel-syncs mymaster 1
sentinel failover-timeout mymaster 15000

est la suivante :

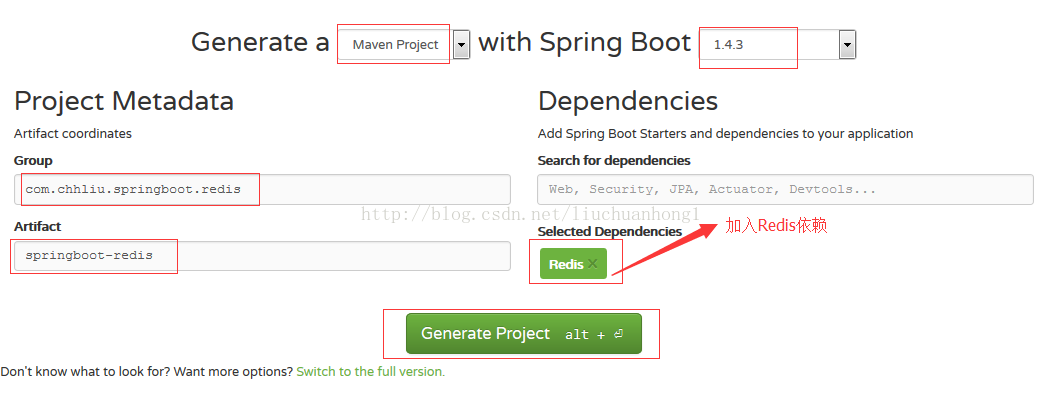
Le fichier pom est le suivant :
<?xml version="1.0" encoding="UTF-8"?>
<project xmlns="http://maven.apache.org/POM/4.0.0" xmlns:xsi="http://www.w3.org/2001/XMLSchema-instance"
	xsi:schemaLocation="http://maven.apache.org/POM/4.0.0 http://maven.apache.org/xsd/maven-4.0.0.xsd">
	<modelVersion>4.0.0</modelVersion>

	<groupId>com.chhliu.springboot.redis</groupId>
	<artifactId>springboot-redis</artifactId>
	<version>0.0.1-SNAPSHOT</version>
	<packaging>jar</packaging>

	<name>springboot-redis</name>
	<description>Demo project for Spring Boot redis</description>

	<parent>
		<groupId>org.springframework.boot</groupId>
		<artifactId>spring-boot-starter-parent</artifactId>
		<version>1.4.3.RELEASE</version>
		<relativePath/> <!-- lookup parent from repository -->
	</parent>

	<properties>
		<project.build.sourceEncoding>UTF-8</project.build.sourceEncoding>
		<project.reporting.outputEncoding>UTF-8</project.reporting.outputEncoding>
		<java.version>1.7</java.version>
	</properties>

	<dependencies>
		<dependency>
			<groupId>org.springframework.boot</groupId>
			<artifactId>spring-boot-starter-data-redis</artifactId>
		</dependency>

		<dependency>
			<groupId>org.springframework.boot</groupId>
			<artifactId>spring-boot-starter-test</artifactId>
			<scope>test</scope>
		</dependency>
	</dependencies>

	<build>
		<plugins>
			<plugin>
				<groupId>org.springframework.boot</groupId>
				<artifactId>spring-boot-maven-plugin</artifactId>
			</plugin>
		</plugins>
	</build>
</project>
Ajouter le contenu suivant au fichier de configuration :
########################################################
###REDIS (RedisProperties) redis基本配置;
########################################################
# database name
spring.redis.database=0
# server host1 单机使用,对应服务器ip
#spring.redis.host=127.0.0.1
# server password 密码,如果没有设置可不配
#spring.redis.password=
#connection port  单机使用,对应端口号
#spring.redis.port=6379
# pool settings ...池配置
spring.redis.pool.max-idle=8
spring.redis.pool.min-idle=0
spring.redis.pool.max-active=8
spring.redis.pool.max-wait=-1
# name of Redis server  哨兵监听的Redis server的名称
spring.redis.sentinel.master=mymaster
# comma-separated list of host:port pairs  哨兵的配置列表
spring.redis.sentinel.nodes=127.0.0.1:26379,127.0.0.1:26479,127.0.0.1:26579
package com.chhliu.springboot.redis;
import org.springframework.beans.factory.annotation.Autowired;
import org.springframework.data.redis.core.RedisTemplate;
import org.springframework.data.redis.core.StringRedisTemplate;
import org.springframework.stereotype.Service;

@Service("redisService")
public class RedisService {
	@Autowired //操作字符串的template,StringRedisTemplate是RedisTemplate的一个子集
	private StringRedisTemplate stringRedisTemplate;

	@Autowired  // RedisTemplate,可以进行所有的操作
        private RedisTemplate<Object,Object> redisTemplate;

	public void set(String key, String value){
		stringRedisTemplate.opsForValue().set(key, value);
	}

	public void set(Student s){
		redisTemplate.opsForValue().set(s.getId(), s);
	}

	public String get(String key){
		return stringRedisTemplate.opsForValue().get(key);
	}

	public Student getStudent(String key){
		return (Student) redisTemplate.opsForValue().get(key);
	}
}Le vo dépendant est le suivant :
package com.chhliu.springboot.redis;
import java.io.Serializable;
public class Student implements Serializable{
	/**
	 *
	 */
	private static final long serialVersionUID = 1L;
	private String id;
	private String name;
	private String age;
	private String grade;
       // 省略getter,setter
	/**
	 * attention:
	 * Details:TODO
	 * @author chhliu
	 * 创建时间:2017-1-18 下午2:24:39
	 * @return
	 */
	@Override
	public String toString() {
		return "Student [id=" + id + ", name=" + name + ", age=" + age
				+ ", grade=" + grade + "]";
	}
}package com.chhliu.springboot.redis;
import org.junit.Test;
import org.junit.runner.RunWith;
import org.springframework.beans.factory.annotation.Autowired;
import org.springframework.boot.test.context.SpringBootTest;
import org.springframework.test.context.junit4.SpringRunner;
@RunWith(SpringRunner.class)
@SpringBootTest
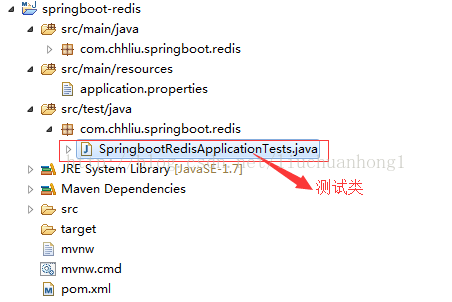
public class SpringbootRedisApplicationTests {
@Autowired
private RedisService service;
@Test
public void contextLoads() {
service.set("myname", "chhliu");
Student s = new Student();
s.setId("001");
s.setName("chhliu");
s.setGrade("一年级");
s.setAge("28");
service.set(s);
String name = service.get("myname");
System.out.println("name:"+name);
Student stu = service.getStudent("001");
System.out.println(stu);
}
}nom : chhliu
Étudiant [id=001, nom=chhliu, age=28, grade=first grade]
Redis' Le mode sentinelle est une solution officielle de haute disponibilité, et la configuration est très simple.
Cet article utilise redis-5.0.5 est installé dans le répertoire /soft/redis Vous devez créer un nouveau répertoire /soft/redis/data
Configuration du nœud maître
vim. config/redis-6379. Conf
# bind 127.0.0.1
port 6379
protected-mode no
daemonize yes
pidfile "/var/run/redis_6379.pid"
dir "/soft/redis/data"
dbfilename "dump-6379.rdb"
logfile "log-6379.log"
À partir du nœud 1 Configuration
Vim Config/Redis-6380.CONF# bind 127.0.0.1 port 6380 protected-mode no daemonize yes pidfile "/var/run/redis_6380.pid" dir "/soft/redis/data" dbfilename "dump-6380.rdb" logfile "log-6380.log" replicaof 192.168.4.176 6379
Configurer
Vim Config/Redis-6381.Conf# bind 127.0.0.1 port 6381 protected-mode no daemonize yes pidfile "/var/run/redis_6381.pid" dir "/soft/redis/data" dbfilename "dump-6381.rdb" logfile "log-6381.log" replicaof 192.168.4.176 6379
description de la configuration
# bind 127.0.0.1 Commentez cette configuration afin que d'autres machines puissent se connecter à redismode protégé non Désactivez le mode protégé pour que d'autres machines puissent se connecter à redisdémoniser le démarrage en mode arrière-planla version redis-v5 utilise une réplique de pour remplacer l'ancien esclave de l'instruction. Démarrez ces 3 nœuds et exécutez-les dans le répertoire /soft/redisredis-server config/redis-6379.conf redis-server config/redis-6380.conf redis-server config/redis-6381.conf
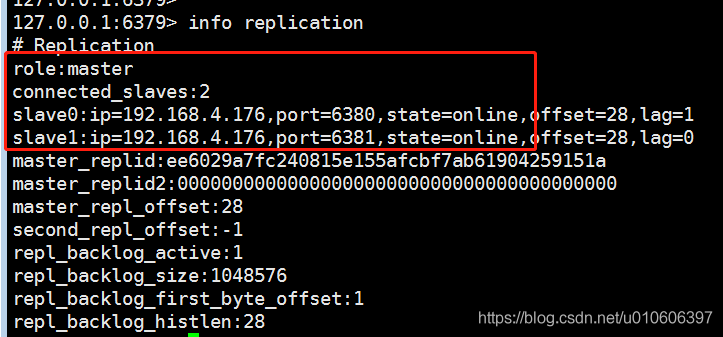
redis-cli -p 6379
info replication

Sentinel Node 1
vim config/redis-sentinel-26379.confport 26379 daemonize yes pidfile "/var/run/redis-sentinel-26379.pid" dir /tmp logfile "log-sentinel-26379.log" sentinel monitor mymaster 192.168.4.176 6379 2 sentinel down-after-milliseconds mymaster 30000 sentinel parallel-syncs mymaster 1 sentinel failover-timeout mymaster 180000 sentinel deny-scripts-reconfig yes
Sentinel Node 2
vim config/redis-sentinel-26380.confport 26380 daemonize yes pidfile "/var/run/redis-sentinel-26380.pid" dir /tmp logfile "log-sentinel-26380.log" sentinel monitor mymaster 192.168.4.176 6379 2 sentinel down-after-milliseconds mymaster 30000 sentinel parallel-syncs mymaster 1 sentinel failover-timeout mymaster 180000 sentinel deny-scripts-reconfig yes
Sentinel Node 3
vim config/redis-sentinel -26 381 .confport 26381 daemonize yes pidfile "/var/run/redis-sentinel-26381.pid" dir /tmp logfile "log-sentinel-26381.log" sentinel monitor mymaster 192.168.4.176 6379 2 sentinel down-after-milliseconds mymaster 30000 sentinel parallel-syncs mymaster 1 sentinel failover-timeout mymaster 180000 sentinel deny-scripts-reconfig yes
Instructions de configuration
monitor mymaster 192.168.4.176 6379 2
down-after-milliseconds
parallel-syncs
Démarrez la sentinelle
redis-sentinel config/redis-sentinel-26379.conf
redis-sentinel config/redis-sentinel-26380.conf
redis-sentinel config/redis-sentinel-26381.conf
<dependency>
    <groupId>org.springframework.boot</groupId>
    <artifactId>spring-boot-starter-data-redis</artifactId>
</dependency>Vérifiez les fichiers de configuration de 6380 et 6381
# 使用哨兵模式不能加以下两行配置,其他配置可以加
# spring.redis.host=192.168.4.176
# spring.redis.port=6379

spring.redis.sentinel.master=mymaster
spring.redis.sentinel.nodes=192.168.4.176:26379, 192.168.4.176:26380, 192.168.4.176:26381
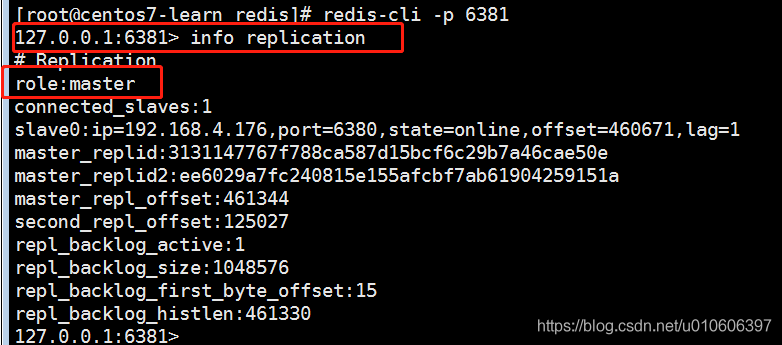
Redémarrez l'instance redis 6379
@RunWith(SpringRunner.class)
@SpringBootTest
public class Sentinel001 {
    @Autowired
    RedisTemplate redisTemplate;

    @Test
    public void test001() throws Exception{
        while (true){
            String key = "time:" + new Date().getTime();
            redisTemplate.opsForValue().set(key, new Date().getTime());
            TimeUnit.MILLISECONDS.sleep(100L);
            System.out.println(redisTemplate.opsForValue().get(key));
        }
    }
}6379 devient le esclave Le nœud de 6381
Ce qui précède est le contenu détaillé de. pour plus d'informations, suivez d'autres articles connexes sur le site Web de PHP en chinois!
 Logiciel de base de données couramment utilisé
 Que sont les bases de données en mémoire ?
 Lequel a une vitesse de lecture plus rapide, mongodb ou redis ?
 Comment utiliser Redis comme serveur de cache
 Comment Redis résout la cohérence des données
 Comment MySQL et Redis assurent-ils la cohérence des doubles écritures ?
 Quelles données le cache Redis stocke-t-il généralement ?
 Quels sont les 8 types de données de Redis