Dans SpringBoot, la gestion du cache et le stockage des données reposent sur les interfaces de gestionnaire de cache org.springframework.cache.Cache et org.springframework.cache.CacheManager liées au cache dans le framework Spring.
S'il n'y a pas de composant Bean de type CacheManager ou de résolveur de cache CacheResolver nommé cacheResolver défini dans le programme, SpringBoot essaiera de sélectionner et d'activer les composants de cache suivants (dans l'ordre spécifié) :
(1) Générique
( 2) JCache (JSR-107) (EhCache 3, Hazelcast, Infinispan, etc.)
(3) EhCache 2.x
(4) Hazelcast
(5) Infinispan
(6) Couchbase
(7 ) Redis
(8) Caféine
(9) Simple
Ce qui précède répertorie 9 composants de cache pris en charge par SpringBoot selon l'ordre de chargement des composants de cache SpringBoot Après avoir ajouté un composant de gestion de cache (tel que Redis) au projet, le projet SpringBoot choisira Et activera le gestionnaire de cache correspondant. Si plusieurs composants de cache sont ajoutés au projet en même temps et qu'aucun gestionnaire de cache ou résolveur de cache (CacheManager ou cacheResolver) n'est spécifié, SpringBoot activera le premier parmi les multiples composants de cache ajoutés dans l'ordre ci-dessus. gestion du cache (par exemple, si les deux composants de cache Couchbase et Redis sont ajoutés en même temps, alors le composant Couchbase est activé en premier).
Dans la gestion du cache par défaut présentée dans l'article précédent SpringBoot Cache Management (1) Default Cache Management, le projet que nous avons construit n'a ajouté aucun composant de gestion du cache, mais la gestion du cache était toujours implémentée. En effet, Après avoir activé la gestion du cache, SpringBoot recherchera les composants de cache valides pour la gestion du cache dans l'ordre des composants de cache ci-dessus, le dernier composant de cache simple sera utilisé par défaut pour la gestion. Le composant de cache simple est le composant de gestion de cache par défaut de SpringBoot. Il utilise ConcurrentMap en mémoire pour le stockage du cache, donc La gestion du cache en mémoire peut toujours être réalisée sans ajouter de composants de cache tiers, mais cela n'est pas recommandé. .
Implémentation du cache Redis basée sur les annotationsPrésentez le composant de cache Redis basé sur le projet construit par SpringBoot Cache Management (1) Default Cache Management et utilisez des méthodes basées sur les annotations pour expliquer l'implémentation spécifique de l'intégration du cache Redis par SpringBoot. (1) Ajouter un démarreur de dépendance Spring Data Redis Ajouter un démarreur de dépendance Spring Data Redis dans le pom. Effectuez des classes d'assemblage automatique liées au cache (auparavant SimpleCacheConfiguration par défaut), le gestionnaire de cache utilisé dans le conteneur est devenu RedisCacheManager ( auparavant le cacheManager par défaut), le cache créé par ce gestionnaire de cache est RedisCache, puis contrôlez Redis pour mettre les données en cache. (2) Configuration de la connexion au serveur RedisAjoutez la configuration de connexion de la base de données Redis dans le fichier de configuration global application.properties du projet L'exemple de code est le suivant :<dependency> <groupId>org.springframework.boot</groupId> <artifactId>spring-boot-starter-data-redis</artifactId></dependency>
# Redis服务器地址
spring.redis.host=127.0.0.1
# Redis服务器连接端口
spring.redis.port=6379
# Redis服务器连接密码(默认为空)
spring.redis.password=
package com.hardy.springbootdatacache.service;import com.hardy.springbootdatacache.entity.Comment;import com.hardy.springbootdatacache.repository.CommentRepository;import org.springframework.beans.factory.annotation.Autowired;import org.springframework.cache.annotation.CacheEvict;import org.springframework.cache.annotation.CachePut;import org.springframework.cache.annotation.Cacheable;import org.springframework.stereotype.Service;import java.util.Optional;/**
 * @Author: HardyYao
 * @Date: 2021/6/19 */@Servicepublic class CommentService {

    @Autowiredprivate CommentRepository commentRepository;/** * 根据评论id查询评论
     * @Cacheable:将该方法的查询结果comment存放在SpringBoot默认缓存中
     * cacheNames:起一个缓存命名空间,对应缓存唯一标识
     * @param id
     * @return */@Cacheable(cacheNames = "comment", unless = "#result==null")public Comment findCommentById(Integer id){
        Optional<Comment> comment = commentRepository.findById(id);if(comment.isPresent()){
            Comment comment1 = comment.get();return comment1;
        }return null;
    }/** * 更新评论
     * @param comment
     * @return */@CachePut(cacheNames = "comment",key = "#result.id")public Comment updateComment(Comment comment) {
        commentRepository.updateComment(comment.getAuthor(), comment.getaId());return comment;
    }/** * 删除评论
     * @param comment_id     */@CacheEvict(cacheNames = "comment")public void deleteComment(int comment_id) {
        commentRepository.deleteById(comment_id);
    }

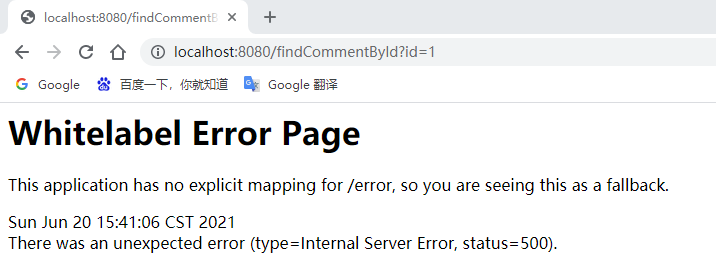
}La page a signalé une erreur, vérifiez les informations de la console : 
Selon le message d'erreur : l'instruction SQL correspondante a été exécutée lors de l'interrogation des informations du commentaire de l'utilisateur Commentaire, mais dans An IllegalArgumentException s'est produite pendant le stockage du cache et le message d'invite exigeait que la classe d'entité Comment correspondante soit sérialisée (DefaultSerializer nécessite une charge utile sérialisable mais a reçu un objet de type [com.hardy.springbootdatacache.entity.Comment]). 
(7) Redémarrer le projet pour tester le cache de requêtes
在浏览器中输入:http://localhost:8080/findCommentById?id=1 进行访问(连续访问三次):


打开Redis客户端可视化工具Redis Desktop Manager,连接本地启用的Redis服务,查看具体的数据缓存效果:

执行findById()方法查询出的用户评论信息Comment正确存储到了Redis缓存库中名为comment的名称空间下。
其中缓存数据的唯一标识key值是以“名称空间comment::+参数值(comment::1)”的字符串形式体现的,而value值则是经过JDK默认序列格式化后的HEX格式存储。这种JDK默认序列格式化后的数据显然不方便缓存数据的可视化查看和管理,所以在实际开发中,通常会自定义数据的序列化格式,这方面的内容在后面会介绍。
(8)基于注解的Redis缓存更新测试
先通过浏览器访问:http://localhost:8080/updateComment?id=1&author=hardy;
接着在访问:http://localhost:8080/findCommentById?id=1,查看浏览器返回信息及控制台打印信息:


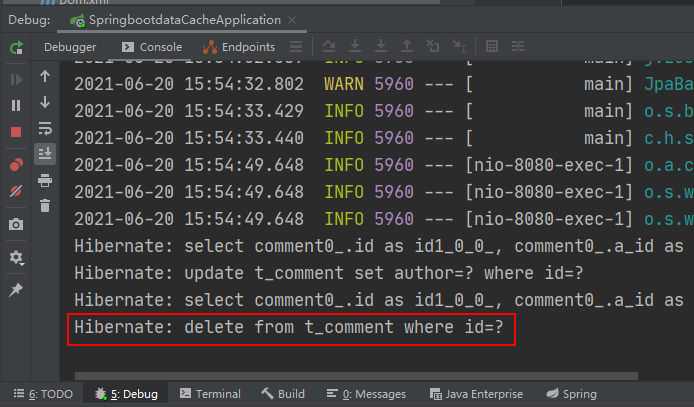
可以看到,执行updateComment()更新id为1的数据时执行了一条更新的SQL语句,后续调用findById()方法查询id为1的用户评论信息时没有再次执行查询的SQL语句,且浏览器返回了更新后的正确结果,这说明@CachePut缓存更新配置成功。
(9)基于注解的Redis缓存删除测试
通过浏览器访问:http://localhost:8080/deleteComment?id=1 和 http://localhost:8080/findCommentById?id=1


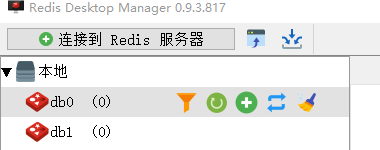
执行deleteComment()方法删除id为1的数据后查询结果为空,查看Redis缓存数据库:

可以看到之前存储的comment相关数据被删除掉了,这表明@CacheEvict注解缓存删除成功实现。
通过上面的案例可以看出:使用基于注解的Redis缓存实现只需要添加Redis依赖、并使用几个注解在对应的方法上,就可以实现对数据的缓存管理。
另外,还可以在SpringBoot全局配置文件中配置Redis有效期,示例代码如下:
# 对基于注解的Redis缓存数据统一设置有效期为1分钟,单位毫秒
spring.cache.redis.time-to-live=60000
上述代码中,在SpringBoot全局配置文件中添加了“spring.cache.redis.time-to-live”属性统一设置Redis数据的有效期(单位为毫秒),但这种方式不够灵活,因此一般不用。
在SpringBoot整合Redis缓存实现中,除了基于注解形式的Redis缓存形式外,还有一种开发中更常用的方式——基于API的Redis缓存实现。这种基于API的Redis缓存实现,需要在某种业务需求下通过Redis提供的API调用相关方法实现数据缓存管理。同时,这种方法还可以手动管理缓存的有效期。
下面,通过Redis API的方式讲解SpringBoot整合Redis缓存的具体实现。
(1)使用Redis API进行业务数据缓存管理
在 com.hardy.springbootdatacache.service 包下新建一个 ApiCommentService:
package com.hardy.springbootdatacache.service;import com.hardy.springbootdatacache.entity.Comment;import com.hardy.springbootdatacache.repository.CommentRepository;import org.springframework.beans.factory.annotation.Autowired;import org.springframework.cache.annotation.CacheEvict;import org.springframework.cache.annotation.CachePut;import org.springframework.cache.annotation.Cacheable;import org.springframework.data.redis.core.RedisTemplate;import org.springframework.stereotype.Service;import java.util.Optional;import java.util.concurrent.TimeUnit;/**
 * @Author: HardyYao
 * @Date: 2021/6/19 */@Servicepublic class ApiCommentService {

    @Autowiredprivate CommentRepository commentRepository;

    @Autowiredprivate RedisTemplate redisTemplate;/** * 根据评论id查询评论
     * @param id
     * @return */public Comment findCommentById(Integer id){// 先查Redis缓存Object o = redisTemplate.opsForValue().get("comment_" + id);if (o != null) {return (Comment) o;
        } else {// 如果缓存中没有,则从数据库查询Optional<Comment> dbComment = commentRepository.findById(id);if (dbComment.isPresent()) {
                Comment redisComment = dbComment.get();// 将查询结果存储到缓存中,并设置有效期为1天redisTemplate.opsForValue().set("comment_"+id, redisComment,1, TimeUnit.DAYS);return redisComment;
            } else {return null;
            }
        }

    }/** * 更新评论
     * @param comment
     * @return */public Comment updateComment(Comment comment) {
        commentRepository.updateComment(comment.getAuthor(), comment.getId());// 更新数据库数据后进行缓存更新redisTemplate.opsForValue().set("comment_" + comment.getId(), comment);return comment;
    }/** * 删除评论
     * @param comment_id     */public void deleteComment(int comment_id) {
        commentRepository.deleteById(comment_id);// 删除数据库数据后进行缓存删除redisTemplate.delete("comment_" + comment_id);
    }

}(2)编写Web访问层ApiCommentController
package com.hardy.springbootdatacache.controller;import com.hardy.springbootdatacache.entity.Comment;import com.hardy.springbootdatacache.service.ApiCommentService;import org.springframework.beans.factory.annotation.Autowired;import org.springframework.web.bind.annotation.RequestMapping;import org.springframework.web.bind.annotation.RestController;/**
 * @Author: HardyYao
 * @Date: 2021/6/19 */@RestController
@RequestMapping("api")  // 改变请求路径public class ApiCommentController {

    @Autowiredprivate ApiCommentService apiCommentService;

    @RequestMapping(value = "/findCommentById")public Comment findCommentById(Integer id){
        Comment comment = apiCommentService.findCommentById(id);return comment;
    }

    @RequestMapping(value = "/updateComment")public Comment updateComment(Comment comment){
        Comment oldComment = apiCommentService.findCommentById(comment.getId());
        oldComment.setAuthor(comment.getAuthor());
        Comment comment1 = apiCommentService.updateComment(oldComment);return comment1;
    }

    @RequestMapping(value = "/deleteComment")public void deleteComment(Integer id){
        apiCommentService.deleteComment(id);
    }

}(3)测试基于API的Redis缓存实现
输入:http://localhost:8080/api/findCommentById?id=2(连续输入三次)、http://localhost:8080/api/updateComment?id=2&author=hardy、http://localhost:8080/deleteComment?id=2进行访问:


Afficher les messages de la console et la base de données Redis :

 #🎜 🎜 #
Configurations associées pour l'implémentation du cache Redis basée sur l'API : L'implémentation du cache Redis basée sur l'API ne nécessite pas l'annotation @EnableCaching pour activer la prise en charge de la mise en cache basée sur les annotations, vous pouvez donc choisir ici de ajoutez-le au projet La suppression ou l'annotation de l'annotation @EnableCaching sur la classe de démarrage n'affectera pas l'implémentation fonctionnelle du projet.
Ce qui précède est le contenu détaillé de. pour plus d'informations, suivez d'autres articles connexes sur le site Web de PHP en chinois!
 Étapes de création du projet SpringBoot
 Logiciel de base de données couramment utilisé
 Que sont les bases de données en mémoire ?
 Lequel a une vitesse de lecture plus rapide, mongodb ou redis ?
 Comment utiliser Redis comme serveur de cache
 Comment Redis résout la cohérence des données
 Comment MySQL et Redis assurent-ils la cohérence des doubles écritures ?
 Quelles données le cache Redis stocke-t-il généralement ?