
有没有人和我一样,遇到同样的困惑:当我使用 Prometheus 来搭建监控体系的时候,每当有一个组件需要监控,我就要为其增加一个 exporter,如果有 10 个组件,我就要增加 10 个 exporter,先不说这 10 个 exporter 的质量如何(因为大部分 exporter 都是广大网友自己开发的),光学习成本、部署成本以及维护成本都让人头疼。
有没有一个组件,就能搞定大部分指标采集的?
Categraf 就是这样的一个采集器。
惊不惊喜,意不意外?
Categraf 是一个监控采集 Agent,类似 Telegraf、Grafana-Agent、Datadog-Agent,希望对所有常见监控对象提供监控数据采集能力,采用 All-in-one 的设计,不但支持指标采集,也希望支持日志和调用链路的数据采集。
相比于其他采集器,Categraf 的优势在于:
安装很简单,下面简单介绍二进制安装的方式。
# 下载$ wget https://download.flashcat.cloud/categraf-v0.2.38-linux-amd64.tar.gz# 解压$ tar xf categraf-v0.2.38-linux-amd64.tar.gz# 进入目录$ cd categraf-v0.2.38-linux-amd64/
修改配置文件,在 conf/config.toml 中,修改的部分如下:
[[writers]]url = "http://127.0.0.1:17000/prometheus/v1/write"[heartbeat]enable = true
然后启动 Categraf。
$ nohup ./categraf &>categraf.log &
配置详解我们上面部署 Categraf 的时候没有指定配置文件,它就会默认读取 conf 目录下的配置文件,conf 目录的结构如下:
[global]# 是否打印配置内容print_configs = false# 机器名,作为本机的唯一标识,会为时序数据自动附加一个 agent_hostname=$hostname 的标签# hostname 配置如果为空,自动取本机的机器名# hostname 配置如果不为空,就使用用户配置的内容作为hostname# 用户配置的hostname字符串中,可以包含变量,目前支持两个变量,# $hostname 和 $ip,如果字符串中出现这两个变量,就会自动替换# $hostname 自动替换为本机机器名,$ip 自动替换为本机IP# 建议大家使用 --test 做一下测试,看看输出的内容是否符合预期# 这里配置的内容,再--test模式下,会显示为 agent_hostname=xxx 的标签hostname = ""# 是否忽略主机名的标签,如果设置为true,时序数据中就不会自动附加agent_hostname=$hostname 的标签omit_hostname = false# 时序数据的时间戳使用ms还是s,默认是ms,是因为remote write协议使用ms作为时间戳的单位precision = "ms"# 全局采集频率,15秒采集一次interval = 15# 配置文件来源,目前支持local和http两种配置,如果配置为local就读取本地的配置,如果配置为http,需要在[http]模块配置http来源providers = ["local"]# 全局附加标签,一行一个,这些写的标签会自动附到时序数据上# [global.labels]# region = "shanghai"# env = "localhost"# 日志模块[log]# 默认的log输出,到标准输出(stdout)# 如果指定为文件, 则写入到指定的文件中file_name = "stdout"# 当日志输出到文件时该配置生效,用于限制日志文件大小max_size = 100# 日志保留天数max_age = 1# 备份日志个数max_backups = 1# 是否使用本地时间格式化日志local_time = true# 是否用gzip对日志进行压缩compress = false# 发给后端的时序数据,会先被扔到 categraf 内存队列里,每个采集插件一个队列# chan_size 定义了队列最大长度# batch 是每次从队列中取多少条,发送给后端backend[writer_opt]batch = 1000chan_size = 1000000# 后端backend配置,在toml中 [[]] 表示数组,所以可以配置多个writer# 每个writer可以有不同的url,不同的basic auth信息[[writers]]url = "http://127.0.0.1:17000/prometheus/v1/write"# 认证用户,默认为空basic_auth_user = ""# 认证密码,默认为空basic_auth_pass = ""## 请求头信息# headers = ["X-From", "categraf", "X-Xyz", "abc"]# 超时配置:单位是 mstimeout = 5000dial_timeout = 2500max_idle_conns_per_host = 100# 如果providers配置为http,就需要在这个地方进行配置[http]# 是否开启enable = false# 地址信息address = ":9100"print_access = falserun_mode = "release"# ibex配置,用于配置ibex-server的地址,用于实现故障自愈[ibex]enable = false## ibex刷新频率interval = "1000ms"## ibex server 地址servers = ["127.0.0.1:20090"]## 脚本临时保存目录meta_dir = "./meta"# 心跳上报给n9e[heartbeat]enable = true# 上报 os version cpu.util mem.util 等元信息url = "http://127.0.0.1:17000/v1/n9e/heartbeat"# 上报频率,单位是 sinterval = 10# 认证用户basic_auth_user = ""# 认证密码basic_auth_pass = ""## header 头信息# headers = ["X-From", "categraf", "X-Xyz", "abc"]# 超时配置,单位 mstimeout = 5000dial_timeout = 2500max_idle_conns_per_host = 100
[logs]# api_key http模式下生效,用于鉴权, 其他模式下占位符api_key = "ef4ahfbwzwwtlwfpbertgq1i6mq0ab1q"# 是否开启log-agentenable = false# 日志接收地址,可以配置tcp、http以及kafkasend_to = "127.0.0.1:17878"# 日志发送协议:http/tcp/kafkasend_type = "http"# kafka模式下的topictopic = "flashcatcloud"# 是否进行压缩use_compress = false# 是否使用tlssend_with_tls = false# 批量发送的等待时间batch_wait = 5# 日志偏移量记录,用于断点续传run_path = "/opt/categraf/run"# 最大打开文件数open_files_limit = 100# 扫描目录日志评论scan_period = 10# udp采集的buffer大小frame_size = 9000# 是否采集pod的stdout/stderr日志collect_container_all = true# 全局处理规则, 该处不支持多行合并。多行日志合并需要在logs.items中配置# [[logs.Processing_rules]]# 日志采集配置[[logs.items]]# 日志类型,支持file/journald/tcp/udptype = "file"# 日志路径,支持统配符,用统配符,默认从最新位置开始采集## 如果类型是file,则必须配置具体的路径; 如果类似是journald/tcp/udp,则配置端口path = "/opt/tomcat/logs/*.txt"# 日志的label 标识日志来源的模块source = "tomcat"# 日志的label 标识日志来源的服务service = "my_service"
其中,日志采集规则可以在全部logs.Processing_rules中配置,也可以在logs.items.logs_processing_rules中进行配置。
规则类型主要分为以下几种:
(1)不发送匹配到的日志行
type = "exclude_at_match"name = "exclude_xxx_users"pattern="\\w+@flashcat.cloud"表示日志中匹配到@flashcat.cloud 的行 不发送
(2)只发送匹配到的日志行
type = "include_at_match"name = "include_demo"pattern="^2022*"表示日志中匹配到2022开头的行 才发送
(3)对日志内容进行替换处理
type = "mask_sequences"name = "mask_phone_number"replace_placeholder = "[186xxx]"pattern="186\\d{8}"表示186的手机号会被[186xxx] 代替(4)多行合并
type = "multi_line"name = "new_line_with_date"pattern="\\d{4}-\\d{2}-\\d{2}" (多行规则不需要添加^ ,代码会自动添加)表示以日期为日志的开头,多行的日志合并为一行进行采集Categraf 本身以及可以完成很多指标的采集,如果你本身已经有了完整的 Promtheus 体系,但是想用 N9e,Categraf 也支持采集 Prometheus 指标。
[prometheus]# 是否启动prometheus agentenable=false# 原来prometheus的配置文件# 或者新建一个prometheus格式的配置文件scrape_config_file="/path/to/in_cluster_scrape.yaml"## 日志级别,支持 debug | warn | info | errorlog_level="info"# 以下配置文件,保持默认就好了## wal file storage path ,default ./data-agent# wal_storage_path="/path/to/storage"## wal reserve time duration, default value is 2 hour# wal_min_duration=2
比如这里配置 Prometheus 自动采集 kube-state-metrics 指标的 scrape 配置:
global:scrape_interval: 15sexternal_labels:scraper: ksm-testcluster: testscrape_configs:- job_name: "kube-state-metrics"metrics_path: "/metrics"kubernetes_sd_configs:- role: endpointsapi_server: "https://172.31.0.1:443"tls_config:ca_file: /etc/kubernetes/pki/ca.crtcert_file: /etc/kubernetes/pki/apiserver-kubelet-client.crtkey_file: /etc/kubernetes/pki/apiserver-kubelet-client.keyinsecure_skip_verify: truescheme: httprelabel_configs:- source_labels:[__meta_kubernetes_namespace,__meta_kubernetes_service_name,__meta_kubernetes_endpoint_port_name,]action: keepregex: kube-system;kube-state-metrics;http-metricsremote_write:- url: "http://172.31.62.213/prometheus/v1/write"
可以在prometheus.toml配置文件中使用scrape_config_file指令来加载上述文件。
这里不做多的解释。
假如我们服务器上有一个 nginx 进程,我们要对其进程监控,我们要修改conf/input.procstat/procstat.toml配置,如下:
# # collect intervalinterval = 15[[instances]]# # executable name (ie, pgrep <search_exec_substring>)search_exec_substring = "nginx"# # pattern as argument for pgrep (ie, pgrep -f <search_cmdline_substring>)# search_cmdline_substring = "n9e server"# # windows service name# search_win_service = ""metrics_name_prefix="nginx"# # search process with specific user, option with exec_substring or cmdline_substring# search_user = ""# # append some labels for serieslabels = { region="cloud", product="n9e" }# # interval = global.interval * interval_times# interval_times = 1# # mode to use when calculating CPU usage. can be one of 'solaris' or 'irix'# mode = "irix"# sum of threads/fd/io/cpu/mem, min of uptime/limitgather_total = true# will append pid as taggather_per_pid = false#gather jvm metrics only when jstat is ready# gather_more_metrics = [# "threads",# "fd",# "io",# "uptime",# "cpu",# "mem",# "limit",# "jvm"# ]</search_cmdline_substring></search_exec_substring>我们指定了进程名,并且为指标增加了nginx的前缀和label。
配置完成后,重启 Categraf 即可。
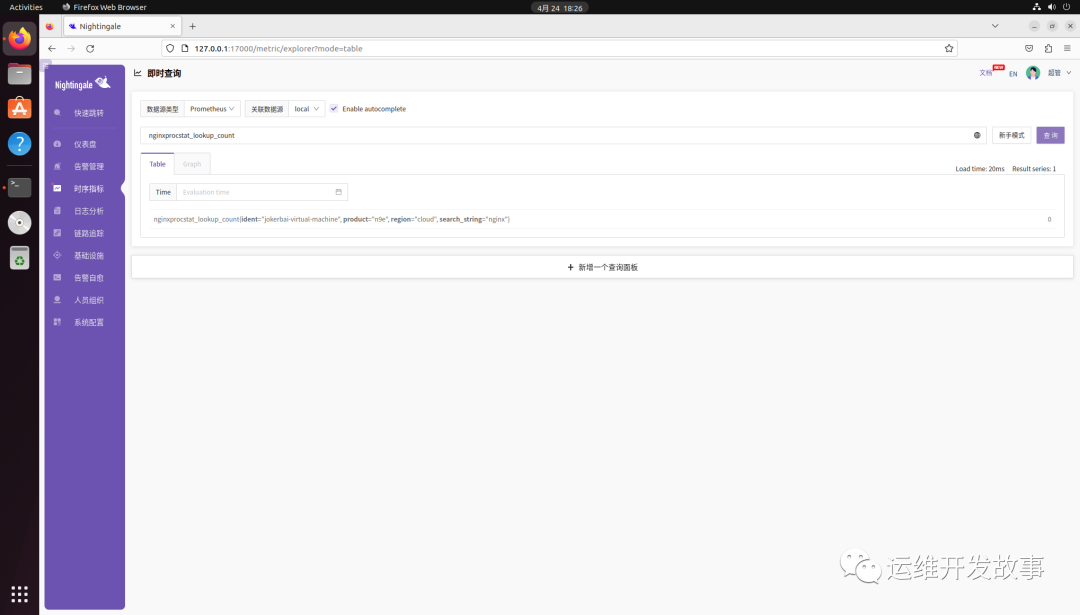
然后就可以看到指标数据,如下:

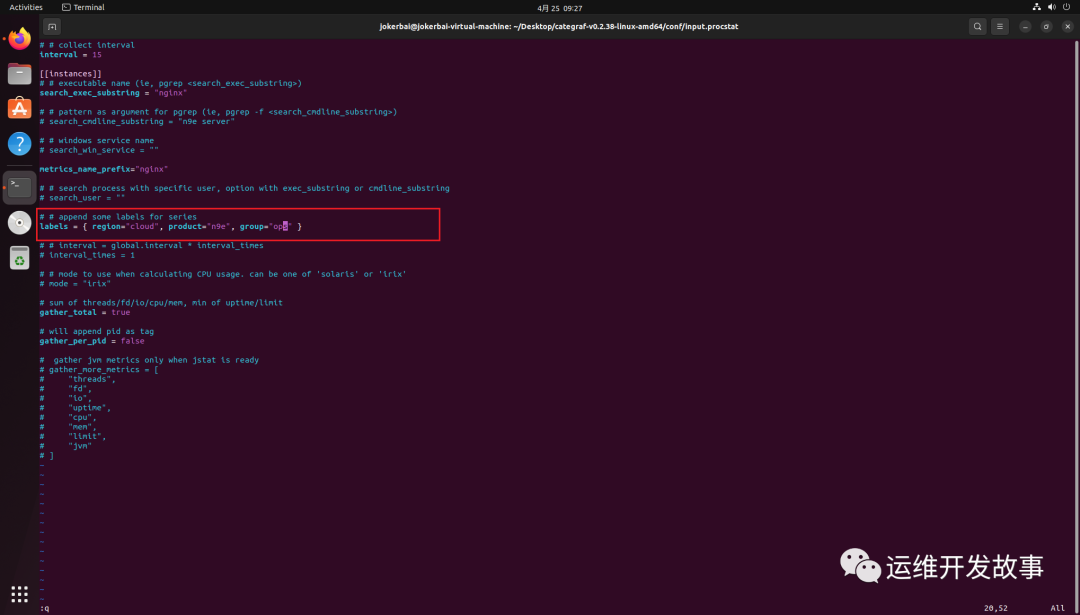
如果想给采集的目标增加标签,直接修改 labels 标签,比如增加group="ops",如下:

然后重启 Categraf 即可。
其他插件的配置类似,可以自行实验。
Jusqu'à présent, Categraf prend en charge de nombreux plug-ins. Selon un décompte approximatif, il en existe environ 60 types, couvrant la plupart des middleware et des plateformes cloud. On peut dire que les fonctions sont très riches.
En termes de capacités, la plupart des scénarios peuvent être remplacés par Categraf seul. Cependant, pour les situations où il existe de nombreuses exigences de plug-in, on ne sait pas si cela aura un impact sur les performances globales de Categraf et si Categraf consommera un. beaucoup de ressources système.
Ce qui précède est le contenu détaillé de. pour plus d'informations, suivez d'autres articles connexes sur le site Web de PHP en chinois!
 RVB en RVB hexadécimal
 Que comprennent les plateformes de commerce électronique ?
 orientéb
 Comment résoudre l'erreur 0xc000409
 compression audio
 Quelles sont les propriétés du dégradé CSS3 ?
 Il existe plusieurs façons de positionner la position CSS
 Comment échanger de la monnaie virtuelle
 Comment changer les paramètres entre les systèmes doubles Huawei