Explication d'Ansible Playbook et fonctionnement pratique
1. Présentation
- playbook est une façon complètement différente d'utiliser ansible par rapport à ad-hoc, similaire au fichier d'état de saltstack. Ad-hoc ne peut pas être utilisé de manière permanente, le playbook peut être utilisé de manière permanente.
- playbook est une liste composée d'une ou plusieurs pièces de théâtre. La fonction principale du jeu est d'habiller les hôtes préalablement regroupés dans un groupe dans des rôles définis à l'avance à travers des tâches dans ansible.
- Fondamentalement parlant, la soi-disant tâche n'est rien de plus qu'un module qui appelle ansible. Organiser plusieurs jeux dans un playbook permet de les combiner pour accomplir une certaine tâche selon un mécanisme pré-arrangé.
Documentation de référence : https://ansible-tran.readthedocs.io/en/latest/docs/playbooks.html
Pour l'introduction de base et le déploiement de l'environnement d'Ansible, vous pouvez vous référer à mon article : Introduction à Ansible et démonstration pratique du fonctionnement
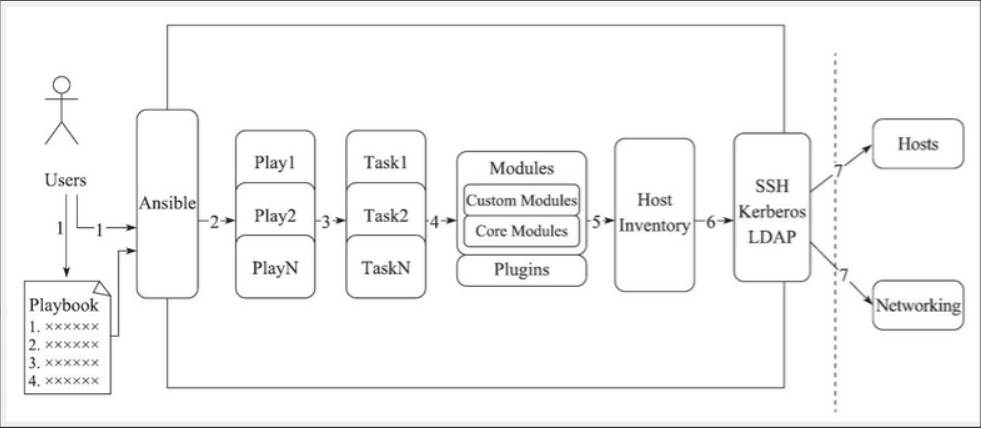
2.
- Tâches Ensemble de tâches
- VarniablesLes variables intégrées ou les variables personnalisées sont appelées dans le playbook
- ModèlesModèles, c'est-à-dire des fichiers utilisant la syntaxe de modèle, tels que des fichiers de configuration, etc.
- Les gestionnaires sont utilisés en combinaison avec notity, par Les opérations déclenchées par des conditions spécifiques ne seront exécutées que lorsque les conditions sont remplies, sinon elles ne seront pas exécutées
- Tags Les balises spécifient une certaine tâche à exécuter et sont. utilisé pour sélectionner et exécuter une partie du code dans le playbook.
- 3. Syntaxe du Playbook (yaml) playbook utilise le format de syntaxe
yaml
- , le suffixe peut être
- yaml ou yml. YAML ( /ˈjæməl/ ) fait référence à de nombreux autres langages, notamment : XML, le langage C, Python, Perl et le format de courrier électronique RFC2822. Clark Evans a publié ce langage pour la première fois en mai 2001, et Ingy döt Net et Oren Ben-Kiki le sont. également co-concepteurs de ce langage. Le format YAML est un format de fichier similaire à JSON. YAML est utilisé pour l'écriture de la configuration des fichiers et JSON est principalement utilisé pour le développement et la conception.
- 1) Introduction YAML
- 1. Le format YAML est le suivant
- Les éléments de liste dans YAML commencent par "-" et sont suivis d'un espace. Ce qui suit est le contenu de l'élément.
- Les éléments d'une même liste doivent conserver la même indentation, sinon cela sera traité comme une erreur.
- Les hôtes, variables, rôles, tâches et autres objets en jeu sont exprimés en séparant les valeurs clés par ":", et un espace doit être ajouté après le ":".
- 2. Explication du fichier de configuration yaml des Playbooks
- 3. Exemple 2) variables variables
--- - hosts: web remote_user: root tasks: - name: install nginx##安装模块,需要在被控主机里加上nginx的源 yum: name=nginx state=present - name: copy nginx.conf##复制nginx的配置文件过去,需要在本机的/tmp目录下编辑nginx.conf copy: src=/tmp/nginx.conf dest=/etc/nginx/nginx.conf backup=yes notify: reload#当nginx.conf发生改变时,通知给相应的handlers tags: reloadnginx#打标签 - name: start nginx service#服务启动模块 service: name=nginx state=started tags: startnginx#打标签 handlers: - name: reload service: name=nginx state=restarted
Copier après la connexion
Hosts:运行指定任务的目标主机
remoute_user:在远程主机上执行任务的用户;
sudo_user:
tasks:任务列表

tasks的具体格式:

tasks:
- name: TASK_NAME
module: arguments
notify: HANDLER_NAME
handlers:
- name: HANDLER_NAME
module: arguments

##模块,模块参数:
格式如下:
(1)action: module arguments
 (2) module: arguments
注意:shell和command模块后直接加命令,而不是key=value类的参数列表


handlers:任务,在特定条件下触发;接受到其他任务的通知时被触发;
les variables ont quatre méthodes de définition. Comme suit :
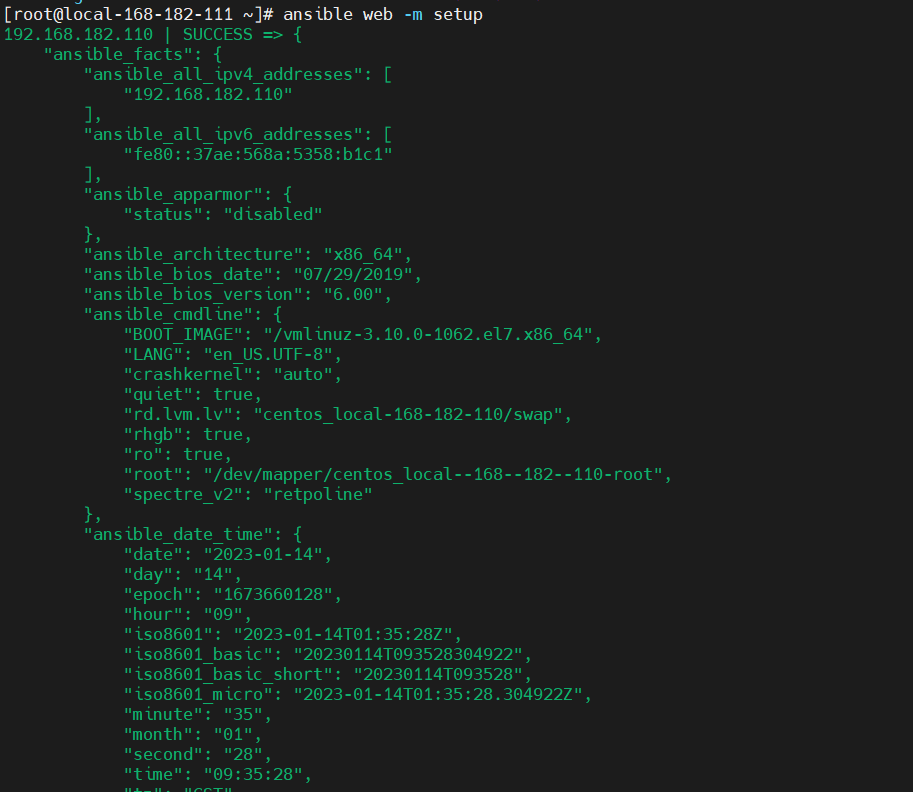
1. Faits : vous pouvez l'appeler directementIl existe un module de configuration dans ansible. Ce module est implémenté via le composant de faits. Il s'agit principalement d'informations système du nœud lui-même, d'informations bios, de réseau. , disque dur et autres informations. Les variables ici peuvent également appeler directement les faits du composant faits. Nous pouvons utiliser le module
setup pour les obtenir, puis les mettre directement dans notre script pour les appeler.ansible web -m setup
常用的几个参数:
ansible_all_ipv4_addresses # ipv4的所有地址
ansible_all_ipv6_addresses # ipv6的所有地址
ansible_date_time # 获取到控制节点时间
ansible_default_ipv4 # 默认的ipv4地址
ansible_distribution # 系统
ansible_distribution_major_version # 系统的大版本
ansible_distribution_version # 系统的版本号
ansible_domain #系统所在的域
ansible_env #系统的环境变量
ansible_hostname #系统的主机名
ansible_fqdn #系统的全名
ansible_machine #系统的架构
ansible_memory_mb #系统的内存信息
ansible_os_family # 系统的家族
ansible_pkg_mgr # 系统的包管理工具
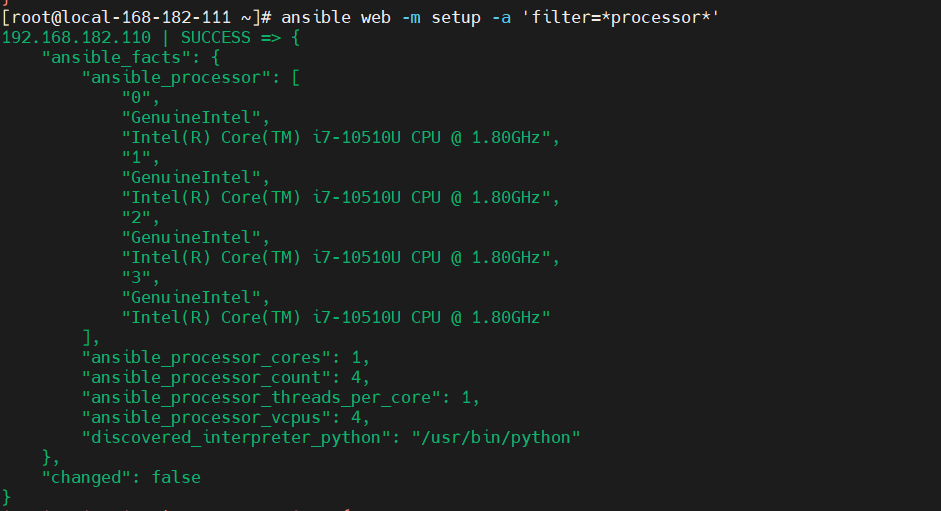
ansible_processor_cores #系统的cpu的核数(每颗)
ansible_processor_count #系统cpu的颗数
ansible_processor_vcpus #系统cpu的总个数=cpu的颗数*CPU的核数
ansible_python # 系统上的python
搜索
ansible web -m setup -a 'filter=*processor*'
2、用户自定义变量
自定义变量有两种方式
- 通过命令行传入
ansible-playbook命令行中的 -e VARS,--extra-vars VARS,这样就可以直接把自定义的变量传入
使用playbook定义变量,实例如下:
---
- hosts: web
remote_user: root
tasks:

- name: install {{ rpmname }}
yum: name={{ rpmname }} state=present
- name: copy {{ rpmname }}.conf
copy: src=/tmp/{{ rpmname }}.conf dest=/etc/{{ rpmname }}/{{ rpmname }}.conf backup=yes
notify: reload
tags: reload{{ rpmname }}
- name: start {{ rpmname }} service
service: name={{ rpmname }} state=started
tags: start{{ rpmname }}

handlers:
- name: reload
service: name={{ rpmname }} state=restarted使用:
ansible-playbook nginx.yml -e rpmname=keepalived
ansible-playbook nginx.yml --extra-vars rpmname=keepalived
- 在playbook中定义变量
##在playbook中定义变量如下:
vars:
- var1: value1
- var2: value2
使用:
---
- hosts: web
remote_user: root
vars:
- rpmname: keepalived
tasks:
- name: install {{ rpmname }}
yum: name={{ rpmname }} state=present
- name: copy {{ rpmname }}.conf
copy: src=/tmp/{{ rpmname }}.conf dest=/etc/{{ rpmname }}/{{ rpmname }}.conf backup=yes
notify: reload
tags: reload{{ rpmname }}
- name: start {{ rpmname }} service
service: name={{ rpmname }} state=started
tags: start{{ rpmname }}

handlers:
- name: reload
service: name={{ rpmname }} state=restarted3、通过roles传递变量
下面介绍roles会使用roles传递变量,小伙伴可以翻到下面看详解讲解。
4、 Host Inventory
可以在主机清单中定义,方法如下:
#向不同的主机传递不同的变量
IP/HOSTNAME varaiable=value var2=value2

#向组中的主机传递相同的变量
[groupname:vars]
variable=value
3)流程控制
1、用when 来表示的条件判断
- hosts: web
remote_user: root#代表用root用户执行,默认是root,可以省略
tasks:
- name: createfile
copy: content="test3" dest=/opt/p1.yml
when: a=='3'
- name: createfile
copy: content="test4" dest=/opt/p1.yml
when: a=='4'
如果a"3",就将“test3”,写入到web组下被管控机的/opt/p1.yml中,
如果a"4",就将“test4”,写入到web组下被管控机的/opt/p1.yml中。
执行
# 语法校验
ansible-playbook--syntax-check p1.yml

#执行
ansible-playbook -e 'a="3"' p1.yml
2、标签(只执行配置文件中的一个任务)
- hosts: web
tasks:
- name: installnginx
yum: name=nginx
- name: copyfile
copy: src=/etc/nginx/nginx.conf dest=/etc/nginx/nginx.conf
tags: copyfile
- name: start
service: name=nginx static=restarted
执行
# 语法校验
ansible-playbook--syntax-check p2.yml

#执行
ansible-playbook -t copyfile p2.yml
3、循环 with_items
创建三个用户
- hosts: web
tasks:
- name: createruser
user: name={{ item }}
with_items:
- shy1
- shy2
- shy3
- name: creategroup
group: name={{ item }}
with_items:
- group1
- group2
- group3 执行
#语法校验
ansible-playbook--syntax-check p3.yml

#执行
ansible-playbook p3.yml
4、循环嵌套(字典)
用户shy1的属组是group1,用户shy2的属组是group2,用户shy3的属组是group3
- hosts: web
tasks:
- name: creategroup
group: name={{item}}
with_items:
- group3
- group4
- group5
- name: createuser
user: name={{item.user}} group={{item.group}}
with_items:
- {'user': shy3,'group': group3}
- {'user': shy4,'group': group4}
- {'user': shy5,'group': group5}执行
#语法校验
ansible-playbook--syntax-check p4.yml

#执行
ansible-playbook p4.yml
4)模板 templates
- 模板是一个文本文件,嵌套有脚本(使用模板编程语言编写)
- Jinja2是python的一种模板语言,以Django的模板语言为原本
该模板支持:
字符串:使用单引号或双引号;
数字:整数,浮点数;
列表:[item1, item2, ...]
元组:(item1, item2, ...)
字典:{key1:value1, key2:value2, ...}
布尔型:true/false
算术运算:
+, -, *, /, //, %, **
比较操作:
==, !=, >, >=, <, <=
逻辑运算:
and, or, not- 通常模板都是通过引用变量来运用的
【示例】
1、定义模板
usernginx; #设置nginx服务的系统使用用户
worker_processes{{ ansible_processor_vcpus }}; #工作进程数

error_log/var/log/nginx/error.log warn; #nginx的错误日志
pid/var/run/nginx.pid; #nginx启动时候的pid

events {
worker_connections1024; #每个进程允许的最大连接数
}

http { #http请求配置,一个http可以包含多个server

#定义 Content-Type
include /etc/nginx/mime.types;
default_typeapplication/octet-stream;

#日志格式 此处main与access_log中的main对应
#$remote_addr:客户端地址
#$remote_user:http客户端请求nginx认证的用户名,默认不开启认证模块,不会记录
#$timelocal:nginx的时间
#$request:请求method + 路由 + http协议版本
#status:http reponse 状态码
#body_bytes_sent:response body的大小
#$http_referer:referer头信息参数,表示上级页面
#$http_user_agent:user-agent头信息参数,客户端信息
#$http_x_forwarded_for:x-forwarded-for头信息参数
log_formatmain'$http_user_agent' '$remote_addr - $remote_user [$time_local] "$request" '
'$status $body_bytes_sent "$http_referer" '
'"$http_user_agent" "$http_x_forwarded_for"';

#访问日志,后面的main表示使用log_format中的main格式记录到access.log中
access_log/var/log/nginx/access.logmain;

#nginx的一大优势,高效率文件传输
sendfileon;
#tcp_nopush on;

#客户端与服务端的超时时间,单位秒
keepalive_timeout65;

#gzipon;
server { #http服务,一个server可以配置多个location
listen {{ nginxport }}; #服务监听端口
server_namelocalhost; #主机名、域名

#charset koi8-r;
#access_log/var/log/nginx/host.access.logmain;

location / {
root /usr/share/nginx/html; #页面存放目录
indexindex.html index.htm; #默认页面
}

#error_page404/404.html;

# 将500 502 503 504的错误页面重定向到 /50x.html
error_page 500 502 503 504/50x.html;
location = /50x.html { #匹配error_page指定的页面路径
root /usr/share/nginx/html; #页面存放的目录
}

# proxy the PHP scripts to Apache listening on 127.0.0.1:80
#
#location ~ \.php$ {
#proxy_pass http://127.0.0.1;
#}

# pass the PHP scripts to FastCGI server listening on 127.0.0.1:9000
#
#location ~ \.php$ {
#root html;
#fastcgi_pass 127.0.0.1:9000;
#fastcgi_indexindex.php;
#fastcgi_paramSCRIPT_FILENAME/scripts$fastcgi_script_name;
#includefastcgi_params;
#}

# deny access to .htaccess files, if Apache's document root
# concurs with nginx's one
#
#location ~ /\.ht {
#denyall;
#}
}
include /etc/nginx/conf.d/*.conf;
}2、定义yaml编排
---
- hosts: web
remote_user: root
vars:
- rpmname: nginx
- nginxport: 8088
tasks:
- name: install {{ rpmname }}
yum: name={{ rpmname }} state=present
- name: copy {{ rpmname }}.conf
copy: src=/tmp/{{ rpmname }}.conf dest=/etc/{{ rpmname }}/{{ rpmname }}.conf backup=yes
notify: reload
tags: reload{{ rpmname }}
- name: start {{ rpmname }} service
service: name={{ rpmname }} state=started
tags: start{{ rpmname }}

handlers:
- name: reload
service: name={{ rpmname }} state=restarted使用
##使用reloadnginx标签,重新加载剧本
copy与template的区别
- copy模块不替代参数,template模块替代参数
- template的参数几乎与copy的参数完全相同
5)handlers(触发事件)
notify:触发
handlers:触发的动作
使用上场景:修改配置文件时
【示例】 正常情况时handlers是不会执行的
- hosts: web
tasks:
- name: installredis
yum: name=redis
- name: copyfile
template: src=redis.conf dest=/etc/redis.conf
tags: copyfile
notify: restart
- name: start
service: name=redis state=started
handlers:
- name: restart
service: name=redis
执行
ansible-playbook -t copyfile p6.yml
6)roles
1、roles介绍与优势
一般情况下将roles写在/etc/ansible/roles中,也可以写在其他任意位置(写在其他位置要自己手动建立一个roles文件夹)
- 对于以上所有方式有个缺点就是无法实现同时部署web、database、keepalived等不同服务或者不同服务器组合不同的应用就需要写多个yaml文件,很难实现灵活的调用
- roles用于层次性,结构化地组织playbook。roles能够根据层次结果自动装载变量文件、tasks以及handlers等。
- 要使用roles只需要在playbook中使用include指令即可。
- 简单来讲,roles就是通过分别将变量(vars)、文件(files)、任务(tasks)、模块(modules)以及处理器(handlers)放置于单独的目录中,并且可以便捷的include它们地一种机制。
- 角色一般用于基于主机构建服务的场景中,但是也可以用于构建守护进程等场景中。4
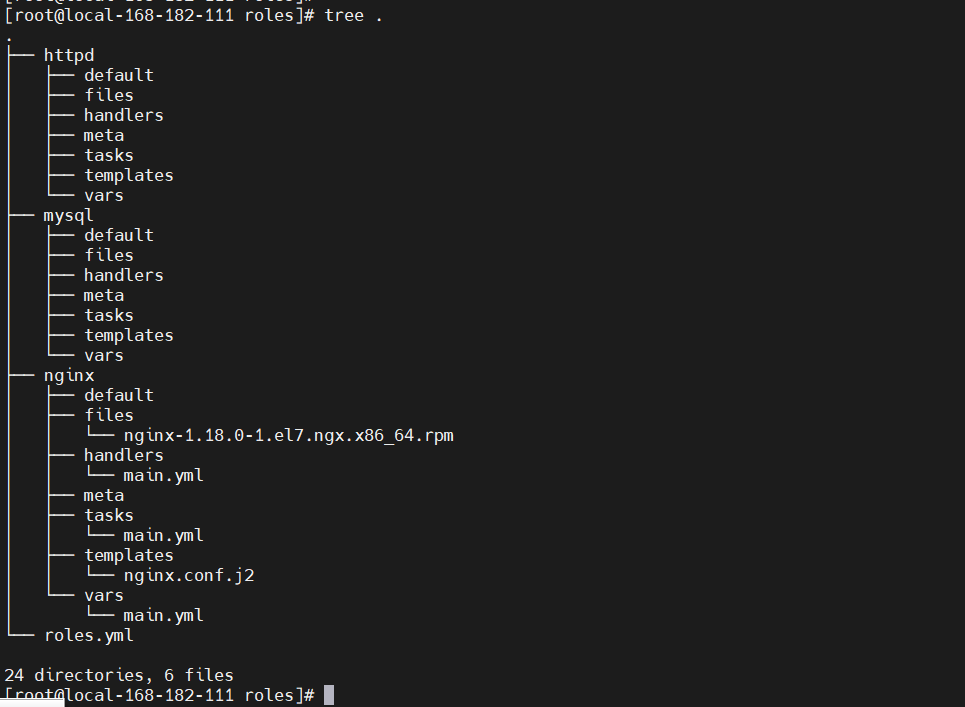
2、目录结构
创建目录
mkdir -pv ./{nginx,mysql,httpd}/{files,templates,vars,tasks,handlers,meta,default}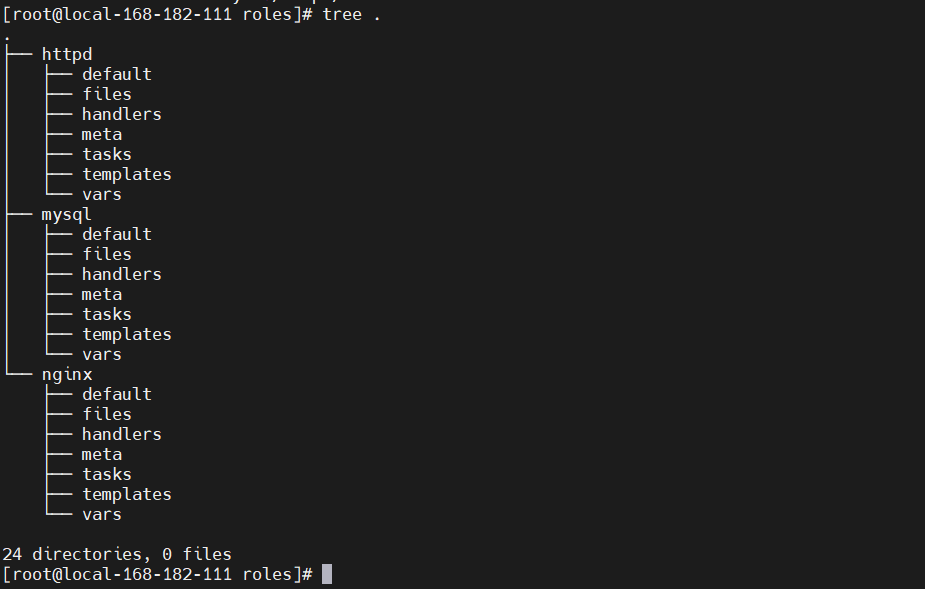
- roles/
- mysql/:mysql服务的yml文件
- httpd/:apached服务的yml文件
- nginx/:nginx服务的yml文件
- files/:存储由copy或者script等模块调用的文件或者脚本;
- tasks/:此目录中至少应该有一个名为main.yml的文件,用于定义各个task;其他文件需要由main.yml进行包含调用;
- handlers/:此目录中至少应该有一个名为main.yml的文件,用于定义各个handler;其他文件需要由main.yml进行包含调用;
- vars/:此目录至少应该有一个名为main,yml的文件,用于定义各个variable;其他的文件需要由main.yml进行包含调用;
- templates/:存储由templates模块调用的模板文件;
- meta/:此目录中至少应该有一个名为main.yml的文件,定义当前角色的特殊设定以及依赖关系,其他文件需要由main.yml进行包含调用;
- default/:此目录至少应该有一个名为main.yml的文件,用于设定默认变量;
3、实战操作
【1】创建目录
mkdir -pv ./{nginx,mysql,httpd}/{files,templates,vars,tasks,handlers,meta,default}【2】定义配置文件
先下载nginx rpm部署包
# 下载地址:http://nginx.org/packages/centos/7/x86_64/RPMS/
 wget http://nginx.org/packages/centos/7/x86_64/RPMS/nginx-1.18.0-1.el7.ngx.x86_64.rpm -O nginx/files/nginx-1.18.0-1.el7.ngx.x86_64.rpm
- nginx/tasks/main.yml
- name: cp
copy: src=nginx-1.18.0-1.el7.ngx.x86_64.rpm dest=/tmp/nginx-1.18.0-1.el7.ngx.x86_64.rpm
- name: install
yum: name=/tmp/nginx-1.18.0-1.el7.ngx.x86_64.rpm state=latest
- name: conf
template: src=nginx.conf.j2 dest=/etc/nginx/nginx.conf
tags: nginxconf
notify: new conf to reload
- name: start service
service: name=nginx state=started enabled=true
- nginx/templates/nginx.conf.j2
usernginx; #设置nginx服务的系统使用用户
worker_processes{{ ansible_processor_vcpus }}; #工作进程数

error_log/var/log/nginx/error.log warn; #nginx的错误日志
pid/var/run/nginx.pid; #nginx启动时候的pid

events {
worker_connections1024; #每个进程允许的最大连接数
}

http { #http请求配置,一个http可以包含多个server

#定义 Content-Type
include /etc/nginx/mime.types;
default_typeapplication/octet-stream;

#日志格式 此处main与access_log中的main对应
#$remote_addr:客户端地址
#$remote_user:http客户端请求nginx认证的用户名,默认不开启认证模块,不会记录
#$timelocal:nginx的时间
#$request:请求method + 路由 + http协议版本
#status:http reponse 状态码
#body_bytes_sent:response body的大小
#$http_referer:referer头信息参数,表示上级页面
#$http_user_agent:user-agent头信息参数,客户端信息
#$http_x_forwarded_for:x-forwarded-for头信息参数
log_formatmain'$http_user_agent' '$remote_addr - $remote_user [$time_local] "$request" '
'$status $body_bytes_sent "$http_referer" '
'"$http_user_agent" "$http_x_forwarded_for"';

#访问日志,后面的main表示使用log_format中的main格式记录到access.log中
access_log/var/log/nginx/access.logmain;

#nginx的一大优势,高效率文件传输
sendfileon;
#tcp_nopush on;

#客户端与服务端的超时时间,单位秒
keepalive_timeout65;

#gzipon;
server { #http服务,一个server可以配置多个location
listen {{ nginxport }}; #服务监听端口
server_namelocalhost; #主机名、域名

#charset koi8-r;
#access_log/var/log/nginx/host.access.logmain;

location / {
root /usr/share/nginx/html; #页面存放目录
indexindex.html index.htm; #默认页面
}

#error_page404/404.html;

# 将500 502 503 504的错误页面重定向到 /50x.html
error_page 500 502 503 504/50x.html;
location = /50x.html { #匹配error_page指定的页面路径
root /usr/share/nginx/html; #页面存放的目录
}

# proxy the PHP scripts to Apache listening on 127.0.0.1:80
#
#location ~ \.php$ {
#proxy_pass http://127.0.0.1;
#}

# pass the PHP scripts to FastCGI server listening on 127.0.0.1:9000
#
#location ~ \.php$ {
#root html;
#fastcgi_pass 127.0.0.1:9000;
#fastcgi_indexindex.php;
#fastcgi_paramSCRIPT_FILENAME/scripts$fastcgi_script_name;
#includefastcgi_params;
#}

# deny access to .htaccess files, if Apache's document root
# concurs with nginx's one
#
#location ~ /\.ht {
#denyall;
#}
}
include /etc/nginx/conf.d/*.conf;
}- nginx/vars/main.yml
nginxport: 9999
- nginx/handlers/main.yml
- name: new conf to reload
service: name=nginx state=restarted
- 定义剧本文件(roles.yml)
- hosts: web
remote_user: root
roles:
- nginx
最后的目录结构如下:
执行
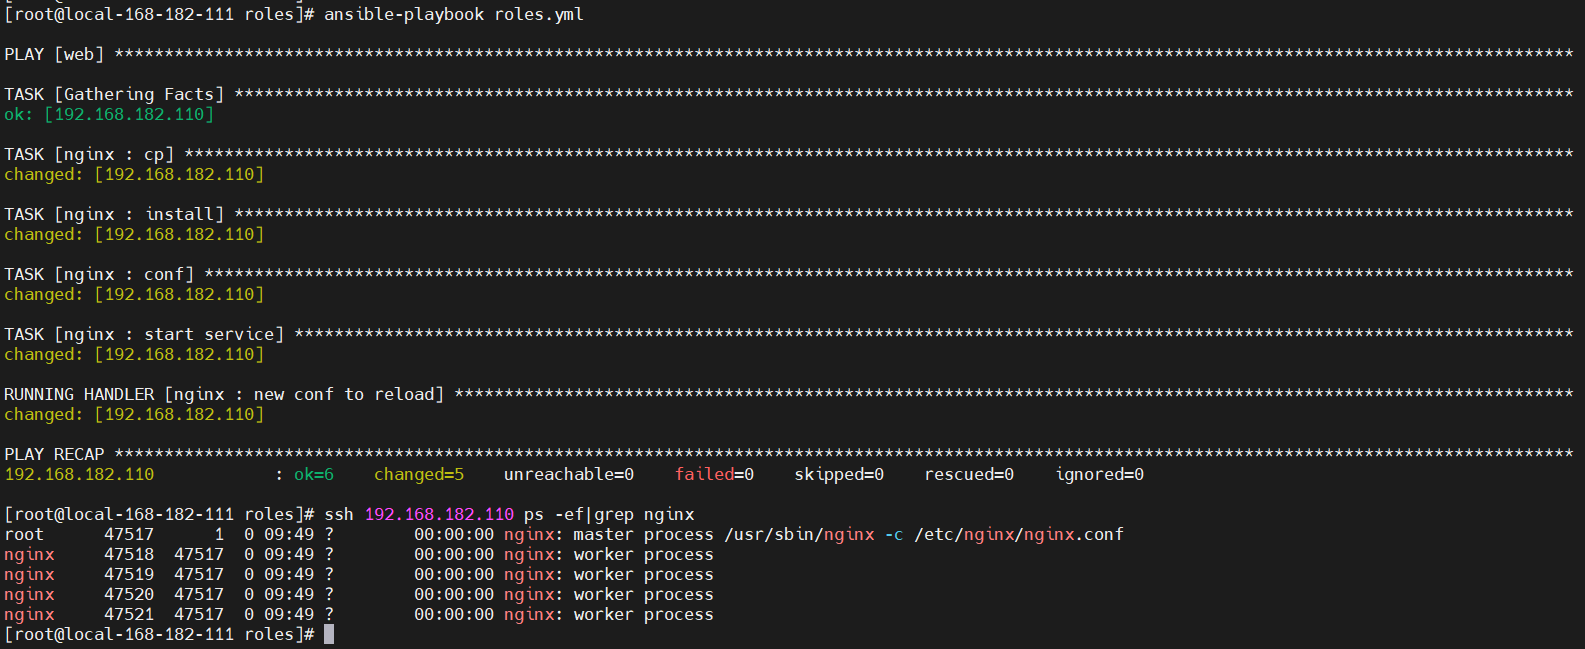
ansible-playbook roles.yml
Ce qui précède est le contenu détaillé de. pour plus d'informations, suivez d'autres articles connexes sur le site Web de PHP en chinois!

Outils d'IA chauds

Undresser.AI Undress
Application basée sur l'IA pour créer des photos de nu réalistes

AI Clothes Remover
Outil d'IA en ligne pour supprimer les vêtements des photos.

Undress AI Tool
Images de déshabillage gratuites

Clothoff.io
Dissolvant de vêtements AI

AI Hentai Generator
Générez AI Hentai gratuitement.

Article chaud

Outils chauds

Bloc-notes++7.3.1
Éditeur de code facile à utiliser et gratuit

SublimeText3 version chinoise
Version chinoise, très simple à utiliser

Envoyer Studio 13.0.1
Puissant environnement de développement intégré PHP

Dreamweaver CS6
Outils de développement Web visuel

SublimeText3 version Mac
Logiciel d'édition de code au niveau de Dieu (SublimeText3)
 Comment supprimer les crochets d'une liste en utilisant Python
Sep 05, 2023 pm 07:05 PM
Python est un logiciel très utile qui peut être utilisé à de nombreuses fins différentes selon les besoins. Python peut être utilisé dans le développement Web, la science des données, l'apprentissage automatique et de nombreux autres domaines nécessitant une automatisation. Il possède de nombreuses fonctionnalités différentes qui nous aident à effectuer ces tâches. Les listes Python sont l'une des fonctionnalités très utiles de Python. Comme son nom l'indique, une liste contient toutes les données que vous souhaitez stocker. Il s’agit essentiellement d’un ensemble de différents types d’informations. Différentes façons de supprimer les crochets Souvent, les utilisateurs se retrouvent dans une situation où les éléments de la liste sont affichés entre crochets. Dans cet article, nous détaillerons comment supprimer ces crochets pour avoir une meilleure vue de votre annonce. L'un des moyens les plus simples de supprimer les parenthèses dans les chaînes et les fonctions de remplacement consiste à
 Comment compter le nombre d'éléments dans une liste à l'aide de la fonction count() de Python
Nov 18, 2023 pm 02:53 PM
Comment utiliser la fonction count() de Python pour compter le nombre d'éléments dans une liste nécessite des exemples de code spécifiques. En tant que langage de programmation puissant et facile à apprendre, Python fournit de nombreuses fonctions intégrées pour gérer différentes structures de données. L'une d'elles est la fonction count(), qui peut être utilisée pour compter le nombre d'éléments dans une liste. Dans cet article, nous expliquerons en détail comment utiliser la fonction count() et fournirons des exemples de code spécifiques. La fonction count() est une fonction intégrée de Python, utilisée pour calculer un certain
 Comment créer une liste de courses dans l'application de rappels iOS 17 sur iPhone
Sep 21, 2023 pm 06:41 PM
Comment créer une liste d'épicerie sur iPhone sous iOS17 Créer une liste d'épicerie dans l'application Rappels est très simple. Il vous suffit d'ajouter une liste et de la remplir avec vos éléments. L'application trie automatiquement vos articles en catégories et vous pouvez même travailler avec votre partenaire ou partenaire d'appartement pour dresser une liste de ce que vous devez acheter dans le magasin. Voici les étapes complètes pour ce faire : Étape 1 : activer les rappels iCloud Aussi étrange que cela puisse paraître, Apple dit que vous devez activer les rappels d'iCloud pour créer une liste d'épicerie sur iOS17. Voici les étapes à suivre : Accédez à l'application Paramètres sur votre iPhone et appuyez sur [votre nom]. Ensuite, sélectionnez je
 Comment créer une liste de courses : utilisez l'application Rappels pour iPhone
Dec 01, 2023 pm 03:37 PM
Dans iOS 17, Apple a ajouté une petite fonctionnalité de liste pratique à l'application Rappels pour vous aider lorsque vous faites vos courses. Lisez la suite pour savoir comment l'utiliser et raccourcir votre déplacement au magasin. Lorsque vous créez une liste à l'aide du nouveau type de liste « Épicerie » (appelé « Shopping » en dehors des États-Unis), vous pouvez saisir une variété d'aliments et de produits d'épicerie et les organiser automatiquement par catégorie. Cette organisation facilite la recherche de ce dont vous avez besoin à l'épicerie ou lors de vos courses. Les types de catégories disponibles dans les alertes incluent les produits, le pain et les céréales, les aliments surgelés, les collations et les bonbons, la viande, les produits laitiers, les œufs et le fromage, les produits de boulangerie, les produits de boulangerie, les produits ménagers, les soins personnels et le bien-être, ainsi que le vin, la bière et les spiritueux. Ce qui suit est créé dans iOS17
 Pouvons-nous insérer une valeur nulle dans la liste Java ?
Aug 20, 2023 pm 07:01 PM
SolutionOui, nous pouvons insérer des valeurs nulles pour les lister facilement à l'aide de sa méthode add(). Si l'implémentation de liste ne prend pas en charge null, elle lancera une exception NullPointerException. Syntaxe booleanadd(Ee) Ajoute l'élément spécifié à la fin de cette liste. Paramètre de type E - Le type d'exécution de l'élément. Paramètre e - élément à ajouter à cette liste
 Quelle est la différence entre Del et Remove() sur les listes en Python ?
Sep 12, 2023 pm 04:25 PM
Avant de discuter des différences, comprenons d'abord ce que sont Del et Remove() dans les listes Python. Mot-clé Del dans une liste Python Le mot-clé del en Python est utilisé pour supprimer un ou plusieurs éléments d'une liste. Nous pouvons également supprimer tous les éléments, c'est-à-dire supprimer la liste entière. Exemple d'utilisation du mot-clé del pour supprimer des éléments d'une liste Python #CreateaListmyList=["Toyota","Benz","Audi","Bentley"]print("List="
 Créez plusieurs répertoires à partir d'une liste à l'aide de Python
Sep 08, 2023 am 08:21 AM
Python est devenu l'un des langages de programmation les plus populaires pour diverses applications en raison de sa simplicité et de sa polyvalence. Que vous soyez un développeur expérimenté ou que vous débutiez tout juste votre parcours de codage, Python propose une large gamme de fonctionnalités et de bibliothèques qui facilitent la gestion des tâches complexes. Dans cet article, nous explorerons un scénario pratique dans lequel Python peut nous aider en automatisant le processus de création de plusieurs répertoires basés sur une liste. En tirant parti de la puissance des modules et techniques intégrés de Python, nous pouvons gérer cette tâche efficacement sans avoir recours à une intervention manuelle. Dans ce didacticiel, nous aborderons le problème de la création de plusieurs répertoires et vous proposerons différentes façons de résoudre ce problème à l'aide de Python. À la fin de cet article, notre objectif est pour vous
 Inverser une liste à l'aide de la fonction reverse() de Python
Nov 18, 2023 pm 02:14 PM
L'utilisation de la fonction reverse() de Python pour inverser une liste nécessite des exemples de code spécifiques. En Python, nous devons souvent opérer sur des listes en programmation, et l'inversion de listes est un besoin courant. À l'heure actuelle, nous pouvons utiliser la fonction reverse() intégrée de Python. fonction à mettre en œuvre. La fonction de la fonction reverse() est d'inverser l'ordre des éléments dans la liste, c'est-à-dire que le premier élément de la liste devient le dernier élément, le deuxième élément devient l'avant-dernier élément, et ainsi de suite. Voici comment utiliser Py


