
Si votre site Web utilise plusieurs taxonomies pour classer les informations, il peut être utile de diviser les publications dans les archives de taxonomie en fonction des termes de la deuxième taxonomie.
Dans ce tutoriel, je vais vous montrer comment créer une archive de catégories pour y parvenir.
Si vous avez déjà utilisé une base de données relationnelle, vous saurez que l'une de leurs fonctionnalités intéressantes est que vous pouvez afficher les données selon plusieurs taxonomies. Par exemple, si vous disposez d'une base de données clients, vous pouvez facilement voir quels clients vous embauchent pour différentes catégories de projets, puis trier davantage en voyant quels clients de conception Web se trouvent dans un emplacement donné, par exemple.
Quand j’ai commencé à utiliser WordPress, j’étais frustré de ne pas pouvoir le faire facilement – du moins, vous ne pouviez pas le faire avec une installation WordPress prête à l’emploi exécutant le thème par défaut.
Cependant, les données peuvent être classées selon plusieurs taxonomies. dans ce tutoriel. Je vais vous montrer comment créer une page de catégorie qui répertorie les publications de cette catégorie, triées par termes qui s'appliquent également à une autre catégorie dans laquelle elles existent.
Je créerai ensuite une deuxième archive de catégorie pour la deuxième catégorie qui répertorie ses publications par ordre de termes de la première catégorie (croyez-moi, cela aura plus de sens quand vous verrez cela se produire !)
<h2>De quoi as-tu besoinPour réaliser ce tutoriel vous aurez besoin de :
Dans ce tutoriel, je vais créer un thème de 24 enfants en utilisant deux nouveaux fichiers modèles, une feuille de style et un fichier de fonction. Si vous utilisez votre propre thème, copiez simplement le code de mon fichier de fonctions dans le fichier de fonctions de votre thème, puis ajoutez le fichier modèle ajusté pour refléter le balisage de votre thème.
Pour créer mon thème, je crée un fichier appelé style.css dans le dossier de thème vide et je le remplis avec le contenu suivant :
/*
Theme Name:     WPTutsPlus Create a Taxonomy Archive to List Posts by a Second Taxonomy's Terms
Theme URI:      https://rachelmccollin.co.uk/wptutsplus-taxonomy-archive-list-by-second-taxonomy/
Description:    Theme to support WPTutsPlus tutorial on creating a custom taxonomy archive. Child theme for the Twenty Fourteen theme.
Author:         Rachel McCollin
Author URI:     http://rachelmccollin.co.uk/
Template:       twentyfourteen
Version:        1.0
*/

@import url("../twentyfourteen/style.css");
Cela créera le thème de mon enfant.
<h2>2. Enregistrez les types de publication et les taxonomies
Dans ce tutoriel, j'utiliserai le même 'animals' 帖子类型和 'animal_cat' 分类法自定义帖子类型模板。我还将添加第二个分类法,名为 'habitat' que celui que j'ai utilisé dans le tutoriel de création.
Pour ce faire, je crée un nouveau fichier appelé functions.php. Tout d'abord, j'ajoute une fonction pour enregistrer mon type de message :
<?php
// register a custom post type called 'animals'
function wptp_create_post_type() {
    $labels = array(
		'name' => __( 'Animals' ),
		'singular_name' => __( 'animal' ),
		'add_new' => __( 'New animal' ),
		'add_new_item' => __( 'Add New animal' ),
		'edit_item' => __( 'Edit animal' ),
		'new_item' => __( 'New animal' ),
		'view_item' => __( 'View animal' ),
		'search_items' => __( 'Search animals' ),
		'not_found' =>  __( 'No animals Found' ),
		'not_found_in_trash' => __( 'No animals found in Trash' ),
	);
	$args = array(
		'labels' => $labels,
		'has_archive' => true,
		'public' => true,
		'hierarchical' => false,
		'supports' => array(
			'title',
			'editor',
			'excerpt',
			'custom-fields',
			'thumbnail',
			'page-attributes'
		),
		'taxonomies' => array( 'post_tag', 'category'),
	);
	register_post_type( 'animal', $args );
}
add_action( 'init', 'wptp_create_post_type' );
?>
Puis j'inscris mes deux taxonomies dans une fonction :
<?php
// register taxonomies
function wptp_register_taxonomies() {

	// register a taxonomy called 'Animal Family'
	register_taxonomy( 'animal_cat', 'animal',
		array(
			'labels' => array(
				'name'              => 'Animal Families',
				'singular_name'     => 'Animal Family',
				'search_items'      => 'Search Animal Families',
				'all_items'         => 'All Animal Families',
				'edit_item'         => 'Edit Animal Families',
				'update_item'       => 'Update Animal Family',
				'add_new_item'      => 'Add New Animal Family',
				'new_item_name'     => 'New Animal Family Name',
				'menu_name'         => 'Animal Family',
			),
			'hierarchical' => true,
			'sort' => true,
			'args' => array( 'orderby' => 'term_order' ),
			'rewrite' => array( 'slug' => 'animal-family' ),
			'show_admin_column' => true
		)
	);

	// register a taxonomy called 'Habitat'
	register_taxonomy( 'habitat', 'animal',
		array(
			'labels' => array(
				'name'              => 'Habitats',
				'singular_name'     => 'Habitat',
				'search_items'      => 'Search Habitats',
				'all_items'         => 'All Habitats',
				'edit_item'         => 'Edit Habitat',
				'update_item'       => 'Update Habitat',
				'add_new_item'      => 'Add New Habitat',
				'new_item_name'     => 'New Habitat Name',
				'menu_name'         => 'Habitat',
			),
			'hierarchical' => true,
			'sort' => true,
			'args' => array( 'orderby' => 'term_order' ),
			'show_admin_column' => true
		)
	);
}
add_action( 'init', 'wptp_register_taxonomies' );
?>
Cela créera 'animal' 帖子类型以及适用于它的两个分类法。请注意,我使用了 'show_admin_column' pour faciliter la gestion de mes publications.
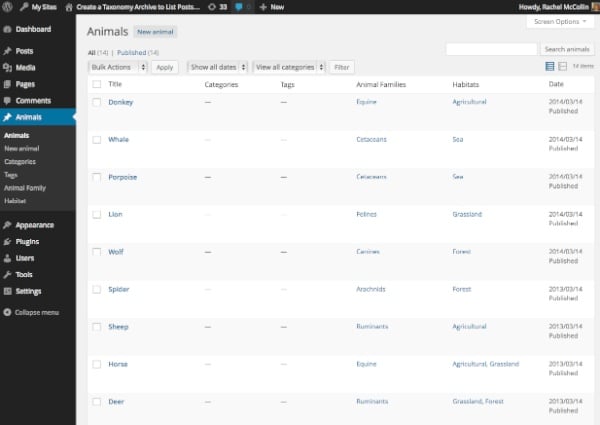
Après avoir ajouté quelques données et classé les animaux selon ma taxonomie, je peux désormais visualiser mes données dans mon tableau de bord WordPress comme indiqué ci-dessous.
Remarque : La classification des animaux que j'utilise n'est pas très scientifique - veuillez ne pas commenter ma compréhension des habitats ou des familles !

La prochaine étape est pour 'animal_cat' 分类存档创建模板文件。在主题文件夹中创建一个文件并将其命名为 taxonomy-animal_cat.php. Ajoutez maintenant le code wrapper de votre thème (j'ai copié ce code de mon thème parent, si vous utilisez votre propre thème votre code sera différent) :
<?php
/*
WpTutsPlus tutorial for creating archive to display posts by mutiple taxonomy terms
Archive template for animal_cat taxonomy
*/
?>

<?php get_header(); ?>

    <div id="main-content" class="main-content">

	<div id="primary" class="content-area">
		<div id="content" class="site-content" role="main">


		</div><!-- #content -->
	</div><!-- #primary -->
	<?php get_sidebar( 'content' ); ?>
</div><!-- #main-content -->

<?php
get_sidebar();
get_footer();
Vous devez maintenant ajouter des données à ce fichier modèle.
Le modèle d'archive utilisera WP_Query pour créer des requêtes personnalisées pour chaque terme. L'un des objets de la requête sera le terme de taxonomie actuellement affiché, vous devez donc l'identifier et le stocker en tant que variable.
Sous la ligne get_header(), ajoutez :
<?php
// get the currently queried taxonomy term, for use later in the template file
$animalcat = get_queried_object();
?>
Vous pourrez utiliser cette $animalcat variable plus tard.
L'archive n'a actuellement pas de titre principal, vous devrez donc en ajouter un en utilisant la variable que vous venez de définir.
Après avoir ouvert la balise <div id="content">, ajoutez ce qui suit :
<header class="archive-header">
    <h1 class="archive-title">
		<?php echo $animalcat->name; ?>
	</h1>
</header><!-- .archive-header -->
Ensuite, vous devez obtenir la liste des termes de la deuxième catégorie. Insérez ce qui suit sous le code que vous venez d'ajouter :
<?php //start by fetching the terms for the animal_cat taxonomy
$terms = get_terms( 'habitat', array(
    'hide_empty' => 0
) );
?>
Cela obtiendra une liste de tous les termes et la stockera dans un tableau. En utilisant 'hide_empty', vous pouvez éviter d'afficher des termes vides - mais comme vous le verrez bientôt, cela empêchera uniquement d'interroger des termes qui n'ont aucune publication, pas ceux qui n'ont aucune publication pour les termes de taxonomie actuellement interrogés.
现在创建一个将为每个术语运行的循环:
<?php
// now run a query for each animal family
foreach ( $terms as $term ) {

    // Define the query
	$args = array(
		'post_type' => 'animal',
		'animal_cat' => $animalcat->slug,
		'habitat' => $term->slug
	);
	$query = new WP_Query( $args );

	// output the term name in a heading tag
	echo'<h2>' . $term->name . ' habitat</h2>';

	// output the post titles in a list
	echo '<ul>';

		// Start the Loop
		while ( $query->have_posts() ) : $query->the_post(); ?>

		<li class="animal-listing" id="post-<?php the_ID(); ?>">
			<a href="<?php the_permalink(); ?>"><?php the_title(); ?></a>
		</li>

		<?php endwhile;

	echo '</ul>';

	// use reset postdata to restore orginal query
	wp_reset_postdata();

} ?>
对此的一些说明:
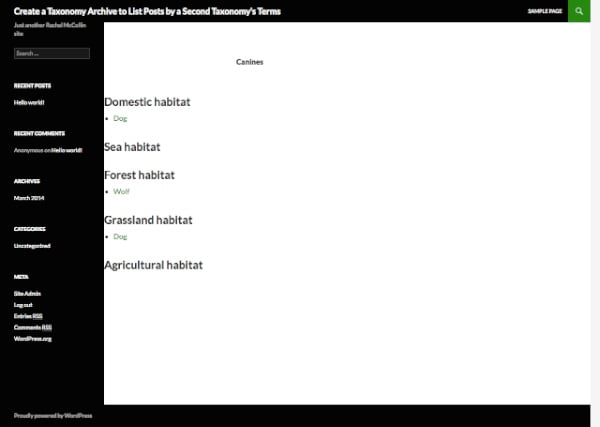
$term) 和当前正在查询的术语 ($animalcat)。'post_type' 参数,但我更愿意包含它以防万一。$term 变量用于使用 $term->name 输出每个部分的标题。现在保存您的模板文件并查看您的动物家族术语之一的分类存档:

目前,如您所见,模板正在输出空列表。通过检查每个查询是否有帖子可以轻松解决此问题。
在循环中包含以下内容:
if ( $query->have_posts() ) {

}
你的循环现在看起来像这样:
if ( $query->have_posts() ) {

	// output the term name in a heading tag
	echo'<h2>' . $term->name . ' habitat</h2>';

	// output the post titles in a list
	echo '<ul>';

		// Start the Loop
		while ( $query->have_posts() ) : $query->the_post(); ?>

		<li class="animal-listing" id="post-<?php the_ID(); ?>">
			<a href="<?php the_permalink(); ?>"><?php the_title(); ?></a>
		</li>

		<?php endwhile;

	echo '</ul>';
}
如果查询没有任何帖子,这会阻止 WordPress 运行循环,从而删除那些空标题。现在我的存档页面如下所示:

好多了!
<h2>为第二个分类创建模板文件最后一步是为第二个分类的档案创建模板文件。
复制您的第一个模板文件并将其重命名为 taxonomy-habitat.php。编辑它以使术语正确。我需要对文件进行的编辑是:
$animalcat 变量的名称更改为 $habitat (您可以通过为该变量指定一个更通用的名称来避免此问题 - 但不要将其称为 $term 因为您在其他地方使用它)<h1> 标题,以便它使用 $habitat 变量来输出当前查询术语的名称(我还在此处添加了一些解释性文本)这是可选的)get_terms() 函数的第一个参数,使其使用 animal_cat 术语,而不是 habitat 术语。'animal_cat' 和 'habitat' 的值。<h2> 内容以引用家庭而不是栖息地。这意味着我的新模板文件如下所示:
<?php
/*
WpTutsPlus tutorial for creating archive to display posts by mutiple taxonomy terms
Archive template for habitat taxonomy
*/
?>

<?php get_header(); ?>

<?php
// get the currently queried taxonomy term, for use later in the template file
$habitat = get_queried_object();
?>

    <div id="main-content" class="main-content">

	<div id="primary" class="content-area">
		<div id="content" class="site-content" role="main">

<header class="archive-header">
	<h1 class="archive-title">
		Habitat - <?php echo $habitat->name; ?>
	</h1>
</header><!-- .archive-header -->

<?php //start by fetching the terms for the animal_cat taxonomy
$terms = get_terms( 'animal_cat', array(
	'hide_empty' => 0
) );
?>

<?php
// now run a query for each animal family
foreach( $terms as $term ) {

	// Define the query
	$args = array(
		'post_type' => 'animal',
		'animal_cat' => $term->slug,
		'habitat' => $habitat->slug
	);
	$query = new WP_Query( $args );

	if( $query->have_posts() ) {

		// output the term name in a heading tag
		echo'<h2>' . $term->name . ' family</h2>';

		// output the post titles in a list
		echo '<ul>';

			// Start the Loop
			while ( $query->have_posts() ) : $query->the_post(); ?>

			<li class="animal-listing" id="post-<?php the_ID(); ?>">
				<a href="<?php the_permalink(); ?>"><?php the_title(); ?></a>
			</li>

			<?php endwhile;

		echo '</ul>';
	}


	// use reset postdata to restore orginal query
	wp_reset_postdata();

} ?>

		</div><!-- #content -->
	</div><!-- #primary -->
	<?php get_sidebar( 'content' ); ?>
</div><!-- #main-content -->

<?php
get_sidebar();
get_footer();
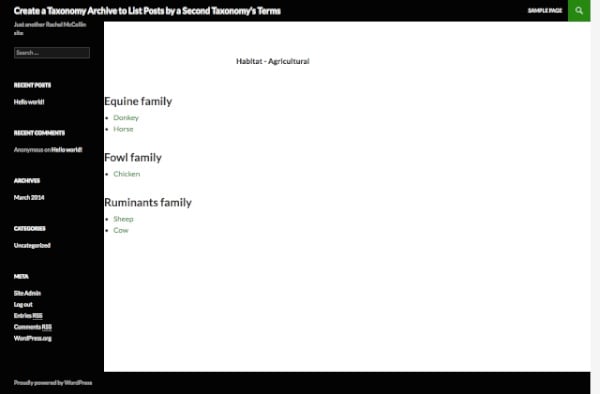
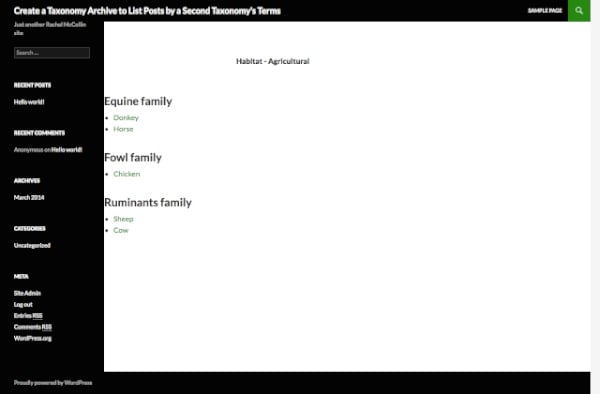
进行这些更改后,保存新模板文件并检查您的存档之一:

您现在拥有第二个分类的页面,其工作方式与第一个分类相同。
<h2>摘要在本教程中,您学习了一种使用多种分类法显示数据的方法。您可以通过以下两种方式之一使用第三种分类法来进一步实现这一点:
$term 变量,其方式与 $habitat 或 $animalcat 变量类似并在现有的 foreach() 语句中添加额外的 foreach() 语句。然后,您需要考虑如何使用列表或网格来布局结果数据。为什么不尝试一下呢?
Ce qui précède est le contenu détaillé de. pour plus d'informations, suivez d'autres articles connexes sur le site Web de PHP en chinois!
 c'est-à-dire que le raccourci ne peut pas être supprimé
 Liste des touches de raccourci Mac
 Comment modifier les autorisations du dossier 777
 Comment connecter asp pour accéder à la base de données
 Comment lire les données de contrôle de macro en javascript
 La différence entre le câble de console et le câble réseau
 Comment représenter des nombres négatifs en binaire
 Que signifie le wifi désactivé ?