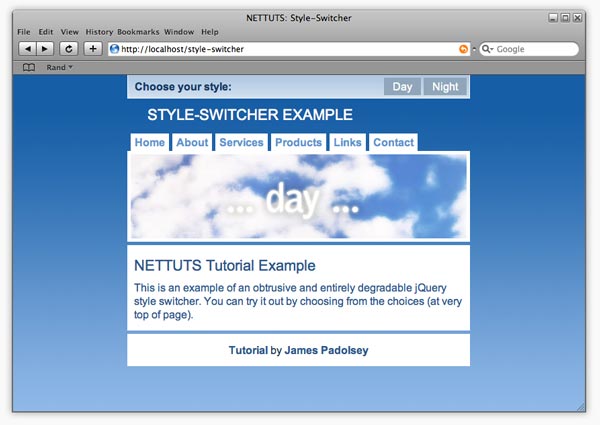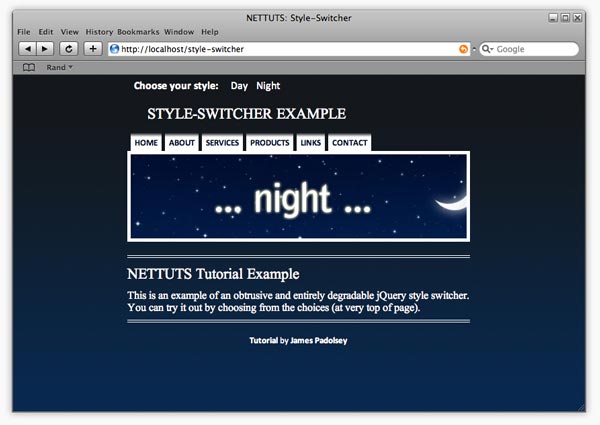
Dans ce tutoriel, je vais vous montrer comment créer un sélecteur de style en utilisant jQuery et PHP. Le résultat final sera un sélecteur de style dynamique discret et entièrement dégradable qui sera rapide et facile à mettre en œuvre.

Nous devons d’abord créer un fichier HTML de base et l’enregistrer sous index.php :
<!DOCTYPE html PUBLIC "-//W3C//DTD XHTML 1.0 Strict//EN" "http://www.w3.org/TR/xhtml1/DTD/xhtml1-strict.dtd">
<html xmlns="http://www.w3.org/1999/xhtml">
	<head>
		<meta http-equiv="Content-Type" content="text/html; charset=utf-8" />
		<title>Style Switcher</title>
		<?php
			// Checks for, and assigns cookie to local variable:
			if(!empty($_COOKIE['style'])) $style = $_COOKIE['style'];
			// If no cookie is present then set style as "day" (default):
			else $style = 'day';
		?>

		<!-- StyleSheet -->
		<link id="stylesheet" type="text/css" href="css/<?php echo $style ?>.css" rel="stylesheet" />

		<!-- jQuery -->
		<script type="text/javascript" src="js/jquery.js"></script>

		<!-- Our plugin -->
		<script type="text/javascript" src="js/styleswitcher.jquery.js"></script>

	</head>
	<body>
		<div id="container">
			<h1>Style-Switcher Example</h1>
			<ul id="nav">
				<li><a href="#">Home</a></li>
				<li><a href="#">About</a></li>
				<li><a href="#">Services</a></li>
				<li><a href="#">Products</a></li>
				<li><a href="#">Links</a></li>
				<li><a href="#">Contact</a></li>
			</ul>
			<div id="banner"></div>
			<div id="content">
				<h2>NETTUTS Tutorial Example</h2>
				<p>Page content...</p>
			</div>
			<div id="foot">
				<p>Footer stuff...</p>
			</div>

			<!-- StyleSheet selection: -->
			<div id="style-switcher">
				<h4>Choose your style:</h4>
				<ul>
					<li id="day"><a href="style-switcher.php?style=day">Day</a></li>
					<li id="night"><a href="style-switcher.php?style=night">Night</a></li>
				</ul>
			</div>

		</div>

		<script type="text/javascript">
			$('#style-switcher a').styleSwitcher(); // Calling the plugin...
		</script>

	</body>
</html>
Vous verrez du PHP sous l'attribut du titre d'en-tête. C'est très simple - il ne fait que rechercher un cookie appelé "style" - s'il existe, il l'assigne à une variable locale (également appelée "style"), si le cookie n'existe pas , il est par défaut le le thème ("jour") est attribué à $style 变量。然后,该变量在链接元素的 href 属性中回显(href="css/<?php echo $style ?>.css").
Vous verrez le div du sélecteur de style inclus dans le code HTML ci-dessus. Il n'est pas nécessaire d'utiliser JavaScript pour ajouter ceci car la méthode que nous utilisons permettra au sélecteur de style de fonctionner lorsque JavaScript est désactivé. Les deux liens (nuit et jour) dirigent l'utilisateur vers un fichier appelé style-switcher.php, avec une chaîne de requête spécifiant le thème correspondant en annexe (par exemple href="style-switcher.php?style=day"). < /p>
J'ai également appelé un plugin jQuery appelé styleSwitcher. Cela n’a pas encore été développé (enfin, cela le sera au moment où vous lirez ceci), alors attendez ! ...nous écrirons ce plugin à l'étape 4 de ce tutoriel.
Maintenant, nous devons créer quelques feuilles de style CSS pour le HTML. J'ai décidé de créer seulement deux feuilles de style - une sur le thème "Jour" et une sur le thème "Nuit" et je les ai nommées de manière appropriée. (Jour.css et Nuit.css)


Il est préférable de commencer avec un style, puis de copier tous les sélecteurs dans la feuille de style alternative. Il ne reste alors plus qu'à modifier les différentes règles et déclarations CSS. Vous pouvez évidemment avoir autant de feuilles de style que vous le souhaitez, mais dans ce didacticiel, nous en utiliserons deux à des fins d'illustration. Et le jour et la nuit s’entendent bien en duo !
#dummy-element{width:2px;} /* Necessary to check if StyleSheet has loaded */

/* Quick Reset */
body,ul,ol,li,img,form,p,h1,h2,h3,h4,h5,h6,blockquote {
	margin: 0;
	padding: 0;
	border: none;
	list-style: none;
	font-weight: normal;
}

/* General / Header */
body {background: #98beeb url(../img/day-body-bg.jpg) repeat-x; }
#container {
	width: 60%;
	margin: 0 auto;
	min-width: 400px;
	max-width: 800px;
	position: relative;
}
h1 {
	text-align: left;
	text-transform: uppercase;
	color: white;
	font-size: 1.4em;
	padding: 45px 30px 10px 30px;
}

/* Navigation */
#nav {
	padding: 5px 5px 0 0;
	overflow: hidden;
}
#nav li {display: inline;}
#nav a {
	float: left;
	color: #6195ce;
	font-weight: bold;
	text-decoration: none;
	padding: 3px 6px;
	margin-left: 5px;
	background: white;
}
#nav a:hover {color: #2c5a8c;}

/* Banner */
#banner {
	height: 125px;
	background: url(../img/day-banner.jpg) center;
	border: 5px solid white;
	clear: both;
}

/* Content Area */
#content {
	border: 10px solid white;
	background: white;
	color: #2c5a8c;
	margin: 5px 0;
}
#content a {font-weight: bold;}
#content a:hover {text-decoration: underline;}
h2 {
	padding: 0.3em 0;
	font-size: 1.4em;
}
p {padding: 0.3em 0;}

/* Footer */
#foot {
	background: white;
	color: #1f3a57;
	text-align: center;
	border: 10px solid white;
	clear: both;
}
#foot a {
	text-decoration: none;
	font-weight: bold;
	color: #2c5a8c;
}
#foot a:hover {text-decoration: underline;}

/* Style-Switcher */
#style-switcher {
	position: absolute;
	width: 100%;
	top: 0;
	left: 0;
	right: 0;
	height: 34px;
	background: #79a3cc url(../img/day-ss-bg.jpg);
	border-bottom: 1px solid white;
}
#style-switcher ul {
	border-right: 1px solid white;
	float: right;
}
#style-switcher h4 {
	display: inline;
	color: #153c67;
	font-weight: bold;
	line-height: 34px;
	padding: 0 10px;
	float: left;
	border-left: 1px solid white;
}
#style-switcher li {display: inline;}
#style-switcher li a {
	float: left;
	line-height: 26px;
	color: white;
	background: #90a6bb;
	text-decoration: none;
	padding: 0 13px;
	display: inline;
	margin: 4px 4px 4px 0;
}
#style-switcher li a:hover {background: #3a5a7c;}
#dummy-element{width:2px;} /* Necessary to check if StyleSheet has loaded */

/* Quick Reset */
body,ul,ol,li,img,form,p,h1,h2,h3,h4,h5,h6,blockquote {
	margin: 0;
	padding: 0;
	border: none;
	list-style: none;
	font-weight: normal;
}

/* General / Header */
body {
	font-family: Calibri,"Arial Narrow",Arial,Sans-Serif;
	background: #072952 url(../img/night-body-bg.jpg) repeat-x;
}
#container {
	width: 60%;
	margin: 0 auto;
	min-width: 400px;
	max-width: 800px;
	position: relative;
}
h1 {
	text-align: left;
	text-transform: uppercase;
	color: white;
	font-size: 1.4em;
	padding: 45px 30px 10px 30px;
	font-family: "Times New Roman", Times, serif;
}

/* Navigation */
#nav {
	padding: 5px 5px 0 0;
	overflow: hidden;
}
#nav li {display: inline;}
#nav a {
	float: left;
	color: #010e2e;
	font-weight: bold;
	text-decoration: none;
	padding: 8px 6px 3px 6px;
	font-size: 0.8em;
	text-transform: uppercase;
	font-weight: 700;
	margin-left: 5px;
	background: white url(../img/night-nav-bg2.jpg) repeat-x;
}
#nav a:hover {color: #2c5a8c;}

/* Banner */
#banner {
	height: 125px;
	background: url(../img/night-banner.jpg) center;
	border: 5px solid white;
	clear: both;
}

/* Content Area */
#content {
	color: white;
	margin: 20px 0;
	padding: 5px 0;
	border-top: 4px double white;
	border-bottom: 4px double white;
	font-family: "Times New Roman", Times, serif;
}
#content a {font-weight: bold;}
#content a:hover {text-decoration: underline;}
h2 {
	padding: 0.3em 0;
	font-size: 1.4em;
}
p {padding: 0.3em 0;}

/* Footer */
#foot {
	color: white;
	font-size: 0.8em;
	clear: both;
}
#foot p {
	text-align: center;
	padding: 0;
}
#foot a {
	text-decoration: none;
	font-weight: bold;
	color: white;
}
#foot a:hover {text-decoration: underline;}

/* Style-Switcher */
#style-switcher {
	position: absolute;
	width: 100%;
	top: 0;
	left: 0;
	right: 0;
	height: 34px;
}
#style-switcher ul {float: left;}
#style-switcher h4 {
	display: inline;
	color: white;
	font-weight: bold;
	line-height: 34px;
	padding: 0 10px;
	float: left;
}
#style-switcher li {display: inline;}
#style-switcher li a {
	float: left;
	line-height: 34px;
	color: white;
	text-decoration: none;
	padding: 0 4px;
	margin-left: 5px;
	display: inline;
}
#style-switcher li a:hover {
	background: white;
	color: #13181c;
	background: white url(../img/night-ss-bg.jpg) repeat-x left bottom;
}
Ceci n'est pas vraiment un tutoriel CSS, donc je n'entrerai pas dans les détails de ce qui précède, mais si vous avez des questions, n'hésitez pas à les poser dans la section commentaires. Oui, je sais que les anciens navigateurs ne prennent pas en charge la largeur minimale ! ;)
C'est ici que nous écrivons les fonctionnalités de base du sélecteur de style. Il ne s'agit en réalité que de quelques lignes de code PHP très basique. Vous devez créer un nouveau fichier appelé "style-switcher.php" et y copier le contenu suivant :
<?php
	$style = $_GET['style'];
	setcookie("style", $style, time()+604800); // 604800 = amount of seconds in one week
	if(isset($_GET['js'])) {
		echo $style;
	} else {
		header("Location: ".$_SERVER['HTTP_REFERER']);
	}
?>
Le code ci-dessus fait donc attribuer la variable GET "style" à la variable locale $style. Autrement dit, il prendra la valeur de l'attribut style dans la chaîne de requête (style-switcher.php?style=$style 变量。换句话说,它将采用查询字符串中样式属性的值 (style-switcher.php?style=day)。然后它设置一个名为“style”的 cookie(持续一周) - 我们将能够使用步骤 1 中显示的代码在主 index.php 上检索此 cookie(还记得 headday
head</code > Des petits bouts de PHP ?). Ensuite, il vérifie si « js » est ajouté à la chaîne de requête. Si c'est le cas, alors nous savons que JavaScript (que nous n'avons pas encore écrit) a demandé ce script PHP. La condition else se produit lorsque l'utilisateur n'a pas activé JavaScript et redirige l'utilisateur vers le référent (c'est-à-dire la page d'où il vient) - cela deviendra plus clair une fois que nous aurons écrit le contenu jQuery ! <h2>
</h2>Étape 4 : Contenu jQuery<p>
</p>Tu peux t'arrêter ici si tu veux ! ...la solution jusqu'à présent fonctionnera parfaitement, mais comme je l'ai dit dans l'introduction, nous allons la rendre encore plus cool avec un peu de puissance jQuery ! Non seulement nous permettrons aux utilisateurs de changer de thème sans actualiser la page, mais nous ajouterons également un effet de fondu vraiment sympa... Je veux dire, quel type de tutoriel jQuery serait-ce sans fondu ! ? ! ? <p>
</p>Évidemment, tout cela est possible sans créer de plugin, mais je pense que ce sera une excellente expérience d'apprentissage pour vous tous, et cela nous permettra d'adapter ou de transférer du code rapidement et facilement. <p>
</p>Tout d’abord, créons un fichier appelé « styleswitcher.jquery.js ». <p>
</p>Créer un nouveau plugin dans jQuery est très simple ; il suffit du code suivant : <p>
<div class="code" style="position:relative; padding:0px; margin:0px;"><pre class='brush:php;toolbar:false;'>jQuery.fn.styleSwitcher = function(){
	// The code goes here...
}
</pre><div class="contentsignin">Copier après la connexion</div></div>
<code>div#style-switcher
Nous voulons donc d'abord préciser ce qui se passe lorsque l'on clique sur l'un des liens de la feuille de style (celui de ) : 🎜
/* "this" refers to each instance of the selected element,
 * So, if you were to call the plugin like this:
 * $('a').styleSwitcher(); then the following would occur
 * when clicking on any anchor within the document:
 */

$(this).click(function(){
	// We're passing this element object through to the
	// loadStyleSheet function.
	loadStyleSheet(this);
	// And then we're returning false.
	return false;
});
现在我们需要编写loadStyleSheet函数:
function loadStyleSheet(obj) {

	// Append new div to body:
	$('body').append('<div id="overlay" />');

	// Give body a height of 100% (to fix IE6 issue):
	$('body').css({height:'100%'});

	// Select newly created div and apply some styles:
	$('#overlay')
		.css({
			display: 'none',
			position: 'absolute',
			top:0,
			left: 0,
			width: '100%',
			height: '100%',
			zIndex: 1000,
			background: 'black url(img/loading.gif) no-repeat center'
		})

		// Now fade in the div (#overlay):
		.fadeIn(500,function(){

			// The following will happen when the div has finished fading in:

			// Request PHP script (obj.href) with appended "js" query string item:
			$.get( obj.href+'&js',function(data){

				// Select link element in HEAD of document (#stylesheet) and change href attribute:
				$('#stylesheet').attr('href','css/' + data + '.css');

				// Check if new CSS StyleSheet has loaded:
				cssDummy.check(function(){

					// When StyleSheet has loaded, fade out and remove the #overlay div:
					$('#overlay').fadeOut(500,function(){
						$(this).remove();
					});
				});
			});
		});
}
我希望评论能充分解释这一点。细心的你会注意到我们正在调用一个当前未定义的函数(cssDummy.check())。别担心,因为这是下一步......
我们需要一种方法来测试样式表是否已加载。如果它已经加载,那么我们可以让覆盖层 div 消失,但如果它没有加载,我们必须继续检查,直到它加载。我在网上进行了一些搜索,找到了测试此类事情的可靠方法。它涉及测试虚拟元素的计算宽度。该元素的宽度将在 CSS 中定义 - 因此,当样式表加载时,计算出的元素宽度将仅等于 CSS 中定义的宽度。我希望您现在明白为什么我们必须在每个 CSS 文件中包含“#dummy-element”规则...
所以,这里是:
var cssDummy = {
	init: function(){
		// Appends "dummy-element" div to body:
		$('<div id="dummy-element" style="display:none" />').appendTo('body');
	},
	check: function(callback) {

		// Checks if computed with equals that which is defined in the StyleSheets (2px):
		if ($('#dummy-element').width()==2) callback();

		// If it has not loaded yet then simple re-initiate this
		// function every 200 milliseconds until it had loaded:
		else setTimeout(function(){cssDummy.check(callback)}, 200);
	}
}
并且,在插件的最后,我们将调用 cssDummy.init 函数:
cssDummy.init();
我们完成了!整个插件现在看起来像这样:
jQuery.fn.styleSwitcher = function(){
	$(this).click(function(){
		loadStyleSheet(this);
		return false;
	});
	function loadStyleSheet(obj) {
		$('body').append('<div id="overlay" />');
		$('body').css({height:'100%'});
		$('#overlay')
			.css({
				display: 'none',
				position: 'absolute',
				top:0,
				left: 0,
				width: '100%',
				height: '100%',
				zIndex: 1000,
				background: 'black url(img/loading.gif) no-repeat center'
			})
			.fadeIn(500,function(){
				$.get( obj.href+'&js',function(data){
					$('#stylesheet').attr('href','css/' + data + '.css');
					cssDummy.check(function(){
						$('#overlay').fadeOut(500,function(){
							$(this).remove();
						});
					});
				});
			});
	}
	var cssDummy = {
		init: function(){
			$('<div id="dummy-element" style="display:none" />').appendTo('body');
		},
		check: function(callback) {
			if ($('#dummy-element').width()==2) callback();
			else setTimeout(function(){cssDummy.check(callback)}, 200);
		}
	}
	cssDummy.init();
}
我们现在可以像这样调用 jQuery 插件:
$('#style-switcher a').styleSwitcher();
如果您不确定文件结构,请下载 src 文件来查看。我希望您喜欢阅读本教程。一如既往,如果您有任何疑问,请随时在下面提问!如果您喜欢这篇文章,请挖掘它!
Ce qui précède est le contenu détaillé de. pour plus d'informations, suivez d'autres articles connexes sur le site Web de PHP en chinois!
 Pourquoi mon téléphone n'est-il pas éteint mais lorsque quelqu'un m'appelle, il me demande de l'éteindre ?
 mysql créer une base de données
 Comment résoudre trop de connexions
 Comment utiliser dc.rectangle
 Désactivez les mises à jour automatiques de Win10
 Représentation binaire des nombres négatifs
 Jailbreak iPhone 4
 Construisez votre propre serveur git
 Quels sont les avantages du framework SpringBoot ?