PS给没有下雪的图片加上下雪的效果教程
你是不是真的看过下雪呢,是不是很美呢,那怎么给没有下雪的图片加上下雪的效果呢,下面小编就为大家介绍PS给没有下雪的图片加上下雪的效果方法,一起来学习吧!
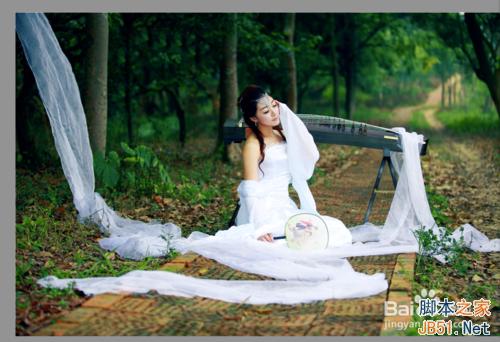
原图:
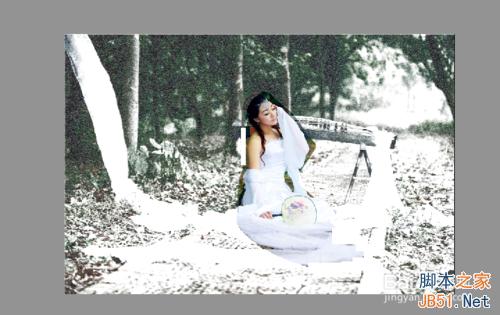
效果图:
方法/步骤
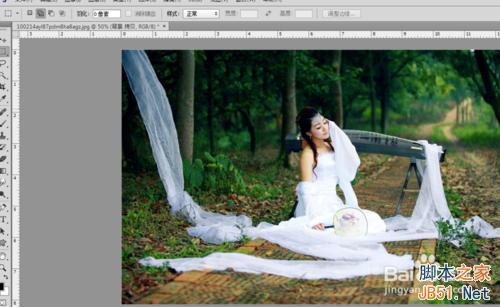
1、打开素材图片【ctrl+o】,复制图层【ctrl+j】,如下图:
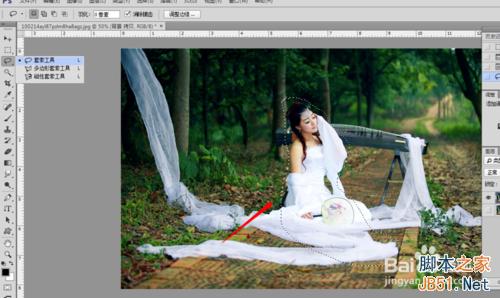
2、单击工具箱中的【套索工具】,把人物选出来,如下图:
3、按shift+ctrl+i,反选,复制【ctrl+c】,单击通道面板,如下图:
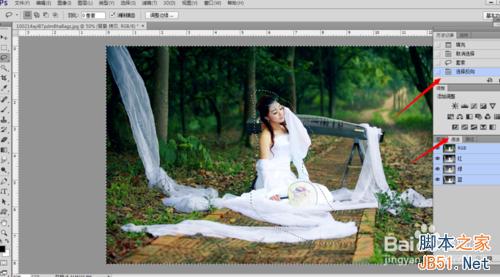
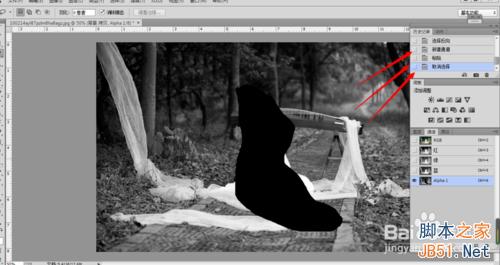
4、新建通道,把刚才复制的粘贴进来【ctrl+v】,取消选择【ctrl+d】,如下图
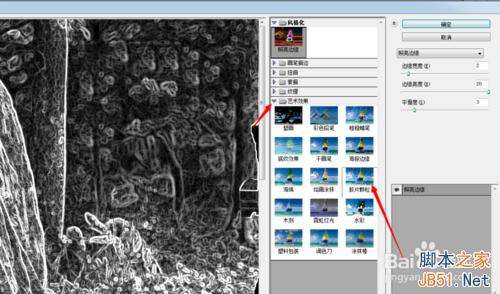
5、执行【滤镜--滤镜库--艺术效果--胶片颗粒】,如下图:
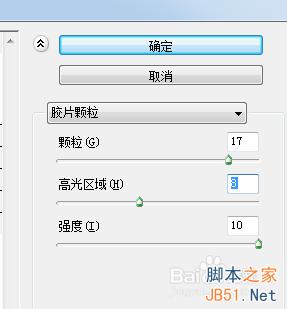
6、参数设置如下图:
7、载入选区,按住【ctrl】键,点击通道【Alpha 1】,用套索工具把人物的选区减去。
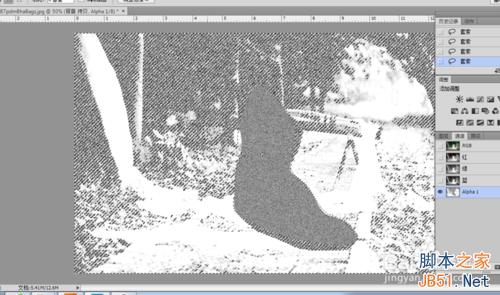
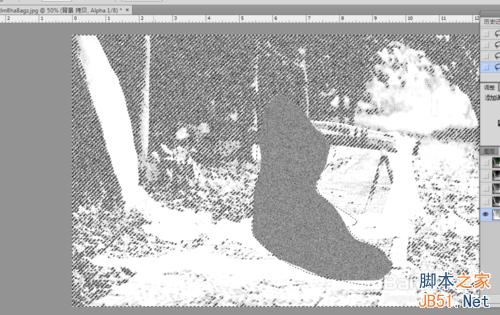
8、回到【图层】面板,选中【背景拷贝】图层,粘贴进来【ctrl+v】,如下图:
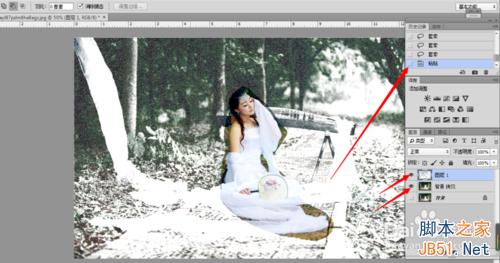
9、最后处理一下细节,如下图所示。

END
人物在这里没有细抠,大家可以用钢笔做精细。
以上就是PS给没有下雪的图片加上下雪的效果教程,希望大家喜欢!

Outils d'IA chauds

Undresser.AI Undress
Application basée sur l'IA pour créer des photos de nu réalistes

AI Clothes Remover
Outil d'IA en ligne pour supprimer les vêtements des photos.

Undress AI Tool
Images de déshabillage gratuites

Clothoff.io
Dissolvant de vêtements AI

AI Hentai Generator
Générez AI Hentai gratuitement.

Article chaud

Outils chauds

Bloc-notes++7.3.1
Éditeur de code facile à utiliser et gratuit

SublimeText3 version chinoise
Version chinoise, très simple à utiliser

Envoyer Studio 13.0.1
Puissant environnement de développement intégré PHP

Dreamweaver CS6
Outils de développement Web visuel

SublimeText3 version Mac
Logiciel d'édition de code au niveau de Dieu (SublimeText3)

Sujets chauds
 1359
1359
 52
52
 numéro de série ps cs5 gratuit en permanence 2020
Jul 13, 2023 am 10:06 AM
Les numéros de série PS CS5 permanents gratuits 2020 incluent : 1. 1330-1384-7388-4265-2355-8589 (chinois) ; 2. 1330-1409-7892-5799-0412-7680 (chinois) ; -8375-9492-6951 (chinois) ; 4. 1330-1971-2669-5043-0398-7801 (chinois), etc.
 Comment supprimer la zone sélectionnée dans PS
Aug 07, 2023 pm 01:46 PM
Étapes pour supprimer la zone sélectionnée dans PS : 1. Ouvrez l'image que vous souhaitez modifier ; 2. Utilisez l'outil approprié pour créer une sélection ; 3. Vous pouvez utiliser diverses méthodes pour supprimer le contenu de la sélection, utilisez le " Supprimer", utilisez l'outil "Healing Brush Tool", utilisez "Content-Aware Fill", utilisez l'"Outil Tampon", etc. ; 4. Utilisez des outils pour réparer les traces ou défauts évidents afin de rendre l'image plus naturelle ; 5 . Une fois l'édition terminée, cliquez sur "Fichier" > dans la barre de menu "Enregistrer" pour enregistrer les résultats de l'édition.
 Que faire si l'installation de PS ne peut pas écrire l'erreur 160 de la valeur de registre
Mar 22, 2023 pm 02:33 PM
Solution à l'erreur 160 lorsque l'installation de ps ne peut pas écrire la valeur de registre : 1. Vérifiez s'il y a un logiciel 2345 sur l'ordinateur et si c'est le cas, désinstallez le logiciel. 2. Appuyez sur « Win+R » et entrez « Regedit » pour ouvrir le registre système ; , puis recherchez "Photoshop.exe" et supprimez l'élément Photoshop.
 Que dois-je faire si la police de l'interface PS est trop petite ?
Dec 01, 2022 am 11:31 AM
Comment réparer la police de l'interface PS qui est trop petite : 1. Ouvrez PS, cliquez sur le bouton "Modifier" dans la barre de menu supérieure de PS pour développer le menu d'édition. 2. Cliquez sur le bouton "Préférences" dans le menu d'édition étendu. puis cliquez sur le bouton "Interface..." ; 3. Dans les paramètres de l'interface, définissez la taille de la police de l'interface utilisateur sur "Grande", définissez la mise à l'échelle de l'interface utilisateur sur "200 %" et enregistrez les paramètres, puis redémarrez PS pour prendre effet.
 Introduction au processus d'extraction de dessins au trait dans PS
Apr 01, 2024 pm 12:51 PM
1. Ouvrez le logiciel et importez un élément de matériel, comme indiqué dans l'image ci-dessous. 2. Puis ctrl+shift+u pour supprimer la couleur. 3. Appuyez ensuite sur ctrl+J pour copier le calque. 4. Ensuite, inversez ctrl+I, puis définissez le mode de fusion des calques sur Color Dodge. 5. Cliquez sur Filtre--Autres--Minimum. 6. Dans la boîte de dialogue contextuelle, définissez le rayon sur 2 et cliquez sur OK. 7. Enfin, vous pouvez voir le brouillon de ligne extrait.
 Comment automatiser les tâches à l'aide de PowerShell
Feb 20, 2024 pm 01:51 PM
Si vous êtes un administrateur informatique ou un expert en technologie, vous devez être conscient de l'importance de l'automatisation. Surtout pour les utilisateurs de Windows, Microsoft PowerShell est l'un des meilleurs outils d'automatisation. Microsoft propose une variété d'outils pour vos besoins d'automatisation, sans qu'il soit nécessaire d'installer des applications tierces. Ce guide détaillera comment exploiter PowerShell pour automatiser les tâches. Qu'est-ce qu'un script PowerShell ? Si vous avez de l'expérience avec PowerShell, vous avez peut-être utilisé des commandes pour configurer votre système d'exploitation. Un script est une collection de ces commandes dans un fichier .ps1. Les fichiers .ps1 contiennent des scripts exécutés par PowerShell, tels que Get-Help de base
 Liste complète des touches de raccourci PS
Mar 11, 2024 pm 04:31 PM
1. Ctrl + N : Créez un nouveau document. 2. Ctrl + O : Ouvrir un fichier. 3. Ctrl + S : Enregistrez le fichier actuel. 4. Ctrl + Maj + S : Enregistrer sous. 5. Ctrl + W : fermez le document actuel. 6. Ctrl + Q : Quittez Photoshop. 7. Ctrl + Z : Annuler. 8. Ctrl + Y : Refaire. 9. Ctrl + X : Couper le contenu sélectionné. 10. Ctrl + C : Copiez le contenu sélectionné.
 Impossible d'utiliser les touches de raccourci PS pour remplir
Feb 19, 2024 am 09:18 AM
Avec le développement de l’ère numérique, les logiciels de traitement d’images sont devenus un élément indispensable de notre vie et de notre travail. Parmi eux, Photoshop (PS en abrégé) développé par Adobe est l'un des logiciels de traitement d'image les plus connus. Il possède des fonctions puissantes et un fonctionnement flexible, et est profondément apprécié des utilisateurs. Cependant, lors de l'utilisation de PS, certains utilisateurs ont signalé que la touche de raccourci « Remplir » ne pouvait pas être utilisée normalement, ce qui causait des problèmes à l'expérience utilisateur. Les touches de raccourci sont une méthode d'opération rapide fournie dans le logiciel pour éviter les opérations fastidieuses de clic de souris.


