AlertDialog(对话框)详解
本节引言:
本节继续给大家带来是显示提示信息的第三个控件AlertDialog(对话框),同时它也是其他 Dialog的的父类!比如ProgressDialog,TimePickerDialog等,而AlertDialog的父类是:Dialog! 另外,不像前面学习的Toast和Notification,AlertDialog并不能直接new出来,如果你打开 AlertDialog的源码,会发现构造方法是protected的,如果我们要创建AlertDialog的话,我们 需要使用到该类中的一个静态内部类:public static class Builder,然后来调用AlertDialog 里的相关方法,来对AlertDialog进行定制,最后调用show()方法来显示我们的AlertDialog对话框! 好的,下面我们就来学习AlertDialog的基本用法,以及定制我们的AlertDialog! 官方文档:AlertDialog
1.基本使用流程
- Step 1:创建AlertDialog.Builder对象;
- Step 2:调用setIcon()设置图标,setTitle()或setCustomTitle()设置标题;
- Step 3:设置对话框的内容:setMessage()还有其他方法来指定显示的内容;
- Step 4:调用setPositive/Negative/NeutralButton()设置:确定,取消,中立按钮;
- Step 5:调用create()方法创建这个对象,再调用show()方法将对话框显示出来;
2.几种常用的对话框使用示例
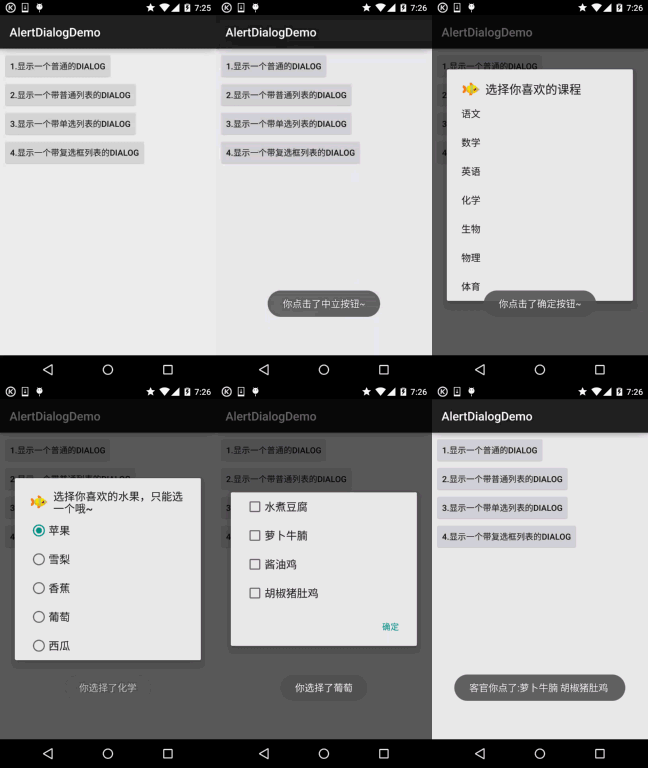
运行效果图:

核心代码:
MainActivity.java:
private Button btn_dialog_one;
private Button btn_dialog_two;
private Button btn_dialog_three;
private Button btn_dialog_four;
private Context mContext;
private boolean[] checkItems;
private AlertDialog alert = null;
private AlertDialog.Builder builder = null;
@Override
protected void onCreate(Bundle savedInstanceState) {
super.onCreate(savedInstanceState);
setContentView(R.layout.activity_main);
mContext = MainActivity.this;
bindView();
}
private void bindView() {
btn_dialog_one = (Button) findViewById(R.id.btn_dialog_one);
btn_dialog_two = (Button) findViewById(R.id.btn_dialog_two);
btn_dialog_three = (Button) findViewById(R.id.btn_dialog_three);
btn_dialog_four = (Button) findViewById(R.id.btn_dialog_four);
btn_dialog_one.setOnClickListener(this);
btn_dialog_two.setOnClickListener(this);
btn_dialog_three.setOnClickListener(this);
btn_dialog_four.setOnClickListener(this);
}
@Override
public void onClick(View v) {
switch (v.getId()) {
//普通对话框
case R.id.btn_dialog_one:
alert = null;
builder = new AlertDialog.Builder(mContext);
alert = builder.setIcon(R.mipmap.ic_icon_fish)
.setTitle("系统提示:")
.setMessage("这是一个最普通的AlertDialog,\n带有三个按钮,分别是取消,中立和确定")
.setNegativeButton("取消", new DialogInterface.OnClickListener() {
@Override
public void onClick(DialogInterface dialog, int which) {
Toast.makeText(mContext, "你点击了取消按钮~", Toast.LENGTH_SHORT).show();
}
})
.setPositiveButton("确定", new DialogInterface.OnClickListener() {
@Override
public void onClick(DialogInterface dialog, int which) {
Toast.makeText(mContext, "你点击了确定按钮~", Toast.LENGTH_SHORT).show();
}
})
.setNeutralButton("中立", new DialogInterface.OnClickListener() {
@Override
public void onClick(DialogInterface dialog, int which) {
Toast.makeText(mContext, "你点击了中立按钮~", Toast.LENGTH_SHORT).show();
}
}).create(); //创建AlertDialog对象
alert.show(); //显示对话框
break;
//普通列表对话框
case R.id.btn_dialog_two:
final String[] lesson = new String[]{"语文", "数学", "英语", "化学", "生物", "物理", "体育"};
alert = null;
builder = new AlertDialog.Builder(mContext);
alert = builder.setIcon(R.mipmap.ic_icon_fish)
.setTitle("选择你喜欢的课程")
.setItems(lesson, new DialogInterface.OnClickListener() {
@Override
public void onClick(DialogInterface dialog, int which) {
Toast.makeText(getApplicationContext(), "你选择了" + lesson[which], Toast.LENGTH_SHORT).show();
}
}).create();
alert.show();
break;
//单选列表对话框
case R.id.btn_dialog_three:
final String[] fruits = new String[]{"苹果", "雪梨", "香蕉", "葡萄", "西瓜"};
alert = null;
builder = new AlertDialog.Builder(mContext);
alert = builder.setIcon(R.mipmap.ic_icon_fish)
.setTitle("选择你喜欢的水果,只能选一个哦~")
.setSingleChoiceItems(fruits, 0, new DialogInterface.OnClickListener() {
@Override
public void onClick(DialogInterface dialog, int which) {
Toast.makeText(getApplicationContext(), "你选择了" + fruits[which], Toast.LENGTH_SHORT).show();
}
}).create();
alert.show();
break;
//多选列表对话框
case R.id.btn_dialog_four:
final String[] menu = new String[]{"水煮豆腐", "萝卜牛腩", "酱油鸡", "胡椒猪肚鸡"};
//定义一个用来记录个列表项状态的boolean数组
checkItems = new boolean[]{false, false, false, false};
alert = null;
builder = new AlertDialog.Builder(mContext);
alert = builder.setIcon(R.mipmap.ic_icon_fish)
.setMultiChoiceItems(menu, checkItems, new DialogInterface.OnMultiChoiceClickListener() {
@Override
public void onClick(DialogInterface dialog, int which, boolean isChecked) {
checkItems[which] = isChecked;
}
})
.setPositiveButton("确定", new DialogInterface.OnClickListener() {
@Override
public void onClick(DialogInterface dialog, int which) {
String result = "";
for (int i = 0; i < checkItems.length; i++) {
if (checkItems[i])
result += menu[i] + " ";
}
Toast.makeText(getApplicationContext(), "客官你点了:" + result, Toast.LENGTH_SHORT).show();
}
})
.create();
alert.show();
break;
}
}
}
布局就是四个简单的按钮,这里就不贴出来了,用法非常简单~无非就是创建一个Builder对象后, 进行相关设置,然后create()生成一个AlertDialog对象,最后调用show()方法将AlertDialog 显示出来而已!另外,细心的你可能发现我们点击对话框的外部区域,对话框就会消失,我们 可以为builder设置setCancelable(false)即可解决这个问题!
3.通过Builder的setView()定制显示的AlertDialog
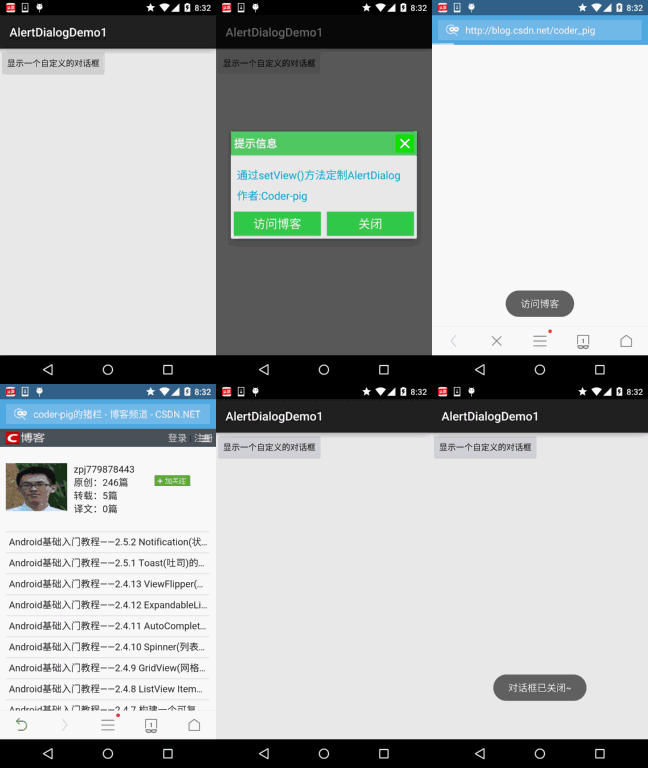
我们可以自定义一个与系统对话框不同的布局,然后调用setView()将我们的布局加载到 AlertDialog上,上面我们来实现这个效果:
运行效果图:

关键代码:
首先是两种不同按钮的selctor的drawable文件:
btn_selctor_exit.xml:
<selector xmlns:android="http://schemas.android.com/apk/res/android">
<item android:state_pressed="true" android:drawable="@mipmap/iv_icon_exit_pressed"/>
<item android:drawable="@mipmap/iv_icon_exit_normal"/>
</selector>
btn_selctor_choose.xml:
<selector xmlns:android="http://schemas.android.com/apk/res/android">
<item android:state_pressed="true" android:drawable="@mipmap/bg_btn_pressed"/>
<item android:drawable="@mipmap/bg_btn_normal"/>
</selector>
接着是自定义的Dialog布局:view_dialog_custom.xml:
<RelativeLayout xmlns:android="http://schemas.android.com/apk/res/android"
android:id="@+id/RelativeLayout1"
android:layout_width="match_parent"
android:layout_height="match_parent"
android:orientation="vertical">
<RelativeLayout
android:id="@+id/titlelayout"
android:layout_width="match_parent"
android:layout_height="wrap_content"
android:layout_alignParentLeft="true"
android:layout_alignParentTop="true"
android:background="../style/images/android-tutorial-alertdialog.html"
android:padding="5dp">
<TextView
android:layout_width="match_parent"
android:layout_height="wrap_content"
android:layout_centerVertical="true"
android:text="提示信息"
android:textColor="#ffffff"
android:textSize="18sp"
android:textStyle="bold" />
<Button
android:id="@+id/btn_cancle"
android:layout_width="30dp"
android:layout_height="30dp"
android:layout_alignParentRight="true"
android:background="../style/images/btn_selctor_exit" />
</RelativeLayout>
<LinearLayout
android:id="@+id/ly_detail"
android:layout_width="wrap_content"
android:layout_height="wrap_content"
android:layout_alignParentLeft="true"
android:layout_below="@+id/titlelayout"
android:layout_centerInParent="true"
android:orientation="vertical">
<TextView
android:layout_width="wrap_content"
android:layout_height="wrap_content"
android:layout_marginLeft="10dp"
android:layout_marginTop="20dp"
android:text="通过setView()方法定制AlertDialog"
android:textColor="#04AEDA"
android:textSize="18sp" />
<TextView
android:layout_width="wrap_content"
android:layout_height="wrap_content"
android:layout_marginLeft="10dp"
android:layout_marginTop="10dp"
android:text="作者:Coder-pig"
android:textColor="#04AEDA"
android:textSize="18sp" />
</LinearLayout>
<LinearLayout
android:layout_width="match_parent"
android:layout_height="wrap_content"
android:layout_below="@+id/ly_detail"
android:layout_marginTop="10dp"
android:orientation="horizontal">
<Button
android:id="@+id/btn_blog"
android:layout_width="match_parent"
android:layout_height="40dp"
android:layout_margin="5dp"
android:layout_weight="1"
android:background="../style/images/btn_selctor_choose"
android:text="访问博客"
android:textColor="#ffffff"
android:textSize="20sp" />
<Button
android:id="@+id/btn_close"
android:layout_width="match_parent"
android:layout_height="40dp"
android:layout_margin="5dp"
android:layout_weight="1"
android:background="../style/images/btn_selctor_choose"
android:text="关闭"
android:textColor="#ffffff"
android:textSize="20sp" />
</LinearLayout>
</RelativeLayout>
最后是MainActivity.java:
private Button btn_show;
private View view_custom;
private Context mContext;
private AlertDialog alert = null;
private AlertDialog.Builder builder = null;
@Override
protected void onCreate(Bundle savedInstanceState) {
super.onCreate(savedInstanceState);
setContentView(R.layout.activity_main);
mContext = MainActivity.this;
btn_show = (Button) findViewById(R.id.btn_show);
//初始化Builder
builder = new AlertDialog.Builder(mContext);
//加载自定义的那个View,同时设置下
final LayoutInflater inflater = MainActivity.this.getLayoutInflater();
view_custom = inflater.inflate(R.layout.view_dialog_custom, null,false);
builder.setView(view_custom);
builder.setCancelable(false);
alert = builder.create();
view_custom.findViewById(R.id.btn_cancle).setOnClickListener(new View.OnClickListener() {
@Override
public void onClick(View v) {
alert.dismiss();
}
});
view_custom.findViewById(R.id.btn_blog).setOnClickListener(new View.OnClickListener() {
@Override
public void onClick(View v) {
Toast.makeText(getApplicationContext(), "访问博客", Toast.LENGTH_SHORT).show();
Uri uri = Uri.parse("http://blog.csdn.net/coder_pig");
Intent intent = new Intent(Intent.ACTION_VIEW, uri);
startActivity(intent);
alert.dismiss();
}
});
view_custom.findViewById(R.id.btn_close).setOnClickListener(new View.OnClickListener() {
@Override
public void onClick(View v) {
Toast.makeText(getApplicationContext(), "对话框已关闭~", Toast.LENGTH_SHORT).show();
alert.dismiss();
}
});
btn_show.setOnClickListener(new View.OnClickListener() {
@Override
public void onClick(View v) {
alert.show();
}
});
}
}
4.示例代码下载
AlertDialogDemo.zip
AlertDialogDemo1.zip
本节小结:
好的,本节给大家介绍了一下AlertDialog的基本使用,写了几个调用AlertDialog的例子, 最后还通过setView方法自定义了一下我们的AlertDialog!是不是还意犹未尽呢?但这说不上 真正的自定义控件,我们把自定义控件放到进阶系列,到时后会有个专题来和大家探讨 下自定义控件~敬请期待~就说这么多,谢谢~


