
When I didn’t learn canvas, I felt that canvas was so mysterious, so gorgeous, and so profound. The effects made with canvas were so cool, and the things that could be done were so broad. , it makes me feel awe in my heart, and I often sigh: If I get this skill, I will definitely go to heaven (note, this is not about going to heaven). The main reason why I never dared to get involved at that time is that, first, I still need to In the era when it is compatible with IE, compatibility is a flaw; secondly, there are so few reference materials, or there are so many reference materials that there is no good reference article suitable for getting started; thirdly, the reason why canvas can do anything is that The biggest reason is that I have a good partner, JavaScript, but I still don’t know much about JavaScript. (So many excuses) Now, I finally have the time and energy to study this mysterious canvas. Considering that there are very few words on the basic knowledge of canvas that are suitable for getting started, I decided to write it in the next paragraph. Time to sort out the canvas API. After all, if you want to do your job well, you must first sharpen your tools. Without further ado, let’s get started!
Note: Each attribute and method in the following API is currently supported, and those that are not fully supported will not be introduced!
First introduction to canvas
To learn canvas, you must first know what canvas is?
<canvas></canvas>
First of all, canvas is just a sticky note in HTML5. It means a canvas. It has no function by itself. It is equivalent to a drawing board. You can draw whatever you want on it. thing, if we don’t set any properties or styles for it, what is its default state? Run the above code and you will get the following: 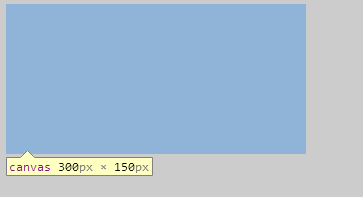
The default width is 300px and the height is 150px. When the body background is white, its background is white and the body background is gray. When, its background is gray, it can be seen that its default background is transparent
<canvas></canvas>
你是什么类型的标签?Add an inline style tag after it to see what type of tag it is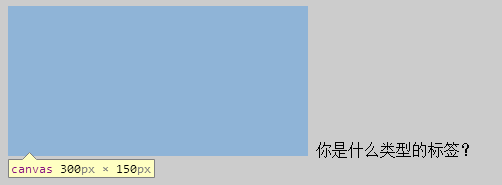
span has moved to the right side of it, indicating that it is an inline element. Okay, we understand the basic situation, so how do we modify its default style?
First of all, canvas, as a special tag of HTML5, also supports style control, such as setting borders, margins, background, etc., but one thing worth noting is that when setting the canvas width and height, if you use style If you set the style, there will be a small problem. I will not explain the specific problem for now and will introduce it to you later. Therefore, it is better to set the width and height on the label.
<canvas width="400" height="400" id="canvas"></canvas>
Of course, canvas is currently only It’s just a drawing board. Without a brush, you can’t do anything. So what is a brush? Here is the beginning of our protagonist
var canvas = document.getElementById("canvas");
var ctx = canvas.getContext("2d"); //目前只有2d,没有3d,以后会有的,如果想了解3d,可以看一下webGLgetContext("2d") is the drawing environment of canvas. It can only be imported It can be used for drawing
Sometimes I wonder, canvas drawing is done in js, so can its own label be able to write something, for example, if you put a picture in it, hehe, What will happen? Let’s do what we say
<canvas width="400" height="400" id="canvas">
        <img src="1.jpg" width="400" height="400" alt="">
</canvas> Dangdangdangdang and witness the miracle! Ma Dan, under the standard browser, there is nothing. Look at the unsatisfactory IE, and it is blinding. A beautiful woman appears
It can be seen that in support In canvas browsers, the content in canvas will not be displayed, but if it is not supported, it will be displayed nakedly. Therefore, we can use it as a prompt to tell the browser that does not support it that it should be changed. Changed
<canvas width="400" height="400" id="canvas">
        <span>亲,您的浏览器不支持canvas,换个浏览器试试吧!</span>
</canvas> Well, for the lower version members of the IE family, they are too old and can only be dealt with in this way. If you insist on supporting IE, you can try the explorercanvas open source project, which has an excanvas .js, of course, when using it, indicate that it is referenced under IE. I did not give the address, and I have no intention of studying it, because I concluded that in the near future, browsers below IE8 will disappear, haha, Hope it comes soon!
It’s all about chatting, and the current protagonist has just begun. The task is arduous and there is a long way to go. The canvas API is divided into attribute parts and method parts, but I don’t want to talk about it this way. It’s too mechanical and hard to understand. People still can't understand it. In the following API, I will use related attributes and methods to explain cross-explanation, and then supplement it with small examples. I believe this will be more understandable and impressive. I am a little excited when I think about it. The API is relatively long and can only be discussed in several installments!
Since the default background of canvas is transparent, in order to distinguish the canvas from the body, the future canvas style is set as follows:
body{ background:#ccc;}
canvas{ background:#fff;} When drawing, you all draw from points, lines, circles, and boxes. It started, so let’s start from the beginning!
MoveTo(x,y) As the name suggests, it is to move to a certain coordinate point, x,y represent the x-axis coordinate and y-axis coordinate respectively
var canvas = document.getElementById("canvas");
var ctx = canvas.getContext("2d");
ctx.moveTo(100,100);当然是不会有任何的效果的,因为这里的意思就相当于把笔移动了100,100的位置,还没有下笔呢,这并不是然并卵,这个是画笔作画的起点,比如画直线,2点一线,只需再做一点就可以画直线了
lineTo(x,y) 意思是连接最后一点的坐标,但是不画,x,y 分别表示x轴坐标和y轴坐标
var canvas = document.getElementById("canvas");
var ctx = canvas.getContext("2d");
ctx.moveTo(100,100);
ctx.lineTo(200,200);然而并没有任何效果,这是为什么呢,实际上,上面只是标注了直线的起点和终点,还没添墨水呢,何为墨水呢?
下面就来介绍我们的黑白双煞:
fill() 填充,此为实心的
stroke() 绘制,此为空心的
因为线条的宽度只有一个像素,所以无法进行填充,于是画线段用fill()方法是没有用的,
var canvas = document.getElementById("canvas");
var ctx = canvas.getContext("2d");
ctx.moveTo(100,100);
ctx.lineTo(200,200);
ctx.stroke();结果:
此黑白双煞在以后的绘图中起到核心作用,切记这2个方法(为什么我叫它们黑白双煞呢,因为canvas默认颜色为黑色,fill()填充颜色为一坨黑,stroke()绘制就像描边一样,一个框,里面是透明的,由此得名,哈哈,方便记忆)。
点,线之后便是面了,我们来绘制矩形吧,矩形也有三兄弟,暂且命名为阮氏三兄弟:
rect(x,y,w,h) 在x,y坐标点绘制一个矩形,宽高为w,h,此方法只是绘制路径,必须用黑白双煞才能显示
fillRect(x,y,w,h) 在x,y坐标点绘制一个填充矩形,宽高为w,h
strokeRect(x,y,w,h) 在x,y坐标点绘制一个描边矩形,宽高为w,h
分别看看它们的表现
//不用黑白双煞
var canvas = document.getElementById("canvas");
var ctx = canvas.getContext("2d");
ctx.rect(5.5,5.5,100,100);//用stroke
var canvas = document.getElementById("canvas");
var ctx = canvas.getContext("2d");
ctx.rect(5.5,5.5,100,100)
ctx.stroke();//用fill
var canvas = document.getElementById("canvas");
var ctx = canvas.getContext("2d");
ctx.rect(5.5,5.5,100,100)
ctx.fill();//用strokeRect
var canvas = document.getElementById("canvas");
var ctx = canvas.getContext("2d");
ctx.strokeRect(5.5,5.5,100,100);//用fillRect
var canvas = document.getElementById("canvas");
var ctx = canvas.getContext("2d");
ctx.fillRect(5.5,5.5,100,100);


为了便于演示,我将画布缩小到(120*120),以上为各个组合的表现,从这些表现可以总结一下几点:
1、rect()不能单独使用,必须借助fill(),stroke()方法;
2、rect()+stroke() 组合的效果和strokeRect()一致,可等价
3、rect()+fill() 组合的效果和fillRect()一致,可等价
这里还有一个小细节需要注意的是,我这个的坐标写的是5.5而不是6或5,为什么?理论上绘制的线框是一个1像素的宽度的,因为一个点就是一像素,当坐标设为(6,6)时,表现会是如下:
对比上图明显粗一些,明显是2个像素的宽度,这是为什么呢?给大家画一个图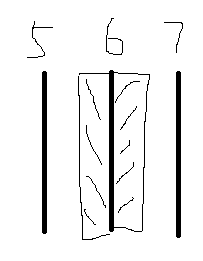
这3条线分别是5像素,6像素,7像素位置,图形绘制时,绘制6像素的地方向左绘制0.5像素,向右绘制0.5像素,但是浏览器实际上是不纯在半个像素的,所以浏览器会帮我们补上个半个像素,就成了2个像素了,如果要做成1像素边框,只需将坐标左移或右移半个像素,即0.5px,如果要精确绘图,须知这一点细节!
矩形之后就可以画圆了,但是圆相对来说比较复杂,咱们还是先来练练字,谢谢书法,哈哈,看看canvas编辑文字有哪些方法:
我们说画布上的图形皆为路径,所以,文字作为另一种图形,也存在黑白双煞:
fillText(text,x,y,[maxWidth]); 顾名思义,这是填充文字
strokeText(text,x,y,[maxWidth]); 顾名思义,这是描边文字
参数:
text :需要绘制的文字
x,y: 文字绘制的起始坐标
[maxWidth] : 文字的最大宽度,选填
//为省篇幅,我合起来写了,你想看到各自的效果,请分开运行
var canvas = document.getElementById("canvas");
var ctx = canvas.getContext("2d");
ctx.fillText('你想对我说什么',50,50);
ctx.strokeText('你想对我说什么',50,50);

咋一看,你会说,咦,怎么描边文字看上去像是加粗的啊,为什么会这样呢?在此稍作悬念,下面揭晓!
我们看一下文字的默认表现:
var canvas = document.getElementById("canvas");
var ctx = canvas.getContext("2d");
ctx.fillText('你想对我说什么',0,0);
结果简直让人大吃一精,哎,是惊!文字怎么跑那里去了,了解css 的都知道,文字是有基准线的,这玩意也是老外的英文搞出来的,html文字基准线是baseline,可以用vertical-align来修改基准线,canvas有吗?哈哈,还真有:
textBaseline
参数:
alphabetic : 默认。文本基线是普通的字母基线。
top : 文本基线是 em 方框的顶端。
hanging : 文本基线是悬挂基线。
middle :文本基线是 em 方框的正中。
ideographic : 文本基线是表意基线。
bottom :文本基线是 em 方框的底端。
看着不懂?我也不太懂,文字不如图片,看看这2张示意图:

实际显示:
//为了让bottom看得到,我将文字向下偏移20像素
var canvas = document.getElementById("canvas");
var ctx = canvas.getContext("2d");
ctx.font="20px Arial";
ctx.textBaseline = "bottom";
ctx.fillText('你想对我说什么',0,20);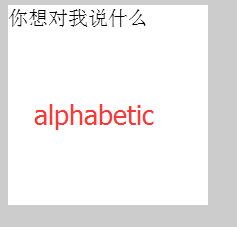


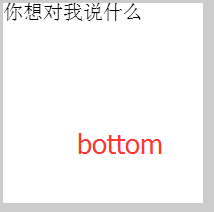
图没有截对齐,凑合着看吧,哦,没有在20px位置画条线,算了,不纠结了,结合上面的图看吧!
只要是文字,那就应该可以设置文字样式,比如css中可以设置颜色,字体,字体大小,等等,css可不可以设置canvas样式呢?咱们说干就干:
canvas{ background:#fff; font-family:"微软雅黑"; font-size:20px; color:#f00; text-align:center;}
好像没什么反应,老年痴呆了?既然css无法设样式,那怎么给文字设置样式呢?
还好强大的canvas自带样式设置技能,走哪里都不怕,我们看看有哪些:
font 参数:font-style font-variant font-weight font-size font-family,分别表示的意思是字体样式(如倾斜),是否大小写,字体粗细,字体大小,字体
var canvas = document.getElementById("canvas");
var ctx = canvas.getContext("2d");
ctx.font="italic bold 40px 微软雅黑 ";
ctx.textBaseline = "top";
ctx.fillStyle = 'red';
ctx.fillText('a你想对我说什么',0,20);
这只是部分的font属性,起用法与css相同,有兴趣可以自己试一试。
textAlign 参数:left(默认,文本左对齐),right(文本右对齐),center(文本在指定位置居中),start(文本开始位置),end(文本结束位置)
这个其实也挺怪异的,如图:
默认是左对齐,右对齐都跑出去了,center就只有一半,一般我们要想将文字居中对齐,其实不用center,而是通过坐标来居中,后面我会给一个文本上下左右居中的小实例供大家参考!
这里说错了,这里的蓝色的竖线是表示文本的开始水平位置,start与left效果相同,都是向左对齐,end和right效果相同,都是在起始点的左边向右对齐,而center则是以这个点为中心点对齐!
字体颜色也跟黑白双煞对应:
strokeStyle fillStyle
用法一样,如:
strokeStyle = color 可设颜色
strokeStyle = gradient 可设渐变对象
strokeStyle = pattern 可创建 pattern 笔触的 pattern 对象
现在可以揭晓上面的悬念了,我觉得实例更能说明问题:
var canvas = document.getElementById("canvas");
var ctx = canvas.getContext("2d");
ctx.font="40px Arial";
ctx.textBaseline = "top";
ctx.textAlign = 'left';
ctx.fillStyle = 'red';
ctx.fillText('你想对我说什么',0,20);
ctx.strokeStyle = 'green';
ctx.strokeText('你想对我说什么',0,60);
效果:
如图所示,描边文字并不是加粗的,而是对文字进行描边了,文字小时,就挤到一起了。
我们都知道,css3有一个新样式 -- text-shadow,表示文字的阴影,canvas也有类似的功能,咱们就来对比一下吧!
shadowOffsetX 阴影距形状的水平距离
shadowOffsetY 阴影距形状的垂直距离
shadowBlur 阴影的模糊级别,这里是高斯模糊,默认值为0
shadowColor 阴影的颜色
其实这个跟css3的阴影设置很相似,我就一起来看一下吧
html:
<canvas width="300" height="200" id="canvas">
        <span>亲,您的浏览器不支持canvas,换个浏览器试试吧!</span>
</canvas>
<span>你想对我说什么</span>css:
body{ background:#ccc;}
canvas{ background:#fff;}
span{ font-size:40px; font-family:Arial; color:red; text-shadow:5px 5px 5px #000; vertical-align: top; display:inline-block;}js:
var canvas = document.getElementById("canvas");
var ctx = canvas.getContext("2d");
ctx.font="40px Arial";
ctx.textBaseline = "top";
ctx.textAlign = 'left';
ctx.fillStyle = 'red';

ctx.shadowOffsetX = 5;
ctx.shadowOffsetY = 5;
ctx.shadowBlur = 5;
ctx.shadowColor = '#000';

ctx.fillText('你想对我说什么',0,20);
ctx.strokeStyle = 'green';
ctx.strokeText('你想对我说什么',0,60);
效果:
看看,基本无差吧,但是还是有一点小区别的,如果给css3的text-shadow不设阴影颜色,它的阴影颜色会默认跟字体颜色一样,但是如果如果不设shadowColor ;则阴影是出不来的,不信?看下图:
补充一点:
measureText(text) 返回文本的宽度,单位为像素,用法是:
measureText(text).width
注意:此方法只能获取到宽度,不能获取到高度,跟我们一般获取宽高的方法有点不一样,它可以在文本输出前计算出其宽度,故如果想在文本输出前知道其宽度,这个方法只好有用武之地
var canvas = document.getElementById("canvas");
var ctx = canvas.getContext("2d");
ctx.font="24px 微软雅黑";
ctx.fillStyle = 'red';
var txt = "快告诉我们我自己有多宽";
var w = ctx.measureText(txt).width;
ctx.fillText('你的宽度:'+w,0,50);
ctx.fillText(txt,0,100);
以上就是canvas API ,通俗的canvas基础知识(一) 的内容,更多相关内容请关注PHP中文网(www.php.cn)!
相关文章:
canvas API 介绍,常见的canvas基础知识(二)


