

What I’m going to talk about today is the conversion function of canvas. If you don’t understand the previous content, you can go out and turn right. Let’s take a look at the basic knowledge first. Without further ado, let’s get to the point. !
What is the conversion function? Students who are familiar with CSS3 know that there are transform, translate, scale, rotate, animation, etc. in CSS3. This is the conversion function of CSS3. Similarly, canvas also supports it, but only partially. Let’s take a look and see which ones are supported. Compared with css3, what are the differences?
1. scale
scale(scaleWidth,scaleHeight) Scale the current drawing
Parameters: scaleWidth represents the width of the current drawing, with values such as 0.5 = 50%, 1 = 100%, 2 = 200% and so on; scaleHeight means scaling the height of the current drawing, with values such as 0.5 = 50%, 1 = 100%, 2 = 200% and so on
We can first look at the performance of css3:
css3 scale(sx,sy) sx,sy represent the scaling vectors to the abscissa and ordinate respectively, with values such as 0.5 = 50%, 1 = 100%, 2 = 200% and so on, which are basically the same as canvas , it’s just a different way of saying it, so since the usage is the same, let’s try it:
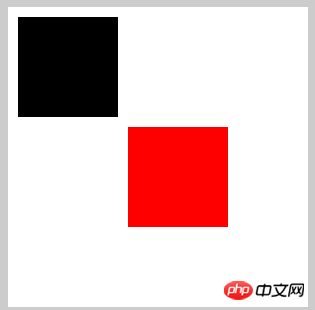
ctx.strokeStyle = 'red';
ctx.strokeRect(5,5,50,50);
ctx.scale(2,2);
ctx.strokeRect(5,5,50,50);
ctx.scale(2,2);
ctx.strokeRect(5,5,50,50);
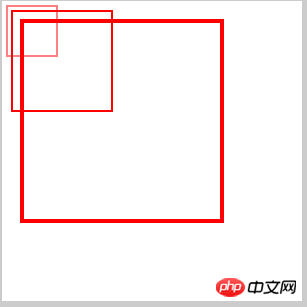
Hey, you will see I came across a very strange phenomenon. It does not start scaling from the origin of positioning, but offsets the origin. In fact, not only the graphics are scaled, but even the margins of the graphics are also scaled, and the scaling multiple is the same as the graphics. The multiples are the same, let’s take a look at how CSS3’s scale will perform:
.box{
    width:50px;
    height:50px;
    border:1px solid #000;
    margin:20px;
}
.box:hover{
    -webkit-transform:scale(2,2);
}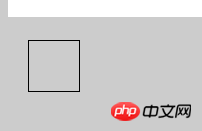
The performance of css3 is to take the center point of the graphic as the origin, and then scale it around. From this, we get one of the differences between the scale of canvas and the scale of css3;
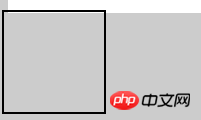
The second difference is that css3 scale, if the scaling factors of the x and y axes are the same, it can be abbreviated into one parameter, such as:
.box:hover{
    -webkit-transform:scale(2);
}
The effect is the same, but the canvas's 2 Even if the scaling factors of the two parameters are the same, they cannot be abbreviated. Both parameters must be written in order to run; The high setting must be set on the canvas tag attribute and cannot be set in css. Why is this? Let’s take a look at an example:
In the first group, we use css to define the width and height of the canvas, and there is no style on the label attribute:
canvas{ background:#fff; width:300px; height:300px; }ctx.strokeStyle = 'red'; ctx.strokeRect(5,5,50,50);
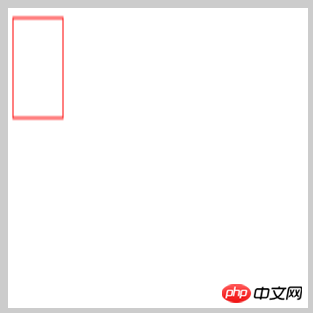 Hey, what the hell is this?
In the second group, we use canvas tag attributes to set the width and height without css settings:
<canvas width="300" height="300" id="canvas">
        <span>亲,您的浏览器不支持canvas,换个浏览器试试吧!</span>
</canvas>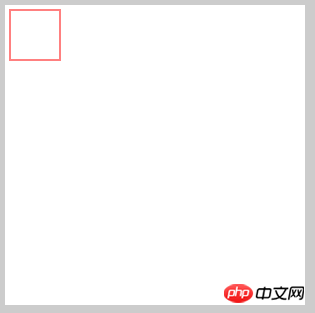 Obviously, the width and height set on the label attribute are normal. Why does this weird situation occur when setting the width and height in css? The reason is that the canvas itself has a default width and height (width 300, height 150). If in css Setting the width and height in will make the canvas think that the width of the canvas is now automatically scaled. The scaling ratio is the width set by css/300, and the height is the same. Then it is understandable. The width set by css is now 300, and the height is 300. If it is 300, then the width will be scaled = 300/300, and the height will be scaled = 300/150. The height will naturally be doubled, so this is why the width and height must be set on the properties of the canvas
Let’s go back to scale. Let’s give a dynamic diagram to see the change process of scale:
var timer = null;
ctx.strokeStyle = 'red';
timer = setInterval(function(){
    ctx.beginPath();
    ctx.scale(1.5,1.5);
    ctx.strokeRect(5,5,50,50);
    ctx.closePath();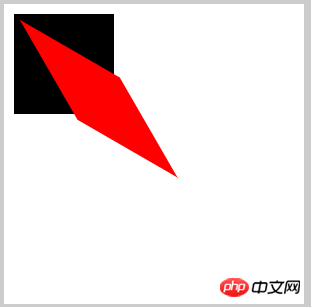
},500) You can download it from As can be seen from this gif, the change in scale is scaling again based on the previous drawing, and then scaling again. Some people say that your timer is scaled again based on the original one, and that is how it should be. , but this effect is not good-looking. Can I set a parameter, and then let it accumulate and scale slowly, with only one graphic?
Well, here we need to explain a method called clearRect(), which means to clear the style within the specified range. If there is only one graphic required here, then the previous drawing must be cleared before the next graphic is drawn. Because the time in between is very short, it feels continuous. Let’s introduce the clearRect() method first:
clearRect(x,y,w,h) Parameters: w,y represent the rectangle that needs to be cleared The upper left corner coordinates of , okay, let’s write the effect you want together:
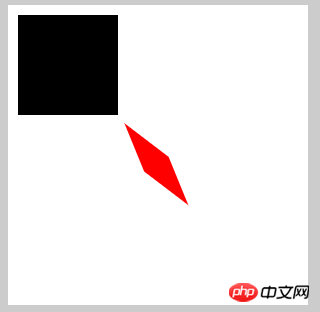
var timer = null;
        var num = 1;
        ctx.strokeStyle = 'red';
        timer = setInterval(function(){

            if(parseInt(num) >=5){
                clearInterval(timer);
                num =5;
            }else{
                num +=0.1;
            }
            ctx.clearRect(0,0,canvas.clientWidth,canvas.clientHeight);
            ctx.save();
            ctx.beginPath();
            ctx.scale(num,num);
            ctx.strokeRect(5,5,50,50);
            ctx.closePath();
            ctx.restore();
        },500)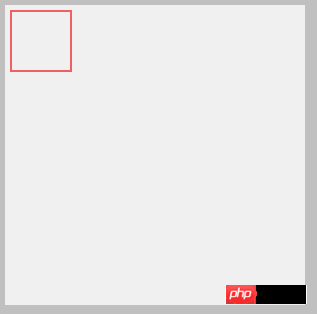
看上图,现在就可以安安静静看它是怎么缩放的了,边距和图形一起缩放,比例也是一样的,这里的效果之所以没有和上面的gif图一样,在上一次缩放的基础上缩放,是因为这一对活宝:save()和restore(),这对活宝上一篇已经讲过了,如果还是不熟悉的同学出门右转,找到API的第3篇,这里的这一对主要功能是保存当前的路径,不被其他的路径污染,这对活宝和clearRect()在做运动的时候是非常有用的,这里终点提示一下!
2、rotate
rotate(angle) 旋转当前绘图 参数:angle表示旋转角度,这里需要填写弧度(弧度和角度的关系,在前面就已经讲过了,不熟悉的同学可以找到API的第2篇)
同样我们看一下css3 rotate的表现:
.box{
    width:50px;
    height:50px;
    border:1px solid #000;
    margin:20px;
}
.box:hover{
    -webkit-transform:rotate(30deg);
}
可以看到css3的旋转是以中心为原点进行旋转,切接受的参数直接就是角度,而不是弧度,那canvas的rotate的表现是什么呢?
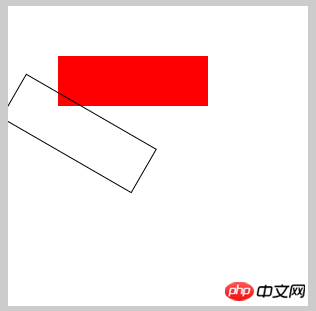
ctx.fillStyle = 'red';
ctx.fillRect(0,0,150,50);
ctx.beginPath();
ctx.rotate(30*Math.PI/180);
ctx.strokeRect(0,0,150,50);
ctx.closePath();
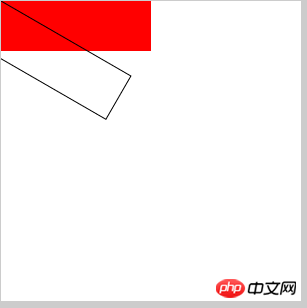
红色为初始图形,黑色为旋转图形,这是将图形坐标设置画布左上角的地方的
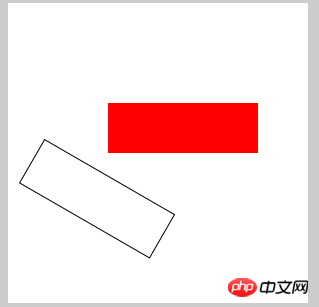
ctx.fillStyle = 'red';
ctx.fillRect(50,50,150,50);
ctx.beginPath();
ctx.rotate(30*Math.PI/180);
ctx.strokeRect(50,50,150,50);
ctx.closePath();
图形坐标设置50,50处
ctx.fillStyle = 'red';
ctx.fillRect(100,100,150,50);
ctx.beginPath();
ctx.rotate(30*Math.PI/180);
ctx.strokeRect(100,100,150,50);
ctx.closePath();
图形坐标设在100,100处
从这个3组效果中,我们可以得出这样的结论:
1、canvas的旋转原点并不是以自身的中心为原点,而是以画布的左上角为原点,3张图的比较可以看出来
2、图形的旋转原点也不是其自身的中心,而是其左上角为原点
这里说了2个原点,可能不好理解哈,几个例子,比如地球,它即绕太阳转,自己本身也转,那么它让太阳转就是我们说的第一点,图形绕画布旋转,准确的来说,也是图形的左上角绕画布左上角旋转,太阳的自转就是我们说的第2点,它自己本身的旋转,只不过canvas图形中的自转不是以中心为原点的旋转,其中心在左上角,这应该就明白看吧!
3、translate
translate(x,y) 重新映射画布上的 (0,0) 位置,这怎么理解?通俗的将,就是重新定义坐标原点,默认原点是(0,0),用此方法会将原点改成(x,y)
参数:x 添加到水平坐标(x)上的值 y添加到垂直坐标(y)上的值
定义不好理解,那我们就用例子来理解:
ctx.fillRect(10,10,100,100);
//设置新原点
ctx.translate(110,110);
ctx.fillRect(10,10,100,100);
首先我们画了一个100*100的矩形,图形坐标(10,10),因为默认原点是画布左上角,所以此图形在距离左上角(10,10)的位置,理论上说,我们再画一个一模一样的矩形,坐标也一样,2图形是会覆盖的,但是我们现在重新设置原点(110,110),刚好在第一个图形的右下角,这样方便观察,然后再画一个坐标和大小一模一样的矩形,我们来看看效果:
第二个矩形就刚好是以(110,110)为新的原点,然后距离新原点(10,10)的距离画了一个矩形,恩,这就是translate的作用
css3也是有translate的,我们不妨也来对比一下,下面我写一个css3的translate的例子:
.box{
    width:150px;
    height:150px;
    border:1px solid #000;
    margin:20px;
}
.box:hover{
    -webkit-transform: translate(100px,0);
}
从gif图可以看出,css3的translate是以自身中心为原点进行平移,但是不会改变原点坐标,所以,canvas的translate跟css3的translate又不一样
4、transform
transform(a,b,c,d,e,f) 替换当前的变换矩阵
参数:
a:水平缩放绘图
b:水平倾斜绘图
c:垂直倾斜绘图
d:垂直缩放绘图
e:水平移动绘图
f:垂直移动绘图
参数很多,但是看这参数的解释,还是很好理解,我们都知道css3的transform是一个集合,其中包含:scale,rotate,translate,skew和matrix,并且其中的matrix(矩阵)是可以转换成前面的任何效果的,换句话说,就是matrix(矩阵)可以包含前面的任何效果,包括自身,而canvas中的transform就是扮演css3的matrix的角色,只是跟css3的效果不一样而已,前面已经对比过了,具体的原理我们在这里就不说了,如果不清楚的,可以看一下css3的matrix是什么个原理,canvas的transform跟他的原理差不多!css3 matrix看这里
scale转成transform公式可得:
context.scale(sx, sy)
缩放我直接用公式来解释:
x’=sx*x
y’=sy*y
(其中,sx 和sy分别表示在x轴和y轴上的缩放倍数,x和y默认为1)
matrix(sx*x,0,0,sy*y,0,0) --> context.transform(sx*x,0,0,sy*y,0,0) -->context.transform(sx,0,0,sy,0,0)
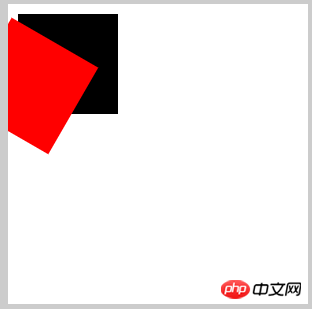
ctx.fillRect(10,10,100,100);
//缩放
ctx.transform(2,0,0,2,0,0);
ctx.fillStyle="red";
ctx.fillRect(10,10,100,100);

rotate转化成transform
rotate(a*Math.PI/180)
公式推导就不推了,直接拿过来了
context.transform(cos(a),sin(a),-sin(a),cos(a),0,0) (a为角度)
--> context.transform(Math.cos(a*Math.PI/180),Math.sin(a*Math.PI/180),-Math.sin(a*Math.PI/180),Math.cos(a*Math.PI/180),0,0)
ctx.fillRect(10,10,100,100);
//旋转
ctx.transform(Math.cos(30*Math.PI/180),Math.sin(30*Math.PI/180),-Math.sin(30*Math.PI/180),Math.cos(30*Math.PI/180),0,0);
ctx.fillStyle="red";
ctx.fillRect(10,10,100,100);
translate转化成transform
translate(tx,ty)
context.transform(1,0,0,1,tx,ty)
ctx.fillRect(10,10,100,100);
//平移
ctx.transform(1,0,0,1,110,110);
ctx.fillStyle="red";
ctx.fillRect(10,10,100,100);
skew转化成transform
虽然canvas没有skew方法,但是transform依然可以做出来
context.transform(1,tan(ay),tan(ax),1,0,0) (ax,ay表示x方向,y方向的倾斜角度)
-->context.transform(1,Math.tan(ay*Math.PI/180),Math.tan(ax*Math.PI/180),1,0,0)
ctx.fillRect(10,10,100,100);
//倾斜
ctx.transform(1,Math.tan(30*Math.PI/180),Math.tan(30*Math.PI/180),1,0,0)
ctx.fillStyle="red";
ctx.fillRect(10,10,100,100);
那么,如果我想实现平移,旋转,倾斜加放大呢,怎么做?那就分开写呗:
ctx.fillRect(10,10,100,100);
//综合
ctx.transform(1,0,0,1,110,110);//平移
ctx.transform(Math.cos(10*Math.PI/180),Math.sin(10*Math.PI/180),-Math.sin(10*Math.PI/180),Math.cos(30*Math.PI/180),0,0);//旋转
ctx.transform(0.5,0,0,0.5,0,0);//缩放
ctx.transform(1,Math.tan(30*Math.PI/180),Math.tan(30*Math.PI/180),1,0,0);//倾斜
ctx.fillStyle="red";
ctx.fillRect(10,10,100,100);
5、setTransform
setTransform(a,b,c,d,e,f) 当前的变换矩阵重置为单位矩阵,用法与transform相同
参数:
a:水平缩放绘图
b:水平倾斜绘图
c:垂直倾斜绘图
d:垂直缩放绘图
e:水平移动绘图
f:垂直移动绘图
怎么理解这个方法呢?
当我们用transform时,前面的变换方法会影响到后面的变换方法,我们俗称污染,比如:
//缩放
ctx.transform(2,0,0,2,0,0);
ctx.fillStyle="red";
ctx.fillRect(10,10,100,100);
ctx.beginPath();
//旋转
ctx.transform(Math.cos(30*Math.PI/180),Math.sin(30*Math.PI/180),-Math.sin(30*Math.PI/180),Math.cos(30*Math.PI/180),0,0);
ctx.fillStyle="green";
ctx.fillRect(10,10,100,100);
前面的一个图形我想让它放大2倍,后面的我不想让它放大,而是想让它旋转30度,结果: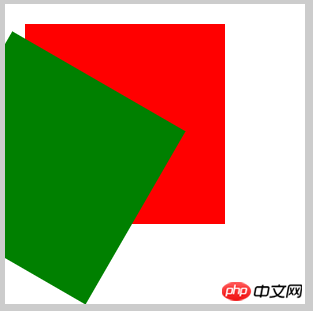
后面的图形也放大了2倍,这不是我们想要的结果,有人会说,我用save()和restore()不就可以了吗?
//缩放
ctx.save();
ctx.transform(2,0,0,2,0,0);
ctx.fillStyle="red";
ctx.fillRect(10,10,100,100);
ctx.restore();
ctx.beginPath();
//旋转
ctx.transform(Math.cos(30*Math.PI/180),Math.sin(30*Math.PI/180),-Math.sin(30*Math.PI/180),Math.cos(30*Math.PI/180),0,0);
ctx.fillStyle="green";
ctx.fillRect(10,10,100,100);
如果你用这2个方法,我就不得不给你赞一个,说明前面的你看进去了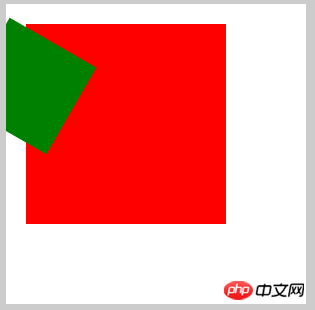
但是我想说的是,我们有更好的方法,就是我们现在要讲的这个--setTransform
//缩放
ctx.setTransform(2,0,0,2,0,0);
ctx.fillStyle="red";
ctx.fillRect(10,10,100,100);
ctx.beginPath();
//旋转
ctx.setTransform(Math.cos(30*Math.PI/180),Math.sin(30*Math.PI/180),-Math.sin(30*Math.PI/180),Math.cos(30*Math.PI/180),0,0);
ctx.fillStyle="green";
ctx.fillRect(10,10,100,100);
效果跟上面的一样,官方解释是该变换只会影响 setTransform() 方法调用之后的绘图,当然,如果你把transform和setTransform一起混用,那也是会污染的:
//缩放
ctx.setTransform(2,0,0,2,0,0);
ctx.fillStyle="red";
ctx.fillRect(10,10,100,100);
ctx.beginPath();
//旋转
ctx.transform(Math.cos(30*Math.PI/180),Math.sin(30*Math.PI/180),-Math.sin(30*Math.PI/180),Math.cos(30*Math.PI/180),0,0);
ctx.fillStyle="green";
ctx.fillRect(10,10,100,100);
要是把这2方法调个个看看:
//缩放
ctx.transform(2,0,0,2,0,0);
ctx.fillStyle="red";
ctx.fillRect(10,10,100,100);
ctx.beginPath();
//旋转
ctx.setTransform(Math.cos(30*Math.PI/180),Math.sin(30*Math.PI/180),-Math.sin(30*Math.PI/180),Math.cos(30*Math.PI/180),0,0);
ctx.fillStyle="green";
ctx.fillRect(10,10,100,100);
看看,效果就又不一样了,所以,在用这些变换方法的时候,必须要弄清楚他们的作用范围和顺序,才能做出我们想要的效果,也不会污染其他的效果,这点,需谨记了!
好了,变换部分就讲完了,感谢大家的关注,如有将的不对的地方,希望能踊跃指正,不甚感谢!
以上就是canvas API ,通俗的canvas基础知识(四) 的内容,更多相关内容请关注PHP中文网(www.php.cn)!
相关文章:
canvas API 介绍,常见的canvas基础知识(一)
 What are the production methods of html5 animation production?
 Drawing software
 How to become a close friend on TikTok
 How to open the download permission of Douyin
 Cryptocurrency exchange rankings
 Introduction to commonly used top-level domain names
 nginx restart
 The difference between null and NULL in c language
 The difference between currentregion and usedrange


![[Web front-end] Node.js quick start](https://img.php.cn/upload/course/000/000/067/662b5d34ba7c0227.png)


