

1) HTMLCanvasElement Members of object :
# #height——corresponds to the height attribute of the canvas element;
##width—— Corresponds to the width attribute of the canvas element;
# getContext(
##2) Draw the rectangle:
## fillRect(x,y,w,h)——Draw a solid rectangle;# strokeRect(x,y,w,h)——Draw a hollow rectangle;
clear
Rect(x,y,w,h)——Clear the specified rectangle;canvas{
border:medium double black;
margin: 4px;
}
body > *{
float: left;
}<canvas id="canvas1" width="500" height="200">
您的浏览器不支持<code>canvas</code>!
</canvas><script>
//绘制矩形
var ctx=document.getElementById("canvas1").getContext("2d");
//ctx.fillRect(10,10,50,50);
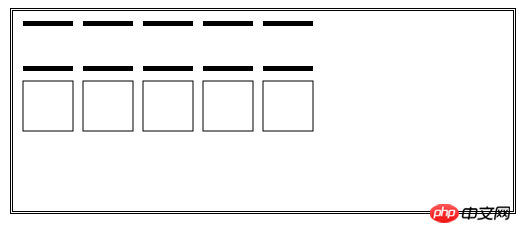
var offset=10;
var size=50;
var count=5;
for(var i=0;i<count;i++){
ctx.fillRect(i*(offset+size)+offset,offset,size,size);
ctx.strokeRect(i*(offset+size)+offset,(2*offset)+size,size,size);
ctx.clearRect(i*(offset+size)+offset,offset+5,size,size-10);
}
</script>
li neWidth——Get or set the width of the line (default value is 1.0);
lineJoin——Get or set The style when the line is connected to the graphic (default value is miter);
fillStyle——Get or set for solid The style of the graphic (default value is black);
strokeStyle - Gets or sets the style used for lines (default value is black );
# <canvas id="canvas2" width="500" height="70">
您的浏览器不支持<code>canvas</code>!
</canvas> <script>
//在执行操作前绘制设置状态
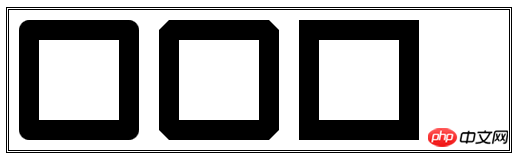
var ctx=document.getElementById("canvas2").getContext("2d");
ctx.lineWidth=2;
ctx.strokeRect(10,10,50,50);
ctx.lineWidth=4;
ctx.strokeRect(70,10,50,50);
ctx.lineWidth=6;
ctx.strokeRect(130,10,50,50);
ctx.lineWidth=8;
ctx.strokeRect(200,10,50,50);
</script><canvas id="canvas3" width="500" height="140">
您的浏览器不支持<code>canvas</code>!
</canvas> <script>
//设置lineJoin属性
var ctx=document.getElementById("canvas3").getContext("2d");
ctx.lineWidth=20;
ctx.lineJoin="round";
ctx.strokeRect(20,20,100,100);
ctx.lineJoin="bevel";
ctx.strokeRect(160,20,100,100);
ctx.lineJoin="miter";
ctx.strokeRect(300,20,100,100);
</script>
    <canvas id="canvas4" width="500" height="140">
        您的浏览器不支持<code>canvas</code>!
</canvas> <script>
//设置填充和笔触样式
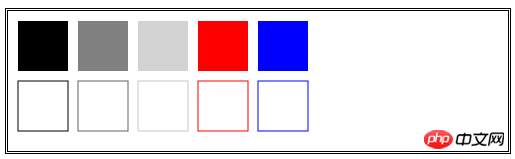
var ctx=document.getElementById("canvas4").getContext("2d");
var offset=10;
var size=50;
var count=5;
var lineWidth=3;
var fillColors=["black","grey","lightgrey","red","blue"];
var strokeColors=["rgb(0,0,0)","rgb(100,100,100)","rgb(200,200,200)","rgb(255,0,0)","rgb(0,0,255)"];
for(var i=0;i<count;i++){
ctx.fillStyle=fillColors[i];
ctx.strokeStyle=strokeColors[i];
ctx.fillRect(i*(offset+size)+offset,offset,size,size);
ctx.strokeRect(i*(offset+size)+offset,(2*offset)+size,size,size);
}
</script>
createRadialGradient(x0,y0,r0,x1,y1,r1 )——Create a radial gradient and return a CanvasGradient object;
CanvasGradient object
Methods: ## addColorStop(<position>,
## <canvas id="canvas5" width="500" height="140">
您的浏览器不支持<code>canvas</code>!
</canvas>
    <canvas id="canvas6" width="500" height="140">
        您的浏览器不支持<code>canvas</code>!
</canvas> <script>
//使用径向渐变
var ctx=document.getElementById("canvas6").getContext("2d");
var grad=ctx.createRadialGradient(250,70,20,200,60,100);
grad.addColorStop(0,"red");
grad.addColorStop(0.5,"white");
grad.addColorStop(1,"black");
ctx.fillStyle=grad;
ctx.fillRect(0,0,500,140);
</script>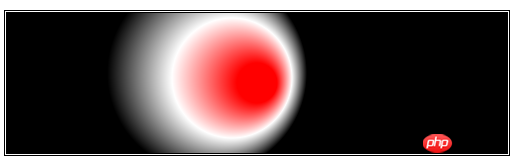
    <canvas id="canvas7" width="500" height="140">
        您的浏览器不支持<code>canvas</code>!
</canvas> <script>
//使用较小的图形和径向渐变
var ctx=document.getElementById("canvas7").getContext("2d");
var grad=ctx.createRadialGradient(250,70,20,200,60,100);
grad.addColorStop(0,"red");
grad.addColorStop(0.5,"white");
grad.addColorStop(1,"black");
ctx.fillStyle=grad;
ctx.fillRect(150,20,75,50);
ctx.lineWidth=8;
ctx.strokeStyle=grad;
ctx.strokeRect(250,20,75,50);
</script>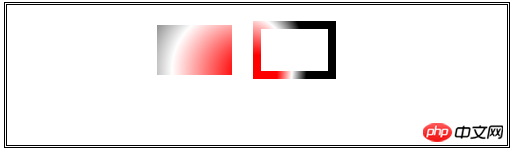
5)使用图案
createPattern(
int2的值是指定重复样式:分别有repeat、repeat-x、repeat-y、no-repeat;
    <canvas id="canvas8" width="500" height="150">
        您的浏览器不支持<code>canvas</code>!
    </canvas>
<img id="banana" hidden src="images/banana-small.png"/> <script>
//使用图像类的图案
var ctx=document.getElementById("canvas8").getContext("2d");
var imageElem=document.getElementById("banana");
var pattern=ctx.createPattern(imageElem,"repeat");
ctx.fillStyle=pattern;
ctx.fillRect(0,0,500,148);
</script>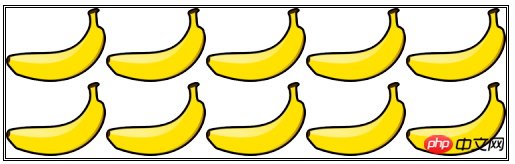
6)保存和恢复状态
save()——保存绘制状态属性的值,并把它们推入状态栈;
restore()——取出状态栈的第一组值,用它们来设置绘制状态;
    <canvas id="canvas9" width="500" height="150" preload="auto">
        您的浏览器不支持<code>canvas</code>!
    </canvas>
    <p>
        <button>Save</button>
        <button>Restore</button>
</p> <script>
//保存和恢复状态
var ctx=document.getElementById("canvas9").getContext("2d");
var grad=ctx.createLinearGradient(500,0,500,140);
grad.addColorStop(0,"red");
grad.addColorStop(0.5,"white");
grad.addColorStop(1,"black");
var colors=["black",grad,"red","green","yellow","black","grey"];
var cIndex=0;
ctx.fillStyle=colors[cIndex];
draw();
var buttons=document.getElementsByTagName("button");
for(var i=0;i<buttons.length;i++){
buttons[i].onclick=handleButtonPress;
}
function handleButtonPress(e){
switch(e.target.innerHTML){
case 'Save':
ctx.save();
cIndex=(cIndex+1)%colors.length;
ctx.fillStyle=colors[cIndex];
draw();
break;
case 'Restore':
cIndex=Math.max(0,cIndex-1);
ctx.restore();
draw();
break;
}
}
function draw(){
ctx.fillRect(0,0,500,140);
}
</script>
7)绘制图像
drawImage方法——在画布上绘制图像,指定一个img、canvas或video元素作为来源;
    <canvas id="canvas10" width="500" height="150" preload="auto">
        您的浏览器不支持<code>canvas</code>!
    </canvas>
<img id="banana2" hidden src="images/banana-small.png"/> <script>
//使用drawImage方法
var ctx2=document.getElementById("canvas10").getContext("2d");
var imageElement=document.getElementById("banana2");
ctx2.drawImage(imageElement,10,10);
ctx2.drawImage(imageElement,120,10,100,120);
ctx2.drawImage(imageElement,20,20,100,50,250,10,100,120);
</script>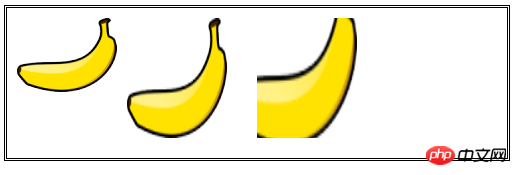
    <video id="vid" src="raw/timessquare.webm" controls preload="auto" width="360" height="240">
        您的浏览器不支持;
    </video>
    <canvas id="canvas11" width="360" height="240">
        您的浏览器不支持;
    </canvas>
    <p>
        <button id="pressme">Snapshot</button>
        <button id="pressme2">PressMe</button>
    </p>
    <canvas id="canvas12" width="360" height="240">
        您的浏览器不支持;
</canvas> <script>
//使用视频作为drawImage方法的来源
var ctx3=document.getElementById("canvas11").getContext("2d");
var imageElement3=document.getElementById("vid");
document.getElementById("pressme").onclick=function(e){
ctx3.drawImage(imageElement3,0,0,360,240);
}
var width=100;
var height=10;
ctx3.lineWidth=5;
ctx3.strokeStyle="red";
setInterval(function(){
ctx3.drawImage(imageElement3,0,0,360,240);
ctx3.strokeRect(180-(width/2),120-(height/2),width,height);
},25);
setInterval(function(){
width=(width-1)%200;
height=(height+3)%200;
},100);
</script>
<script>
//将画布作为drawImage方法的来源
var srcCanvasElement=document.getElementById("canvas11");
var ctx4=srcCanvasElement.getContext("2d");
var ctx5=document.getElementById("canvas12").getContext("2d");
var imageElement4=document.getElementById("vid");
document.getElementById("pressme2").onclick=takeSnapshot;
var width=100;
var height=10;
ctx4.lineWidth=5;
ctx4.strokeStyle="red";
ctx5.lineWidth=30;
ctx5.strokeStyle="black";
setInterval(function(){
ctx4.drawImage(imageElement4,0,0,360,240);
ctx4.strokeRect(180-(width/2),120-(height/2),width,height);
},25);
setInterval(function(){
width=(width+1)%200;
height=(height+3)%200;
},100);
function takeSnapshot(){
ctx5.drawImage(srcCanvasElement,0,0,360,240);
ctx5.strokeRect(0,0,360,240);
}
</script>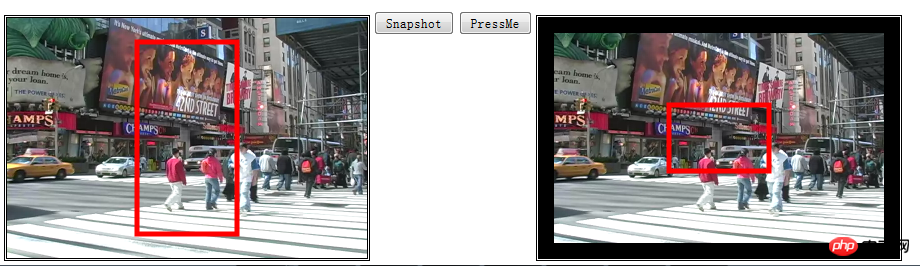
The above is the detailed content of Detailed explanation of code examples for getting started with HTML5 canvas (picture). For more information, please follow other related articles on the PHP Chinese website!
 What are the production methods of html5 animation production?
 The difference between HTML and HTML5
 How to recover data after formatting
 mul instruction usage
 How to open hosts file
 connectionresetSolution
 Dynamic link library initialization routine failed
What are the production methods of html5 animation production?
Dynamic link library initialization routine failed
What are the production methods of html5 animation production?
 The difference between official replacement phone and brand new phone


![[Web front-end] Node.js quick start](https://img.php.cn/upload/course/000/000/067/662b5d34ba7c0227.png)


