 Web Front-end
 H5 Tutorial
 HTML5 hybrid development QR code scanning and calling local camera example tutorial
HTML5 hybrid development QR code scanning and calling local camera example tutorial
I received a task today, saying that I need to use hybrid development and use H5 to call the local camera to scan the QR code. I have done native Android QR code scanning before, mainly by calling the zxing plug-in. , and even got a flash. But I had never touched a pure H5, and I didn’t know what to do with it, so I went home at night and started looking for solutions online. The following is my understanding and code of H5 scanning QR codes and calling local cameras. I hope Can help everyone.
Popular science website:
How H5 generates Android component objects
H5 calls Android local camera api
Online QR code image generator
QR code scanning :(Using the mui framework, the following is the html code)
<!doctype html>
<html>
<head>
<meta charset="UTF-8">
<title></title>
<meta name="viewport" content="width=device-width,initial-scale=1,minimum-scale=1,maximum-scale=1,user-scalable=no" />
<link href="css/mui.min.css" rel="stylesheet" />
<script src="js/mui.min.js"></script>
<style type="text/css">
#bcid{
width: 100%;
height: 100%;
position: absolute;
background: #000000;
}
html, body ,p{
height:100%;
width: 100%;
}
.fbt{
color: #0E76E1;
width: 50%;
background-color: #ffffff;
float: left;
line-height: 44px;
text-align: center;
}
</style>
</head>
<body>
<header class="mui-bar mui-bar-nav" style="">
<a class="mui-action-back mui-icon mui-icon-left-nav mui-pull-left"></a>
<h1 class="mui-title" style="color: #0E76E1;">H5webapp二维码扫描</h1>
<span class="mui-icon mui-icon-spinner-cycle mui-spin mui-pull-right" id="turnTheLight"></span>
</header>
<p id="bcid">
<!--盛放扫描控件的p-->
</p>
<p class="mui-bar mui-bar-footer" style="padding: 0px;">
<p class="fbt" onclick="scanPicture();">从相册选择二维码</p>
<p class="fbt mui-action-back">取 消</p>
</p>
<script type="text/javascript">
var height = window.innerHeight + 'px';//获取页面实际高度
var width = window.innerWidth + 'px';
document.getElementById("bcid").style.height= height;
document.getElementById("bcid").style.width= width;
scan = null;//扫描对象
mui.plusReady(function () { //通过mui初始化扫描
mui.init();
startRecognize();
});
function startRecognize(){ //开启扫描
try{
var filter;
//自定义的扫描控件样式
var styles = {frameColor: "#29E52C",scanbarColor: "#29E52C",background: ""}
//扫描控件构造
scan = new plus.barcode.Barcode('bcid',filter,styles);
scan.onmarked = onmarked;
scan.onerror = onerror; //扫描错误
scan.start();
//打开关闭闪光灯处理
var flag = false;
document.getElementById("turnTheLight").addEventListener('tap',function(){
if(flag == false){
scan.setFlash(true);
flag = true;
}else{
scan.setFlash(false);
flag = false;
}
});
}catch(e){
alert("出现错误啦:\n"+e);
}
};
function onerror(e){ //错误弹框
alert(e);
};
function onmarked( type, result ) { //这个是扫描二维码的回调函数,type是扫描二维码回调的类型
var text = '';
switch(type){ //QR,EAN13,EAN8都是二维码的一种编码格式,result是返回的结果
case plus.barcode.QR:
text = 'QR: ';
break;
case plus.barcode.EAN13:
text = 'EAN13: ';
break;
case plus.barcode.EAN8:
text = 'EAN8: ';
break;
}
alert( text + " : "+ result );
};
// 从相册中选择二维码图片
function scanPicture() { //可以直接识别二维码图片
plus.gallery.pick(function(path){
plus.barcode.scan(path,onmarked,function(error){
plus.nativeUI.alert( "无法识别此图片" );
});
},function(err){
plus.nativeUI.alert("Failed: "+err.message);
});
}
</script>
</body>
</html>The following is the package structure: the development tool is hbuilder
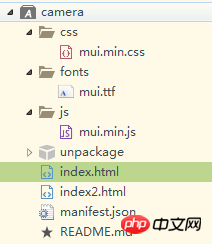
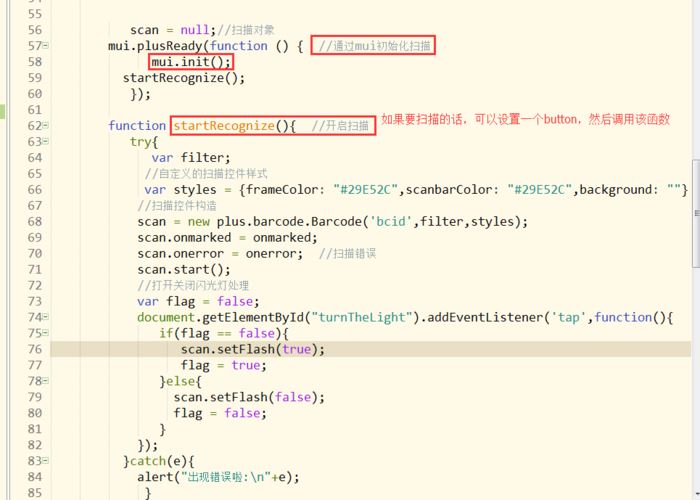
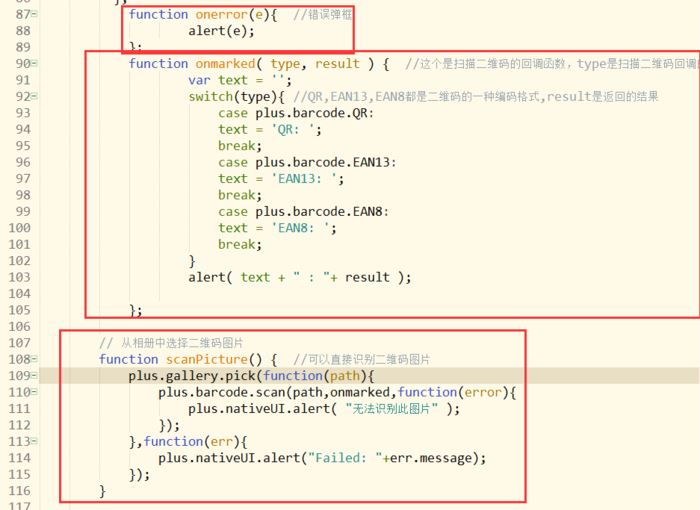
mui.plusReady function is mainly for initialization
startRecognize() is to enable the function of scanning QR codes
onerror is the error message
onmarked is the key point, it is the callback function after scanning the QR code, type is the QR code recognition type, and result is the QR code callback The content
scanPicture() can directly identify the local QR code picture and analyze it
H5 calls the local camera
<!DOCTYPE html>
<html>
<head>
    <meta charset="utf-8">
    <meta name="viewport" content="width=device-width,initial-scale=1,minimum-scale=1,maximum-scale=1,user-scalable=no" />
    <title></title>
    <script src="js/mui.min.js"></script>
    <link href="css/mui.min.css" rel="stylesheet"/>
    <script type="text/javascript" charset="utf-8">
        document.addEventListener( "plusready", function(){
            mui.init();
        });
        function getCamera(){
            var cam = plus.camera.getCamera();
            //字符串数组,摄像头支持的拍照分辨率
            var Resolutions = cam.supportedImageResolutions[0];
            //字符串数组,摄像头支持的拍照文件格式
            var Formats = cam.supportedImageFormats[0];
            //调用拍照方法
            //capturedFile,拍照完成后,照片的存放地址
            cam.captureImage(function(capturedfile){
                //拍照成功
                alert(capturedfile);//打印一下
            },function(){
                //拍照失败
            },{
                //拍照参数
                format : Formats,
                index : 1//1表示主摄像头,2表示辅摄像头
            });

            var Resolutions = cam.supportedImageResolutions[0];
            //字符串数组,摄像头支持的拍照文件格式
            var Formats = cam.supportedImageFormats[0];
            //调用拍照方法
            //capturedFile,拍照完成后,照片的存放地址
            cam.captureImage(function(capturedFile){
                //拍照成功
                alert(capturedFile);//打印一下
                //调用系统方法,根据照片地址获取照片
                plus.io.resolvLocalFileSystemURL(capturedFile,
                    //成功的回调函数
                    //entry文件的相关信息
                    function(entry){
                        var img = document.createElement("img");
                        img.src = entry.toLocalURL();
                        document.documentElement.appendChild(img);
                    },function(){
                        //失败的回调函数
                    });
            });
        }
    </script>
</head>
<body>
    <button onclick="getCamera()">照相</button>
</body>
</html>
mui.init(); is the initialization of mui framework
getCamera() method is to first generate the camera object, then take a photo, and after taking the photo, print out the generated image path.
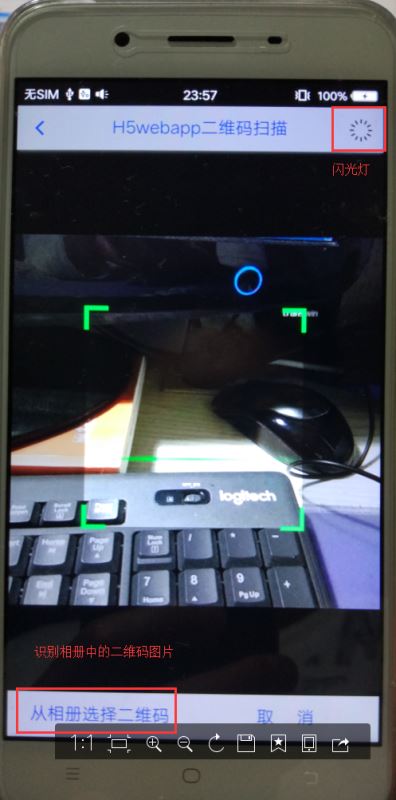
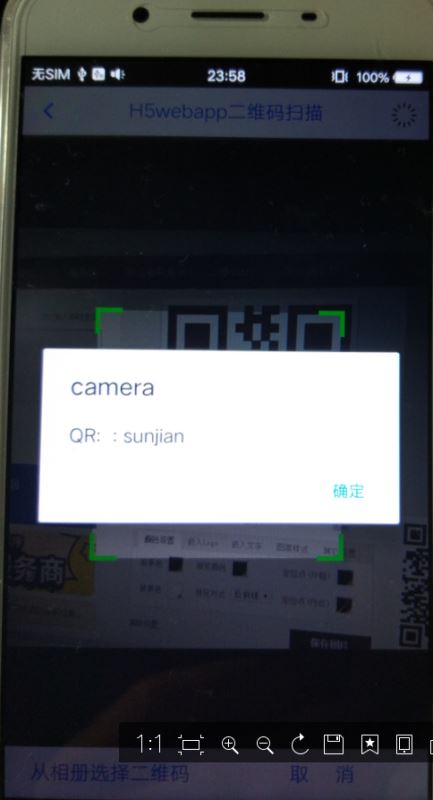
Have you learned it? I feel like giving it a try.
Related recommendations:
How to implement QR code recognition in PHP - example sharing
How to generate QR code in TP5 Encapsulation in
Use plug-in to generate QR code notes
The above is the detailed content of HTML5 hybrid development QR code scanning and calling local camera example tutorial. For more information, please follow other related articles on the PHP Chinese website!

Hot AI Tools

Undresser.AI Undress
AI-powered app for creating realistic nude photos

AI Clothes Remover
Online AI tool for removing clothes from photos.

Undress AI Tool
Undress images for free

Clothoff.io
AI clothes remover

Video Face Swap
Swap faces in any video effortlessly with our completely free AI face swap tool!

Hot Article

Hot Tools

Notepad++7.3.1
Easy-to-use and free code editor

SublimeText3 Chinese version
Chinese version, very easy to use

Zend Studio 13.0.1
Powerful PHP integrated development environment

Dreamweaver CS6
Visual web development tools

SublimeText3 Mac version
God-level code editing software (SublimeText3)

Hot Topics
 1657
1657
 14
14
 1415
1415
 52
52
 1309
1309
 25
25
 1257
1257
 29
29
 1229
1229
 24
24
 Table Border in HTML
Sep 04, 2024 pm 04:49 PM
Guide to Table Border in HTML. Here we discuss multiple ways for defining table-border with examples of the Table Border in HTML.
 Nested Table in HTML
Sep 04, 2024 pm 04:49 PM
This is a guide to Nested Table in HTML. Here we discuss how to create a table within the table along with the respective examples.
 HTML margin-left
Sep 04, 2024 pm 04:48 PM
Guide to HTML margin-left. Here we discuss a brief overview on HTML margin-left and its Examples along with its Code Implementation.
 HTML Table Layout
Sep 04, 2024 pm 04:54 PM
Guide to HTML Table Layout. Here we discuss the Values of HTML Table Layout along with the examples and outputs n detail.
 HTML Input Placeholder
Sep 04, 2024 pm 04:54 PM
Guide to HTML Input Placeholder. Here we discuss the Examples of HTML Input Placeholder along with the codes and outputs.
 HTML Ordered List
Sep 04, 2024 pm 04:43 PM
Guide to the HTML Ordered List. Here we also discuss introduction of HTML Ordered list and types along with their example respectively
 HTML onclick Button
Sep 04, 2024 pm 04:49 PM
Guide to HTML onclick Button. Here we discuss their introduction, working, examples and onclick Event in various events respectively.
 Moving Text in HTML
Sep 04, 2024 pm 04:45 PM
Guide to Moving Text in HTML. Here we discuss an introduction, how marquee tag work with syntax and examples to implement.


