
This time I will bring you the moving animation effect based on the HTML5 gyroscope. What are the precautions for realizing the moving animation effect based on the HTML5 gyroscope. The following is a practical case, let's take a look.
When I was using the Ofo Little Yellow Car App recently, I found that when I swiped the swipe below, it turned into a little yellow man with moving eyes. I thought it was quite interesting. Here I use HTML5 to imitate the effect.
ofo eye effect

##Effect analysis
It is not difficult to see from the effect that it is achieved using gyroscope events. Let’s first look at some concepts of gyroscope events in HTML5. The gyroscope event isdeviceorientation. Here we mainly get the alpha, beta, gamma in the event.
aplha
The angle of rotation around the Z-axis when the mobile device is placed horizontally, ranging from 0 to 360 degrees.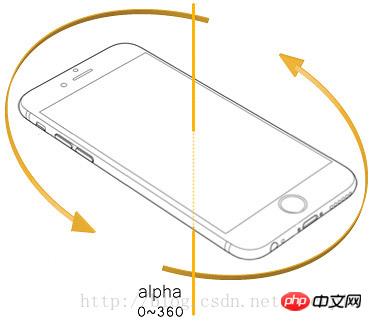
beta
The angle of rotation around the X-axis when the mobile device is placed horizontally, ranging from -180 degrees to 180 degrees.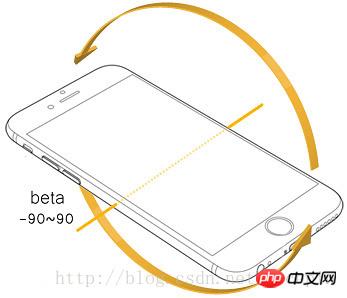
gamma
The angle of rotation around the Z-axis when the mobile device is placed horizontally, the value is -90 degrees to 90 degrees.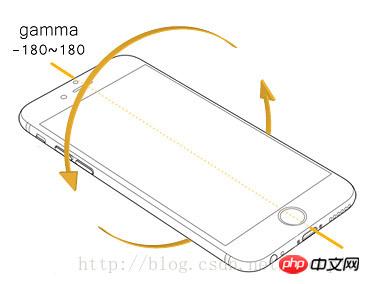
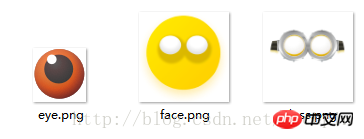
Code implementation
<!DOCTYPE html>
<html lang="en">
<head>
  <meta charset="UTF-8">
  <meta name="viewport" content="width=device-width, initial-scale=1.0, maximum-scale=1.0, user-scalable=no">
  <title>Document</title>
  <style>
    #box{
      position: relative;
      width: 300px;
      margin: 0 auto;
    }
    #face{
      background-image: url(images/face.png);
      background-size: cover;
      width: 300px;
      height: 300px;
      position: absolute;
    }
    #eyeLeft{
      background-image: url(images/eye.png);
      background-size: cover;
      width: 40px;
      height: 40px;
      position: absolute;
      top: 90px;
      left: 100px;
    }
    #eyeRight{
      background-image: url(images/eye.png);
      background-size: cover;
      width: 40px;
      height: 40px;
      position: absolute;
      top: 90px;
      left: 190px;
    }
    #glass{
      background-image: url(images/glass.png);
      background-size: cover;
      width: 300px;
      height: 300px;
      position: absolute;
    }
  </style>
</head>
<body>
  <p id="box">
    <p id="face"></p>
    <p id="eyeLeft"></p>
    <p id="eyeRight"></p>
    <p id="glass"></p>
    <p id="log"></p>
  </p>
<script>
'use strict';
/*
* author: 王乐平
* date:2017.7.17
*/
var eyeLeftPosition = {
  start: [70, 78],
  end: [100, 110]
};
var eyeRightPosition = {
  start: [150, 78],
  end: [190, 110]
};
var eyeLeftCenterPosition = {
  x: (eyeLeftPosition.end[0] - eyeLeftPosition.start[0]) / 2 + eyeLeftPosition.start[0],
  y: (eyeLeftPosition.end[1] - eyeLeftPosition.start[1]) / 2 + eyeLeftPosition.start[1]
};
var eyeRightCenterPosition = {
  x: (eyeRightPosition.end[0] - eyeRightPosition.start[0]) / 2 + eyeRightPosition.start[0],
  y: (eyeRightPosition.end[1] - eyeRightPosition.start[1]) / 2 + eyeRightPosition.start[1]
};
var r = 20;
var eyeLeft = document.querySelector('#eyeLeft');
var eyeRight = document.querySelector('#eyeRight');
if (window.DeviceOrientationEvent) {
  window.addEventListener('deviceorientation', function (event) {
    let {alpha, beta, gamma} = event;
    eyeLeft.style.left = eyeLeftCenterPosition.x + gamma / 90 * r + 'px';
    eyeRight.style.left = eyeRightCenterPosition.x + gamma / 90 * r + 'px';
    eyeLeft.style.top = eyeRight.style.top
                      = eyeLeftCenterPosition.y + beta / 180 * r + 'px';
    eyeRight.style.transform = eyeLeft.style.transform
                         = eyeRight.style.WebkitTransform
                         = eyeLeft.style.WebkitTransform
                         = 'rotate(' + beta + 'deg)';
  }, false);
} else {
  document.querySelector('body').innerHTML = '浏览器不支持DeviceOrientationEvent';
}
</script>
</body>
</html>
H5 drag and drop API for drag and drop sorting
How to deal with IE8 incompatible rgba()
The above is the detailed content of Implementing moving animation effects based on HTML5 gyroscope. For more information, please follow other related articles on the PHP Chinese website!
 what is h5
 What are the production methods of html5 animation production?
 The difference between HTML and HTML5
 How to implement h5 to slide up and load the next page on the web side
 ps paint bucket shortcut keys
 What to do if the blue screen code 0x0000007e occurs
 There are several types of php arrays
 How to define strings in php
 What size is a5 paper


