

重新配置或卸载 11gR2 Grid Infrastructure

Oracle 11g R2 Grid Infrastructure 的安装与配置较之前的版本提供了更多的灵活性。在Grid Infrastructure安装完毕前执行root.sh经常容易出现错误,并且需要修复该错误才能得以继续。在这个版本中我们可以直接通过执行脚本rootcrs.pl来重新配置Grid Infrastr
Oracle 11g R2 Grid Infrastructure 的安装与配置较之前的版本提供了更多的灵活性。在Grid Infrastructure安装完毕前执行root.sh经常容易出现错误,并且需要修复该错误才能得以继续。在这个版本中我们可以直接通过执行脚本rootcrs.pl来重新配置Grid Infrastructure而无需先卸载Grid Infrastructure,然后修复故障后进行再次安装。下面描述了rootcrs.pl的用法以及使用deinstall彻底卸载Grid Infrastructure。
1、rootcrs.pl命令介绍
[python] view plaincopyprint?
- #命令位置:$GRID_HOME/crs/install
- #命令说明:
- # 该命令主要是用于对crs进行维护与管理,包括patch,upgrade,downgrade,deconfig等等
- # perldoc rootcrs.pl执行这个命令获得完整的介绍
- [root@linux1 install]# ./rootcrs.pl -h
- Unknown option: h
- Usage:
- rootcrs.pl [-verbose] [-upgrade | -patch] [-hahome
] - [-paramfile
] - [-deconfig | -downgrade] [-force] [-lastnode]
- [-downgrade] [-oldcrshome
] [-version ] - [-unlock [-crshome
]] - Options:
- -verbose Run this script in verbose mode
- -upgrade Oracle HA is being upgraded from previous version
- -patch Oracle HA is being upgraded to a patch version
- -hahome Complete path of Oracle Clusterware home
- -paramfile Complete path of file specifying HA parameter values
- -lastnode Force the node this is executing on to be considered the
- last node of the install and perform actions associated
- with configurig the last node
- -downgrade Downgrade the clusterware
- -version For use with downgrade; special handling is required if
- downgrading to 9i. This is the old crs version in the format
- A.B.C.D.E (e.g 11.1.0.6.0).
- -deconfig Remove Oracle Clusterware to allow it to be uninstalled or reinstalled.
- -force Force the executon of steps in delete that cannot be verified
- to be safe
- -unlock Unlock CRS home
- -crshome Complete path of crs home. Use with unlock option.
- -oldcrshome For use with downgrade. Complete path of the old crs home.
- If neither -upgrade nor -patch is supplied, a new install is performed
- To see the full manpage for this program, execute:
- perldoc rootcrs.pl
#对于执行root.sh失败时,我们可以通过该命令以-deconfig 参数来清除crs的配置信息,然后根据log修复故障或使用patch之后再重新执行root.sh
#对于该命令的patch,upgrade,downgrade用法再此不作详细介绍
2、重新配置Grid Infrastructure及ASM
[python] view plaincopyprint?
- #重新配置Grid Infrastructure并不会移除已经复制的二进制文件,仅仅是回复到配置crs之前的状态,下面是其步骤
- a、使用root用户登录,并执行下面的命令(所有节点,但最后一个节点除外)
- # perl $GRID_HOME/crs/install/rootcrs.pl -verbose -deconfig -force
- b、同样使用root用户在最后一个节点执行下面的命令。该命令将清空ocr 配置和voting disk
- # perl $GRID_HOME/crs/install/rootcrs.pl -verbose -deconfig -force -lastnode
- c、如果使用了ASM磁盘,继续下面的操作以使得ASM重新作为候选磁盘(清空所有的ASM磁盘组)
- # dd if=/dev/zero of=/dev/sdb1 bs=1024 count=100
- # /etc/init.d/oracleasm deletedisk DATA /dev/sdb1
- # /etc/init.d/oracleasm createdisk DATA /dev/sdb1
- #Author : Robinson
- #Blog : http://blog.csdn.net/robinson_0612
3、彻底删除Grid Infrastructure
[python] view plaincopyprint?
- #11g R2 Grid Infrastructure也提供了彻底卸载的功能,deinstall该命令取代了使用OUI方式来清除clusterware以及ASM,回复到安装grid之前的环境。
- #该命令将停止集群,移除二进制文件及其相关的所有配置信息。
- #命令位置:$GRID_HOME/deinstall
- #下面是该命令操作的具体事例,操作期间,需要提供一些交互信息,以及在新的session以root身份清除一些/tmp下的文件
- [root@linux1 bin]# ./crsctl check crs
- CRS-4638: Oracle High Availability Services is online
- CRS-4537: Cluster Ready Services is online
- CRS-4529: Cluster Synchronization Services is online
- CRS-4533: Event Manager is online
- [root@linux1 bin]# cd ../deinstall/
- [root@linux1 deinstall]# pwd
- /u01/app/11.2.0/grid/deinstall
- [root@linux1 deinstall]# ./deinstall
- You must not be logged in as root to run ./deinstall.
- Log in as Oracle user and rerun ./deinstall.
- [root@linux1 deinstall]# su grid
- [grid@linux1 deinstall]$ ./deinstall
- Checking for required files and bootstrapping ...
- Please wait ...
- Location of logs /tmp/deinstall2013-07-16_05-54-03-PM/logs/
- ############ ORACLE DEINSTALL & DECONFIG TOOL START ############
- ######################## CHECK OPERATION START ########################
- Install check configuration START
- Checking for existence of the Oracle home location /u01/app/11.2.0/grid
- Oracle Home type selected for de-install is: CRS
- Oracle Base selected for de-install is: /u01/app/grid
- Checking for existence of central inventory location /u01/app/oraInventory
- Checking for existence of the Oracle Grid Infrastructure home /u01/app/11.2.0/grid
- The following nodes are part of this cluster: linux1,linux2
- Install check configuration END
- Traces log file: /tmp/deinstall2013-07-16_05-54-03-PM/logs//crsdc.log
- Network Configuration check config START
- Network de-configuration trace file location: /tmp/deinstall2013-07-16_05-54-03-PM/logs/netdc_check207506844451155733.log
- Network Configuration check config END
- Asm Check Configuration START
- ASM de-configuration trace file location: /tmp/deinstall2013-07-16_05-54-03-PM/logs/asmcadc_check2698133635629979531.log
- ASM configuration was not detected in this Oracle home. Was ASM configured in this Oracle home (y|n) [n]: y
- Automatic Storage Management (ASM) instance is detected in this Oracle home /u01/app/11.2.0/grid.
- ASM Diagnostic Destination : /u01/app/grid
- ASM Diskgroups : +DATA
- Diskgroups will be dropped
- De-configuring ASM will drop all the diskgroups and it's contents at cleanup time. This will affect all of the databases and ACFS
- that use this ASM instance(s).
- If you want to retain the existing diskgroups or if any of the information detected is incorrect, you can modify by entering 'y'.
- Do you want to modify above information (y|n) [n]:
- ######################### CHECK OPERATION END #########################
- ####################### CHECK OPERATION SUMMARY #######################
- Oracle Grid Infrastructure Home is: /u01/app/11.2.0/grid
- The cluster node(s) on which the Oracle home exists are: (Please input nodes seperated by ",", eg: node1,node2,...)linux1,linux2
- Oracle Home selected for de-install is: /u01/app/11.2.0/grid
- Inventory Location where the Oracle home registered is: /u01/app/oraInventory
- ASM instance will be de-configured from this Oracle home
- Do you want to continue (y - yes, n - no)? [n]: y
- A log of this session will be written to: '/tmp/deinstall2013-07-16_05-54-03-PM/logs/deinstall_deconfig2013-07-16_05-54-37-PM.out'
- Any error messages from this session will be written to: '/tmp/deinstall2013-07-16_05-54-03-PM/logs/deinstall_deconfig2013-07-16_05-54-37-PM.err'
- ######################## CLEAN OPERATION START ########################
- ASM de-configuration trace file location: /tmp/deinstall2013-07-16_05-54-03-PM/logs/asmcadc_clean3319637107726750003.log
- ASM Clean Configuration START
- ASM Clean Configuration END
- Network Configuration clean config START
- Network de-configuration trace file location: /tmp/deinstall2013-07-16_05-54-03-PM/logs/netdc_clean9055263637610505743.log
- De-configuring Naming Methods configuration file on all nodes...
- Naming Methods configuration file de-configured successfully.
- De-configuring Local Net Service Names configuration file on all nodes...
- Local Net Service Names configuration file de-configured successfully.
- De-configuring Directory Usage configuration file on all nodes...
- Directory Usage configuration file de-configured successfully.
- De-configuring backup files on all nodes...
- Backup files de-configured successfully.
- The network configuration has been cleaned up successfully.
- Network Configuration clean config END
- ---------------------------------------->
- Run the following command as the root user or the administrator on node "linux2".
- /tmp/deinstall2013-07-16_05-54-03-PM/perl/bin/perl -I/tmp/deinstall2013-07-16_05-54-03-PM/perl/lib
- -I/tmp/deinstall2013-07-16_05-54-03-PM/crs/install /tmp/deinstall2013-07-16_05-54-03-PM/crs/install/rootcrs.pl -force
- -delete -paramfile /tmp/deinstall2013-07-16_05-54-03-PM/response/deinstall_Ora11g_gridinfrahome1.rsp
- Run the following command as the root user or the administrator on node "linux1".
- /tmp/deinstall2013-07-16_05-54-03-PM/perl/bin/perl -I/tmp/deinstall2013-07-16_05-54-03-PM/perl/lib
- -I/tmp/deinstall2013-07-16_05-54-03-PM/crs/install /tmp/deinstall2013-07-16_05-54-03-PM/crs/install/rootcrs.pl -force
- -delete -paramfile /tmp/deinstall2013-07-16_05-54-03-PM/response/deinstall_Ora11g_gridinfrahome1.rsp -lastnode
- Press Enter after you finish running the above commands
- Oracle Universal Installer clean START
- Detach Oracle home '/u01/app/11.2.0/grid' from the central inventory on the local node : Done
- Delete directory '/u01/app/11.2.0/grid' on the local node : Done
- Delete directory '/u01/app/oraInventory' on the local node : Done
- Delete directory '/u01/app/grid' on the local node : Done
- Detach Oracle home '/u01/app/11.2.0/grid' from the central inventory on the remote nodes 'linux2' : Done
- Delete directory '/u01/app/11.2.0/grid' on the remote nodes 'linux2' : Done
- Delete directory '/u01/app/oraInventory' on the remote nodes 'linux2' : Done
- Delete directory '/u01/app/grid' on the remote nodes 'linux2' : Done
- Oracle Universal Installer cleanup was successful.
- Oracle Universal Installer clean END
- Oracle install clean START
- Clean install operation removing temporary directory '/tmp/install' on node 'linux1'
- Clean install operation removing temporary directory '/tmp/install' on node 'linux2'
- Oracle install clean END
- ######################### CLEAN OPERATION END #########################
- ####################### CLEAN OPERATION SUMMARY #######################
- ASM instance was de-configured successfully from the Oracle home
- Oracle Clusterware is stopped and successfully de-configured on node "linux2"
- Oracle Clusterware is stopped and successfully de-configured on node "linux1"
- Oracle Clusterware is stopped and de-configured successfully.
- Successfully detached Oracle home '/u01/app/11.2.0/grid' from the central inventory on the local node.
- Successfully deleted directory '/u01/app/11.2.0/grid' on the local node.
- Successfully deleted directory '/u01/app/oraInventory' on the local node.
- Successfully deleted directory '/u01/app/grid' on the local node.
- Successfully detached Oracle home '/u01/app/11.2.0/grid' from the central inventory on the remote nodes 'linux2'.
- Successfully deleted directory '/u01/app/11.2.0/grid' on the remote nodes 'linux2'.
- Successfully deleted directory '/u01/app/oraInventory' on the remote nodes 'linux2'.
- Successfully deleted directory '/u01/app/grid' on the remote nodes 'linux2'.
- Oracle Universal Installer cleanup was successful.
- Run 'rm -rf /etc/oraInst.loc' as root on node(s) 'linux1,linux2' at the end of the session.
- Oracle install successfully cleaned up the temporary directories.
- #######################################################################
- ############# ORACLE DEINSTALL & DECONFIG TOOL END #############

更多参考
有关Oracle RAC请参考
使用crs_setperm修改RAC资源的所有者及权限
使用crs_profile管理RAC资源配置文件
RAC 数据库的启动与关闭
再说 Oracle RAC services
Services in Oracle Database 10g
Migrate datbase from single instance to Oracle RAC
Oracle RAC 连接到指定实例
Oracle RAC 负载均衡测试(结合服务器端与客户端)
Oracle RAC 服务器端连接负载均衡(Load Balance)
Oracle RAC 客户端连接负载均衡(Load Balance)
ORACLE RAC 下非缺省端口监听配置(listener.ora tnsnames.ora)
ORACLE RAC 监听配置 (listener.ora tnsnames.ora)
配置 RAC 负载均衡与故障转移
CRS-1006 , CRS-0215 故障一例
基于Linux (RHEL 5.5) 安装Oracle 10g RAC
使用 runcluvfy 校验Oracle RAC安装环境
有关Oracle 网络配置相关基础以及概念性的问题请参考:
配置非默认端口的动态服务注册
配置sqlnet.ora限制IP访问Oracle
Oracle 监听器日志配置与管理
设置 Oracle 监听器密码(LISTENER)
配置ORACLE 客户端连接到数据库
有关基于用户管理的备份和备份恢复的概念请参考
Oracle 冷备份
Oracle 热备份
Oracle 备份恢复概念
Oracle 实例恢复
Oracle 基于用户管理恢复的处理
SYSTEM 表空间管理及备份恢复
SYSAUX表空间管理及恢复
Oracle 基于备份控制文件的恢复(unsing backup controlfile)
有关RMAN的备份恢复与管理请参考
RMAN 概述及其体系结构
RMAN 配置、监控与管理
RMAN 备份详解
RMAN 还原与恢复
RMAN catalog 的创建和使用
基于catalog 创建RMAN存储脚本
基于catalog 的RMAN 备份与恢复
RMAN 备份路径困惑
使用RMAN实现异机备份恢复(WIN平台)
使用RMAN迁移文件系统数据库到ASM
linux 下RMAN备份shell脚本
使用RMAN迁移数据库到异机
有关ORACLE体系结构请参考
Oracle 表空间与数据文件
Oracle 密码文件
Oracle 参数文件
Oracle 联机重做日志文件(ONLINE LOG FILE)
Oracle 控制文件(CONTROLFILE)
Oracle 归档日志
Oracle 回滚(ROLLBACK)和撤销(UNDO)
Oracle 数据库实例启动关闭过程
Oracle 10g SGA 的自动化管理
Oracle 实例和Oracle数据库(Oracle体系结构)

ホットAIツール

Undresser.AI Undress
リアルなヌード写真を作成する AI 搭載アプリ

AI Clothes Remover
写真から衣服を削除するオンライン AI ツール。

Undress AI Tool
脱衣画像を無料で

Clothoff.io
AI衣類リムーバー

AI Hentai Generator
AIヘンタイを無料で生成します。

人気の記事
ホットツール

メモ帳++7.3.1
使いやすく無料のコードエディター

SublimeText3 中国語版
中国語版、とても使いやすい

ゼンドスタジオ 13.0.1
強力な PHP 統合開発環境

ドリームウィーバー CS6
ビジュアル Web 開発ツール

SublimeText3 Mac版
神レベルのコード編集ソフト(SublimeText3)
ホットトピック
 7518
7518
 15
1378
52
81
11
21
67
15
1378
52
81
11
21
67

 WPSドキュメントをアンインストールする方法
Mar 20, 2024 pm 02:01 PM
WPSドキュメントをアンインストールする方法
Mar 20, 2024 pm 02:01 PM
WPS ドキュメントをアンインストールする方法: コントロール パネルに移動し、wpsoffic を見つけて WPS をアンインストールします。WPS には、社会人に最も人気のあるオフィス機能が備わっています。よく使用されるドキュメント、フォーム、プレゼンテーションなどの機能を直接使用でき、多くの機能を提供できます。作業効率。しかし、多くの友人はwpsファイルをアンインストールする方法を知りません。では、wpsファイルをアンインストールするにはどうすればよいですか?以下で説明させていただきます。アンインストールは、ディスク領域を解放し、システムからソフトウェアを削除するために、プログラム ファイル、フォルダー、および関連データをコンピューターから削除するプロセスです。さらに、アンインストールには、ハード ディスクからデバイス ドライバーと関連するレジストリ情報を削除し、コンピューターの物理デバイスからデバイスを削除することが含まれます。以下は、WPS ドキュメントをアンインストールする手順です。これは、あらゆるソフトウェアのアンインストールに適しています。
 360 ブラウザをアンインストールする手順を完了する
Feb 25, 2024 pm 04:51 PM
360 ブラウザをアンインストールする手順を完了する
Feb 25, 2024 pm 04:51 PM
360 ブラウザをきれいにアンインストールする方法 インターネットの急速な発展と普及により、ブラウザは人々の日常生活に欠かせないツールの 1 つになりました。市場には、Chrome、Firefox、Edge など、選択できるブラウザーが多数あります。ただし、360 Browser は中国でも人気のブラウザとして多くのユーザーに使用されています。ただし、場合によっては、ユーザーが 360 ブラウザを使用しなくなった、または別のブラウザを試したいなどの理由で、360 ブラウザをアンインストールする必要がある場合があります。この記事では、シンプルでドライな方法を提供します。
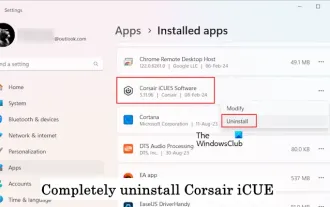 Windows 11/10でCorsair Icueを完全にアンインストールする方法
Mar 04, 2024 am 10:22 AM
Windows 11/10でCorsair Icueを完全にアンインストールする方法
Mar 04, 2024 am 10:22 AM
CorsairIcue ソフトウェアは、RGB 照明制御、ファン制御などのパフォーマンス監視などのいくつかの機能をユーザーに提供します。 CorsairIcue ソフトウェアが正しく動作しない場合があります。この場合、完全にアンインストールして再インストールする必要があります。この記事では、Windows 11/10でCorsairIcueを完全にアンインストールする方法を紹介します。 Windows 11/10 で CorsairIcue を完全にアンインストールする方法 次の手順では、Windows 11/10 で CorsairIcue をアンインストールする方法を説明します。設定またはコントロール パネルから CorsairICue をアンインストールします 関連するサービスをすべて削除します レジストリ キーを削除します 残りのファイルを削除します 以下、
 LinuxシステムにおけるGDMの動作原理と設定方法
Mar 01, 2024 pm 06:36 PM
LinuxシステムにおけるGDMの動作原理と設定方法
Mar 01, 2024 pm 06:36 PM
タイトル: Linux システムにおける GDM の動作原理と構成方法 Linux オペレーティング システムでは、GDM (GNOMEDisplayManager) は、グラフィカル ユーザー インターフェイス (GUI) ログインとユーザー セッション管理を制御するために使用される一般的なディスプレイ マネージャーです。この記事では、GDM の動作原理と構成方法を紹介し、具体的なコード例を示します。 1. GDM の動作原理 GDM は GNOME デスクトップ環境のディスプレイ マネージャーであり、X サーバーの起動とログイン インターフェイスの提供を担当します。
 Quark Network Diskをアンインストールするにはどうすればよいですか? Quark Network Diskを完全にアンインストールする方法
Mar 14, 2024 am 08:52 AM
Quark Network Diskをアンインストールするにはどうすればよいですか? Quark Network Diskを完全にアンインストールする方法
Mar 14, 2024 am 08:52 AM
Baidu Cloud Disk、Quark Cloud Disk、Alibaba Cloud Disk など、使いやすいネットワーク ディスク ソフトウェアが数多く市場に出ています。一部のユーザーは、Quark Network Disk のリソースを別のディスクに転送し、Quark Network Disk をアンインストールしたいと考えていますが、アンインストールできないことに気づきました。このチュートリアルでは、Quark Network Diskを完全にアンインストールする方法を説明します。 Quark Network Diskをアンインストールするにはどうすればよいですか? 1. まずコントロールパネルを開きます。 2. 次に「プログラムのアンインストール」を選択します。 3. 最後に、右クリックして「アンインストール」を選択し、完全にアンインストールします。 PS: アンインストールした後、ソフトウェアを使用して再度スキャンして、ゴミが残っているかどうかを確認することもできます。
 openivをアンインストールする方法
Feb 23, 2024 am 09:09 AM
openivをアンインストールする方法
Feb 23, 2024 am 09:09 AM
コンピュータの普及とソフトウェアの発展に伴い、ニーズを満たすためにソフトウェアを追加またはアンインストールする必要が生じることがよくあります。ソフトウェアのインストールおよびアンインストール要件の 1 つは OpenIV です。 OpenIV は、グランド セフト オート (GTA) ゲームを変更および管理するためのツールです。ただし、OpenIV が不要になった場合、またはアンインストールする必要がある場合に混乱する可能性があります。この記事では、OpenIV をアンインストールする方法を紹介します。まず、OpenIV がどのようにインストールされるかを理解する必要があります。いつもの
 Linux Bashrc の機能、構成、使用法を理解する
Mar 20, 2024 pm 03:30 PM
Linux Bashrc の機能、構成、使用法を理解する
Mar 20, 2024 pm 03:30 PM
Linux Bashrc について: 機能、構成、および使用法 Linux システムでは、Bashrc (BourneAgainShellruncommands) は非常に重要な構成ファイルであり、システムの起動時に自動的に実行されるさまざまなコマンドと設定が含まれています。 Bashrc ファイルは通常、ユーザーのホーム ディレクトリにある隠しファイルであり、その機能はユーザーの Bashshell 環境をカスタマイズすることです。 1. Bashrc関数の設定環境
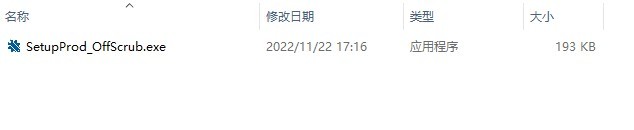 Office が完全にアンインストールされず、再インストールできない問題の最新の解決策
Mar 13, 2024 pm 04:31 PM
Office が完全にアンインストールされず、再インストールできない問題の最新の解決策
Mar 13, 2024 pm 04:31 PM
現在、市販されているコンピューターには既定で Office ソフトウェアがインストールされていますが、一部のユーザーはこのバージョンが使いにくいと感じており、一般的に使用されている Office バージョンをアンインストールして再インストールしようとすると、アンインストールに失敗したことを示すメッセージが表示され、アンインストールできません。これは、システム自体の Office をアンインストールすることができず、インストール中にバージョンの競合が発生するためです。 Officeが完全にアンインストールされず、再インストールできない問題の解決方法を見てみましょう。方法 1: 公式の Office アンインストール ツールを使用する 1. Office 2007 ~ 2019 シリーズおよび Microsoft 365 などのソフトウェアの自動アンインストールをサポートする [Microsoft 公式 Office アンインストール ツール] をダウンロードします。 2. [SetupProd_OffScrub.exe]を実行すると、自動的に
