

搭pl/proxy集群

最近朋友要上一个系统,设计百亿级数据。我去帮着搭建系统,采用pg/proxy集群,业务相关就不说了,这里就把简单技术验证放出来。相关人员比较保守,就用了OS官方的安装包,pg版本9.1. 规划中两台服务器上验证,一个上三个实例(一个实例做代理,另外两个做数
最近朋友要上一个系统,设计百亿级数据。我去帮着搭建系统,采用pg/proxy集群,业务相关就不说了,这里就把简单技术验证放出来。相关人员比较保守,就用了OS官方的安装包,pg版本9.1.
规划中两台服务器上验证,一个上三个实例(一个实例做代理,另外两个做数据节点),一个上两个实例(做数据节点)
数据节目录如下,不过是在两台服务器上,如上所说。
/opt/pg91/pgdata0
/opt/pg91/pgdata1
/opt/pg91/pgdata2
/opt/pg91/pgdata3
/opt/pg91/pgdata4
0
第一部分,安装
1
查询可安装版本
zxw@pgproxy1:~$ apt-cache search postgres | grep 9
libpgtypes3 - shared library libpgtypes for PostgreSQL 9.1
postgresql-9.1 - object-relational SQL database, version 9.1 server
。。。
postgresql-9.1-slony1-2 - replication system for PostgreSQL: PostgreSQL 9.1 server plug-in
skytools-modules-9.1 - PostgreSQL 9.1 modules for skytools
2
装
zxw@pgproxy1:~$ sudo apt-get install -y postgresql-9.1 postgresql-client-9.1 postgresql-contrib-9.1 postgresql-server-dev-9.1
... ...
update-alternatives: using /usr/share/postgresql/9.1/man/man1/postmaster.1.gz to provide /usr/share/man/man1/postmaster.1.gz (postmaster.1.gz) in auto mode.
* Starting PostgreSQL 9.1 database server
...done.
Setting up postgresql-contrib-9.1 (9.1.14-0ubuntu0.12.04) ...
Setting up postgresql-server-dev-9.1 (9.1.14-0ubuntu0.12.04) ...
Processing triggers for libc-bin ...
ldconfig deferred processing now taking place
看到上面这句就ok了,就是说有些事情在以上安装过程中给deferred(推迟)了,推迟到现在集中处理了。
3
查看,已经跑起来了
zxw@pgproxy1:~$ ps -ef | grep postgres
postgres 8362 1 0 17:22 ? 00:00:00 /usr/lib/postgresql/9.1/bin/postgres -D /var/lib/postgresql/9.1/main -c config_file=/etc/postgresql/9.1/main/postgresql.conf
postgres 8364 8362 0 17:22 ? 00:00:00 postgres: writer process
postgres 8365 8362 0 17:22 ? 00:00:00 postgres: wal writer process
postgres 8366 8362 0 17:22 ? 00:00:00 postgres: autovacuum launcher process
postgres 8367 8362 0 17:22 ? 00:00:00 postgres: stats collector process
zxw 8425 1486 0 17:34 pts/0 00:00:00 grep --color=auto postgres
zxw@pgproxy1:~$
zxw@pgproxy1:~$ /etc/init.d/postgresql status
Running clusters: 9.1/main
4
这样登录不行,默认Peer authentication
zxw@pgproxy1:~$ psql -U postgres postgres
psql: FATAL: Peer authentication failed for user "postgres"
zxw@pgproxy1:~$
5
这样登录
zxw@pgproxy1:~$ sudo -u postgres psql
[sudo] password for zxw:
psql (9.1.14)
Type "help" for help.
postgres=# \q
5
确认Peer authentication
zxw@pgproxy1:~$ sudo nl /etc/postgresql/9.1/main/pg_hba.conf | more
79 # Database administrative login by Unix domain socket
80 local all postgres peer
81 # TYPE DATABASE USER ADDRESS METHOD
82 # "local" is for Unix domain socket connections only
83 local all all peer
84 # IPv4 local connections:
85 host all all 127.0.0.1/32 md5
peer
Obtain the client’s operating system user name from the operating system and check if it
matches the requested database user name. This is only available for local connections. See
Section 19.3.7 for details.
给改成md5认证,
6
安装时没提示设置密码,超级用户密码随机了一个,给修改一下
postgres=# select * from pg_user;
usename | usesysid | usecreatedb | usesuper | usecatupd | userepl | passwd | valuntil | useconfig
----------+----------+-------------+----------+-----------+---------+----------+----------+-----------
postgres | 10 | t | t | t | t | ******** | |
(1 row)
postgres=# alter user postgres password 'postgres';
ALTER ROLE
postgres=# select * from pg_user;
usename | usesysid | usecreatedb | usesuper | usecatupd | userepl | passwd | valuntil | useconfig
----------+----------+-------------+----------+-----------+---------+----------+----------+-----------
postgres | 10 | t | t | t | t | ******** | |
(1 row)
7
md5 authentication ok:
zxw@pgproxy1:~$ psql -h 127.0.0.1 -U postgres postgres
Password for user postgres:
psql (9.1.14)
SSL connection (cipher: DHE-RSA-AES256-SHA, bits: 256)
Type "help" for help.
postgres=#
8
修改监听地址等,加载配置参数
zxw@pgproxy1:~$ sudo -u postgres /etc/init.d/postgresql reload
* Reloading PostgreSQL 9.1 database server
...done.
zxw@pgproxy1:~$
9
验证ok
zxw@pgproxy1:~$ psql -h127.0.0.1 -Upostgres postgres
Password for user postgres:
psql (9.1.14)
SSL connection (cipher: DHE-RSA-AES256-SHA, bits: 256)
Type "help" for help.
postgres=# show all ;
name | setting | description
---------------------------------+------------------------------------------+-------------------------------------------------------------------------------------------------------------------------------
allow_system_table_mods | off | Allows modifications of the structure of system tables.
。。。。。。
listen_addresses | * | Sets the host name or IP address(es) to listen to.
lo_compat_privileges | off | Enables backward compatibility mode for privilege checks on large objects.
local_preload_libraries | | Lists shared libraries to preload into each backend.
10
验证ok
zxw@pgproxy1:~$ psql -h192.168.11.131 -Upostgres postgres
Password for user postgres:
psql (9.1.14)
SSL connection (cipher: DHE-RSA-AES256-SHA, bits: 256)
Type "help" for help.
postgres=#
11
ubuntu12上官方pg包安装完后的目录基本如下:
istall directory
/usr/lib/postgresql/9.1/bin/postgres proc
/var/lib/postgresql/9.1/main data
/etc/postgresql/9.1/main/postgresql.conf option file
/usr/share/postgresql/9.1/contrib/
/usr/share/postgresql/9.1/extension/
/usr/share/postgresql-common/
第二部分
初始化n个实例
1
准备目录
root@pgproxy1:~# mkdir /opt/pg91
root@pgproxy1:~# chown postgres:postgres /opt/pg91/
2
初始化一个实例
root@pgproxy1:~# sudo -u postgres /usr/lib/postgresql/9.1/bin/initdb -E utf8 -Upostgres --locale=C -W -D /opt/pg91/pgdata1
could not change directory to "/root"
The files belonging to this database system will be owned by user "postgres".
This user must also own the server process.
The database cluster will be initialized with locale C.
The default text search configuration will be set to "english".
creating directory /opt/pg91/pgdata1 ... ok
creating subdirectories ... ok
selecting default max_connections ... 100
。。。
Enter new superuser password:
。。。
vacuuming database template1 ... ok
copying template1 to template0 ... ok
copying template1 to postgres ... ok
WARNING: enabling "trust" authentication for local connections
You can change this by editing pg_hba.conf or using the -A option the
next time you run initdb.
Success. You can now start the database server using:
/usr/lib/postgresql/9.1/bin/postgres -D /opt/pg91/pgdata1
or
/usr/lib/postgresql/9.1/bin/pg_ctl -D /opt/pg91/pgdata1 -l logfile start
root@pgproxy1:~#
3
查看数据集目录
root@pgproxy1:~# ll /opt/pg91/pgdata1/
total 88
drwx------ 13 postgres postgres 4096 Oct 23 15:49 ./
drwxr-xr-x 3 postgres postgres 4096 Oct 23 15:49 ../
drwx------ 5 postgres postgres 4096 Oct 23 15:49 base/
drwx------ 2 postgres postgres 4096 Oct 23 15:49 global/
drwx------ 2 postgres postgres 4096 Oct 23 15:49 pg_clog/
-rw------- 1 postgres postgres 4476 Oct 23 15:49 pg_hba.conf
-rw------- 1 postgres postgres 1636 Oct 23 15:49 pg_ident.conf
drwx------ 4 postgres postgres 4096 Oct 23 15:49 pg_multixact/
drwx------ 2 postgres postgres 4096 Oct 23 15:49 pg_notify/
drwx------ 2 postgres postgres 4096 Oct 23 15:49 pg_serial/
drwx------ 2 postgres postgres 4096 Oct 23 15:49 pg_stat_tmp/
drwx------ 2 postgres postgres 4096 Oct 23 15:49 pg_subtrans/
drwx------ 2 postgres postgres 4096 Oct 23 15:49 pg_tblspc/
drwx------ 2 postgres postgres 4096 Oct 23 15:49 pg_twophase/
-rw------- 1 postgres postgres 4 Oct 23 15:49 PG_VERSION
drwx------ 3 postgres postgres 4096 Oct 23 15:49 pg_xlog/
-rw------- 1 postgres postgres 19129 Oct 23 15:49 postgresql.conf
4
搞个放日志的地方
root@pgproxy1:~# mkdir /opt/pg91/pgdata1/pg_log
root@pgproxy1:~# chown postgres:postgres /opt/pg91/pgdata1/pg_log/
root@pgproxy1:~# chmod 700 /opt/pg91/pgdata1/pg_log/
修改认证监听等相关参数,后跑一个
root@pgproxy1:~# sudo -u postgres /usr/lib/postgresql/9.1/bin/pg_ctl -D /opt/pg91/pgdata1 -l /opt/pg91/pgdata1/pg_log/pg.log start
重复以上跑起5个实例。
第三部分
安装pl/proxy
1
查一下能装啥
zxw@pgproxy1:~$ 【本文来自鸿网互联 (http://www.68idc.cn)】apt-cache search plproxy
postgresql-9.1-plproxy - database partitioning system for PostgreSQL 9.1
2
装
zxw@pgproxy1:~$ sudo apt-get install -y postgresql-9.1-plproxy
[sudo] password for zxw:
Reading package lists... Done
Building dependency tree
Reading state information... Done
The following NEW packages will be installed:
postgresql-9.1-plproxy
0 upgraded, 1 newly installed, 0 to remove and 69 not upgraded.
Need to get 65.3 kB of archives.
After this operation, 268 kB of additional disk space will be used.
Get:1 http://hk.archive.ubuntu.com/ubuntu/ precise/universe postgresql-9.1-plproxy amd64 2.3-1 [65.3 kB]
Fetched 65.3 kB in 10s (6,138 B/s)
Selecting previously unselected package postgresql-9.1-plproxy.
(Reading database ... 58432 files and directories currently installed.)
Unpacking postgresql-9.1-plproxy (from .../postgresql-9.1-plproxy_2.3-1_amd64.deb) ...
Setting up postgresql-9.1-plproxy (2.3-1) ...
zxw@pgproxy1:~$
3
规划
proxy node:
ip
port portN
create user beiigang
create user proxy
create database proxy;
schema beiigang
data node:
ip
port portN
create user beiigang
create user devart
create database datadb
schema beiigang
4
跑规划
#
#proxy
#
create role beiigang superuser login encrypted password 'beiigang';
create role proxy nosuperuser nocreatedb nocreaterole noinherit login encrypted password 'proxy';
create database proxy with owner beiigang template template0 encoding 'UTF8' lc_collate 'en_US.UTF-8' lc_ctype 'en_US.UTF-8';
grant all on database proxy to proxy;
create schema proxy authorization proxy;
#
#data node
#
create role beiigang superuser login encrypted password 'beiigang';
create role devart nosuperuser nocreatedb nocreaterole noinherit login encrypted password 'devart';
create database datadb with owner beiigang template template0 encoding 'UTF8' lc_collate 'en_US.UTF-8' lc_ctype 'en_US.UTF-8';
grant all on database datadb to devart;
create schema devart authorization devart;
#
#proxy node
#
postgres=# create role beiigang superuser login encrypted password 'beiigang';
CREATE ROLE
postgres=# create role proxy nosuperuser nocreatedb nocreaterole noinherit login encrypted password 'proxy';
CREATE ROLE
postgres=# create database proxy with owner beiigang template template0 encoding 'UTF8' lc_collate 'en_US.UTF-8' lc_ctype 'en_US.UTF-8';
CREATE DATABASE
postgres=# grant all on database proxy to proxy;
GRANT
proxy=# create schema proxy authorization proxy;
CREATE SCHEMA
#
#data node
#
postgres=# create role beiigang superuser login encrypted password 'beiigang';
CREATE ROLE
postgres=# create role datasch nosuperuser nocreatedb nocreaterole noinherit login encrypted password 'datasch';
CREATE ROLE
postgres=# create database datadb with owner beiigang template template0 encoding 'UTF8' lc_collate 'en_US.UTF-8' lc_ctype 'en_US.UTF-8';
CREATE DATABASE
postgres=# grant all on database datadb to datasch;
GRANT
datadb=> create schema datasch authorization datasch;
CREATE SCHEMA
5
在代理上跑plproxy.sql
root@pgproxy1:~# psql -h ip -p portN -Upostgres -f /usr/share/postgresql/9.1/contrib/plproxy.sql proxy
Password for user postgres:
CREATE FUNCTION
CREATE LANGUAGE
CREATE FUNCTION
CREATE FOREIGN DATA WRAPPER
plproxy.sql的内容如下
## nl /usr/share/postgresql/9.1/contrib/plproxy.sql | more
#
# 1 -- handler function
# 2 CREATE FUNCTION plproxy_call_handler ()
# 3 RETURNS language_handler AS '$libdir/plproxy' LANGUAGE C;
#
# 4 -- language
# 5 CREATE LANGUAGE plproxy HANDLER plproxy_call_handler;
#
# 6 -- validator function
# 7 CREATE FUNCTION plproxy_fdw_validator (text[], oid)
# 8 RETURNS boolean AS '$libdir/plproxy' LANGUAGE C;
#
# 9 -- foreign data wrapper
# 10 CREATE FOREIGN DATA WRAPPER plproxy VALIDATOR plproxy_fdw_validator;
6
查看上面创建的对象
#proxy=# select * from pg_language;
# lanname | lanowner | lanispl | lanpltrusted | lanplcallfoid | laninline | lanvalidator | lanacl
#----------+----------+---------+--------------+---------------+-----------+--------------+--------
# internal | 10 | f | f | 0 | 0 | 2246 |
# c | 10 | f | f | 0 | 0 | 2247 |
# sql | 10 | f | t | 0 | 0 | 2248 |
# plpgsql | 10 | t | t | 11678 | 11679 | 11680 |
# plproxy | 10 | t | f | 16399 | 0 | 0 |
#(5 rows)
#
#proxy=# select * from pg_foreign_data_wrapper;
# fdwname | fdwowner | fdwhandler | fdwvalidator | fdwacl | fdwoptions
#---------+----------+------------+--------------+--------+------------
# plproxy | 10 | 0 | 16401 | |
#(1 row)
#还drop了一回,这个不要跑啊
#proxy=# drop language plproxy cascade;
#DROP LANGUAGE
#proxy=#
#proxy=# drop FOREIGN DATA WRAPPER plproxy cascade;
#DROP FOREIGN DATA WRAPPER
#proxy=#
#proxy=# drop function plproxy_call_handler();
#DROP FUNCTION
#proxy=#
#proxy=# drop function plproxy_fdw_validator (text[], oid);
#DROP FUNCTION
#
7
授权
########这句报错
#proxy=# grant usage on language plproxy to proxy;
#ERROR: language "plproxy" is not trusted
#HINT: Only superusers can use untrusted languages.
########下面的ok
#proxy=# grant usage on foreign data wrapper plproxy to proxy;
#GRANT
#proxy=# grant usage on foreign server cluster_art to proxy;
#GRANT
8
proxy node创建plproxy server
#super user do
#drop server cluster_art;
CREATE SERVER cluster_art FOREIGN DATA WRAPPER plproxy OPTIONS
(connection_lifetime '1800',
p0 'dbname=datadb port=9901 host=192.168.11.196 application_name=testart',
p1 'dbname=datadb port=9902 host=192.168.11.197 ',
p2 'dbname=datadb port=9903 host=192.168.11.196 ',
p3 'dbname=datadb port=9904 host=192.168.11.197 ');
9
proxy node授权
grant usage on foreign server cluster_art to proxy;
10
proxy node创建user mapping
create user mapping for proxy server cluster_art options (user 'devart', password 'xxxxxxxx');
plproxy集群搭好了。。。。。。
第四部分
测试
这儿前前后后测试了不少场景,花了好几天,基本上没有记录,下面的也不是一个完整一致的测试,只是记录到这儿,大家就不要看了,看了就晕了
--test
CREATE OR REPLACE FUNCTION proxy.test_pl_clust(sql text)
RETURNS SETOF record
LANGUAGE plproxy
STRICT
AS $function$
cluster 'cluster_art';
run on all;
target devart.test_pl_clust;
$function$;
grant execute on function datasch.test_pl_clust(text) to proxy;
CREATE OR REPLACE FUNCTION test_pl_clust(sql text)
RETURNS SETOF record
LANGUAGE plpgsql
STRICT
AS $function$
declare
rec record;
begin
for rec in execute sql loop
return next rec;
end loop;
return;
end;
$function$;
select * from datasch.test_pl_clust('select count(*) from pg_class') as t(i int8);
proxy=> select * from test_pl_clust('select count(*) from pg_user') as t(k int8);
k
---
3
3
3
3
(4 rows)
proxy=> select sum(k) from test_pl_clust('select count(*) from pg_user') as t(k int8);
sum
-----
12
(1 row)
附记
1
pl/proxy源码下载地址,好像是吧
http://pgfoundry.org/projects/plproxy
2
官网上记录的一个bug
dumpall 不能正常工作
http://pgfoundry.org/tracker/index.php?func=detail&aid=1011283&group_id=1000207&atid=814
pg_dumpall sorts 'create server FOREIGN DATA WRAPPER' options
(keys) as varchar and not as integer.
Example from dumped sql (see "pX" option key):
CREATE SERVER can_master_cluster FOREIGN DATA WRAPPER plproxy OPTIONS (
connection_lifetime '1800',
p0 'dbname=database11 host=xxx-11 port=9811',
p1 'dbname=database12 host=xxx-12 port=9812',
p10 'dbname=database21 host=xxx-21 port=9821',
p11 'dbname=database22 host=xxx-22 port=9822',
p12 'dbname=database23 host=xxx-23 port=9823',
p13 'dbname=database24 host=xxx-24 port=9824',
p14 'dbname=database25 host=xxx-25 port=9825',
p15 'dbname=database26 host=xxx-26 port=9826',
p2 'dbname=database13 host=xxx-13 port=9813',
p3 'dbname=database14 host=xxx-14 port=9814',
p4 'dbname=database15 host=xxx-15 port=9815',
p5 'dbname=database16 host=xxx-16 port=9816',
p6 'dbname=database17 host=xxx-17 port=9817',
p7 'dbname=database18 host=xxx-18 port=9818',
p8 'dbname=database19 host=xxx-19 port=9819',
p9 'dbname=database20 host=xxx-20 port=9820'
);
which causes next error during the load:
ERROR: Pl/Proxy: partitions must be numbered consecutively
HINT: next valid partition number is 2
STATEMENT: CREATE SERVER can_master_cluster ...
Old 9.0 'pg_dumpall' doing job correct.

ホットAIツール

Undresser.AI Undress
リアルなヌード写真を作成する AI 搭載アプリ

AI Clothes Remover
写真から衣服を削除するオンライン AI ツール。

Undress AI Tool
脱衣画像を無料で

Clothoff.io
AI衣類リムーバー

Video Face Swap
完全無料の AI 顔交換ツールを使用して、あらゆるビデオの顔を簡単に交換できます。

人気の記事
ホットツール

メモ帳++7.3.1
使いやすく無料のコードエディター

SublimeText3 中国語版
中国語版、とても使いやすい

ゼンドスタジオ 13.0.1
強力な PHP 統合開発環境

ドリームウィーバー CS6
ビジュアル Web 開発ツール

SublimeText3 Mac版
神レベルのコード編集ソフト(SublimeText3)
ホットトピック
 7695
7695
 15
1640
14
1393
52
1287
25
1229
29
15
1640
14
1393
52
1287
25
1229
29

 オープンソース!ゾーイデプスを超えて! DepthFM: 高速かつ正確な単眼深度推定!
Apr 03, 2024 pm 12:04 PM
オープンソース!ゾーイデプスを超えて! DepthFM: 高速かつ正確な単眼深度推定!
Apr 03, 2024 pm 12:04 PM
0.この記事は何をするのですか?私たちは、多用途かつ高速な最先端の生成単眼深度推定モデルである DepthFM を提案します。従来の深度推定タスクに加えて、DepthFM は深度修復などの下流タスクでも最先端の機能を実証します。 DepthFM は効率的で、いくつかの推論ステップ内で深度マップを合成できます。この作品について一緒に読みましょう〜 1. 論文情報タイトル: DepthFM: FastMonocularDepthEstimationwithFlowMatching 著者: MingGui、JohannesS.Fischer、UlrichPrestel、PingchuanMa、Dmytr
 ファーウェイのQiankun ADS3.0インテリジェント運転システムは8月に発売され、初めてXiangjie S9に搭載される
Jul 30, 2024 pm 02:17 PM
ファーウェイのQiankun ADS3.0インテリジェント運転システムは8月に発売され、初めてXiangjie S9に搭載される
Jul 30, 2024 pm 02:17 PM
7月29日、AITO Wenjieの40万台目の新車のロールオフ式典に、ファーウェイの常務取締役、ターミナルBG会長、スマートカーソリューションBU会長のYu Chengdong氏が出席し、スピーチを行い、Wenjieシリーズモデルの発売を発表した。 8月にHuawei Qiankun ADS 3.0バージョンが発売され、8月から9月にかけて順次アップグレードが行われる予定です。 8月6日に発売されるXiangjie S9には、ファーウェイのADS3.0インテリジェント運転システムが初搭載される。 LiDARの支援により、Huawei Qiankun ADS3.0バージョンはインテリジェント運転機能を大幅に向上させ、エンドツーエンドの統合機能を備え、GOD(一般障害物識別)/PDP(予測)の新しいエンドツーエンドアーキテクチャを採用します。意思決定と制御)、駐車スペースから駐車スペースまでのスマート運転のNCA機能の提供、CAS3.0のアップグレード
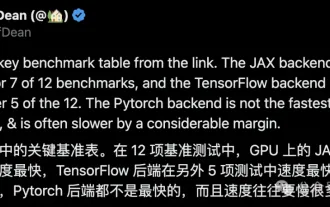 Google は大喜び: JAX のパフォーマンスが Pytorch や TensorFlow を上回りました! GPU 推論トレーニングの最速の選択肢となる可能性があります
Apr 01, 2024 pm 07:46 PM
Google は大喜び: JAX のパフォーマンスが Pytorch や TensorFlow を上回りました! GPU 推論トレーニングの最速の選択肢となる可能性があります
Apr 01, 2024 pm 07:46 PM
Google が推進する JAX のパフォーマンスは、最近のベンチマーク テストで Pytorch や TensorFlow のパフォーマンスを上回り、7 つの指標で 1 位にランクされました。また、テストは最高の JAX パフォーマンスを備えた TPU では行われませんでした。ただし、開発者の間では、依然として Tensorflow よりも Pytorch の方が人気があります。しかし、将来的には、おそらくより大規模なモデルが JAX プラットフォームに基づいてトレーニングされ、実行されるようになるでしょう。モデル 最近、Keras チームは、ネイティブ PyTorch 実装を使用して 3 つのバックエンド (TensorFlow、JAX、PyTorch) をベンチマークし、TensorFlow を使用して Keras2 をベンチマークしました。まず、主流のセットを選択します
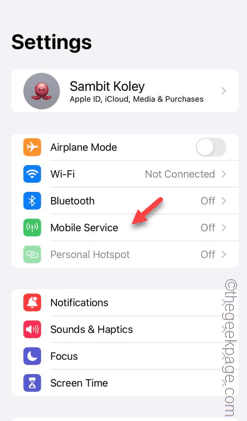 iPhoneのセルラーデータインターネット速度が遅い:修正
May 03, 2024 pm 09:01 PM
iPhoneのセルラーデータインターネット速度が遅い:修正
May 03, 2024 pm 09:01 PM
iPhone のモバイル データ接続に遅延や遅い問題が発生していませんか?通常、携帯電話の携帯インターネットの強度は、地域、携帯ネットワークの種類、ローミングの種類などのいくつかの要因によって異なります。より高速で信頼性の高いセルラー インターネット接続を実現するためにできることがいくつかあります。解決策 1 – iPhone を強制的に再起動する 場合によっては、デバイスを強制的に再起動すると、携帯電話接続を含む多くの機能がリセットされるだけです。ステップ 1 – 音量を上げるキーを 1 回押して放します。次に、音量小キーを押して、もう一度放します。ステップ 2 – プロセスの次の部分は、右側のボタンを押し続けることです。 iPhone の再起動が完了するまで待ちます。セルラーデータを有効にし、ネットワーク速度を確認します。もう一度確認してください 修正 2 – データ モードを変更する 5G はより優れたネットワーク速度を提供しますが、信号が弱い場合はより適切に機能します
 ZTE 5G ポータブル Wi-Fi U50S が初期価格 NT$899 で発売:最大ネットワーク速度 500Mbps
Apr 26, 2024 pm 03:46 PM
ZTE 5G ポータブル Wi-Fi U50S が初期価格 NT$899 で発売:最大ネットワーク速度 500Mbps
Apr 26, 2024 pm 03:46 PM
4月26日のニュースによると、ZTEの5GポータブルWi-Fi U50Sが正式に販売され、価格は899元からとなっている。外観デザインに関しては、ZTE U50S ポータブル Wi-Fi はシンプルでスタイリッシュで、持ちやすく、梱包しやすいです。サイズは159/73/18mmで持ち運びが簡単で、いつでもどこでも5G高速ネットワークを楽しむことができ、妨げられないモバイルオフィスとエンターテインメント体験を実現します。 ZTE 5G ポータブル Wi-Fi U50S は、最大 1800Mbps のピーク レートの高度な Wi-Fi 6 プロトコルをサポートし、Snapdragon X55 高性能 5G プラットフォームを利用して、ユーザーに非常に高速なネットワーク エクスペリエンスを提供します。 5G デュアルモード SA+NSA ネットワーク環境と Sub-6GHz 周波数帯域をサポートするだけでなく、測定されたネットワーク速度は驚異的な 500Mbps に達することもあり、これは簡単に満足できます。
 レトロトレンド! HMDとハイネケンが共同で折りたたみ式携帯電話を発売:透明なシェルデザイン
Apr 17, 2024 pm 06:50 PM
レトロトレンド! HMDとハイネケンが共同で折りたたみ式携帯電話を発売:透明なシェルデザイン
Apr 17, 2024 pm 06:50 PM
4月17日のニュースによると、HMDは有名なビールブランドのハイネケンとクリエイティブ企業のボデガと提携して、ユニークな折りたたみ式携帯電話「The Boring Phone」を発売した。この携帯電話は、デザインの革新性だけでなく、機能面でも自然に立ち返り、人々を本当の人間関係に戻し、友人と飲む純粋な時間を楽しむことを目指しています。退屈な携帯電話は、ユニークな透明なフリップデザインを採用し、シンプルでありながらエレガントな美しさを示しています。内部には 2.8 インチ QVGA ディスプレイ、外部には 1.77 インチ ディスプレイが装備されており、ユーザーに基本的な視覚的インタラクション エクスペリエンスを提供します。写真に関しては、3,000万画素のカメラしか搭載されていませんが、日常の簡単な作業には十分です。
 超知性の生命力が覚醒する!しかし、自己更新 AI の登場により、母親はデータのボトルネックを心配する必要がなくなりました。
Apr 29, 2024 pm 06:55 PM
超知性の生命力が覚醒する!しかし、自己更新 AI の登場により、母親はデータのボトルネックを心配する必要がなくなりました。
Apr 29, 2024 pm 06:55 PM
世界は狂ったように大きなモデルを構築していますが、インターネット上のデータだけではまったく不十分です。このトレーニング モデルは「ハンガー ゲーム」のようであり、世界中の AI 研究者は、データを貪欲に食べる人たちにどのように餌を与えるかを心配しています。この問題は、マルチモーダル タスクで特に顕著です。何もできなかった当時、中国人民大学学部のスタートアップチームは、独自の新しいモデルを使用して、中国で初めて「モデル生成データフィード自体」を実現しました。さらに、これは理解側と生成側の 2 つの側面からのアプローチであり、両方の側で高品質のマルチモーダルな新しいデータを生成し、モデル自体にデータのフィードバックを提供できます。モデルとは何ですか? Awaker 1.0 は、中関村フォーラムに登場したばかりの大型マルチモーダル モデルです。チームは誰ですか?ソフォンエンジン。人民大学ヒルハウス人工知能大学院の博士課程学生、ガオ・イージャオ氏によって設立されました。
 テスラのロボットは工場で働く、マスク氏:手の自由度は今年22に達する!
May 06, 2024 pm 04:13 PM
テスラのロボットは工場で働く、マスク氏:手の自由度は今年22に達する!
May 06, 2024 pm 04:13 PM
テスラのロボット「オプティマス」の最新映像が公開され、すでに工場内で稼働可能となっている。通常の速度では、バッテリー(テスラの4680バッテリー)を次のように分類します:公式は、20倍の速度でどのように見えるかも公開しました - 小さな「ワークステーション」上で、ピッキング、ピッキング、ピッキング:今回は、それがリリースされたハイライトの1つビデオの内容は、オプティマスが工場内でこの作業を完全に自律的に行い、プロセス全体を通じて人間の介入なしに完了するというものです。そして、オプティマスの観点から見ると、自動エラー修正に重点を置いて、曲がったバッテリーを拾い上げたり配置したりすることもできます。オプティマスのハンドについては、NVIDIA の科学者ジム ファン氏が高く評価しました。オプティマスのハンドは、世界の 5 本指ロボットの 1 つです。最も器用。その手は触覚だけではありません
