

OSX as Transparent Wifi MITM Proxy

Yesterday I was in the situation where I wanted to debug an iOS deviceand what network calls it would make. Normally the trivial step is tojust define an HTTP proxy server in the wifi settings but that will onlywork for as long as you have
Yesterday I was in the situation where I wanted to debug an iOS device and what network calls it would make. Normally the trivial step is to just define an HTTP proxy server in the wifi settings but that will only work for as long as you have something that actually honors this proxy server. But there are better ways to transparently proxy connections from a device connected via Wifi which does not require any changes on the actual device.
The Tools
In order for this to work you need a device running OS X which is connected to the same network as the Wifi. Then you need to convince the Wifi device to see you as the gateway instead of the actual gateway. The easiest way is just to go to the settings and change the gateway to your computer's IP. The second ingredient is an HTTP proxy, ideally one that can also decrypt and reencrypt SSL traffic. Personally I can recommend Charles for that. Lastly you will need another proxy that can work transparently which sits between your device and Charles. On OS X redsocks gets this job done.
If you don't want to spend the money on Charles or you want to rewrite traffic with Python you can use mitmproxy.
The Setup
The first thing you will notice is that when you point your Wifi device to your computer it will loose network connectivity. That's because by default your computer won't forward packets. This can easily be changed through sysctl:
$ sudo sysctl -w net.inet.ip.forwarding=1
After that you should be able to browse the internet again on your Wifi device.
The second step is installing redsocks. If you have brew that's a very trivial operation:
$ brew install redsocks
Once installed you will need to create a config file for it. Call it redsocks.conf and place it in a folder from which you run redsocks:
base {
    log_debug = on;
    log_info = on;
    log = stderr;
    daemon = off;
    redirector = generic;
}
redsocks {
    local_ip = 0.0.0.0;
    local_port = 12345;
    ip = 127.0.0.1;
    port = 8889;
    // known types: socks4, socks5, http-connect, http-relay
    type = socks5;
}
Since I'm using Charles I take advantage of it's socks5 support and point it to localhost:8889 where Charles normally starts up if configured as Socks5 proxy. If you're using a regular HTTP proxy you can use http-connect as proxy type. The local_port defines where the actual transparent redsocks proxy opens.
All you have to do then is to start it:
$ redsocks
After that you will need to point all the traffic that is not from your computer and from port 80 and 443 of your Wifi through redsocks. On OS X the firewall canbe controlled through ipfw. In my case the wifi device is en1:
$ sudo ipfw add fwd 127.0.0.1,12345 tcp from not me to any 80 in via en1
$ sudo ipfw add fwd 127.0.0.1,12345 tcp from not me to any 443 in via en1
Working around OS X Bugs
Now currently if you finish that above setup you will notice that nothing actually works. The cause for this is a Bug in the OS X kernel that requires flipping the net.inet.ip.scopedroute flag to 0. I am not entirely sure what it does, but the internet reports that it breaks network sharing through the user preferences. In any case it fixes ipfw based forwarding so you can flip it with sysctl:
$ sudo sysctl -w net.inet.ip.scopedroute=0
Unfortunately in OS X Lion this flag can actually not be flipped from userspace so you need to set it as boot parameter and then restart your computer. You can do this by editing the /Library/Preferences/SystemConfiguration/com.apple.Boot.plist file:
<?xml version="1.0" encoding="UTF-8"?>

<plist version="1.0">
<dict>
  <key>Kernel Flags</key>
  <string>net.inet.ip.scopedroute=0</string>
</dict>
</plist>
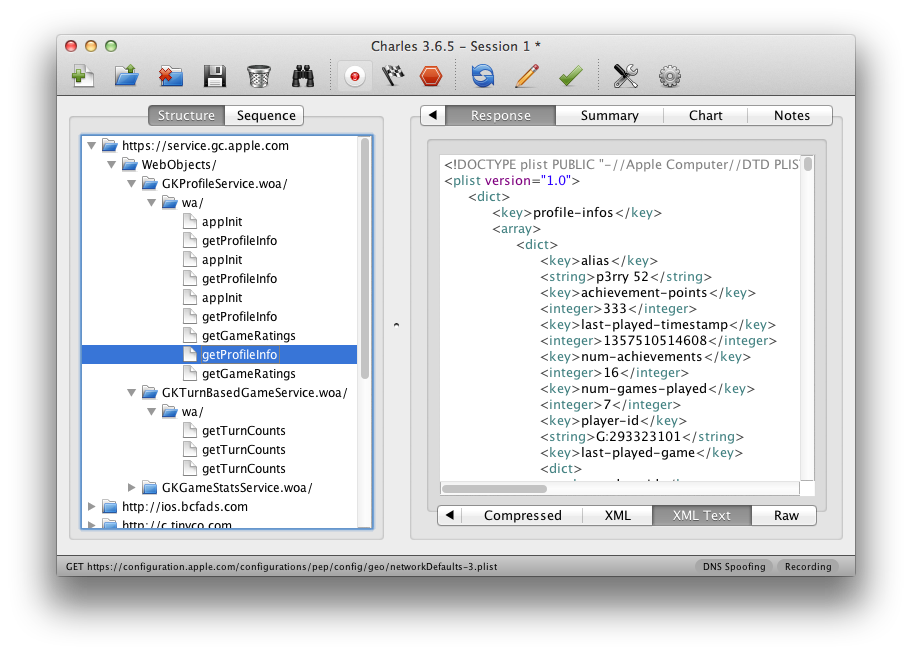
Installing SSL Certificates
After all that your HTTP traffic should show up in your SSL interception proxy. SSL will only work if the application on your Wifi device is trusting your SSL interception proxy's CA. For browsers for instance that's trivial to change. The Charles Certificate can be added to the trust store by following this link: charles.crt. Note that this will not work with applications that don't use the system's CA trust store. In that case you will need to recompile your application so that it trusts the Charles CA.
原文地址:OSX as Transparent Wifi MITM Proxy, 感谢原作者分享。

ホットAIツール

Undresser.AI Undress
リアルなヌード写真を作成する AI 搭載アプリ

AI Clothes Remover
写真から衣服を削除するオンライン AI ツール。

Undress AI Tool
脱衣画像を無料で

Clothoff.io
AI衣類リムーバー

Video Face Swap
完全無料の AI 顔交換ツールを使用して、あらゆるビデオの顔を簡単に交換できます。

人気の記事
ホットツール

メモ帳++7.3.1
使いやすく無料のコードエディター

SublimeText3 中国語版
中国語版、とても使いやすい

ゼンドスタジオ 13.0.1
強力な PHP 統合開発環境

ドリームウィーバー CS6
ビジュアル Web 開発ツール

SublimeText3 Mac版
神レベルのコード編集ソフト(SublimeText3)
ホットトピック
 1660
1660
 14
1416
52
1310
25
1260
29
1233
24
14
1416
52
1310
25
1260
29
1233
24

 HP プリンターが Wi-Fi に接続できない場合の対処方法 - HP プリンターが Wi-Fi に接続できない場合の対処方法
Mar 06, 2024 pm 01:00 PM
HP プリンターが Wi-Fi に接続できない場合の対処方法 - HP プリンターが Wi-Fi に接続できない場合の対処方法
Mar 06, 2024 pm 01:00 PM
HP プリンターを使用する多くのユーザーは、HP プリンターが Wi-Fi に接続できない場合の対処法に慣れていません。以下では、HP プリンターが Wi-Fi に接続できない問題の解決策をエディターが提供します。以下を見てみましょう。 HP プリンターの MAC アドレスを設定して、自動的に選択し、ネットワークに自動的に参加します。チェックを入れて、ネットワーク構成を変更します。dhcp を使用してパスワードを入力し、HP プリンターに接続します。Wi-Fi に接続されていることが表示されます。
 自宅の Wi-Fi に「安全でないネットワーク」と表示されるのはなぜですか?
Nov 15, 2023 pm 02:39 PM
自宅の Wi-Fi に「安全でないネットワーク」と表示されるのはなぜですか?
Nov 15, 2023 pm 02:39 PM
理由は、1. WiFi 自体に問題がある、2. ルーターが過熱または破損している可能性がある、3. ブロードバンドの利用が滞っており、インターネットにアクセスできない可能性がある、4. WiFi 名に中国語が含まれている、というものです。文字が含まれているため、一部のコンピュータがインターネットに接続できなくなる; 5. コンピュータ システムの問題; 6. IP アドレス設定の問題; 7. ワイヤレス ネットワークにワイヤレス パスワードが設定されていないなど。解決策: 1. WiFi 接続をチェックして、デバイスが正しい WiFi ネットワークに接続されていることを確認します; 2. ルーターの設定を確認して、ルーターをリセットして、SSID とパスワードが正しいことを確認してください。
 モバイル Wi-Fi に感嘆符が付いているのはなぜですか?
Sep 18, 2023 pm 04:05 PM
モバイル Wi-Fi に感嘆符が付いているのはなぜですか?
Sep 18, 2023 pm 04:05 PM
モバイル Wi-Fi に感嘆符が表示される理由は、インターネットに接続できない、信号が弱い、認証の問題、IP アドレスの競合などが考えられます。詳細な紹介: 1. インターネットに接続できません。Wi-Fi アイコンに感嘆符が表示されている場合は、携帯電話がインターネットに接続できない可能性があります。これは、ルーターの切断、ネットワーク障害、またはルーターの切断が原因である可能性があります。携帯電話の設定の問題; 2. 電波が弱い Wi-Fi アイコンに感嘆符が表示されている場合は、Wi-Fi 電波が弱いことが原因である可能性があります。ルーターから遠すぎたり、ルーターがブロックされている可能性があります。障害物や信号の妨害などによる。
 Windows 10 で Wi-Fi に接続できないのはなぜですか?
Jan 16, 2024 pm 04:18 PM
Windows 10 で Wi-Fi に接続できないのはなぜですか?
Jan 16, 2024 pm 04:18 PM
win10 オペレーティング システムを使用して Wi-Fi ワイヤレス ネットワークに接続すると、Wi-Fi ネットワークに接続できず制限されているというメッセージが表示されます。この種の問題の場合は、ネットワークと共有センターで独自のネットワークを見つけて、一連の調整を行うことができると思います。エディターがどのように行ったかを確認するための具体的な手順を見てみましょう ~ Win10 が Wi-Fi に接続できないのはなぜですか? 方法 1: 1. コンピューター画面の下部にある通知領域にあるワイヤレス WIFI アイコンを右クリックし、[Wi-Fi] を選択します。 「ネットワークとインターネットの設定」を開き、「アダプター オプションの変更」ボタンをクリックします。 2. ポップアップ ネットワーク接続インターフェイスで、「WLAN」という名前のワイヤレス接続を探し、再度右クリックして、「閉じる」(または「無効」)を選択します。 3. 待ちます
 Wi-Fi 機能をオンにできない原因は何ですか? 添付: Wi-Fi 機能をオンにできない場合の解決方法
Mar 14, 2024 pm 03:34 PM
Wi-Fi 機能をオンにできない原因は何ですか? 添付: Wi-Fi 機能をオンにできない場合の解決方法
Mar 14, 2024 pm 03:34 PM
現在、携帯電話にはデータ通信と Wi-Fi に加えて 2 つの方法でインターネットにアクセスでき、OPPO 携帯電話も例外ではありませんが、使用中に Wi-Fi 機能をオンにできない場合はどうすればよいでしょうか?まだ心配しないでください。このチュートリアルを読んでもいいでしょう。きっと役に立ちます。携帯電話の Wi-Fi 機能をオンにできない場合はどうすればよいですか? WLAN スイッチがオンになるまでにわずかな遅延が発生している可能性があります。オンになるまで 2 秒待ってください。連続クリックしないでください。 1. 「設定 > WLAN」に入り、WLAN スイッチを再度オンにしてみてください。 2. 機内モードをオン/オフにして、WLAN スイッチを再度オンにしてみてください。 3. 電話機を再起動し、WLAN が正常にオンになるかどうかを確認します。 4. データをバックアップした後、工場出荷時の設定に復元してみることをお勧めします。上記のいずれの方法でも問題が解決しない場合は、購入した製品をご持参ください。
 win10でWi-Fiパスワードが入力できない問題の解決方法
Dec 30, 2023 pm 05:43 PM
win10でWi-Fiパスワードが入力できない問題の解決方法
Dec 30, 2023 pm 05:43 PM
win10wifi のパスワードを入力できないのは非常に憂鬱な問題です。通常、カードの所有者が原因です。コンピュータを再度開くか再起動してください。それでも問題を解決できないユーザーは、急いで詳細な解決策を確認してください。チュートリアル。 Win10 Wifi でパスワードを入力できないチュートリアル方法 1: 1. パスワードを入力できない場合は、キーボードの接続に問題がある可能性があります。キーボードが使用できるかどうかを慎重に確認してください。 2. キーパッドを使用して数字を入力する必要がある場合は、キーパッドがロックされているかどうかも確認する必要があります。方法 2: 注: 一部のユーザーは、この操作を実行した後、コンピューターの電源をオンにできなかったと報告しました。実際には、この設定の原因ではなく、コンピューター システム自体の問題です。この操作を実行した後は、コンピュータの通常の起動には影響せず、コンピュータ システムには影響がありません。
 Wi-Fi が接続されているのにインターネットにアクセスできないのはなぜですか?
Dec 07, 2023 pm 05:00 PM
Wi-Fi が接続されているのにインターネットにアクセスできないのはなぜですか?
Dec 07, 2023 pm 05:00 PM
WiFi は接続されているがインターネットにアクセスできない理由: 1. WiFi 信号が弱い、2. IP アドレスの競合、3. DNS サーバーの問題、4. ルーターの障害、5. ネットワーク プロバイダーの問題、6. WiFi ネットワーク自体の問題、6. WiFi ネットワーク自体の問題、6. 問題がある。 7. ルーターの問題、8. 機器のネットワーク設定の問題、9. 信号干渉または障害物、10. 機器の問題。詳細な紹介: 1. WiFi 信号が弱いです。WiFi 信号の強さはネットワークの安定性と速度に直接影響します。接続された WiFi 信号が弱い場合、ネットワーク接続が不安定になったり、インターネットにアクセスできなくなる可能性があります。 、など。
 Ubuntu18.04で隠しWiFiネットワークに接続するにはどうすればよいですか?
Jan 01, 2024 pm 03:58 PM
Ubuntu18.04で隠しWiFiネットワークに接続するにはどうすればよいですか?
Jan 01, 2024 pm 03:58 PM
Ubuntu18.04 隠されたワイヤレス ネットワークが必要ですか? Wi-Fiネットワークに接続するにはどうすればよいですか?以下の詳細なチュートリアルを見てみましょう。 1. Ubuntuを起動後、デスクトップ右上の逆三角形をクリックします。 2. ドロップダウン メニューが表示され、[Wi-Fi 設定] をクリックして選択します。 3. [wifi設定]の詳細ページに入ります。 4. Wi-Fi スイッチ ステータスの右側にある 3 つの水平アイコンにマウスを移動し、アイコンをクリックします。 5. ドロップダウン メニューが表示されるので、マウスをクリックして [非表示のネットワークに接続する] を選択します。 6. [非表示の WiFi ネットワークに接続] ダイアログボックスが表示されます。 WiFi ネットワーク名、暗号化方式、その他の情報を入力する必要があります。 7. 非表示の WiFi ネットワーク名を入力し、暗号化方式として [WPA および WPA2 Personal] を選択し、入力します
